PP | PE - Cepex
PP | PE - Cepex
PP | PE - Cepex

Create successful ePaper yourself
Turn your PDF publications into a flip-book with our unique Google optimized e-Paper software.
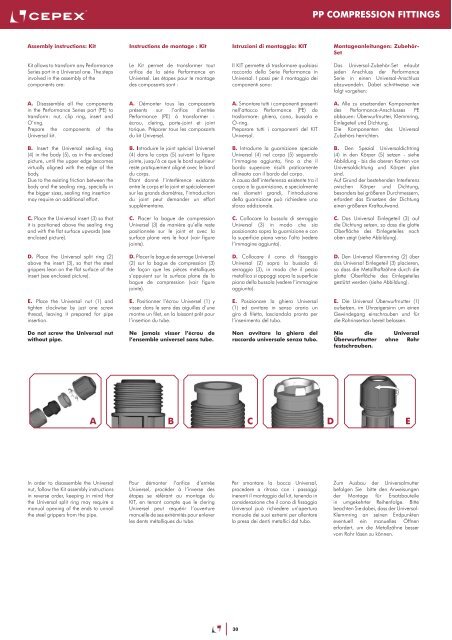
Assembly instructions: Kit<br />
Kit allows to transform any Performance<br />
Series port in a Universal one. The steps<br />
involved in the assembly of the<br />
components are:<br />
A. Disassemble all the components<br />
in the Performance Series port (<strong>PE</strong>) to<br />
transform: nut, clip ring, insert and<br />
O’ring.<br />
Prepare the components of the<br />
Universal kit.<br />
B. Insert the Universal sealing ring<br />
(4) in the body (5), as in the enclosed<br />
picture, until the upper edge becomes<br />
virtually aligned with the edge of the<br />
body.<br />
Due to the existing friction between the<br />
body and the sealing ring, specially in<br />
the bigger sizes, sealing ring insertion<br />
may require an additional effort.<br />
C. Place the Universal insert (3) so that<br />
it is positioned above the sealing ring<br />
and with the flat surface upwards (see<br />
enclosed picture).<br />
D. Place the Universal split ring (2)<br />
above the insert (3), so that the steel<br />
grippers lean on the flat surface of the<br />
insert (see enclosed picture).<br />
E. Place the Universal nut (1) and<br />
tighten clockwise by just one screw<br />
thread, leaving it prepared for pipe<br />
insertion.<br />
Do not screw the Universal nut<br />
without pipe.<br />
In order to disassemble the Universal<br />
nut, follow the Kit assembly instructions<br />
in reverse order, keeping in mind that<br />
the Universal split ring may require a<br />
manual opening of the ends to unnail<br />
the steel grippers from the pipe.<br />
Instructions de montage : Kit<br />
Le Kit permet de transformer tout<br />
orifice de la série Performance en<br />
Universel. Les étapes pour le montage<br />
des composants sont :<br />
A. Démonter tous les composants<br />
présents sur l’orifice d’entrée<br />
Performance (<strong>PE</strong>) à transformer :<br />
écrou, clering, porte-joint et joint<br />
torique. Préparer tous les composants<br />
du kit Universel.<br />
B. Introduire le joint spécial Universel<br />
(4) dans le corps (5) suivant la figure<br />
jointe, jusqu’à ce que le bord supérieur<br />
reste pratiquement aligné avec le bord<br />
du corps.<br />
Étant donné l’interférence existante<br />
entre le corps et le joint et spécialement<br />
sur les grands diamètres, l’introduction<br />
du joint peut demander un effort<br />
supplémentaire.<br />
C. Placer la bague de compression<br />
Universel (3) de manière qu’elle reste<br />
positionnée sur le joint et avec la<br />
surface plane vers le haut (voir figure<br />
jointe).<br />
D. Placer la bague de serrage Universel<br />
(2) sur la bague de compression (3)<br />
de façon que les pièces métalliques<br />
s’appuient sur la surface plane de la<br />
bague de compression (voir figure<br />
jointe).<br />
E. Positionner l’écrou Universel (1) y<br />
visser dans le sens des aiguilles d’une<br />
montre un filet, en la laissant prêt pour<br />
l’insertion du tube.<br />
Ne jamais visser l’écrou de<br />
l’ensemble universel sans tube.<br />
30<br />
<strong>PP</strong> COMPRESSION FITTINGS<br />
A B C D E<br />
Pour démonter l’orifice d’entrée<br />
Universel, procéder à l’inverse des<br />
étapes se référant au montage du<br />
KIT, en tenant compte que le clering<br />
Universel peut requérir l’ouverture<br />
manuelle de ses extrémités pour enlever<br />
les dents métalliques du tube.<br />
Istruzioni di montaggio: KIT<br />
Il KIT permette di trasformare qualsiasi<br />
raccordo della Serie Performance in<br />
Universal. I passi per il montaggio dei<br />
componenti sono:<br />
A. Smontare tutti i componenti presenti<br />
nell’attacco Performance (<strong>PE</strong>) da<br />
trasformare: ghiera, cono, bussola e<br />
O-ring.<br />
Preparare tutti i componenti del KIT<br />
Universal.<br />
B. Introdurre la guarnizione speciale<br />
Universal (4) nel corpo (5) seguendo<br />
l’immagine aggiunta, fino a che il<br />
bordo superiore risulti praticamente<br />
allineato con il bordo del corpo.<br />
A causa dell’interferenza esistente tra il<br />
corpo e la guarnizione, e specialmente<br />
nei diametri grandi, l’introduzione<br />
della guarnizione può richiedere uno<br />
sforzo addizionale.<br />
C. Collocare la bussola di serraggio<br />
Universal (3) in modo che sia<br />
posizionato sopra la guarnizione e con<br />
la superficie piana verso l’alto (vedere<br />
l’immagine aggiunta).<br />
D. Collocare il cono di fissaggio<br />
Universal (2) sopra la bussola di<br />
serraggio (3), in modo che il pezzo<br />
metallico si appoggi sopra la superficie<br />
piana della bussola (vedere l’immagine<br />
aggiunta).<br />
E. Posizionare la ghiera Universal<br />
(1) ed avvitare in senso orario un<br />
giro di filetto, lasciandola pronta per<br />
l’inserimento del tubo.<br />
Non avvitare la ghiera del<br />
raccordo universale senza tubo.<br />
Per smontare la bocca Universal,<br />
procedere a ritroso con i passaggi<br />
inerenti il montaggio del kit, tenendo in<br />
considerazione che il cono di fissaggio<br />
Universal può richiedere un’apertura<br />
manuale dei suoi estremi per allentare<br />
la presa dei denti metallici dal tubo.<br />
Montageanleitungen: Zubehör-<br />
Set<br />
Das Universal-Zubehör-Set erlaubt<br />
jeden Anschluss der Performance<br />
Serie in einen Universal-Anschluss<br />
abzuwandeln. Dabei schrittweise wie<br />
folgt vorgehen:<br />
A. Alle zu ersetzenden Komponenten<br />
des Performance-Anschlusses <strong>PE</strong><br />
abbauen: Überwurfmutter, Klemmring,<br />
Einlegeteil und Dichtung.<br />
Die Komponenten des Universal<br />
Zubehörs herrichten.<br />
B. Den Spezial Universaldichtring<br />
(4) in den Körper (5) setzen - siehe<br />
Abbildung - bis die oberen Kanten von<br />
Universaldichtung und Körper plan<br />
sind.<br />
Auf Grund der bestehenden Interferenz<br />
zwischen Körper und Dichtung,<br />
besonders bei größeren Durchmessern,<br />
erfordert das Einsetzen der Dichtung<br />
einen größeren Kraftaufwand.<br />
C. Das Universal Einlegeteil (3) auf<br />
die Dichtung setzen, so dass die glatte<br />
Oberfläche des Einlegeteiles nach<br />
oben zeigt (siehe Abbildung).<br />
D. Den Universal Klemmring (2) über<br />
das Universal Einlegeteil (3) placieren,<br />
so dass die Metallhaftzähne durch die<br />
glatte Oberfläche des Einlegeteiles<br />
gestützt werden (siehe Abbildung).<br />
E. Die Universal Überwurfmutter (1)<br />
aufsetzen, im Uhrzeigersinn um einen<br />
Gewindegang einschrauben und für<br />
die Rohrinsertion bereit belassen.<br />
Nie die Universal<br />
Überwurfmutter ohne Rohr<br />
festschrauben.<br />
Zum Ausbau der Universalmutter<br />
befolgen Sie bitte den Anweisungen<br />
der Montage für Ersatzbauteile<br />
in umgekehrter Reihenfolge. Bitte<br />
beachten Sie dabei, dass der Universal-<br />
Klemmring an seinen Endpunkten<br />
eventuell ein manuelles Öffnen<br />
erfordert, um die Metallzähne besser<br />
vom Rohr lösen zu können.