

OPERATING AND INSTALLATION MANUAL - Johnson Controls
OPERATING AND INSTALLATION MANUAL - Johnson Controls
OPERATING AND INSTALLATION MANUAL - Johnson Controls

You also want an ePaper? Increase the reach of your titles
YUMPU automatically turns print PDFs into web optimized ePapers that Google loves.
CONNECTIONS Installer<br />
DRAIN PIPE CONNECTION<br />
The indoor unit is fitted with a condensate drain pipe to<br />
which a lagged drainage hose should be connected leading<br />
to a suitable drainage outlet. The appliance is designed for<br />
condensate drainage from either side, although the drain<br />
pipe is connected in the factory on the left.<br />
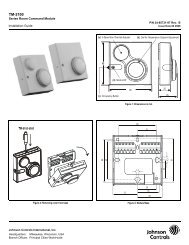
- Remove front panel as described in Maintenence section.<br />
- Using a tool remove fixing spring located in left condesate<br />
pipe.<br />
- Remove plug present.<br />
- Place fixing spring in right condensate pipe.<br />
- Replace front panel<br />
Connect a lagged drainage pipe (inside ø 16 mm) to the<br />
hose fitting of the drain pipe and direct it towards a suitable<br />
drainage outlet.<br />
After installation, check that the condensation flows out<br />
regularly.<br />
For data regarding installation, see the section “Information<br />
for installation”.<br />
To access the connections, see the section “Access to<br />
connections”.<br />
The drainage pipe must have a 3% slope downwards<br />
towards the drain.<br />
Check all the joints for leaks.<br />
Apply heat-insulating material to the joints.<br />
CONNECTION TO THE WATER SYSTEM<br />
For connections at the sides:<br />
- Remove the relevant knockout from the housing<br />
For connections at the rear:<br />
- Drill a hole Ø 60 in the wall within one of the two areas A”<br />
(see section “Information for installation”).<br />
Pass a protective plastic pipe through the hole in the<br />
wall.<br />
Ensure that the section of wall in question has no bearing<br />
structural members, pipes or electric cables.<br />
Upon completion of work it is advisable to close the<br />
holes made in the wall using elastic and, if possible,<br />
soundproofing material.<br />
- To facilitate carrying out the water connections, keep the<br />
unit raised by means of a spacer.<br />
- If necessary position the connections in the space provided<br />
at the rear of the indoor unit and fix them with the provided<br />
bracket A.<br />
10<br />
Position the pipes so that they occupy as little space as<br />
possible in order to facilitate hooking of the appliance<br />
onto the metal plate.<br />
GB<br />
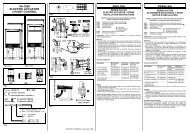
Indoors<br />
A<br />
Protective pipe<br />
Knockouts<br />
Outdoors<br />
2~5 mm


![[PDF] •Outdoor installation 4-5 - Johnson Controls](https://img.yumpu.com/10374038/1/184x260/pdf-ooutdoor-installation-4-5-johnson-controls.jpg?quality=85)
![[PDF] The European Products Catalogue 2012 - Johnson Controls](https://img.yumpu.com/3624903/1/184x260/pdf-the-european-products-catalogue-2012-johnson-controls.jpg?quality=85)