
You also want an ePaper? Increase the reach of your titles
YUMPU automatically turns print PDFs into web optimized ePapers that Google loves.
34<br />
IT<br />
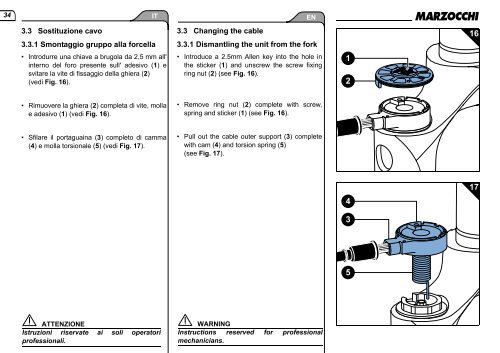
3.3 Sostituzione cavo<br />
3.3.1 Smontaggio gruppo alla forcella<br />
• Introdurre una chiave a brugola da 2,5 mm all'<br />
interno del foro presente sull' adesivo (1) e<br />
svitare la vite di fissaggio della ghiera (2)<br />
(vedi Fig. 16).<br />
EN<br />
3.3 Changing the cable<br />
3.3.1 Dismantling the unit from the fork<br />
• Introduce a 2.5mm Allen key into the hole in<br />
the sticker (1) and unscrew the screw fixing<br />
ring nut (2) (see Fig. 16).<br />
1<br />
2<br />
16<br />
• Rimuovere la ghiera (2) completa di vite, molla<br />
e adesivo (1) (vedi Fig. 16).<br />
• Remove ring nut (2) complete with screw,<br />
spring and sticker (1) (see Fig. 16).<br />
• Sfilare il portaguaina (3) completo di camma<br />
(4) e molla torsionale (5) (vedi Fig. 17).<br />
• Pull out the cable outer support (3) complete<br />
with cam (4) and torsion spring (5)<br />
(see Fig. 17).<br />
4<br />
3<br />
17<br />
5<br />
ATTENZIONE<br />
Istruzioni riservate ai soli operatori<br />
professionali.<br />
WARNING<br />
Instructions reserved for professional<br />
mechanicians.