
Create successful ePaper yourself
Turn your PDF publications into a flip-book with our unique Google optimized e-Paper software.
8<br />
IT<br />
2 INSTALLAZIONE DEL SISTEMA<br />
REMOTO SU FORCELLE<br />
PREDISPOSTE<br />
EN<br />
2 INSTALLATION OF THE<br />
REMOTE SYSTEM ON FORKS<br />
WITH THE RELEVANT FITTINGS<br />
10<br />
NOTA<br />
In caso di acquisto di forcella con dispositivo<br />
TST remote control già installato, è<br />
necessario eseguire solo le operazioni e le<br />
verifiche descritte al paragrafo 2.3<br />
"Installazione gruppo di comando sul<br />
manubrio" e 2.4 "Verifica di funzionamento".<br />
REMEMBER<br />
If you purchase a fork with the TST remote<br />
control already installed, you only have to<br />
perform the operations and checks described<br />
in Paragraph 2.3 "Installing the control on<br />
the handlebar" and 2.4 "Operation check".<br />
1<br />
ATTENZIONE<br />
Le istruzioni di montaggio che seguono sono<br />
state redatte per dare la possibilità ad un<br />
Centro Sospensioni <strong>Marzocchi</strong> autorizzato di<br />
eseguire gli interventi.Una installazione<br />
scorretta può provocare malfunzionamenti e<br />
danni al sistema remoto.<br />
WARNING<br />
The following assembly instructions have<br />
been drawn up for the <strong>Marzocchi</strong> Suspension<br />
Centers authorized to carry out the<br />
interventions. The incorrect installation can<br />
cause malfunctions and damage to the<br />
remote system.<br />
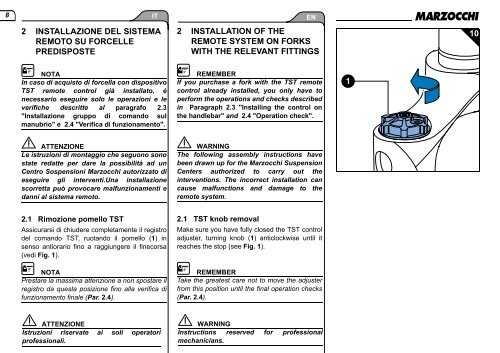
2.1 Rimozione pomello TST<br />
Assicurarsi di chiudere completamente il registro<br />
del comando TST, ruotando il pomello (1) in<br />
senso antiorario fino a raggiungere il finecorsa<br />
(vedi Fig. 1).<br />
NOTA<br />
Prestare la massima attenzione a non spostare il<br />
registro da questa posizione fino alla verifica di<br />
funzionamento finale (Par. 2.4).<br />
2.1 TST knob removal<br />
Make sure you have fully closed the TST control<br />
adjuster, turning knob (1) anticlockwise until it<br />
reaches the stop (see Fig. 1).<br />
REMEMBER<br />
Take the greatest care not to move the adjuster<br />
from this position until the final operation checks<br />
(Par. 2.4).<br />
ATTENZIONE<br />
Istruzioni riservate ai soli operatori<br />
professionali.<br />
WARNING<br />
Instructions reserved for professional<br />
mechanicians.