Télécharger le manuel d'utilisation Sanyo PLC-XU110 - Lampe ...
Télécharger le manuel d'utilisation Sanyo PLC-XU110 - Lampe ...
Télécharger le manuel d'utilisation Sanyo PLC-XU110 - Lampe ...

Create successful ePaper yourself
Turn your PDF publications into a flip-book with our unique Google optimized e-Paper software.
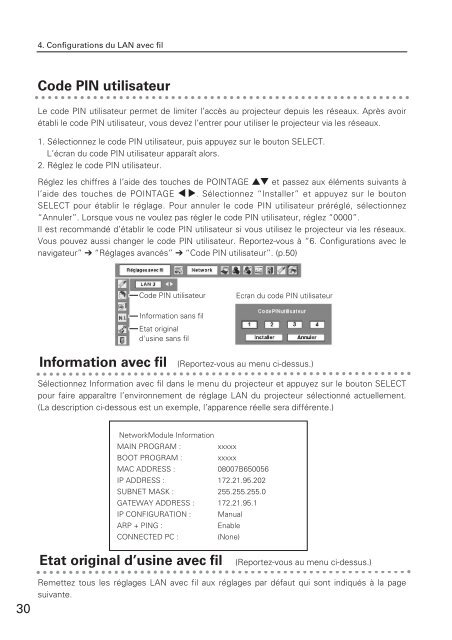
4. Configurations du LAN avec filCode PIN utilisateurLe code PIN utilisateur permet de limiter l’accès au projecteur depuis <strong>le</strong>s réseaux. Après avoirétabli <strong>le</strong> code PIN utilisateur, vous devez l’entrer pour utiliser <strong>le</strong> projecteur via <strong>le</strong>s réseaux.1. Sé<strong>le</strong>ctionnez <strong>le</strong> code PIN utilisateur, puis appuyez sur <strong>le</strong> bouton SELECT.L’écran du code PIN utilisateur apparaît alors.2. Rég<strong>le</strong>z <strong>le</strong> code PIN utilisateur.Rég<strong>le</strong>z <strong>le</strong>s chiffres à l’aide des touches de POINTAGE ed et passez aux éléments suivants àl’aide des touches de POINTAGE 7 8. Sé<strong>le</strong>ctionnez “Instal<strong>le</strong>r” et appuyez sur <strong>le</strong> boutonSELECT pour établir <strong>le</strong> réglage. Pour annu<strong>le</strong>r <strong>le</strong> code PIN utilisateur préréglé, sé<strong>le</strong>ctionnez“Annu<strong>le</strong>r”. Lorsque vous ne vou<strong>le</strong>z pas rég<strong>le</strong>r <strong>le</strong> code PIN utilisateur, rég<strong>le</strong>z “0000”.Il est recommandé d’établir <strong>le</strong> code PIN utilisateur si vous utilisez <strong>le</strong> projecteur via <strong>le</strong>s réseaux.Vous pouvez aussi changer <strong>le</strong> code PIN utilisateur. Reportez-vous à “6. Configurations avec <strong>le</strong>navigateur” ➔ “Réglages avancés” ➔ “Code PIN utilisateur”. (p.50)Code PIN utilisateurEcran du code PIN utilisateurInformation sans filEtat originald'usine sans filInformation avec fil(Reportez-vous au menu ci-dessus.)Sé<strong>le</strong>ctionnez Information avec fil dans <strong>le</strong> menu du projecteur et appuyez sur <strong>le</strong> bouton SELECTpour faire apparaître l’environnement de réglage LAN du projecteur sé<strong>le</strong>ctionné actuel<strong>le</strong>ment.(La description ci-dessous est un exemp<strong>le</strong>, l’apparence réel<strong>le</strong> sera différente.)NetworkModu<strong>le</strong> InformationMAIN PROGRAM : xxxxxBOOT PROGRAM : xxxxxMAC ADDRESS :08007B650056IP ADDRESS : 172.21.95.202SUBNET MASK : 255.255.255.0GATEWAY ADDRESS : 172.21.95.1IP CONFIGURATION : ManualARP + PING :Enab<strong>le</strong>CONNECTED PC :(None)Etat original d’usine avec fil(Reportez-vous au menu ci-dessus.)30Remettez tous <strong>le</strong>s réglages LAN avec fil aux réglages par défaut qui sont indiqués à la pagesuivante.