Télécharger le manuel d'utilisation Sanyo PLC-XU110 - Lampe ...
Télécharger le manuel d'utilisation Sanyo PLC-XU110 - Lampe ...
Télécharger le manuel d'utilisation Sanyo PLC-XU110 - Lampe ...

Create successful ePaper yourself
Turn your PDF publications into a flip-book with our unique Google optimized e-Paper software.
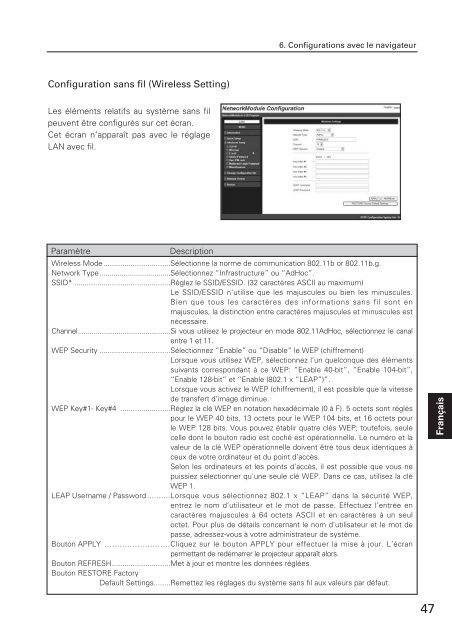
6. Configurations avec <strong>le</strong> navigateurConfiguration sans fil (Wire<strong>le</strong>ss Setting)Les éléments relatifs au système sans filpeuvent être configurés sur cet écran.Cet écran n’apparaît pas avec <strong>le</strong> réglageLAN avec fil.ParamètreDescriptionWire<strong>le</strong>ss Mode................................Sé<strong>le</strong>ctionne la norme de communication 802.11b or 802.11b.g.Network Type....................................Sé<strong>le</strong>ctionnez “Infrastructure” ou “AdHoc”.SSID* ..............................................Rég<strong>le</strong>z <strong>le</strong> SSID/ESSID. (32 caractères ASCII au maximum)Le SSID/ESSID n’utilise que <strong>le</strong>s majuscu<strong>le</strong>s ou bien <strong>le</strong>s minuscu<strong>le</strong>s.Bien que tous <strong>le</strong>s caractères des informations sans fil sont enmajuscu<strong>le</strong>s, la distinction entre caractères majuscu<strong>le</strong>s et minuscu<strong>le</strong>s estnécessaire.Channel................................................Si vous utilisez <strong>le</strong> projecteur en mode 802.11AdHoc, sé<strong>le</strong>ctionnez <strong>le</strong> cana<strong>le</strong>ntre 1 et 11.WEP Security ..................................Sé<strong>le</strong>ctionnez “Enab<strong>le</strong>” ou “Disab<strong>le</strong>” <strong>le</strong> WEP (chiffrement)Lorsque vous utilisez WEP, sé<strong>le</strong>ctionnez l’un quelconque des élémentssuivants correspondant à ce WEP: “Enab<strong>le</strong> 40-bit”, “Enab<strong>le</strong> 104-bit”,“Enab<strong>le</strong> 128-bit” et “Enab<strong>le</strong> (802.1 x “LEAP”)”.Lorsque vous activez <strong>le</strong> WEP (chiffrement), il est possib<strong>le</strong> que la vitessede transfert d’image diminue.WEP Key#1- Key#4 ........................Rég<strong>le</strong>z la clé WEP en notation hexadécima<strong>le</strong> (0 à F). 5 octets sont régléspour <strong>le</strong> WEP 40 bits, 13 octets pour <strong>le</strong> WEP 104 bits, et 16 octets pour<strong>le</strong> WEP 128 bits. Vous pouvez établir quatre clés WEP; toutefois, seu<strong>le</strong>cel<strong>le</strong> dont <strong>le</strong> bouton radio est coché est opérationnel<strong>le</strong>. Le numéro et lava<strong>le</strong>ur de la clé WEP opérationnel<strong>le</strong> doivent être tous deux identiques àceux de votre ordinateur et du point d’accès.Selon <strong>le</strong>s ordinateurs et <strong>le</strong>s points d’accès, il est possib<strong>le</strong> que vous nepuissiez sé<strong>le</strong>ctionner qu’une seu<strong>le</strong> clé WEP. Dans ce cas, utilisez la cléWEP 1.LEAP Username / Password ..........Lorsque vous sé<strong>le</strong>ctionnez 802.1 x “LEAP” dans la sécurité WEP,entrez <strong>le</strong> nom d’utilisateur et <strong>le</strong> mot de passe. Effectuez l’entrée encaractères majuscu<strong>le</strong>s à 64 octets ASCII et en caractères à un seuloctet. Pour plus de détails concernant <strong>le</strong> nom d’utilisateur et <strong>le</strong> mot depasse, adressez-vous à votre administrateur de système.Bouton APPLY ..........................Cliquez sur <strong>le</strong> bouton APPLY pour effectuer la mise à jour. L’écranpermettant de redémarrer <strong>le</strong> projecteur apparaît alors.Bouton REFRESH............................Met à jour et montre <strong>le</strong>s données réglées.Bouton RESTORE FactoryDefault Settings........Remettez <strong>le</strong>s réglages du système sans fil aux va<strong>le</strong>urs par défaut.Français47