- Page 1: Projecteur multimédiaMODÈLE PLC-X
- Page 4 and 5: Table des matièresCaractéristique
- Page 6 and 7: Instructions pour la sécuritéLise
- Page 8 and 9: Instructions pour la sécuritéInst
- Page 10 and 11: Nom des composants et leurs fonctio
- Page 12 and 13: Nom des composants et leurs fonctio
- Page 14 and 15: Nom des composants et leurs fonctio
- Page 16 and 17: Nom des composants et leurs fonctio
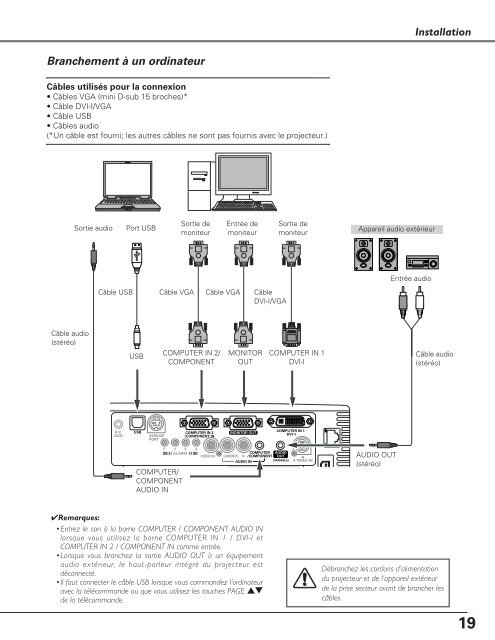
- Page 20 and 21: InstallationBranchement à un équi
- Page 22 and 23: Fonctionnement de base22Mise sous t
- Page 24 and 25: Fonctionnement de baseUtilisation d
- Page 26 and 27: Fonctionnement de baseRéglage du z
- Page 28 and 29: Fonctionnement de baseFonctionnemen
- Page 30 and 31: Entrée d’ordinateurSélection de
- Page 32 and 33: Entrée d’ordinateurSélection du
- Page 34 and 35: Entrée d’ordinateurRéglage manu
- Page 36 and 37: Entrée d’ordinateurSélection du
- Page 38 and 39: Entrée d’ordinateurMémoriserPou
- Page 40 and 41: Entrée vidéoSélection de la sour
- Page 42 and 43: Entrée vidéoSélection du systèm
- Page 44 and 45: Entrée vidéoRéglage de l’image
- Page 46 and 47: Entrée vidéoRéglage de la taille
- Page 48 and 49: RéglageTrapèzeCette fonction est
- Page 50 and 51: RéglageMémoriser logo PIN codeCet
- Page 52 and 53: RéglageMode veilleCette fonction e
- Page 54 and 55: RéglageSécurité (Réglages de Ve
- Page 56 and 57: RéglagePuissance ventilationPuissa
- Page 58 and 59: Fonction d’Alarme antivolUtilisat
- Page 60 and 61: Fonction d’Alarme antivolCharger
- Page 62 and 63: Entretien et nettoyageTémoin WARNI
- Page 64 and 65: Entretien et nettoyageObturateur à
- Page 66 and 67: Entretien et nettoyageRemise à zé
- Page 68 and 69:
AnnexeCertains affichages n’appar
- Page 70 and 71:
AnnexeEntrée vidéoRéglageSélect
- Page 72 and 73:
AnnexeSpécifications des ordinateu
- Page 74 and 75:
AnnexeSpécifications techniquesInf
- Page 76 and 77:
AnnexeAvis PJ LinkCe projecteur est
- Page 78 and 79:
AnnexeNotes relatives au numéro de
- Page 80 and 81:
Mode d’emploiConfiguration etutil
- Page 82 and 83:
Instructions de sécuritéPRECAUTIO
- Page 84 and 85:
Table des matièresConfiguration av
- Page 86:
Environnement d’exploitation et c
- Page 89 and 90:
1. A propos des fonctions LANCaract
- Page 91 and 92:
1. A propos des fonctions LANModes
- Page 94 and 95:
Chapitre22. Procédures de configur
- Page 96 and 97:
2. Procédures de configurationInst
- Page 98 and 99:
Chapitre33. Noms et fonctions desco
- Page 100 and 101:
3.Noms et fonctions des composants
- Page 102:
3.Noms et fonctions des composants
- Page 105 and 106:
4. Configurations du LAN avec filLe
- Page 107 and 108:
4. Configurations du LAN avec filCo
- Page 109 and 110:
4. Configurations du LAN avec filCo
- Page 112 and 113:
Chapitre55. Configurations du LAN s
- Page 114 and 115:
5. Configurations du LAN sans fil3.
- Page 116 and 117:
5. Configurations du LAN sans filEn
- Page 118 and 119:
Chapitre66. Configurations avec le
- Page 120 and 121:
6. Configurations avec le navigateu
- Page 122 and 123:
6. Configurations avec le navigateu
- Page 124 and 125:
6. Configurations avec le navigateu
- Page 126 and 127:
6. Configurations avec le navigateu
- Page 128 and 129:
6. Configurations avec le navigateu
- Page 130 and 131:
6. Configurations avec le navigateu
- Page 132 and 133:
6. Configurations avec le navigateu
- Page 134 and 135:
Chapitre77. Projection de l’image
- Page 136 and 137:
Chapitre88. Utilisation de la fonct
- Page 138 and 139:
8. Utilisation de la fonction de mo
- Page 140 and 141:
8. Utilisation de la fonction de mo
- Page 142 and 143:
Chapitre99. Utilisation de Network
- Page 144 and 145:
9. Utilisation de Network Viewer■
- Page 146 and 147:
9. Utilisation de Network Viewer5.
- Page 148 and 149:
9. Utilisation de Network Viewer4.
- Page 150:
9. Utilisation de Network Viewer4.
- Page 153 and 154:
10. Utilisation du PJ ControllerMé
- Page 155 and 156:
10. Utilisation du PJ ControllerCon
- Page 157 and 158:
10. Utilisation du PJ ControllerAli
- Page 159 and 160:
10. Utilisation du PJ ControllerCon
- Page 161 and 162:
10. Utilisation du PJ ControllerSYS
- Page 163 and 164:
10. Utilisation du PJ ControllerScr
- Page 165 and 166:
10. Utilisation du PJ Controller86P
- Page 167 and 168:
10. Utilisation du PJ Controller2.
- Page 169 and 170:
10. Utilisation du PJ ControllerPar
- Page 171 and 172:
11. AnnexeDépannageEn cas de diffi
- Page 173 and 174:
11. Annexe■ Impossible de lancer
- Page 175 and 176:
11. AnnexeConfiguration de l’adre
- Page 177 and 178:
11. Annexe2. Sélectionnez “Key i