672T14 - V-Tech Garage Equipment
672T14 - V-Tech Garage Equipment
672T14 - V-Tech Garage Equipment
- No tags were found...

You also want an ePaper? Increase the reach of your titles
YUMPU automatically turns print PDFs into web optimized ePapers that Google loves.
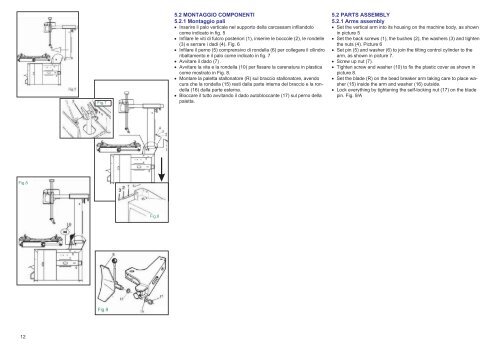
Fig.75.2 MONTAGGIO COMPONENTI5.2.1 Montaggio pali Inserire il palo verticale nel supporto della carcassam infilandolocome indicato in fig. 5 Infilare le viti di fulcro posteriori (1), inserire le boccole (2), le rondelle(3) e serrare i dadi (4). Fig. 6 Infilare il perno (5) comprensivo di rondella (6) per collegare il cilindroribaltamento e il palo come indicato in fig. 7 Avvitare il dado (7) . Avvitare la vite e la rondella (10) per fissare la carenatura in plasticacome mostrato in Fig. 8. Montare la paletta stallonatore (R) sul braccio stallonatore, avendocura che la rondella (15) resti dalla parte interna del braccio e la rondella(16) dalla parte esterna. Bloccare il tutto avvitando il dado autobloccante (17) sul perno dellapaletta.5.2 PARTS ASSEMBLY5.2.1 Arms assembly Set the vertical arm into its housing on the machine body, as shownin picture 5 Set the back screws (1), the bushes (2), the washers (3) and tightenthe nuts (4). Picture 6 Set pin (5) and washer (6) to join the tilting control cylinder to thearm, as shown in picture 7. Screw up nut (7). Tighten screw and washer (10) to fix the plastic cover as shown inpicture 8. Set the blade (R) on the bead breaker arm taking care to place washer(15) inside the arm and washer (16) outside. Lock everything by tightening the self-locking nut (17) on the bladepin. Fig. 9/AFig.8Fig.6Fig.912