672T14 - V-Tech Garage Equipment
672T14 - V-Tech Garage Equipment
672T14 - V-Tech Garage Equipment
- No tags were found...

You also want an ePaper? Increase the reach of your titles
YUMPU automatically turns print PDFs into web optimized ePapers that Google loves.
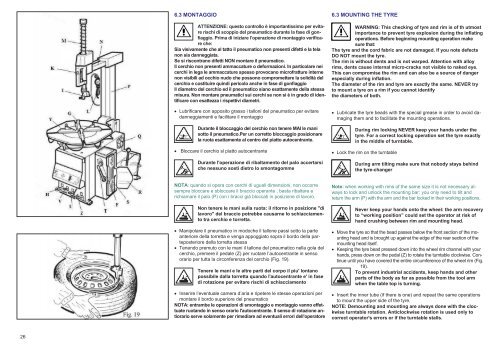
6.3 MONTAGGIOATTENZIONE: questo controllo è importantissimo per evitarerischi di scoppio del pneumatico durante la fase di gonfiaggio.Prima di iniziare l’operazione di montaggio verificareche:Sia visivamente che al tatto il pneumatico non presenti difetti e la telanon sia danneggiata.Se si riscontrano difetti NON montare il pneumatico.Il cerchio non presenti ammaccature o deformazioni. In particolare neicerchi in lega le ammaccature spesso provocano microfratture internenon visibili ad occhio nudo che possono compromettere la solidità delcerchio e costituire quindi pericolo anche in fase di gonfiaggioIl diametro del cerchio ed il pneumatico siano esattamente della stessamisura. Non montare pneumatici sui cerchi se non si è in grado di identificarecon esattezza i rispettivi diametri. Lubrificare con apposito grasso i talloni del pneumatico per evitaredanneggiamenti e facilitare il montaggioDurante il bloccaggio del cerchio non tenere MAI le manisotto il pneumatico.Per un corretto bloccaggio posizionarela ruota esattamente al centro del piatto autocentrante.6.3 MOUNTING THE TYREWARNING: This checking of tyre and rim is of th utmostimportance to prevent tyre explosion during the inflatingoperations. Before beginning mounting operation makesure that:The tyre and the cord fabric are not damaged. If you note defectsDO NOT mount the tyre.The rim is without dents and is not warped. Attention with alloyrims, dents cause internal micro-cracks not visible to naked eye.This can compromise the rim and can also be a source of dangerespecially during inflation.The diameter of the rim and tyre are exactly the same. NEVER tryto mount a tyre on a rim if you cannot identifythe diameters of both. Lubricate the tyre beads with the special grease in order to avoid damagingthem and to facilitate the mounting operations.During rim locking NEVER keep your hands under thetyre. For a correct locking operation set the tyre exactlyin the middle of turntable.Bloccare il cerchio sl piatto autocentranteDurante l'operazione di ribaltamento del palo accertarsiche nessuno sosti dietro lo smontagomme Lock the rim on the turntableDuring arm tilting make sure that nobody stays behindthe tyre-changerNOTA: quando si opera con cerchi di uguali dimensioni, non occorresempre bloccare e sbloccare il braccio operante ; basta ribaltare erichiamare il palo (P) con i bracci già bloccati in posizione di lavoro.Non tenere le mani sulla ruota: il ritorno in posizione "dilavoro" del braccio potrebbe causarne lo schiacciamentotra cerchio e torretta. Manipolare il pneumatico in modoche il tallone passi sotto la parteanteriore della torretta e venga appoggiato sopra il bordo della parteposterioredella torretta stessa Tenendo premuto con le mani il tallone del pneumatico nella gola delcerchio, premere il pedale (Z) per ruotare l’autocentrante in sensoorario per tutta la circonferenza del cerchio (Fig. 19).Tenere le mani e le altre parti del corpo il piu' lontanopossibile dalla torretta quando l'autocentrante e' in fasedi rotazione per evitare rischi di schiacciamento Inserire l’eventuale camera d’aria e ripetere le stesse operazioni permontare il bordo superiore del pneumaticoNOTA: entrambe le operazioni di smontaggio e montaggio vannoeffettuateruotando in senso orario l'autocentrante. Il senso di rotazione antiorarioserve solamente per rimediare ad eventuali errori dell'operatoreNote: when working with rims of the same size it is not necessary alwaysto lock and unlock the mounting bar; you only need to tilt andreturn the arm (P) with the arm and the bar locked in their working positions.Never keep your hands onto the wheel: the arm recoveryto “working position” could set the operator at risk ofhand crushing between rim and mounting head. Move the tyre so that the bead passes below the front section ofthemountinghead and is brought up against the edge of the rear section of themounting head itself. Keeping the tyre bead pressed down into the wheel rim channel with yourhands, press down on the pedal (Z) to rotate the turntable clockwise. Continueuntil you have covered the entire circumference of the wheel rim (Fig.19).To prevent industrial accidents, keep hands and otherparts of the body as far as possible from the tool armwhen the table top is turning. Insert the inner tube (if there is one) and repeat the same operationsto mount the upper side of the tyre.NOTE: Demounting and mounting are always done with the clockwiseturntable rotation. Anticlockwise rotation is used only tocorrect operator's errors or if the turntable stalls.26