672T14 - V-Tech Garage Equipment
672T14 - V-Tech Garage Equipment
672T14 - V-Tech Garage Equipment
- No tags were found...

Create successful ePaper yourself
Turn your PDF publications into a flip-book with our unique Google optimized e-Paper software.
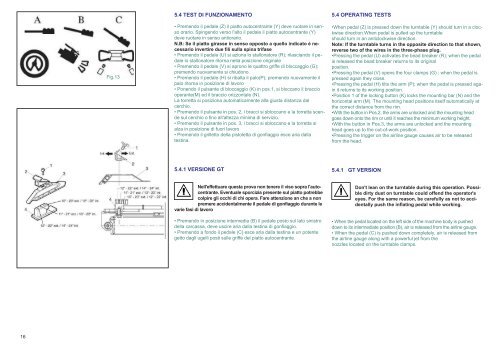
Fig.135.4 TEST DI FUNZIONAMENTO• Premendo il pedale (Z) il piatto autocentrante (Y) deve ruotare in sensoorario. Spingendo verso l'alto il pedale il piatto autocentrante (Y)deve ruotare in senso antiorario.N.B: Se il piatto girasse in senso opposto a quello indicato è necessarioinvertire due fili sulla spina trifase• Premendo il pedale (U) si aziona lo stallonatore (R); rilasciando il pedalelo stallonatore ritorna nella posizione originale• Premendo il pedale (V) si aprono le quattro griffe di bloccaggio (G);premendo nuovamente si chiudono.• Premendo il pedale (H) si ribalta il palo(P); premendo nuovamente ilpalo ritorna in posizione di lavoro• Ponendo il pulsante di bloccaggio (K) in pos.1, si bloccano il bracciooperante(M) ed il braccio orizzontale (N).La torretta si posiziona automaticamente alla giusta distanza dalcerchio.• Premendo il pulsante in pos. 2, i bracci si sbloccano e la torretta scendesul cerchio o fino all'altezza minima di servizio.• Premendo il pulsante in pos. 3, i bracci si sbloccano e la torretta sialza in posizione di fuori lavoro• Premendo il grilletto della pistoletta di gonfiaggio esce aria dallatestina.5.4 OPERATING TESTS•When pedal (Z) is pressed down the turntable (Y) should turn in a clockwisedirection.When pedal is pulled up the turntableshould turn in an anticlockwise direction.Note: If the turntable turns in the opposite direction to that shown,reverse two of the wires in the three-phase plug.•Pressing the pedal (U) activates the bead breaker (R); when the pedalis released the bead breaker returns to its originalposition.•Pressing the pedal (V) opens the four clamps (G) ; when the pedal ispressed again they close.•Pressing the pedal (H) tilts the arm (P); when the pedal is pressed againit returns to its working position.•Position 1 of the locking button (K) locks the mounting bar (N) and thehorizontal arm (M). The mounting head positions itself automatically atthe correct distance from the rim.•With the button in Pos.2, the arms are unlocked and the mounting headgoes down onto the rim or until it reaches the minimum working height.•With the button in Pos.3, the arms are unlocked and the mountinghead goes up to the out-of-work position.•Pressing the trigger on the airline gauge causes air to be releasedfrom the head.5.4.1 VERSIONE GT5.4.1 GT VERSIONNell'effettuare questa prova non tenere il viso sopra l'autocentrante.Eventuale sporcizia presente sul piatto potrebbecolpire gli occhi di chi opera. Fare attenzione an che a nonpremere accidentalmente il pedale di gonfiaggio durante levarie fasi di lavoro• Premendo in posizione intermedia (B) il pedale posto sul lato sinistrodella carcassa, deve uscire aria dalla testina di gonfiaggio.• Premendo a fondo il pedale (C) esce aria dalla testina e un potentegetto dagli ugelli posti sulle griffe del piatto autocentrante.Don't lean on the turntable during this operation. Possibledirty dust on turntable could offend the operator'seyes. For the same reason, be carefully as not to accidentallypush the inflating pedal while working.•Whenthepedallocatedontheleftsideofthemachinebodyispusheddown to its intermediate position (B), air is released from the airline gauge.• When the pedal (C) is pushed down completely, air is released fromthe airline gauge along with a powerful jet from thenozzles located on the turntable clamps.16