672T14 - V-Tech Garage Equipment
672T14 - V-Tech Garage Equipment
672T14 - V-Tech Garage Equipment
- No tags were found...

You also want an ePaper? Increase the reach of your titles
YUMPU automatically turns print PDFs into web optimized ePapers that Google loves.
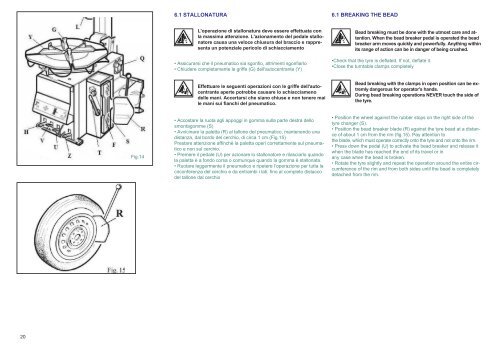
6.1 STALLONATURA6.1 BREAKING THE BEADL'operazione di stallonatura deve essere effettuata conla massima attenzione. L'azionamento del pedale stallonatorecausa una veloce chiusura del braccio e rappresentaun potenziale pericolo di schiacciamento• Assicurarsi che il pneumatico sia sgonfio, altrimenti sgonfiarlo• Chiudere completamente le griffe (G) dell'autocentrante (Y)Bead breaking must be done with the utmost care and attention.When the bead breaker pedal is operated the beadbreaker arm moves quickly and powerfully. Anything withinits range of action can be in danger of being crushed.•Check that the tyre is deflated. If not, deflate it.•Close the turntable clamps completelyEffettuare le seguenti operazioni con le griffe dell'autocentranteaperte potrebbe causare lo schiacciamenodelle mani. Accertarsi che siano chiuse e non tenere maile mani sui fianchi del pneumatico.Bead breaking with the clamps in open position can be extremlydangerous for operator's hands.During bead breaking operations NEVER touch the side ofthe tyre.Fig.14• Accostare la ruota agli appoggi in gomma sulla parte destra dellosmontagomme (S)• Avvicinare la paletta (R) al tallone del pneumatico, mantenendo unadistanza, dal bordo del cerchio, di circa 1 cm.(Fig.15)Prestare attenzione affinchè la paletta operi correttamente sul pneumaticoe non sul cerchio.• Premere il pedale (U) per azionare lo stallonatore e rilasciarlo quandola paletta è a fondo corsa o comunque quando la gomma è stallonata.• Ruotare leggermente il pneumatico e ripetere l’operazione per tutta lacirconferenza del cerchio e da entrambi i lati, fino al completo distaccodel tallone dal cerchio• Position the wheel against the rubber stops on the right side of thetyre changer (S).• Position the bead breaker blade (R) against the tyre bead at a distanceof about 1 cm from the rim (fig.15). Pay attention tothe blade, which must operate correctly onto the tyre and not onto the rim.• Press down the pedal (U) to activate the bead breaker and release itwhen the blade has reached the end of its travel or inany case when the bead is broken.• Rotate the tyre slightly and repeat the operation around the entire circumferenceof the rim and from both sides until the bead is completelydetached from the rim.20