D Einbau- und Bedienungsanleitung RolloTron ... - Rademacher
D Einbau- und Bedienungsanleitung RolloTron ... - Rademacher
D Einbau- und Bedienungsanleitung RolloTron ... - Rademacher
- No tags were found...

Create successful ePaper yourself
Turn your PDF publications into a flip-book with our unique Google optimized e-Paper software.
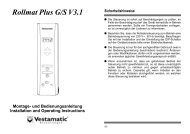
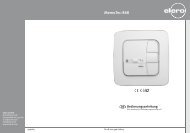
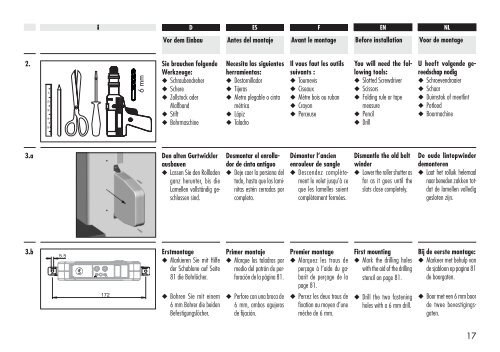
i D ES FENNLVor dem <strong>Einbau</strong>Antes del montajeAvant le montageBefore installationVoor de montage2.123456 mmSie brauchen folgendeWerkzeuge:◆ Schraubendreher◆ Schere◆ Zollstock oderMaßband◆ Stift◆ BohrmaschineNecesita las siguientesherramientas:◆ Destornillador◆ Tijeras◆ Metro plegable o cintamétrica◆ Lápiz◆ TaladroIl vous faut les outilssuivants :◆ Tournevis◆ Ciseaux◆ Mètre bois ou ruban◆ Crayon◆ PerceuseYou will need the followingtools:◆ Slotted Screwdriver◆ Scissors◆ Folding rule or tapemeasure◆ Pencil◆ DrillU heeft volgende gereedschapnodig◆ Schroevendraaier◆ Schaar◆ Duimstok of meetlint◆ Potlood◆ Boormachine3.aDen alten Gurtwicklerausbauen◆ Lassen Sie den Rollladenganz herunter, bis dieLamellen vollständig geschlossensind.Desmontar el enrolladorde cinta antiguo◆ Deje caer la persiana deltodo, hasta que las laminitasestén cerradas porcompleto.Démonter l’ancienenrouleur de sangle◆ Descendez complètementle volet jusqu’à ceque les lamelles soientcomplètement fermées.Dismantle the old beltwinder◆ Lower the roller shutter asfar as it goes until theslats close completely.De oude lintopwinderdemonteren◆ Laat het rolluik helemaalnaar beneden zakken totdatde lamellen vollediggesloten zijn.3.b5.5172Erstmontage◆ Markieren Sie mit Hilfeder Schablone auf Seite81 die Bohrlöcher.◆ Bohren Sie mit einem6 mm Bohrer die beidenBefestigungslöcher.Primer montaje◆ Marque los taladros pormedio del patrón de perforaciónde la página 81.◆ Perfore con una broca de6 mm, ambos agujerosde fijación.Premier montage◆ Marquez les trous deperçage à l’aide du gabaritde perçage de lapage 81.◆ Percez les deux trous defixation au moyen d’unemèche de 6 mm.First mounting◆ Mark the drilling holeswith the aid of the drillingstencil on page 81.◆ Drill the two fasteningholes with a 6 mm drill.Bij de eerste montage:◆ Markeer met behulp vande sjabloon op pagina 81de boorgaten.◆ Boor met een 6 mm boorde twee bevestigingsgaten.17