SENSATION® 7Fr. IAB CATHETER INSTRUCTIONS FOR USE
SENSATION® 7Fr. IAB CATHETER INSTRUCTIONS FOR USE
SENSATION® 7Fr. IAB CATHETER INSTRUCTIONS FOR USE
You also want an ePaper? Increase the reach of your titles
YUMPU automatically turns print PDFs into web optimized ePapers that Google loves.
| 4 | SENSATION <strong>7Fr</strong>. | Instructions for Use |<br />
Figure 15<br />
Figure 16<br />
Figure 17<br />
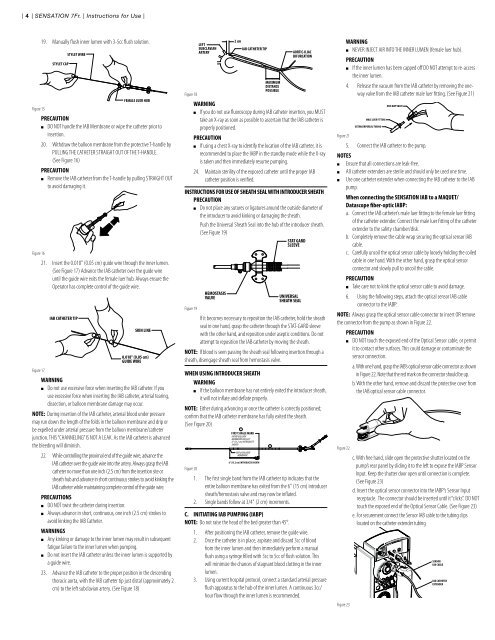
19. Manually flush inner lumen with 3-5cc flush solution.<br />
STYLET CAP<br />
PRECAUTION<br />
STYLET WIRE<br />
FEMALE LUER HUB<br />
DO NOT handle the <strong>IAB</strong> Membrane or wipe the catheter prior to<br />
insertion.<br />
20. Withdraw the balloon membrane from the protective T-handle by<br />
PULLING THE <strong>CATHETER</strong> STRAIGHT OUT OF THE T-HANDLE.<br />
(See Figure 16)<br />
PRECAUTION<br />
Remove the <strong>IAB</strong> catheter from the T-handle by pulling STRAIGHT OUT<br />
to avoid damaging it.<br />
21. Insert the 0.018" (0.05 cm) guide wire through the inner lumen.<br />
(See Figure 17) Advance the <strong>IAB</strong> catheter over the guide wire<br />
until the guide wire exits the female luer hub. Always ensure the<br />
Operator has complete control of the guide wire.<br />
<strong>IAB</strong> <strong>CATHETER</strong> TIP<br />
WARNING<br />
SKIN LINE<br />
0.018" (0.05 cm)<br />
GUIDE WIRE<br />
Do not use excessive force when inserting the <strong>IAB</strong> catheter. If you<br />
use excessive force when inserting the <strong>IAB</strong> catheter, arterial tearing,<br />
dissection, or balloon membrane damage may occur.<br />
NOTE: During insertion of the <strong>IAB</strong> catheter, arterial blood under pressure<br />
may run down the length of the folds in the balloon membrane and drip or<br />
be expelled under arterial pressure from the balloon membrane/catheter<br />
junction. THIS “CHANNELING” IS NOT A LEAK. As the <strong>IAB</strong> catheter is advanced<br />
the bleeding will diminish.<br />
22. While controlling the proximal end of the guide wire, advance the<br />
<strong>IAB</strong> catheter over the guide wire into the artery. Always grasp the <strong>IAB</strong><br />
catheter no more than one inch (2.5 cm) from the insertion site or<br />
sheath hub and advance in short continuous strokes to avoid kinking the<br />
<strong>IAB</strong> catheter while maintaining complete control of the guide wire.<br />
PRECAUTIONS<br />
DO NOT twist the catheter during insertion.<br />
Always advance in short, continuous, one inch (2.5 cm) strokes to<br />
avoid kinking the <strong>IAB</strong> Catheter.<br />
WARNINGS<br />
Any kinking or damage to the inner lumen may result in subsequent<br />
fatigue failure to the inner lumen when pumping.<br />
Do not insert the <strong>IAB</strong> catheter unless the inner lumen is supported by<br />
a guide wire.<br />
23. Advance the <strong>IAB</strong> catheter to the proper position in the descending<br />
thoracic aorta, with the <strong>IAB</strong> catheter tip just distal (approximately 2<br />
cm) to the left subclavian artery. (See Figure 18)<br />
2 cm<br />
LEFT<br />
SUBCLAVIAN<br />
ARTERY<br />
<strong>IAB</strong> <strong>CATHETER</strong> TIP<br />
AORTIC-ILIAC<br />
BIFURCATION<br />
MAXIMUM<br />
DISTANCE<br />
POSSIBLE<br />
Figure 18<br />
WARNING<br />
If you do not use fluoroscopy during <strong>IAB</strong> catheter insertion, you MUST<br />
take an X-ray as soon as possible to ascertain that the <strong>IAB</strong> catheter is<br />
properly positioned.<br />
PRECAUTION<br />
If using a chest X-ray to identify the location of the <strong>IAB</strong> catheter, it is<br />
recommended to place the <strong>IAB</strong>P in the standby mode while the X-ray<br />
is taken and then immediately resume pumping.<br />
24. Maintain sterility of the exposed catheter until the proper <strong>IAB</strong><br />
catheter position is verified.<br />
<strong>INSTRUCTIONS</strong> <strong>FOR</strong> <strong>USE</strong> OF SHEATH SEAL WITH INTRODUCER SHEATH<br />
PRECAUTION<br />
Do not place any sutures or ligatures around the outside diameter of<br />
the introducer to avoid kinking or damaging the sheath.<br />
Push the Universal Sheath Seal into the hub of the introducer sheath.<br />
(See Figure 19)<br />
Figure 19<br />
HEMOSTASIS<br />
VALVE<br />
STAT GARD<br />
SLEEVE<br />
UNIVERSAL<br />
SHEATH SEAL<br />
If it becomes necessary to reposition the <strong>IAB</strong> catheter, hold the sheath<br />
seal in one hand, grasp the catheter through the STAT-GARD sleeve<br />
with the other hand, and reposition under aseptic conditions. Do not<br />
attempt to reposition the <strong>IAB</strong> catheter by moving the sheath.<br />
NOTE: If blood is seen passing the sheath seal following insertion through a<br />
sheath, disengage sheath seal from hemostasis valve.<br />
WHEN USING INTRODUCER SHEATH<br />
WARNING<br />
If the balloon membrane has not entirely exited the introducer sheath,<br />
it will not inflate and deflate properly.<br />
NOTE: Either during advancing or once the catheter is correctly positioned;<br />
confirm that the <strong>IAB</strong> catheter membrane has fully exited the sheath.<br />
(See Figure 20)<br />
Figure 20<br />
1<br />
FIRST SINGLE MARK<br />
ENTIRE BALLOON<br />
MEMBRANE HAS LEFT<br />
6" (15.2 cm) INTRODUCER<br />
SHEATH<br />
END of BALLOON<br />
MEMBRANE<br />
6" (15.2 cm) INTRODUCER SHEATH<br />
1. The first single band from the <strong>IAB</strong> catheter tip indicates that the<br />
entire balloon membrane has exited from the 6" (15 cm) introducer<br />
sheath/hemostasis valve and may now be inflated.<br />
2. Single bands follow at 3/4" (2 cm) increments.<br />
C. INITIATING <strong>IAB</strong> PUMPING (<strong>IAB</strong>P)<br />
NOTE: Do not raise the head of the bed greater than 45°.<br />
1. After positioning the <strong>IAB</strong> catheter, remove the guide wire.<br />
2. Once the catheter is in place, aspirate and discard 3cc of blood<br />
from the inner lumen and then immediately perform a manual<br />
flush using a syringe filled with 3cc to 5cc of flush solution. This<br />
will minimize the chances of stagnant blood clotting in the inner<br />
lumen.<br />
3. Using current hospital protocol, connect a standard arterial pressure<br />
flush apparatus to the hub of the inner lumen. A continuous 3cc/<br />
hour flow through the inner lumen is recommended.<br />
2<br />
BALLOON<br />
Figure 21<br />
NOTES<br />
WARNING<br />
NEVER INJECT AIR INTO THE INNER LUMEN (female luer hub).<br />
PRECAUTION<br />
If the inner lumen has been capped off DO NOT attempt to re-access<br />
the inner lumen.<br />
4. Release the vacuum from the <strong>IAB</strong> catheter by removing the oneway<br />
valve from the <strong>IAB</strong> catheter male luer fitting. (See Figure 21)<br />
MALE LUER FITTING<br />
EXTRACORPOREAL TUBING<br />
ONE-WAY VALVE<br />
5. Connect the <strong>IAB</strong> catheter to the pump.<br />
Ensure that all connections are leak-free.<br />
All catheter extenders are sterile and should only be used one time.<br />
Use one catheter extender when connecting the <strong>IAB</strong> catheter to the <strong>IAB</strong><br />
pump.<br />
When connecting the SENSATION <strong>IAB</strong> to a MAQUET/<br />
Datascope ber-optic <strong>IAB</strong>P:<br />
a. Connect the <strong>IAB</strong> catheter’s male luer fitting to the female luer fitting<br />
of the catheter extender. Connect the male luer fitting of the catheter<br />
extender to the safety chamber/disk.<br />
b. Completely remove the cable wrap securing the optical sensor <strong>IAB</strong><br />
cable.<br />
c. Carefully uncoil the optical sensor cable by loosely holding the coiled<br />
cable in one hand. With the other hand, grasp the optical sensor<br />
connector and slowly pull to uncoil the cable.<br />
PRECAUTION<br />
Take care not to kink the optical sensor cable to avoid damage.<br />
6. Using the following steps, attach the optical sensor <strong>IAB</strong> cable<br />
connector to the <strong>IAB</strong>P:<br />
NOTE: Always grasp the optical sensor cable connector to insert OR remove<br />
the connector from the pump as shown in Figure 22.<br />
PRECAUTION<br />
DO NOT touch the exposed end of the Optical Sensor cable, or permit<br />
it to contact other surfaces. This could damage or contaminate the<br />
sensor connection.<br />
a. With one hand, grasp the <strong>IAB</strong>’s optical sensor cable connector as shown<br />
in Figure 22. Note that the red mark on the connector should be up.<br />
b. With the other hand, remove and discard the protective cover from<br />
the <strong>IAB</strong> optical sensor cable connector.<br />
Figure 22<br />
Figure 23<br />
BALLOON<br />
c. With free hand, slide open the protective shutter located on the<br />
pump’s rear panel by sliding it to the left to expose the <strong>IAB</strong>P Sensor<br />
Input. Keep the shutter door open until connection is complete.<br />
(See Figure 23)<br />
d. Insert the optical sensor connector into the <strong>IAB</strong>P’s Sensor Input<br />
receptacle. The connector should be inserted until it “clicks”. DO NOT<br />
touch the exposed end of the Optical Sensor Cable. (See Figure 23)<br />
e. For securement connect the Sensor <strong>IAB</strong> cable to the tubing clips<br />
located on the catheter extender tubing.<br />
SENSOR<br />
<strong>IAB</strong> CABLE<br />
<strong>IAB</strong> <strong>CATHETER</strong><br />
EXTENDER


