Instruction Manual - Service
Instruction Manual - Service
Instruction Manual - Service

You also want an ePaper? Increase the reach of your titles
YUMPU automatically turns print PDFs into web optimized ePapers that Google loves.
E N G L I S H<br />
Using an extension cable<br />
An extension cord should not be used unless absolutely<br />
necessary. Use an approved extension cable suitable for the<br />
power input of your charger (see technical data). The minimum<br />
conductor size is 1 mm2; the maximum length is 30 m.<br />
Assembly and adjustment<br />
• Prior to assembly and adjustment, always<br />
remove the battery pack.<br />
• Always switch off the tool before inserting<br />
or removing the battery pack.<br />
Use only Berner battery packs and<br />
chargers.<br />
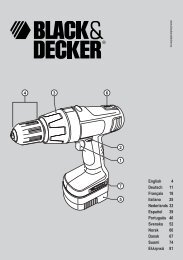
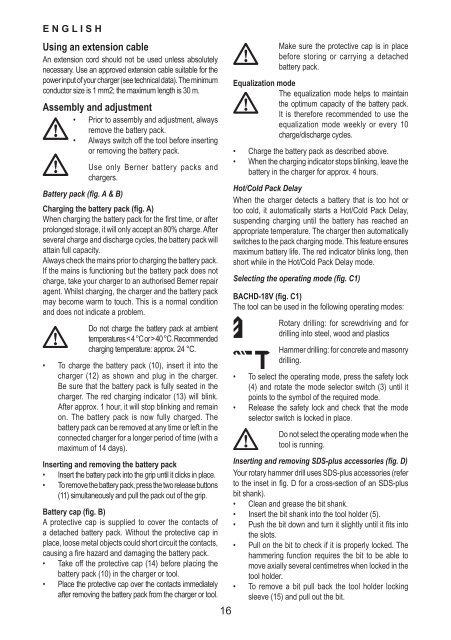
Battery pack (fi g. A & B)<br />
Charging the battery pack (fi g. A)<br />
When charging the battery pack for the fi rst time, or after<br />
prolonged storage, it will only accept an 80% charge. After<br />
several charge and discharge cycles, the battery pack will<br />
attain full capacity.<br />
Always check the mains prior to charging the battery pack.<br />
If the mains is functioning but the battery pack does not<br />
charge, take your charger to an authorised Berner repair<br />
agent. Whilst charging, the charger and the battery pack<br />
may become warm to touch. This is a normal condition<br />
and does not indicate a problem.<br />
Do not charge the battery pack at ambient<br />
temperatures < 4 °C or > 40 °C. Recommended<br />
charging temperature: approx. 24 °C.<br />
• To charge the battery pack (10), insert it into the<br />
charger (12) as shown and plug in the charger.<br />
Be sure that the battery pack is fully seated in the<br />
charger. The red charging indicator (13) will blink.<br />
After approx. 1 hour, it will stop blinking and remain<br />
on. The battery pack is now fully charged. The<br />
battery pack can be removed at any time or left in the<br />
connected charger for a longer period of time (with a<br />
maximum of 14 days).<br />
Inserting and removing the battery pack<br />
• Insert the battery pack into the grip until it clicks in place.<br />
• To remove the battery pack, press the two release buttons<br />
(11) simultaneously and pull the pack out of the grip.<br />
Battery cap (fi g. B)<br />
A protective cap is supplied to cover the contacts of<br />
a detached battery pack. Without the protective cap in<br />
place, loose metal objects could short circuit the contacts,<br />
causing a fi re hazard and damaging the battery pack.<br />
• Take off the protective cap (14) before placing the<br />
battery pack (10) in the charger or tool.<br />
• Place the protective cap over the contacts immediately<br />
after removing the battery pack from the charger or tool.<br />
16<br />
Make sure the protective cap is in place<br />
before storing or carrying a detached<br />
battery pack.<br />
Equalization mode<br />
The equalization mode helps to maintain<br />
the optimum capacity of the battery pack.<br />
It is therefore recommended to use the<br />
equalization mode weekly or every 10<br />
charge/discharge cycles.<br />
• Charge the battery pack as described above.<br />
• When the charging indicator stops blinking, leave the<br />
battery in the charger for approx. 4 hours.<br />
Hot/Cold Pack Delay<br />
When the charger detects a battery that is too hot or<br />
too cold, it automatically starts a Hot/Cold Pack Delay,<br />
suspending charging until the battery has reached an<br />
appropriate temperature. The charger then automatically<br />
switches to the pack charging mode. This feature ensures<br />
maximum battery life. The red indicator blinks long, then<br />
short while in the Hot/Cold Pack Delay mode.<br />
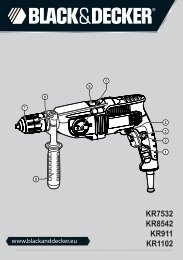
Selecting the operating mode (fi g. C1)<br />
BACHD-18V (fi g. C1)<br />
The tool can be used in the following operating modes:<br />
Rotary drilling: for screwdriving and for<br />
drilling into steel, wood and plastics<br />
Hammer drilling: for concrete and masonry<br />
drilling.<br />
• To select the operating mode, press the safety lock<br />
(4) and rotate the mode selector switch (3) until it<br />
points to the symbol of the required mode.<br />
• Release the safety lock and check that the mode<br />
selector switch is locked in place.<br />
Do not select the operating mode when the<br />
tool is running.<br />
Inserting and removing SDS-plus accessories (fi g. D)<br />
Your rotary hammer drill uses SDS-plus accessories (refer<br />
to the inset in fi g. D for a cross-section of an SDS-plus<br />
bit shank).<br />
• Clean and grease the bit shank.<br />
• Insert the bit shank into the tool holder (5).<br />
• Push the bit down and turn it slightly until it fi ts into<br />
the slots.<br />
• Pull on the bit to check if it is properly locked. The<br />
hammering function requires the bit to be able to<br />
move axially several centimetres when locked in the<br />
tool holder.<br />
• To remove a bit pull back the tool holder locking<br />
sleeve (15) and pull out the bit.