english
english
english

Create successful ePaper yourself
Turn your PDF publications into a flip-book with our unique Google optimized e-Paper software.
ENGLISH<br />
36<br />
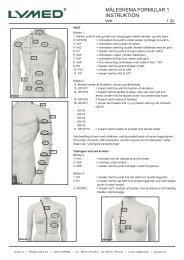
3.4 POSITIONING AND INSTALLATION OF THE STRUCTURE<br />
3.4.1 INSTALLATION OF LIFT VERSION “SI 32” WITH FLOOR PIPE CHANNEL AND “SI 32 P” WITH EMBEDDED PIPE CHANNEL<br />
WARNING<br />
For both versions SI 32 and SI 32 P, with floor or embedded type pipe channel, take care that the position of the pipe channel is perfectly<br />
centered between the two columns, as indicated in (Fig. 1A)<br />
PREPARATION OF THE PIPE CHANNEL PIT FOR VERSION SI 32 P<br />
- If the lift must be installed with “embedded” pipe channel, version 32 P, dig a foundation trench with a section as shown in Fig.1A ,<br />
with a length covering the total distance between the base plates of the two columns P1 and P2 as shown in Fig.1A<br />
- When the pit is ready, cement the pipe channel to the floor as shown, bearing in mind that the channel must be positioned in the middle<br />
of the two columns as shown in (Fig. 1A).<br />
- Remove the packed lift protection cardboards and place the different components to the floor, so that you can work freely on the main structures.<br />
- Remove the internal protection covers of the columns (27 Fig.2) and the covers at the bottom of the columns (28 Fig.2)<br />
WARNING<br />
The position of the control column P1 (2 Fig. 2) (the one that is equipped with the hydraulic unit and switchboard) has no influence on the<br />
entry direction of the vehicle.<br />
- Take off the packing plates (1 Fig. 6) and, keeping the columns always in horizontal position by means of supports and/or lifting systems (Fig.<br />
6), hook first the column P1 (2 Fig. 6) (the one that is equipped with the hydraulic unit and switchboard) and the column P2 (3 Fig. 6), using<br />
raising systems of suitable capacity (Fig. 9). Then position the columns on the pavement, in such a way that they are placed symmetrically<br />
and aligned with each other, with the carriage of each column facing each other and respecting the distances indicated (1 Fig. 1A).<br />
- Through the 10 holes that are along the external perimeter of the base plate of each column P1 and P2, make marks on the floor and drill the<br />
16 mm diameter anchoring holes to fix the columns P1 and P2 to the floor; then clean the floor and the holes.<br />
- Insert the ten M16 expansion dowels (1 Fig. 7) in each column base plate (type HILTI HSA-A M16x140, or equivalents) tapping them lightly<br />
with an hammer.<br />
- Place and fit on both sides of the column the triangular-shape anti-toe trapping devices (2 Fig. 7) as shown in the figure.<br />
- Tighten the bolts of the anchor dowels (1 Fig. 7) with a torque of 100 Nm. If the dowels turn idle, replace them with larger ones.<br />
3.4.1.2 LAYING AND CONNECTION OF THE CABLES for the lifts version SI 32 and SI 32 P:<br />
- HYDRAULIC<br />
- PNEUMATIC<br />
- ELECTRIC<br />
WARNING: Lay all pipes and cables in an orderly way, avoiding narrow bendings. Fix them together with plastic clamps.<br />
Lay the cables on the floor or on the bottom of the embedded channel and carry out the different connections between the two columns<br />
- Remove the protection caps of the cylinders P1 and P2 that are placed inside the columns.<br />
- Lay down the hydraulic rubber pipe (1 Fig.12 P1) and (1 Fig.12 P2), connecting the two pipe ends to the base of each cylinder of the columns<br />
P1 and P2, using the suitable loose fittings (2,3 Fig.12 P1) and (2,3 Fig.12 P2).<br />
- Thread the plastic discharge pipe (1 Fig.13) and (12 Fig. 12) through the hole at the top of the column P1 (2 Fig.13) and then along the cable<br />
conduit (4 Fig.12) that is placed inside the column P1. Stretch the pipe carefully on the floor or at the bottom of the embedded channel, then<br />
insert the reinforcement brass sleeve (5 Fig.12) to the plastic pipe end and connect it to the preassembled cylinder connection (6 Fig.12).<br />
Connect the other end of the discharge pipe to the hydraulic unit as shown in (5 Fig.13)<br />
- Introduce the small diameter plastic pipe (3 Fig. 13 and 7 Fig.12) through the hole (2 Fig.13) of the column P1, pass it along the cable conduit<br />
(4 Fig.12) that is located inside the column P1and then on the floor or at the bottom of the embedded channel. Connect the pipe by<br />
means of the 90° fitting (8 Fig.12) to the pneumatic cylinder (9 Fig.12) that is fitted inside the column P2. Connect the other pipe end (3<br />
Fig.13) to one of the 2 output connections (4 Fig.13) of the pneumatic electrovalve EVP.<br />
Connect then the pneumatic solenoid valve EVP to the supply line that should deliver a maximum pressure of 8 bar.<br />
- Pass the bipolar electric cable through the hole (3 Fig.14) of the column P1, then along (10 Fig. 12) the cable conduit (4 Fig.12) that is located<br />
inside column P1 and finally on the floor or at the bottom of the embedded channel. Connect it to the terminal (11 Fig.12) of the electric<br />
cable that feeds the limit switch (FC3), fitted inside the column P2. The other numbered end of the cable (1 Fig.14), must be connected<br />
to the terminal strip (2 Fig.14) that is installed on top of the switchboard, to the two cables having the same numbers.<br />
- Before carrying out the procedures described in the paragraphs 3.5 CONNECTION OF THE LIFT TO THE ELECTRIC SUPPLY and 3.6 FILLING<br />
OF THE HYDRAULIC SYSTEM, read carefully and understand the chapter 4.0 concerning the control panel functions.