- Seite 1 und 2: AV Center AV Center Operating Instr
- Seite 3 und 4: On safety • Comply with your loca
- Seite 5 und 6: General Settings DVD setup . . . .
- Seite 7 und 8: t page 26 You can simultaneously en
- Seite 9 und 10: The following chart shows the suppo
- Seite 11 und 12: Screen display When no source is se
- Seite 13 und 14: H .m/M> buttons Disc: To skip a cha
- Seite 15 und 16: Basic Operations Playing discs Depe
- Seite 17 und 18: I u Touch to pause/resume play afte
- Seite 19 und 20: Radio reception display and control
- Seite 21 und 22: Advanced Operations — Discs This
- Seite 23 und 24: 1 During playback, touch “PLAY MO
- Seite 25 und 26: The shuffle options and switching o
- Seite 27 und 28: To return to the previous display,
- Seite 29 und 30: Advanced Operations — Radio Stori
- Seite 31 und 32: Note You cannot use this function i
- Seite 33 und 34: Multi-channel output of 2-channel s
- Seite 35: 1 While the unit is off, touch “S
- Seite 39 und 40: General Settings Various settings a
- Seite 41 und 42: Parental control settings Select
- Seite 43 und 44: System settings — System Select
- Seite 45 und 46: No Signal Setting Shows the wallpap
- Seite 47 und 48: Speaker Setting Item Option Purpose
- Seite 49 und 50: Disc playback settings — Disc Sel
- Seite 51 und 52: Using Optional Equipment Auxiliary
- Seite 53 und 54: Repeat and shuffle play 1 During pl
- Seite 55 und 56: Notes on DATA CDs and DATA DVDs Som
- Seite 57 und 58: 2Pull the release keys to unseat th
- Seite 59 und 60: Sound There is no sound/sound skips
- Seite 61 und 62: Glossary Album Section of a music p
- Seite 63 und 64: Language code/area code list Langua
- Seite 65 und 66: M Menu DVD control (DVD CONTROL) 17
- Seite 67 und 68: - Schauen Sie aus Sicherheitsgründ
- Seite 69 und 70: Monitoreinstellungen Einstellen des
- Seite 71 und 72: t Seite 40 Sie können aus gespeich
- Seite 73 und 74: In der folgenden Tabelle sehen Sie
- Seite 75 und 76: Display Wenn keine Signalquelle aus
- Seite 77 und 78: G Taste u (Wiedergabe/Pause) Starte
- Seite 79 und 80: Grundfunktionen Wiedergeben von Dis
- Seite 81 und 82: H ./> Berühren Sie dieses Bedienel
- Seite 83 und 84: Radioempfang 1 Berühren Sie „SOU
- Seite 85 und 86: Wiedergabe von Raumklang Erzeugen e
- Seite 87 und 88:
Für die DVD-Wiedergabe 1 Berühren
- Seite 89 und 90:
Deaktivieren der Kindersicherung 1
- Seite 91 und 92:
1 Geben Sie während der Wiedergabe
- Seite 93 und 94:
Auflisten von Stücken/Bildern/ Vid
- Seite 95 und 96:
Weitere Funktionen — Radio Speich
- Seite 97 und 98:
2 Berühren Sie den gewünschten Pr
- Seite 99 und 100:
Mehrkanalausgabe von 2-Kanal-Signal
- Seite 101 und 102:
Einstellen, ob bestimmte Lautsprech
- Seite 103 und 104:
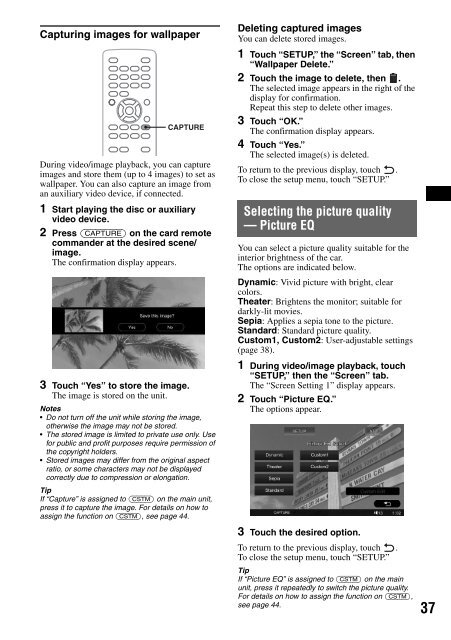
Einstellen des Hintergrundbilds und
- Seite 105 und 106:
Um zur vorherigen Anzeige zurückzu
- Seite 107 und 108:
Spracheinstellungen für Anzeige od
- Seite 109 und 110:
Hinweis Wenn die Kindersicherung ak
- Seite 111 und 112:
Systemeinstellungen — System Wäh
- Seite 113 und 114:
AUX 3* (Seite 55) Einstellen des Ge
- Seite 115 und 116:
Speaker Setting (Lautsprechereinste
- Seite 117 und 118:
Disc-Wiedergabeeinstellungen — Di
- Seite 119 und 120:
Einstellen der Uhr Die Uhr zeigt di
- Seite 121 und 122:
Bearbeiten der Linien 1 Berühren S
- Seite 123 und 124:
Weitere Informationen Sicherheitsma
- Seite 125 und 126:
Wiedergabereihenfolge von MP3-/ WMA
- Seite 127 und 128:
Technische Daten Monitor Display-Ty
- Seite 129 und 130:
Ton Es ist kein Ton zu hören/Ton s
- Seite 131 und 132:
Please push RESET. Das Gerät und d
- Seite 133 und 134:
Sprachcode-/Gebietscodeliste Liste
- Seite 135 und 136:
M Menü DVD-Konfiguration (DVD SETU
- Seite 137 und 138:
Sécurité Vous devez vous conforme
- Seite 139 und 140:
Paramètres du moniteur Réglage de
- Seite 141 und 142:
t page 28 Vous pouvez écouter simu
- Seite 143 und 144:
Le tableau suivant montre les forma
- Seite 145 und 146:
Affichage à l’écran Si aucune s
- Seite 147 und 148:
D Touche TOP MENU Permet d’ouvrir
- Seite 149 und 150:
Opérations de base Lecture de disq
- Seite 151 und 152:
H ./> Appuyez sur cette touche pour
- Seite 153 und 154:
Ecoute de la radio 1 Appuyez sur «
- Seite 155 und 156:
Son ambiophonique Création d’un
- Seite 157 und 158:
Pour les DVD 1 En cours de lecture,
- Seite 159 und 160:
Pour supprimer un numéro saisi, ap
- Seite 161 und 162:
Les rubriques de recherche diffère
- Seite 163 und 164:
Affichage par liste de plages/ d’
- Seite 165 und 166:
Opérations avancées — Radio Mé
- Seite 167 und 168:
2 Appuyez sur le type de programme
- Seite 169 und 170:
Sortie multi-canaux de sources à 2
- Seite 171 und 172:
Configuration du statut de connexio
- Seite 173 und 174:
2 Appuyez sur « Screen ». Les opt
- Seite 175 und 176:
Personnalisation de la qualité d
- Seite 177 und 178:
Configuration de la langue à l’
- Seite 179 und 180:
Remarque Si le contrôle parental e
- Seite 181 und 182:
Configuration système — System S
- Seite 183 und 184:
AUX 3* (page 55) Règle le type d
- Seite 185 und 186:
Speaker Setting (Configuration du h
- Seite 187 und 188:
Réglages de la lecture du disque
- Seite 189 und 190:
Réglage de l’horloge L’horloge
- Seite 191 und 192:
Pour revenir à l’écran précéd
- Seite 193 und 194:
Informations complémentaires Préc
- Seite 195 und 196:
Ordre de lecture des fichiers MP3/
- Seite 197 und 198:
Généralités Sorties : Borne de s
- Seite 199 und 200:
Disque Impossible d’introduire le
- Seite 201 und 202:
Glossaire Album Section d’un morc
- Seite 203 und 204:
Liste des codes de langue/codes de
- Seite 205 und 206:
Mise hors tension du moniteur 11 Mo
- Seite 207 und 208:
Sicurezza Osservare le leggi sul tr
- Seite 209 und 210:
Impostazioni del monitor Regolazion
- Seite 211 und 212:
t pagina 27 Possibilità di collega
- Seite 213 und 214:
Nella seguente tabella sono indicat
- Seite 215 und 216:
Display dello schermo Se non è sel
- Seite 217 und 218:
E Tasto m (microfono) Per attivare
- Seite 219 und 220:
Operazioni di base Riproduzione di
- Seite 221 und 222:
H ./> Toccare per saltare un capito
- Seite 223 und 224:
Ascolto della radio 1 Toccare “SO
- Seite 225 und 226:
Uso dell’audio surround Creazione
- Seite 227 und 228:
Per DVD 1 Durante la riproduzione,
- Seite 229 und 230:
4 Per confermare, premere i tasti n
- Seite 231 und 232:
1 Durante la riproduzione, premere
- Seite 233 und 234:
Visualizzazione di un elenco di bra
- Seite 235 und 236:
Operazioni avanzate — Radio Memor
- Seite 237 und 238:
Tipi di programmi News (Notiziario)
- Seite 239 und 240:
Uscita multicanale di sorgenti a 2
- Seite 241 und 242:
Impostazione dello stato del colleg
- Seite 243 und 244:
3 Toccare l’opzione desiderata. P
- Seite 245 und 246:
Personalizzazione della qualità de
- Seite 247 und 248:
Impostazione della lingua di visual
- Seite 249 und 250:
Direct Search (pagina 27) Consente
- Seite 251 und 252:
Impostazioni di sistema — System
- Seite 253 und 254:
AUX 3* (pagina 55) Consente di impo
- Seite 255 und 256:
Listening Position (pagina 35) Cons
- Seite 257 und 258:
Impostazioni di riproduzione disco
- Seite 259 und 260:
Impostazione dell’orologio L’or
- Seite 261 und 262:
Modifica delle linee 1 Toccare “L
- Seite 263 und 264:
Informazioni aggiuntive Precauzioni
- Seite 265 und 266:
Informazioni sui file MP3 MP3, acro
- Seite 267 und 268:
Ingressi: Terminale di controllo AT
- Seite 269 und 270:
Dischi Non è possibile inserire un
- Seite 271 und 272:
Glossario Album Sezione di un pezzo
- Seite 273 und 274:
Elenco dei codici della lingua/di z
- Seite 275 und 276:
M Memorizzazione automatica delle e
- Seite 277 und 278:
Veiligheid • Houd u aan de verkee
- Seite 279 und 280:
Monitorinstellingen De monitorhoek
- Seite 281 und 282:
t pagina 28 U kunt tegelijkertijd g
- Seite 283 und 284:
In de volgende tabel kunt u zien we
- Seite 285 und 286:
Schermweergave Als er geen bron is
- Seite 287 und 288:
E m (microfoon) toets De karaokesta
- Seite 289 und 290:
Basishandelingen Discs afspelen Mog
- Seite 291 und 292:
H ./> Raak deze aan om een hoofdstu
- Seite 293 und 294:
Naar de radio luisteren 1 Raak "SOU
- Seite 295 und 296:
Surround sound beluisteren Een idea
- Seite 297 und 298:
Voor DVD 1 Raak tijdens het afspele
- Seite 299 und 300:
Als u een ingevoerd nummer wilt wis
- Seite 301 und 302:
Afhankelijk van de disc en de indel
- Seite 303 und 304:
Lijst met tracks/beelden/ videobest
- Seite 305 und 306:
Geavanceerde handelingen — Radio
- Seite 307 und 308:
Programmatypen News (Nieuws), Curre
- Seite 309 und 310:
Meerkanaals uitvoer van 2-kanaals b
- Seite 311 und 312:
De aansluitingsstatus van de luidsp
- Seite 313 und 314:
De achtergrond en het spectrum anal
- Seite 315 und 316:
Opmerking De beeldkwaliteit van de
- Seite 317 und 318:
Taalinstellingen voor het scherm of
- Seite 319 und 320:
Alle instellingen herstellen Alle i
- Seite 321 und 322:
Key Setting (Toetsinstelling) Item
- Seite 323 und 324:
Geluids-/luidsprekerinstellingen
- Seite 325 und 326:
Scherminstellingen — Screen Selec
- Seite 327 und 328:
De beveiligingscode instellen Cijfe
- Seite 329 und 330:
Het apparaattype instellen Als u he
- Seite 331 und 332:
Bedieningselementen De overeenkomst
- Seite 333 und 334:
Wanneer er MP3/WMA/JPEG/DivX ® is
- Seite 335 und 336:
Technische gegevens Monitor Display
- Seite 337 und 338:
Het beeld wordt niet weergegeven op
- Seite 339 und 340:
Please press RESET. Het apparaat en
- Seite 341 und 342:
Lijst met taal-/regiocodes Lijst me
- Seite 343 und 344:
M Menu DVD-bediening (DVD CONTROL)