Emergency Lighting Device CLS 24 - 7Ah CLS 24/SV CLS Power ...
Emergency Lighting Device CLS 24 - 7Ah CLS 24/SV CLS Power ...
Emergency Lighting Device CLS 24 - 7Ah CLS 24/SV CLS Power ...

Sie wollen auch ein ePaper? Erhöhen Sie die Reichweite Ihrer Titel.
YUMPU macht aus Druck-PDFs automatisch weboptimierte ePaper, die Google liebt.
<strong>CLS</strong> <strong>24</strong>/<strong>SV</strong> Montage- und Betriebsanleitung<br />
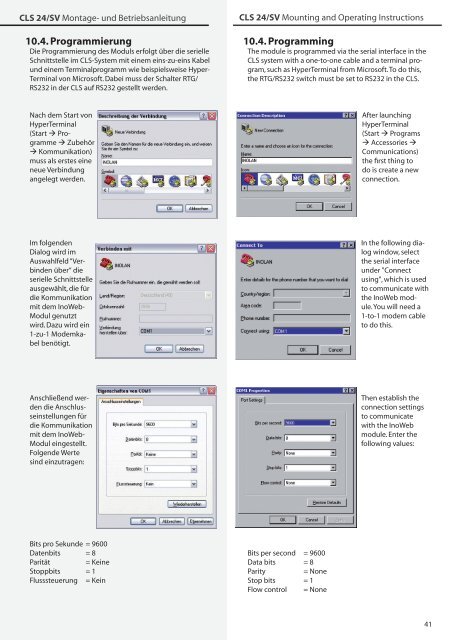
10.4. Programmierung<br />
Die Programmierung des Moduls erfolgt über die serielle<br />
Schnittstelle im <strong>CLS</strong>-System mit einem eins-zu-eins Kabel<br />
und einem Terminalprogramm wie beispielsweise Hyper-<br />
Terminal von Microsoft. Dabei muss der Schalter RTG/<br />
RS232 in der <strong>CLS</strong> auf RS232 gestellt werden.<br />
<strong>CLS</strong> <strong>24</strong>/<strong>SV</strong> Mounting and Operating Instructions<br />
10.4. Programming<br />
The module is programmed via the serial interface in the<br />
<strong>CLS</strong> system with a one-to-one cable and a terminal program,<br />
such as HyperTerminal from Microsoft. To do this,<br />
the RTG/RS232 switch must be set to RS232 in the <strong>CLS</strong>.<br />
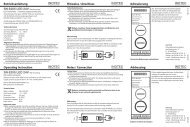
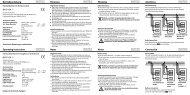
Nach dem Start von<br />
HyperTerminal<br />
(Start Programme<br />
Zubehör<br />
Kommunikation)<br />
muss als erstes eine<br />
neue Verbindung<br />
angelegt werden.<br />
After launching<br />
HyperTerminal<br />
(Start Programs<br />
Accessories <br />
Communications)<br />
the first thing to<br />
do is create a new<br />
connection.<br />
Im folgenden<br />
Dialog wird im<br />
Auswahlfeld “Verbinden<br />
über“ die<br />
serielle Schnittstelle<br />
ausgewählt, die für<br />
die Kommunikation<br />
mit dem InoWeb-<br />
Modul genutzt<br />
wird. Dazu wird ein<br />
1-zu-1 Modemkabel<br />
benötigt.<br />
In the following dialog<br />
window, select<br />
the serial interface<br />
under "Connect<br />
using", which is used<br />
to communicate with<br />
the InoWeb module.<br />
You will need a<br />
1-to-1 modem cable<br />
to do this.<br />
Anschließend werden<br />
die Anschlusseinstellungen<br />
für<br />
die Kommunikation<br />
mit dem InoWeb-<br />
Modul eingestellt.<br />
Folgende Werte<br />
sind einzutragen:<br />
Then establish the<br />
connection settings<br />
to communicate<br />
with the InoWeb<br />
module. Enter the<br />
following values:<br />
Bits pro Sekunde = 9600<br />
Datenbits = 8<br />
Parität<br />
= Keine<br />
Stoppbits = 1<br />
Flusssteuerung = Kein<br />
Bits per second = 9600<br />
Data bits = 8<br />
Parity<br />
= None<br />
Stop bits = 1<br />
Flow control = None<br />
41