Installation Manual - CertainTeed
Installation Manual - CertainTeed
Installation Manual - CertainTeed

Create successful ePaper yourself
Turn your PDF publications into a flip-book with our unique Google optimized e-Paper software.
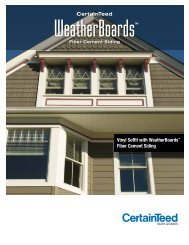
<strong>CertainTeed</strong> WeatherBoards Fiber Cement Siding <strong>Installation</strong> <strong>Manual</strong><br />
Fastening<br />
XXNails: Corrosion resistant or stainless steel, 16 ga.<br />
finish nails. Nail length must allow penetration of at<br />
least 1" into solid wood.<br />
XXScrews: Corrosion resistant or stainless steel.<br />
Trim Size<br />
Fastening Schedule<br />
XXDrive the fastener perpendicular to the surface of<br />
the trim.<br />
XXPenetrate the framing at least 1".<br />
Number of<br />
Fasteners Spacing<br />
4" wide or less 2 12" to 16" o.c.<br />
5" wide or more 3 12" to 16" o.c.<br />
XXAlways nail from one end to the other. Never nail from<br />
both ends to the middle—it will stress the trim board.<br />
XXDrive the fastener flush with the trim.<br />
XXWhen you install trim over lap siding, always nail<br />
through the trim and the underlying siding. Be sure to<br />
nail on the high points—or overlap—into the framing.<br />
XXDo not over drive the fasteners. When a fastener is<br />
driven below the surface of the trim, its holding power<br />
is reduced and it creates an entryway for moisture.<br />
XXIrregularities in framing may be visible in the finished<br />
application. To minimize the effect of uneven walls,<br />
shim the wall as necessary.<br />
XXIf you are hand nailing, it may be necessary to predrill<br />
to help prevent the corners from breaking. Position<br />
fasteners no closer than 1" from the side edges of the<br />
trim and no closer than 2" from the end.<br />
XXFor trim 4" wide or less, fasten in an alternate<br />
position to both sides of the piece, spaced no<br />
more than 12" to 16" o.c.<br />
XXFor trim 4" wide or more, but less than 5" wide, apply<br />
two fasteners, one on each side of the piece, spaced<br />
no more than 12" to 16" o.c.<br />
XXTrim wider than 5" requires three fasteners.<br />
Paint/Primer<br />
Use a 100% acrylic latex paint or primer applied<br />
according to the paint manufacturer’s recommendations.<br />
Windows and Doors:<br />
XXSquare or miter-cut the trim boards.<br />
XXNail trim flush to the window or door.<br />
Outside Corners:<br />
When assembling a traditional corner from two pieces,<br />
fasten the trim to the substrate, studs or blocking every<br />
12" to 16".<br />
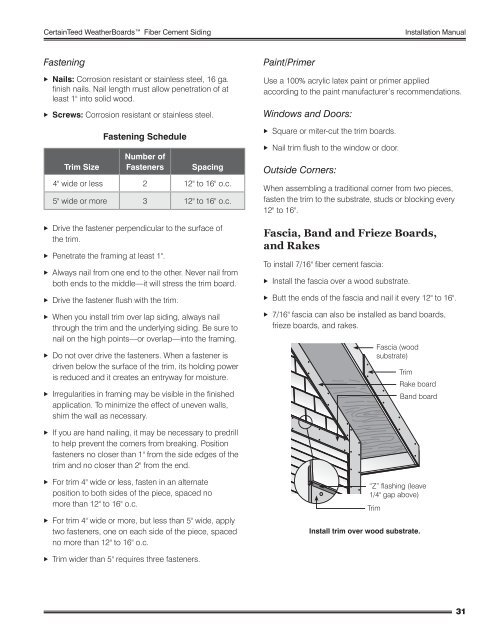
Fascia, Band and Frieze Boards,<br />
and Rakes<br />
To install 7/16" fiber cement fascia:<br />
XXInstall the fascia over a wood substrate.<br />
XXButt the ends of the fascia and nail it every 12" to 16".<br />
XX7/16" fascia can also be installed as band boards,<br />
frieze boards, and rakes.<br />
Fascia (wood<br />
substrate)<br />
Trim<br />
Rake board<br />
Band board<br />
“Z” flashing (leave<br />
1/4" gap above)<br />
Trim<br />
Install trim over wood substrate.<br />
31