Installation Manual - CertainTeed
Installation Manual - CertainTeed
Installation Manual - CertainTeed

You also want an ePaper? Increase the reach of your titles
YUMPU automatically turns print PDFs into web optimized ePapers that Google loves.
<strong>CertainTeed</strong> WeatherBoards Fiber Cement Siding <strong>Installation</strong> <strong>Manual</strong><br />
Butt and End Joint Application<br />
There are three ways to fasten butt and end joints:<br />
1. Into solid framing<br />
2. Into structural sheathing<br />
3. With an off-stud joiner<br />
Butt End/Joints Fastened into Solid Framing<br />
or Structural Sheathing<br />
Butt end/joints should be installed with factory-sealed<br />
or factory-prefinished ends butted together in moderate<br />
contact. We recommend that butt end/joints be fastened<br />
into a stud or framing member. If no stud or framing<br />
member is available, butt end/joints may be fastened into<br />
structural-rated sheathing.<br />
When installing WeatherBoards lap siding, you must<br />
install butt joints using either backflashing, joint covers,<br />
or H-covers. Consult local code for butt joint treatment<br />
requirements in your area. Backflashing should be<br />
constructed of a durable, non-corrosive material that is<br />
compatible with fiber cement. Do not attempt to flash<br />
behind end or butt joints with housewrap—housewrap<br />
will not direct water away from the wall. Flashing size<br />
should be a minimum of 6" wide (3" to the left and right<br />
of the joint) and extend at least 1" over the top of the<br />
previous course. Examples of butt end/joint flashing<br />
materials include:<br />
X X#15<br />
felt<br />
XXTrim coil (painted or PVC coated)<br />
XXBear Skin Joint Flashing<br />
Joint<br />
flashing<br />
extends<br />
3" to left<br />
and right<br />
of joint and<br />
overlaps<br />
the previous<br />
course by 1"<br />
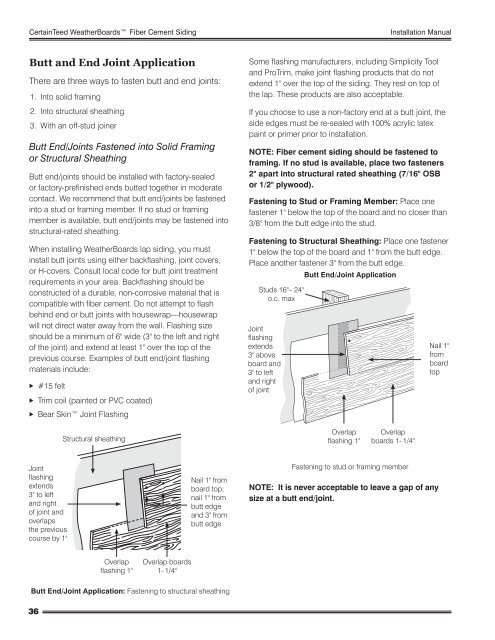
Butt End/Joint Application: Fastening to structural sheathing<br />
36<br />
Structural sheathing<br />
Overlap<br />
flashing 1"<br />
Overlap boards<br />
1- 1/4"<br />
Nail 1" from<br />
board top;<br />
nail 1" from<br />
butt edge<br />
and 3" from<br />
butt edge<br />
Some flashing manufacturers, including Simplicity Tool<br />
and ProTrim, make joint flashing products that do not<br />
extend 1" over the top of the siding. They rest on top of<br />
the lap. These products are also acceptable.<br />
If you choose to use a non-factory end at a butt joint, the<br />
side edges must be re-sealed with 100% acrylic latex<br />
paint or primer prior to installation.<br />
NOTE: Fiber cement siding should be fastened to<br />
framing. If no stud is available, place two fasteners<br />
2" apart into structural rated sheathing (7/16" OSB<br />
or 1/2" plywood).<br />
Fastening to Stud or Framing Member: Place one<br />
fastener 1" below the top of the board and no closer than<br />
3/8" from the butt edge into the stud.<br />
Fastening to Structural Sheathing: Place one fastener<br />
1" below the top of the board and 1" from the butt edge.<br />
Place another fastener 3" from the butt edge.<br />
Butt End/Joint Application<br />
Studs 16"– 24"<br />
o.c. max<br />
Joint<br />
flashing<br />
extends<br />
3" above<br />
board and<br />
3" to left<br />
and right<br />
of joint<br />
Overlap<br />
flashing 1"<br />
Overlap<br />
boards 1- 1/4"<br />
Fastening to stud or framing member<br />
NOTE: It is never acceptable to leave a gap of any<br />
size at a butt end/joint.<br />
Nail 1"<br />
from<br />
board<br />
top