Installation Manual - CertainTeed
Installation Manual - CertainTeed
Installation Manual - CertainTeed

Create successful ePaper yourself
Turn your PDF publications into a flip-book with our unique Google optimized e-Paper software.
<strong>CertainTeed</strong> WeatherBoards Fiber Cement Siding <strong>Installation</strong> <strong>Manual</strong><br />
Starter Strip<br />
You can use fiber cement, vinyl utility trim, or PVC skirtboard<br />
as a starter strip. It must be at least 2" wide and<br />
1/4" to 5/16" thick. When starting installation at ground<br />
level, establish a straight, level reference line (chalk line)<br />
to guide the positioning of the starter strip and the shake<br />
starter course.<br />
1. Find the lowest point of the sheathing and make a<br />
mark that is 1" above the lowest point. The bottom<br />
edge of the siding will be 2-1/4" below the mark you<br />
just made. Make sure this point is high enough to<br />
ensure that the shakes are installed at least 6" above<br />
the finished grade or 1" above surfaces where water<br />
may collect.<br />
2. From this mark, snap a level chalk line to the opposite<br />
end of the wall.<br />
3. Repeat around the entire house.<br />
4. Using the chalk line as a guide, attach a starter strip.<br />
Starter Course<br />
To ensure that the keyways are fully backed by fiber<br />
cement, install the first course of Individual Shakes<br />
over a full starter course of 9-1/4" lap siding. If you are<br />
transitioning from less than 9-1/4" lap siding to Individual<br />
Shakes, use 9-1/4" lap siding as your starter course at<br />
the transition. If you are starting the wall with Individual<br />
Shakes, place a starter strip under the starter course.<br />
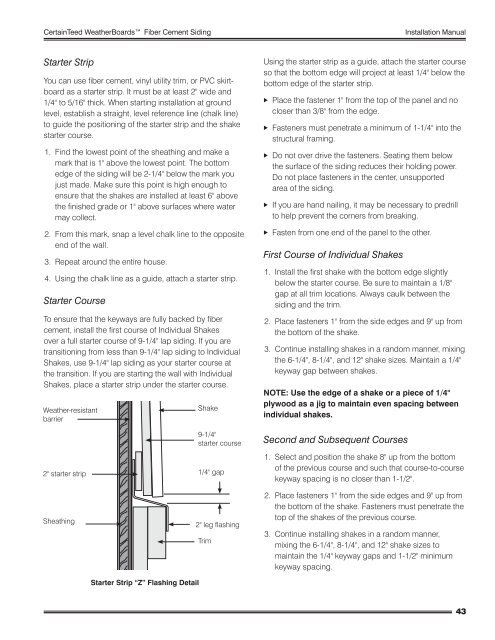
Weather-resistant<br />
barrier<br />
2" starter strip<br />
Sheathing<br />
Starter Strip “Z” Flashing Detail<br />
Shake<br />
9-1/4"<br />
starter course<br />
1/4" gap<br />
2" leg flashing<br />
Trim<br />
Using the starter strip as a guide, attach the starter course<br />
so that the bottom edge will project at least 1/4" below the<br />
bottom edge of the starter strip.<br />
XXPlace the fastener 1" from the top of the panel and no<br />
closer than 3/8" from the edge.<br />
XXFasteners must penetrate a minimum of 1-1/4" into the<br />
structural framing.<br />
XXDo not over drive the fasteners. Seating them below<br />
the surface of the siding reduces their holding power.<br />
Do not place fasteners in the center, unsupported<br />
area of the siding.<br />
XXIf you are hand nailing, it may be necessary to predrill<br />
to help prevent the corners from breaking.<br />
XXFasten from one end of the panel to the other.<br />
First Course of Individual Shakes<br />
1. Install the first shake with the bottom edge slightly<br />
below the starter course. Be sure to maintain a 1/8"<br />
gap at all trim locations. Always caulk between the<br />
siding and the trim.<br />
2. Place fasteners 1" from the side edges and 9" up from<br />
the bottom of the shake.<br />
3. Continue installing shakes in a random manner, mixing<br />
the 6-1/4", 8-1/4", and 12" shake sizes. Maintain a 1/4"<br />
keyway gap between shakes.<br />
NOTE: Use the edge of a shake or a piece of 1/4"<br />
plywood as a jig to maintain even spacing between<br />
individual shakes.<br />
Second and Subsequent Courses<br />
1. Select and position the shake 8" up from the bottom<br />
of the previous course and such that course-to-course<br />
keyway spacing is no closer than 1-1/2".<br />
2. Place fasteners 1" from the side edges and 9" up from<br />
the bottom of the shake. Fasteners must penetrate the<br />
top of the shakes of the previous course.<br />
3. Continue installing shakes in a random manner,<br />
mixing the 6-1/4", 8-1/4", and 12" shake sizes to<br />
maintain the 1/4" keyway gaps and 1-1/2" minimum<br />
keyway spacing.<br />
43