Installation Manual - CertainTeed
Installation Manual - CertainTeed
Installation Manual - CertainTeed

You also want an ePaper? Increase the reach of your titles
YUMPU automatically turns print PDFs into web optimized ePapers that Google loves.
<strong>CertainTeed</strong> WeatherBoards Fiber Cement Siding <strong>Installation</strong> <strong>Manual</strong><br />
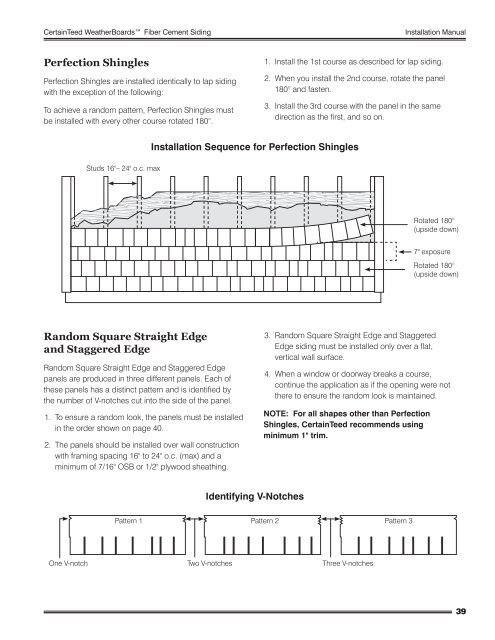
Perfection Shingles<br />
Perfection Shingles are installed identically to lap siding<br />
with the exception of the following:<br />
To achieve a random pattern, Perfection Shingles must<br />
be installed with every other course rotated 180°.<br />
Studs 16"– 24" o.c. max<br />
Random Square Straight Edge<br />
and Staggered Edge<br />
Random Square Straight Edge and Staggered Edge<br />
panels are produced in three different panels. Each of<br />
these panels has a distinct pattern and is identified by<br />
the number of V-notches cut into the side of the panel.<br />
1. To ensure a random look, the panels must be installed<br />
in the order shown on page 40.<br />
2. The panels should be installed over wall construction<br />
with framing spacing 16" to 24" o.c. (max) and a<br />
minimum of 7/16" OSB or 1/2" plywood sheathing.<br />
1. Install the 1st course as described for lap siding.<br />
2. When you install the 2nd course, rotate the panel<br />
180° and fasten.<br />
3. Install the 3rd course with the panel in the same<br />
direction as the first, and so on.<br />
<strong>Installation</strong> Sequence for Perfection Shingles<br />
Identifying V-Notches<br />
3. Random Square Straight Edge and Staggered<br />
Edge siding must be installed only over a flat,<br />
vertical wall surface.<br />
4. When a window or doorway breaks a course,<br />
continue the application as if the opening were not<br />
there to ensure the random look is maintained.<br />
NOTE: For all shapes other than Perfection<br />
Shingles, <strong>CertainTeed</strong> recommends using<br />
minimum 1" trim.<br />
Pattern 1 Pattern 2<br />
Pattern 3<br />
One V-notch Two V-notches Three V-notches<br />
Rotated 180°<br />
(upside down)<br />
7" exposure<br />
Rotated 180°<br />
(upside down)<br />
39