Installation Manual - CertainTeed
Installation Manual - CertainTeed
Installation Manual - CertainTeed

Create successful ePaper yourself
Turn your PDF publications into a flip-book with our unique Google optimized e-Paper software.
<strong>CertainTeed</strong> WeatherBoards Fiber Cement Siding <strong>Installation</strong> <strong>Manual</strong><br />
<strong>Installation</strong><br />
1. WeatherBoards Fiber Cement soffit should be applied<br />
to structural framing members spaced no more than<br />
24" o.c. with the longest dimension perpendicular to<br />
the framing.<br />
Fascia<br />
Subfascia (wood)<br />
Nailer board<br />
52<br />
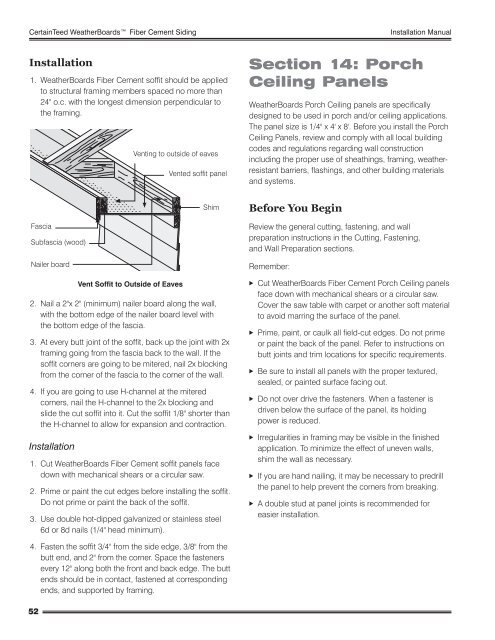
Vent Soffit to Outside of Eaves<br />
2. Nail a 2"x 2" (minimum) nailer board along the wall,<br />
with the bottom edge of the nailer board level with<br />
the bottom edge of the fascia.<br />
3. At every butt joint of the soffit, back up the joint with 2x<br />
framing going from the fascia back to the wall. If the<br />
soffit corners are going to be mitered, nail 2x blocking<br />
from the corner of the fascia to the corner of the wall.<br />
4. If you are going to use H-channel at the mitered<br />
corners, nail the H-channel to the 2x blocking and<br />
slide the cut soffit into it. Cut the soffit 1/8" shorter than<br />
the H-channel to allow for expansion and contraction.<br />
<strong>Installation</strong><br />
Venting to outside of eaves<br />
Vented soffit panel<br />
Shim<br />
1. Cut WeatherBoards Fiber Cement soffit panels face<br />
down with mechanical shears or a circular saw.<br />
2. Prime or paint the cut edges before installing the soffit.<br />
Do not prime or paint the back of the soffit.<br />
3. Use double hot-dipped galvanized or stainless steel<br />
6d or 8d nails (1/4" head minimum).<br />
4. Fasten the soffit 3/4" from the side edge, 3/8" from the<br />
butt end, and 2" from the corner. Space the fasteners<br />
every 12" along both the front and back edge. The butt<br />
ends should be in contact, fastened at corresponding<br />
ends, and supported by framing.<br />
Section 14: Porch<br />
Ceiling Panels<br />
WeatherBoards Porch Ceiling panels are specifically<br />
designed to be used in porch and/or ceiling applications.<br />
The panel size is 1/4" x 4' x 8'. Before you install the Porch<br />
Ceiling Panels, review and comply with all local building<br />
codes and regulations regarding wall construction<br />
including the proper use of sheathings, framing, weatherresistant<br />
barriers, flashings, and other building materials<br />
and systems.<br />
Before You Begin<br />
Review the general cutting, fastening, and wall<br />
preparation instructions in the Cutting, Fastening,<br />
and Wall Preparation sections.<br />
Remember:<br />
XXCut WeatherBoards Fiber Cement Porch Ceiling panels<br />
face down with mechanical shears or a circular saw.<br />
Cover the saw table with carpet or another soft material<br />
to avoid marring the surface of the panel.<br />
XXPrime, paint, or caulk all field-cut edges. Do not prime<br />
or paint the back of the panel. Refer to instructions on<br />
butt joints and trim locations for specific requirements.<br />
XXBe sure to install all panels with the proper textured,<br />
sealed, or painted surface facing out.<br />
XXDo not over drive the fasteners. When a fastener is<br />
driven below the surface of the panel, its holding<br />
power is reduced.<br />
XXIrregularities in framing may be visible in the finished<br />
application. To minimize the effect of uneven walls,<br />
shim the wall as necessary.<br />
XXIf you are hand nailing, it may be necessary to predrill<br />
the panel to help prevent the corners from breaking.<br />
XXA double stud at panel joints is recommended for<br />
easier installation.