Installation Manual - CertainTeed
Installation Manual - CertainTeed
Installation Manual - CertainTeed

Create successful ePaper yourself
Turn your PDF publications into a flip-book with our unique Google optimized e-Paper software.
<strong>CertainTeed</strong> WeatherBoards Fiber Cement Siding <strong>Installation</strong> <strong>Manual</strong><br />
First Course<br />
First Panel<br />
1. Start at the left side of the wall.<br />
2. Remove a bit of the left edge of the panels so that<br />
the entire panel butts up flush against the trim.<br />
3. Place the first nail 1" above the top of the keyways<br />
and no closer than 3/8" from the edge of the panel.<br />
This will ensure the nails are concealed.<br />
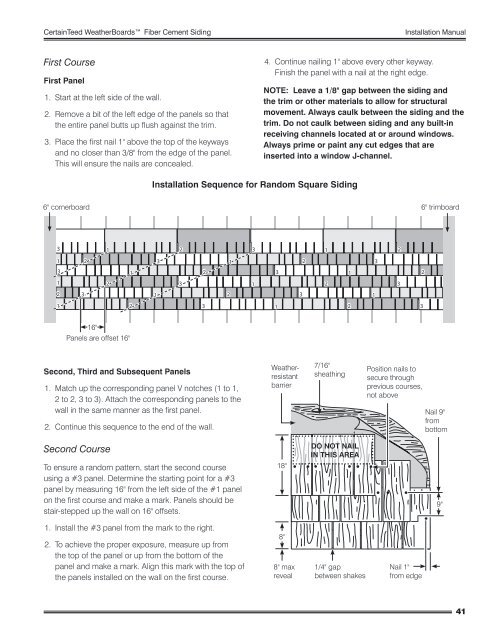
6" cornerboard<br />
16"<br />
Panels are offset 16"<br />
Second, Third and Subsequent Panels<br />
1. Match up the corresponding panel V notches (1 to 1,<br />
2 to 2, 3 to 3). Attach the corresponding panels to the<br />
wall in the same manner as the first panel.<br />
2. Continue this sequence to the end of the wall.<br />
Second Course<br />
To ensure a random pattern, start the second course<br />
using a #3 panel. Determine the starting point for a #3<br />
panel by measuring 16" from the left side of the #1 panel<br />
on the first course and make a mark. Panels should be<br />
stair-stepped up the wall on 16" offsets.<br />
1. Install the #3 panel from the mark to the right.<br />
2. To achieve the proper exposure, measure up from<br />
the top of the panel or up from the bottom of the<br />
panel and make a mark. Align this mark with the top of<br />
the panels installed on the wall on the first course.<br />
4. Continue nailing 1" above every other keyway.<br />
Finish the panel with a nail at the right edge.<br />
<strong>Installation</strong> Sequence for Random Square Siding<br />
NOTE: Leave a 1/8" gap between the siding and<br />
the trim or other materials to allow for structural<br />
movement. Always caulk between the siding and the<br />
trim. Do not caulk between siding and any built-in<br />
receiving channels located at or around windows.<br />
Always prime or paint any cut edges that are<br />
inserted into a window J-channel.<br />
Weather-<br />
resistant<br />
barrier<br />
18"<br />
8"<br />
8" max<br />
reveal<br />
7/16"<br />
sheathing<br />
DO NOT NAIL<br />
IN THIS AREA<br />
1/4" gap<br />
between shakes<br />
Position nails to<br />
secure through<br />
previous courses,<br />
not above<br />
Nail 1"<br />
from edge<br />
6" trimboard<br />
Nail 9"<br />
from<br />
bottom<br />
9"<br />
41