

Trre OnIGINAL HONAE WOOOWORKING RruN ... - Wood Tools
Trre OnIGINAL HONAE WOOOWORKING RruN ... - Wood Tools
Trre OnIGINAL HONAE WOOOWORKING RruN ... - Wood Tools

You also want an ePaper? Increase the reach of your titles
YUMPU automatically turns print PDFs into web optimized ePapers that Google loves.
SETECT SilRAIGITT STOGK<br />
A straight fence starts with straight<br />
lumber, but it was tough finding<br />
1x4's at my local lumber yard that<br />
werent crooked or full of knots.<br />
Since I needed some 1x12 stock as<br />
well, I decided to look for it instead,<br />
and found a rack with some beautifirl<br />
16-footers. Quickly calculating<br />
lumber yield in the wider boards, I<br />
bought most of the pile. Even<br />
though it meant ripping a few<br />
boards to get the narrower widths I<br />
needed (not a pleasant task given<br />
cedar's irritating sawdust), the<br />
resulting straight-grained stock was<br />
worth the extra trouble.<br />
START WMI THE SGREEN<br />
One ofthe beauties ofthis fence is its<br />
repetition of elements. The "screen"<br />
- named for its role in screening the<br />
yard from view - consisB of an<br />
alternating pattern of narrow and<br />
wide infill boards separated by 1"wide<br />
gaps (FENCE coNsrRuc-<br />
TION vIEw). As I ripped the infill<br />
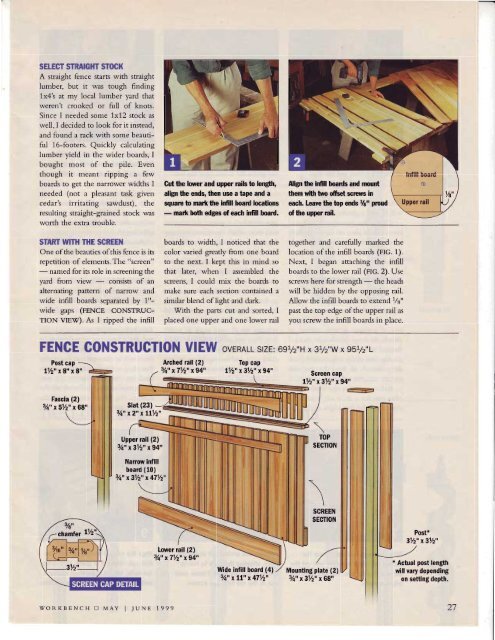
Cut $e lover and upper raib to httgUt,<br />
align tie endq then uss a tape and a<br />
squarc b mad($e Inf,ll boad locatiotts<br />
- mrt boft ed$s of each affill boad.<br />
boards to width, I noticed that the<br />
color varied gready fiom one board<br />
to the next. I kept this in mind so<br />
that later, when I assembled the<br />
screens, I could mix the boards to<br />
make sure each section contained a<br />
similar blend of light and dark.<br />
With the parts cut and sorted, I<br />
placed one upper and one lower rail<br />
Alignfteffi boadsand moud<br />
dnm withtvooftetsqerus in<br />
eadt. l.eave Ute top etds Ys" protd<br />
of the upper nll.<br />
together and carefirlly marked the<br />
location of the infill boards (rtc. 1).<br />
Next, I began attaching the infill<br />
boards to the lower rail (rtC. 2). Use<br />
screws here for strength - the heads<br />
will be hidden by the opposing rail.<br />
Allow the infill boards to extend 1/8"<br />
past the top edge of the upper rail as<br />
you screw the infill boards in place.<br />
FENGE CONSTRUCTION VIEW ovERALL stzE:6e!/z"H x312"w xes!/z"L<br />
Post cap<br />
Arched rall (2)<br />
1%"x8nx8n Vc"x71hx94"<br />
Scrcen cap<br />
lVz" x3Vz" x94"<br />
-<br />
'<br />
Ve"<br />
chamfer 1<br />
Upper nll (2)<br />
Vq" x31/2" x94<br />
llanow Inflll<br />
boad (10)<br />
E/4" x3Y2" r47Y2"<br />
lower nll (2)<br />
V+" xf/2" x94"<br />
Wlde Inflll boad (4)<br />
V{ xll" x471/2"<br />
\<br />
TOP<br />
sEcIt0l{<br />
\<br />
SCREEII<br />
sEcfl0il<br />
Mounung platc (2)<br />
3y4u atl2r x68"<br />
Post*<br />
!!2" x!1/2"<br />
* Actual post length<br />
wlll vary dependlng<br />
on settlng depth.<br />
WoRKBENCH O MAY I JUNE 1999 27


![Til]tl](https://img.yumpu.com/45878240/1/190x245/tiltl.jpg?quality=85)


