

Trre OnIGINAL HONAE WOOOWORKING RruN ... - Wood Tools
Trre OnIGINAL HONAE WOOOWORKING RruN ... - Wood Tools
Trre OnIGINAL HONAE WOOOWORKING RruN ... - Wood Tools

Create successful ePaper yourself
Turn your PDF publications into a flip-book with our unique Google optimized e-Paper software.
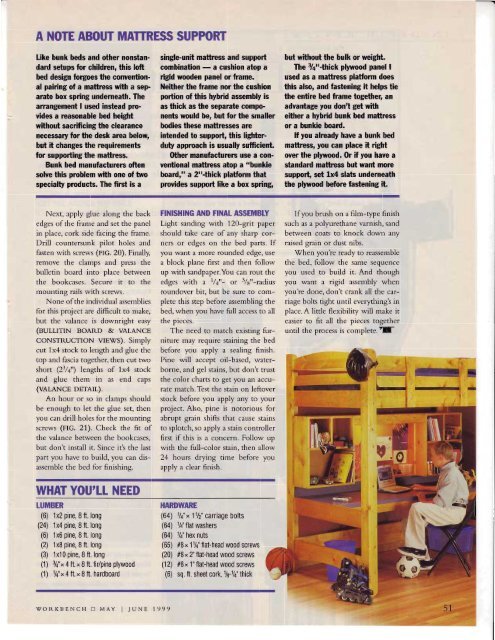
A NOTE ABOI'T MATTRESS SUPPORT<br />
Like bunk beds and other nonstan- single-unit mattrcss and support<br />
dard setups for childrcn, this loft combination - a cushion atop a<br />
bed design foEpes the convention- rigid wooden panel or frame.<br />
but without the bulk or weight.<br />
The<br />
al pairing of a mattrcss with a sep- Neither the frame nor the cushion<br />
arate box spring underneath. The<br />
arrangement I used instead pro-<br />
poilion of this hybtid assembly is<br />
as thick as the separate compovides<br />
a rcasonable bed helght nents would be, but for the smaller<br />
without sacrificing the clearance<br />
necessary for the desk arca beloq<br />
but it changes the rcquircments<br />
for suppoding the mattless.<br />
bodies these maftrcsses arc<br />
intended to suppott, this ligfiterduty<br />
approach is usually sufficient.<br />
0ther manufacturens use a con-<br />
Bunk bed manufacturcrc often<br />
solve this problem with one of two<br />
specialty products. The first is a<br />
ventional mattrcss atop a "bunkie<br />
board," a 2"-thick platform that<br />
prcvides support like a box spring,<br />
3A"-thick plywood panel I<br />
used as a mattrcss platform does<br />
this also, and fastening it helps tie<br />
the entire bed frame togethel an<br />
advantage you don't get with<br />
either a hybrid bunk bed mattress<br />
or a bunkie board.<br />
lf you alrcady have a bunk bed<br />
mattr€ss, you can place it dght<br />
over the plyrvood. 0r if you have a<br />
standad mattrcss but want morc<br />
support, set 1x4 slats underneath<br />
the plnvood before fastening it.<br />
Next, apply glue along the back<br />
edges of the frame and set the panel<br />
in place, cork side facing the frame.<br />
Drill countersunk pilot holes and<br />
fasten with screws (FIG. 20). Finally,<br />
remove the clamps and press the<br />
bulletin board into place between<br />
the bookcases. Secure it to the<br />
mounting rails with screws.<br />
None of the individual assemblies<br />
for this project are difficult to make,<br />
but the valance is downright easy<br />
(BULLITIN BOARD & VALANCE<br />
CoNSTRUCTION vIEwS). Simply<br />
cut 1x4 stock to length and glue the<br />
top and fascia together, then cut rwo<br />
short (2314") lengths of 1x4 stock<br />
and glue them in as end caps<br />
(VALANCE DETAIL).<br />
An hour or so in clamps should<br />
be enough to let the glue set, then<br />
you can drill holes for the mounting<br />
screws (FIG. 21). Check the fit of<br />
the valance between the bookcases,<br />
but don't install it. Since it's the last<br />
part you have to build, you can dis-<br />
assemble the bed for finishins.<br />
WHAT YOU'LL NEED<br />
TUMBER<br />
(6) 1x2 pine, 8 ft. long<br />
(24) 1x4 pine,8ft.long<br />
(6) 1x6 pine, 8 ft. long<br />
(2) 1x8 pine, 8 ft. long<br />
(3) 1x10 pine, 8 ft. long<br />
(1) 34 4 ft. x I ft. firlpine plywood<br />
"<br />
(1) % ,4 ft.x 8 ft. hardboard<br />
WORKBENCH ! MAY I TUNE 1999<br />
FINISHING A]{D FII{AL AIiSEIIIBIY<br />
Light sanding with 120-grit paper<br />
should take care of any sharp corners<br />
or edges on the bed parts. If<br />
you want a more rounded edge, use<br />
a block plane first and then follow<br />
up with sandpaper.You can rout the<br />
edges with a 1/4"- or 3/g"-radius<br />
Ifyou brush on a film-type finish<br />
such as a polyurethane varnish, sand<br />
between coats to knock down any<br />
raised grain or dust nibs.<br />
When you're ready to reassemble<br />
the bed, follow the same sequence<br />
you used to build it. And though<br />
you want a rigid assembly when<br />
roundover bit, but be sure to com- you're done, don't crank all the carplete<br />
this step before assembling the riage bolts tight until everything's in<br />
bed, when you have full access to all place. A little flexibiliry will make it<br />
the pieces.<br />
easier to fit all the pieces together<br />
The need to match existing fur- until the process is complete. L-<br />
niture may require staining the bed<br />
before you apply a sealing finish.<br />
Pine will accept oil-based, water-<br />
borne, and gel stains, but don't trust<br />
the color charts to get you an accu-<br />
rate match.Test the stain on leftover<br />
stock before you apply any to your<br />
project. Also, pine is notorious for<br />
abrupt grain shifts that cause stains<br />
to splotch, so apply a stain controller<br />
first if this is a concern. Follow up<br />
with the full-color stain, then allow<br />
24 hours drying time before you<br />
apply a clear finish.<br />
HANDWARE<br />
(64) Vq"x 11/2" carriage bolts<br />
(64) lA"flat washers<br />
(64) 1/i'hex nuts<br />
(65) #8,1V+ flat-head wood screws<br />
(20) #8x 2 flat-head wood screws<br />
(12) #8x 1 flat-head wood screws<br />
(6) sq. ft. sheet cork, Va-Vi tnick


![Til]tl](https://img.yumpu.com/45878240/1/190x245/tiltl.jpg?quality=85)


