Trre OnIGINAL HONAE WOOOWORKING RruN ... - Wood Tools
Trre OnIGINAL HONAE WOOOWORKING RruN ... - Wood Tools
Trre OnIGINAL HONAE WOOOWORKING RruN ... - Wood Tools
Create successful ePaper yourself
Turn your PDF publications into a flip-book with our unique Google optimized e-Paper software.
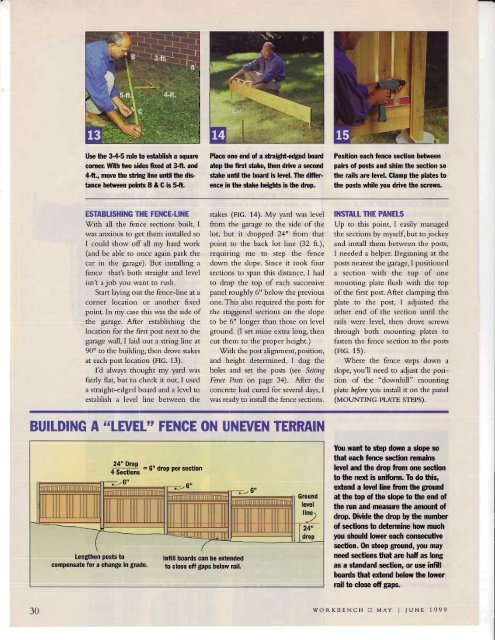
Use the 345 rule to establish a square<br />
corner. With two sides fixed at 3-ft. and<br />
&ft., move the string line until the dis<br />
tance betrveen points B & G is 5-ft.<br />
ESTABLISHING THE FENCE.TINE<br />
With all the Gnce sections built, I<br />
was anxious to get thern installed so<br />
I could show off all my hard work<br />
(and be able to once again park the<br />
car in the garage). But installing a<br />
fence that's both straight and level<br />
isn't a job you want to rush.<br />
Start laying out the fence-line at a<br />
corner location or another fixed<br />
point. In my case this was the side of<br />
the garage. After establishing the<br />
location for the first post next to the<br />
garage wall, I laid out a string line at<br />
90o to the building, then drove stakes<br />
at each post location (FIG. 13).<br />
I'd always thought my yard was<br />
fairly flat, but to check it out, I used<br />
a straight-edged board and a level to<br />
establish a level line between the<br />
Place one end of a stniglrt edgpd boad<br />
atop the first stake, then drive a second<br />
stake until the boad is level. The difrerence<br />
in the stake heietts is the drup.<br />
Position each fence section between<br />
pairs of posts and shim the section so<br />
the rails arc level. Clamp the plates to<br />
the posts while you drive the screws.<br />
stakes (RG. 14). My yard was level INSTAII IIIE PANETS<br />
from the garage to the side of the Up to this point, I easily managed<br />
lot, but it dropped 24" frorn that the sections by myself, but to jockey<br />
point to the back lot line (32 ft.), and install them between the posts,<br />
requiring me to step the fence I needed a helper. Beginning at the<br />
down the slope. Since it took four posts nearest the garage, I positioned<br />
sections to span this distance, I had a section with the top of one<br />
to drop the top of each successive mounting plate flush with the top<br />
panel roughly 6" below the previous of the first post. After clamping this<br />
one. This also required the posts for plate to the post, I adjusted the<br />
the staggered sections on the slope other end of the section until the<br />
to be 6" longer than those on level rails were level, then drove screws<br />
ground. (I set mine extra long, then through both mounting plates to<br />
cut then to the proper height.) fasten the fence section to the posts<br />
Wirh the posr alignnrenr, posirion, (Erc. 15).<br />
and height determined, I dug the Where the fence steps down a<br />
holes and set the posts (see Selllng slope, you'll need to adjust the posi-<br />
Fence Posts on page 34). After the tion of the "downhill" mounting<br />
concrete had cured for several days, I plate before you install it on the panel<br />
was ready to install the fence sections. (MOUNTING PLATE STEPS).<br />
BUILDING A "LEI/EL'' FENGE ON UNWEN TERRAIN<br />
Lengthen posts to<br />
compensate for a change in grade.<br />
Inflll boards can be extended<br />
to close off gaps below rail.<br />
You want to step down a slope so<br />
that each fence section rcmains<br />
level and the drup fiom one section<br />
to the next is unifiorm. To do this,<br />
extend a level line fiom the grcund<br />
at the top of the slope to the end of<br />
the run and measurc the amount of<br />
drcp. Divide the drcp by the number<br />
of sections to determine how much<br />
you should lorver each oonsecutiye<br />
section. On steep gnrund, you may<br />
need sections that arc half as long<br />
as a standad section, or use infill<br />
boads that extend below the lower<br />
rail to close off gaps.<br />
30 woF.KBENCH tr MAY I JUNE 1999


![Til]tl](https://img.yumpu.com/45878240/1/190x245/tiltl.jpg?quality=85)


