

Trre OnIGINAL HONAE WOOOWORKING RruN ... - Wood Tools
Trre OnIGINAL HONAE WOOOWORKING RruN ... - Wood Tools
Trre OnIGINAL HONAE WOOOWORKING RruN ... - Wood Tools

Create successful ePaper yourself
Turn your PDF publications into a flip-book with our unique Google optimized e-Paper software.
V2<br />
Fence<br />
upright<br />
58<br />
-33/e"<br />
When edges align,<br />
tighten clamps<br />
stading at center.<br />
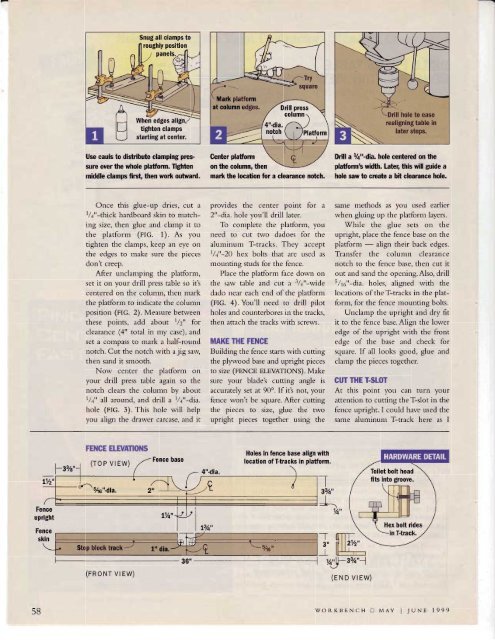
Use cauls to distribute clamping prcssure<br />
oyer the whole platform. lighten<br />
middle clamps first, then wodr outward.<br />
Once this glue-up dries, cut r<br />
l/+"-thick hardboard skin to nratch-<br />
ing size, then glue and clar.np it to<br />
the platfornr (ntc. 1). As you<br />
tighten tl.re clamps, keep ar.r eye' on<br />
thc cdqcs to rrr:rkc sr.rrc tlrc piccer<br />
don't creep.<br />
After unclamping the platfolnr,<br />
set it on your drill press table so it's<br />
centerec-l on the colunrn, then nrark<br />
the platfomi to indicate thc' colnnrn<br />
position (FIG. 2). Mc'asure between<br />
these points, add about |/2" for<br />
clearance (4" total ir-r nry case), and<br />
set a conrpass to lnark a half-round<br />
notch. Cut the r.rotch with a jig saw,<br />
then sand it snrooth.<br />
Now center tl-re platfornr or-r<br />
your drill press table agair.r so the<br />
notch clears the colunlr by about<br />
1/+" tll alound, and drill a l/4"-dia.<br />
hole (rtc. 3). This hole rvill help<br />
you align the drawer carcase, and it<br />
FENCE ELEVATIONS<br />
(TOP VrEW)<br />
h*u"n,..<br />
'<br />
Fence base<br />
Stop blocktrack-/ l" dla.<br />
(FRONT VrEW)<br />
7 4"-dia.<br />
madr the location for a clearance notch.<br />
provides the center point for r<br />
2"-dia. hole you'11 drill later.<br />
To conrplete the platform, you<br />
rreed to cut two dacloes fol the<br />
rlurrrirrunr T-trlcks. Tlrey lcccpt<br />
t/+"-20 l-rex bolts that alc used ls<br />
rrrourrtirrrl stLrds for thc [c'rrce.<br />
l)hce tl.re platfblnr fice down on<br />
the slw table and cut l r/+"-rvide<br />
dado ncar each end of the platfbrnr<br />
(FIG. 4). You'll r.reed to drill pilot<br />
holes and counterbores in tl're tmcks,<br />
then att;rch the tr;rcks with screr,vs.<br />
MAIG THE FENCE<br />
lluilding the fence starts with cuttin{:<br />
the plywood base ar-rd upright pieces<br />
to size (rnNCE ELEVATIONS). Make<br />
slrre your blade's cutting angle is<br />
:rccurately set at 90o. If it'.s not, your<br />
fence won't be square. After cutting<br />
tlre pieces to size, glue the two<br />
upright pieces together using the<br />
location of T-tracks in<br />
/:]\ )t. /<br />
*"vl<br />
I l3/q"<br />
\.r<br />
reallgnlng table In<br />
Drill a %"-dia, hole centered on the<br />
platform's width. [ate6 this will guide a<br />
hole saw to crcate a bit clearance hole.<br />
sanle nlethods as yolr used earlier<br />
when gluing up the platform hyers.<br />
lfhile the slue sets or1 the<br />
upright, place the fence base on the<br />
phtforr.n - align their back edges.<br />
Transfer the colunrn clearance<br />
notch to the fence base, ther-r cut it<br />
out and sand thc ope ning. Also, drill<br />
5/r(,"-c'lia.<br />
holes, aligned with the<br />
locltir.rns of the T-tracks in the plat-<br />
fomr, for the fence lnountins bolts.<br />
Unclar.np the upright and dry fit<br />
it to the fence base. Align the lower<br />
cdge of the r-rpright with the front<br />
eclgc of the base :rr-rd check for<br />
sqlrrre. If all looks good, glue and<br />
clamp the pieces togethcr'.<br />
CUT THE T.SIOT<br />
At this point you can tllrn your<br />
:rttention to cLltting the T-slot in the<br />
fence upright. I could have used the<br />
sanre aluminur-n Tltlack here as I<br />
vU, 3v*)<br />
(E N D VIEW)<br />
wor{KTJENCH tr MAY I JUNE 1999


![Til]tl](https://img.yumpu.com/45878240/1/190x245/tiltl.jpg?quality=85)


