

Trre OnIGINAL HONAE WOOOWORKING RruN ... - Wood Tools
Trre OnIGINAL HONAE WOOOWORKING RruN ... - Wood Tools
Trre OnIGINAL HONAE WOOOWORKING RruN ... - Wood Tools

Create successful ePaper yourself
Turn your PDF publications into a flip-book with our unique Google optimized e-Paper software.
Position each slat in the gooved<br />
screen cap, hold it firmly in place, and<br />
drive a screw to anchor the assembly.<br />
CUT THE ARCHED TOP RAII]S<br />
One of the most distinguishing fea-<br />
tures ofthis fence is the arched top<br />
rail. It was also the most fun to fab-<br />
ricate - especially after cutting all<br />
those slats.<br />
Laying out the curve requires a<br />
flexible wood strip that boatbuilders<br />
call a batten (see the Skill-Builder).1<br />
creared mine by ripping a l/a"-thick<br />
piece off the edge of a 1O-ft.-long<br />
cedar 2x4. Once I had the curve<br />
marked, I clamped the arched rail<br />
blanks together and gang-cut them<br />
with a jig saw (nIG. 7).This gave me<br />
two perfectly matched rails.<br />
Attach the arched rails to the slats<br />
just as you did the screen rails and<br />
infill boards. Screw through the slats<br />
into one arched rail (rIc. 8), then<br />
nail the opposing arched rail to that<br />
assembly (FIG. 9). Be sure to allow<br />
Glamp the top cap to the top section<br />
assembly and nail it in place. Drive 6d<br />
galvanized casing nails thtougft the<br />
cap and irto the arched rails.<br />
the slat ends to protrude 1/a" beyond<br />
the rails' top edges. ComPlete the<br />
top section by aligning the grooved<br />
top cap over the slats and nailing it<br />
in place (FIG. 10).<br />
COMBINE T}IE SECTIONS<br />
With the screen and top sections<br />
built, it's time to bring them together<br />
to complete a fence section.At first, I<br />
tried positioning the top section with<br />
the screen standing upright, but it was<br />
pretry awkward. It worked better if I<br />
laid the screen down flat and clamped<br />
the top section in posirion. Nail<br />
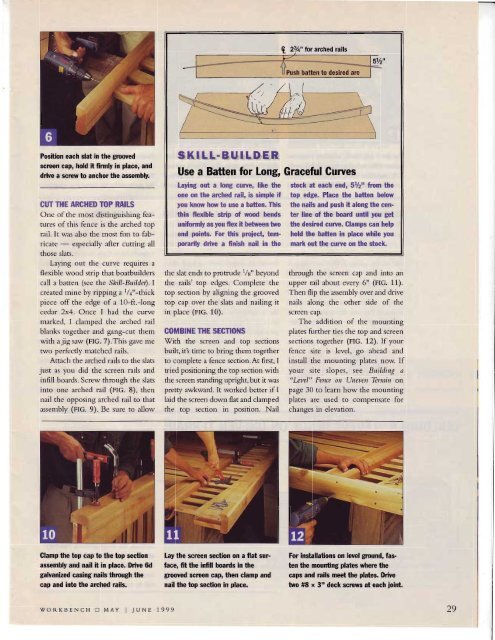
Push batten to deslred are<br />
SKITL.BUILDER<br />
Use a Batten for Long, Graceful Gurues<br />
Laying out a long curye' like the<br />
one on the arched rail, is simple if<br />
you know how to use a batien. This<br />
thin flexible strip of wood bends<br />
uniformly as you flex it betueen two<br />
end points. For this proiect' tem'<br />
porarily drive a finish nail in the<br />
Lay the scrcen section on a flat sur'<br />
face, fit the infill boards in the<br />
gfooved screen cap' then clamP and<br />
nail the top section in place.<br />
stock at each end, 5%" from the<br />
top edge. Place the batten below<br />
the nails and push it along the cen'<br />
ter line of the board urtil You get<br />
the desired curve. Clamps can helP<br />
hold the baften in place while You<br />
marlt out the curue on the stock.<br />
through the screen cap and into an<br />
upper rail about every 6" (FIG. 11).<br />
Then flip the assembly over and drive<br />
nails along the other side of the<br />
screen cap.<br />
The addition of the mounting<br />
plates further ties the top and screen<br />
sections together (FIG. 12). If your<br />
fence site is level, go ahead and<br />
install the mounting plates now. If<br />
your site slopes, see Building a<br />
"Level" Fence on Uneuen Tbrrain on<br />
page 30 to learn how the mounting<br />
plates are used to compensate for<br />
changes in elevation.<br />
For installations on level gound, fas<br />
ten the mounting plates wherc the<br />
caps and rails meet the plates. Drive<br />
two #8 x 3" deck scrcws at each ioint.<br />
WORKBENCH ! MAY I IUNE 1999 29


![Til]tl](https://img.yumpu.com/45878240/1/190x245/tiltl.jpg?quality=85)


