

Trre OnIGINAL HONAE WOOOWORKING RruN ... - Wood Tools
Trre OnIGINAL HONAE WOOOWORKING RruN ... - Wood Tools
Trre OnIGINAL HONAE WOOOWORKING RruN ... - Wood Tools

Create successful ePaper yourself
Turn your PDF publications into a flip-book with our unique Google optimized e-Paper software.
FITflilG IHE RAI]S<br />
Everything drilled and counterbored<br />
for the end frames? Great -<br />
now you can bolt those assemblies<br />
together. Press each carriage bolt in<br />
through an end leg and rail, and tap<br />
the head with a hammer to seat it.<br />
Then run a flat washer and nut onto<br />
the other end and tighten. Because<br />
the nut will be recessed in the<br />
counterbored hole, you'll need a<br />
ratchet wrench and a7/rctt socket.<br />
After you've assembled both end<br />
&ames, cut all of the longer stock to<br />
length. This group includes the rear<br />
foot rail, the desk rail and stretcher,<br />
two platform side rails, two mounting<br />
rails, and two safety rails.<br />
The most reliable way to get<br />
these parts attached to the end<br />
frames is to secure them with<br />
clamps, then drill through both the<br />
legs and rails at the same time -<br />
Glamp the long stock to the end frame Fasten 1112 cleats to the inside faces<br />
assembliGs and check fior alignment of the platfiorm rails. Theae support<br />
and squarc. Ihen drill the boft holes. the plnvood panel fior the mattrcs$<br />
the right place. Use a framing square<br />
to check alignment of the frame,<br />
then drill the<br />
just like you did with the end<br />
frames, but with one notable difference.<br />
Handling larger components<br />
- the longer stock and preassembled<br />
end frames - makes benchtop<br />
assembly impractical. You have to<br />
stand the end frames up to fit the<br />
rails into position, and recruiting<br />
someone else to help will make this<br />
task much easier. It can be done<br />
solo, but it will take longer.<br />
Even ifyou have to borrow a few<br />
clamps to do it, try to get all the<br />
long rails and stretchers positioned<br />
before you do any drilling. Having<br />
all the parts there w'ill make it easier<br />
to determine if everything's in<br />
l,/ail-dia.<br />
GUARD RAII Al{D LADDER<br />
holes through<br />
The guard rail assembly at the front<br />
of the bed bolts together like the bed<br />
the side legs and rails (EIc. 7).Watch frames (cuaru RAIL ELEVATIoN).<br />
the exceptions - the rails that get Cut 1x4 stock to length for the<br />
fastened with screws, for example, uprights and rails, and cut the curve<br />
and the front side legs, which dont on the rail corners with a jig saw.<br />
get safety rails.Unclamp the rails Like before, I did the drilling on the<br />
and repeat the counterbore procedure<br />
you used earlier for the end<br />
clamped-up assembly rather than on<br />
the individual parts, but now I had<br />
rails, but this time orient the jig for plenty of room to work, so I coun-<br />
the side rail ofiiet. Bolt the frame terbored and drilled (in that order)<br />
together now, but keep in mind that without having to unclamp the<br />
you'll be disassembling the bed later boards. Once I bolted the guard rails<br />
for finishing and final setup. and uprights together, I clamped this<br />
Complete the platform frame by assembly to the front platform rail,<br />
fastening support cleats to the plat- then drilled and bolted it in place.<br />
form rails (FIG. 8). I dso fitted the<br />
3/+"-thick plywood panel (uc. 9),<br />
The ladder is almost as simple to<br />
build as the guard rail assembly, but<br />
but didnt screw it to the cleats yet. it relies more on joinery than fas-<br />
Having the panel in place will keep teners (LADDER ELEVATToNS). To<br />
the whole bed assembly square as add strength, the rungs fit in dadoes<br />
you fit the desk top and other parts. in the uprights. I could have routed<br />
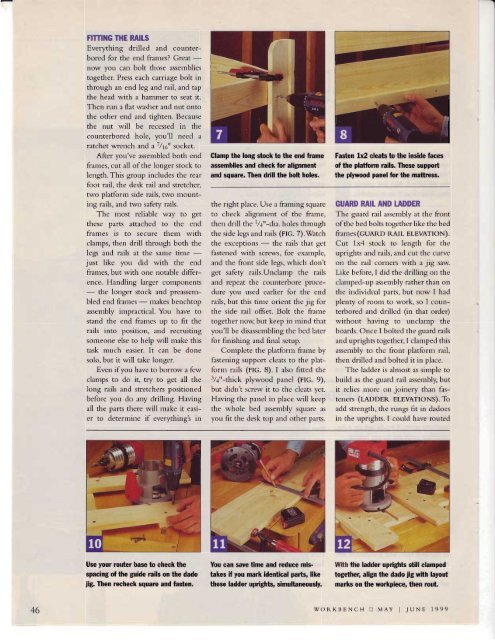
Use your rcuter base to check the<br />
spacing of the guide nils on lfte dado<br />
iig;' Ihen rccheck squan ard fasten.<br />
You can save time and rcduce mis'<br />
takes if you ma* identical pails, like<br />
these ladder uprighls, simultaneously.<br />
Wth the ladder upriglrts still clamped<br />
togpthef align the dado jig wih layout<br />
mads on the rvo*piece, then ruut<br />
46 WORKBENCH tr MAY I JUNE 1999


![Til]tl](https://img.yumpu.com/45878240/1/190x245/tiltl.jpg?quality=85)


