

Trre OnIGINAL HONAE WOOOWORKING RruN ... - Wood Tools
Trre OnIGINAL HONAE WOOOWORKING RruN ... - Wood Tools
Trre OnIGINAL HONAE WOOOWORKING RruN ... - Wood Tools

Create successful ePaper yourself
Turn your PDF publications into a flip-book with our unique Google optimized e-Paper software.
(FRONT<br />
VIEW)<br />
F- 93lro" +<br />
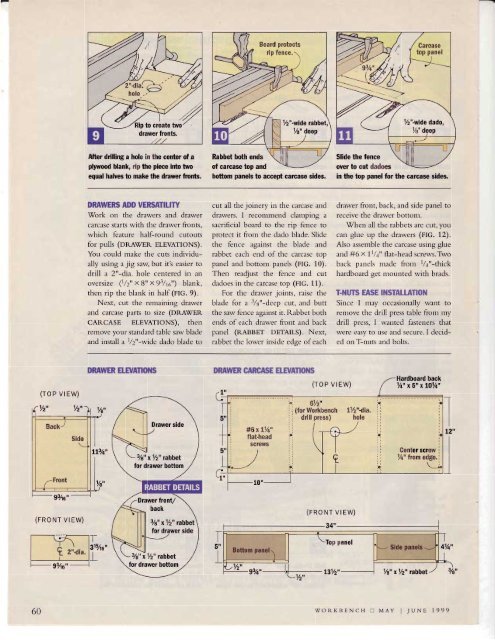
After ddlling a hole in the center of a<br />
pbrud blank, rip the piece into two<br />
equal halves to make the drawer fiorts.<br />
DRAWERS ADD VERSAIILITY<br />
Work on the drawers and drawer<br />
carcase starts with the drawer fronts,<br />
which feature haltround cutouts<br />
for pulls (onewEn ELEVATIoNS).<br />
You could make the cuts individually<br />
using a jig saw, but itt easier to<br />
drill a 2"-dia. hole centered in an<br />
oversize (1/2" x 8" x 93lte") blank,<br />
then rip the blank in half (FIG. 9).<br />
Next, cut the remaining drawer<br />
and carcase parts to size (oRewEn<br />
CARCASE ELEVATIONS), then<br />
remove your standard table saw blade<br />
and install a t/2"-wide dado blade to<br />
DRAWER B.E'ANONS<br />
f 315Aa"<br />
I<br />
3yr, a't/2,'rabbat<br />
for drawer bottom<br />
3/g" x1/2" rcbbel<br />
3/g" x1/2" rabbel<br />
for drawer bottom<br />
Board protects<br />
Rabbet both ends<br />
of carcase top and<br />
bottom panels to accept carcase sides.<br />
cut all the joinery in the carcase and<br />
drawers. I reconrmend clamping a<br />
sacrificial board to the rip Gnce to<br />
protect it from the dado blade. Slide<br />
the fence against the blade and<br />
rabbet each end of the carcase top<br />
panel and bottom panels (nIC. 10).<br />
Then readjust the fence and cut<br />
dadoes in the carcase top (FIG. 11).<br />
For the drawer joints, raise the<br />
blade for a 3/g"-deep cut, and butt<br />
the saw fence against it. Rabbet both<br />
ends of each drawer front and back<br />
panel (nennET DETAILS). Next,<br />
rabbet the lower inside edee of each<br />
DRAI'VER GARCASE EtilANOM;<br />
T<br />
5"<br />
I<br />
34"<br />
Slide the fence<br />
over to cut dadoes<br />
in the top panel for the carcase sides.<br />
drawer front, back, and side panel to<br />
receive the drawer bottom.<br />
When all the rabbets are cut, you<br />
can glue up the drawers (FIG. 12).<br />
Also assemble the carcase using glue<br />
and#6x 71/4" flat-head screws.Tko<br />
back panels made from l/4"-thick<br />
hardboard get mounted with brads.<br />
(FRONT VrEW)<br />
T.I{IJTS EASE INSTATLATION<br />
Since I may occasionally want to<br />
remove the drill press table from my<br />
drill press, I wanted fasteners that<br />
were easy to use and secure. I decided<br />
onT-nuts and bolts.<br />
(TOP VrEW)<br />
e"/n"-4t.' rtVr" Ta" xY2" rcbbet<br />
60 wORKBENcH tr MAY I IUNE 1999


![Til]tl](https://img.yumpu.com/45878240/1/190x245/tiltl.jpg?quality=85)


