

Trre OnIGINAL HONAE WOOOWORKING RruN ... - Wood Tools
Trre OnIGINAL HONAE WOOOWORKING RruN ... - Wood Tools
Trre OnIGINAL HONAE WOOOWORKING RruN ... - Wood Tools

Create successful ePaper yourself
Turn your PDF publications into a flip-book with our unique Google optimized e-Paper software.
28<br />
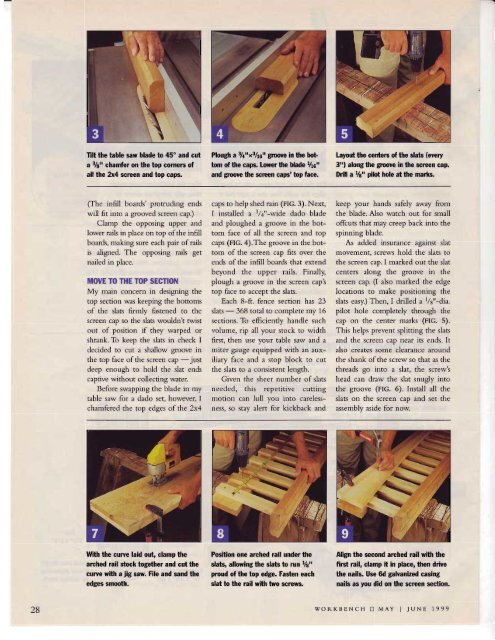
Iilt the table saw blade to 45' and cut<br />
a 3/s" chamfer on the top comerc of<br />
all the 2x4 scrcen and top caps.<br />
(The infill boards' protruding ends<br />
will fit into a grooved screen cap.)<br />
Clamp the opposing upper and<br />
lower rails in place on top of the infill<br />
boards, making sure each pair of rails<br />
is aligned. The opposing rails get<br />
nailed in place.<br />
MOVE TO THE TOP SECTIOiI<br />
My main concern in designing the<br />
top section was keeping the bottoms<br />
of the slats firmly fastened to the<br />
screen cap so the slets wouldnt twist<br />
out of position if they warped or<br />
shrank. To keep the slas in check I<br />
decided to cut a shallow groove in<br />
the top face of the screen cap - just<br />
deep enough to hold the slat ends<br />
captive without collecting water.<br />
Before swapping the blade in my<br />
table saw for a dado set, however, I<br />
chamfered the top edges ofthe 2x4<br />
With the cune laid ont, clamp the<br />
archd rail stock together and cut the<br />
cune with a iig saw. File and sand the<br />
edges smooth.<br />
Pfough a !4'x3ls,u gowe in the bottom<br />
of the caps. Lover the blade Vte"<br />
and gruwe the scrcen capst top face.<br />
layout the ceilerc of the s|ats (every<br />
3"1 along the gnove in the scrcen cap.<br />
Drill a Ve" pilot hole at the marks.<br />
caps to help shed rain (rIG. 3). Next,<br />
I installed 2 314"-titde dado blade<br />
keep your hands safely away from<br />
the blade. Also watch out for small<br />
and ploughed a groove in the bot- offcuts that may creep back into the<br />
tom face of all the screen and top spinning blade.<br />
caps (rIG. 4).The groove in the bot- As added insurance against slat<br />
tom of the screen cap fits over the movement, screws hold the slats to<br />
ends ofthe infill boards that extend the screen cap. I marked out the slat<br />
beyond the upper rails. Finally, centers along the groove in the<br />
plough a groove in the screen cap's screen cap. (I also marked the edge<br />
top face to accept the slats.<br />
locations to make positioning the<br />
Each S-ft. fence section has 23 slats easy.) Then, I drilled a<br />
slats - 368 total to complete my 16<br />
sections. To eficiendy handle such<br />
volume, rip all your stock to width<br />
first, then use your table saw and a<br />
miter gauge equipped with an auxiliary<br />
face and a stop block to cut<br />
the slats to a consistent length.<br />
Given the sheer number of slats<br />
needed, this repetitive cutting<br />
motion can lull you into carelessness,<br />
so stay alert for kickback and<br />
t/s"-dta.<br />
pilot hole completely through the<br />
cap on the center marks (EtC. 5).<br />
This helps prevent splitting the slats<br />
and the screen cap near its ends. It<br />
also creates some clearance around<br />
the shank ofthe screw so that as the<br />
threads go into a slat, the screw's<br />
head can draw the slat snugly into<br />
the groove (FIG. 6). Install all the<br />
slats on the screen cap and set the<br />
assembly aside for now.<br />
Position one arched rail under the<br />
slats, allowingthe slats to nrn Vs"<br />
prcud of the top edge. Fasten each<br />
slat to the rail with trvo scrcws.<br />
Align the second arched rail with the<br />
first rail, clamp it in place, then drive<br />
the nails. Use 6d gahanized casing<br />
nails as you did on the screen sestion.<br />
WORKBENCH ! MAY I IUNE 1999


![Til]tl](https://img.yumpu.com/45878240/1/190x245/tiltl.jpg?quality=85)


