Trre OnIGINAL HONAE WOOOWORKING RruN ... - Wood Tools
Trre OnIGINAL HONAE WOOOWORKING RruN ... - Wood Tools
Trre OnIGINAL HONAE WOOOWORKING RruN ... - Wood Tools
You also want an ePaper? Increase the reach of your titles
YUMPU automatically turns print PDFs into web optimized ePapers that Google loves.
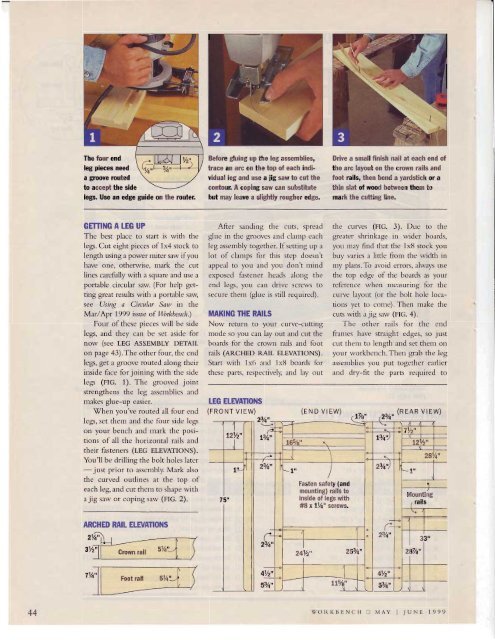
The four end<br />
leg pieces need<br />
a grcove routed<br />
to accept the side<br />
legs. Use an edge guide on the routen<br />
GE]TING A LEG<br />
UP<br />
The best place to start is with the<br />
legs. Cut eight pieces of 1x4 stock to<br />
length using a power miter saw ifyou<br />
have one. otherwise. mark the cut<br />
lines carefully with a square and use a<br />
portable circular saw. (For help get-<br />
ting great results with a portable saw,<br />
see Using a Circular Sar.y in the<br />
Mar/Apr 1999 issue of Workbench.)<br />
Four of these pieces will be side<br />
legs, and they can be set aside for<br />
now (see LEG ASSEMBLY DETAIL<br />
on page 43).The other four, the end<br />
legs, get a groove routed along their<br />
inside face for joining with the side<br />
Iegs (rtc. 1). The grooved joint<br />
strengthens the leg assemblies and<br />
makes glue-up easier.<br />
When you've routed all four end<br />
legs, set them and the four side legs<br />
on your bench and mark the posi-<br />
tions of all the horizontal rails and<br />
their fasreners (rEc ELEVATTONS).<br />
You'Il be drilling the bolt holes later<br />
- just prior to assembly. Mark also<br />
the curved outlines at the top of<br />
each leg, and cut them to shape with<br />
ajig saw or coping saw (rtc. 2).<br />
ARCHED RAIL ELEIIATIONS<br />
,'2"\_r<br />
tr1;<br />
Before gluing up the leg assemblies,<br />
trace an arc on the top of each individual<br />
leg and use a jig saw to cut the<br />
contour. A coping saw can substitute<br />
but may leave a slightly rougher edge.<br />
After sanding the cuts, spread<br />
glue in the grooves and clamp each<br />
leg assembly together. If serting up a<br />
lot of clamps for this step doesn't<br />
appeal to you and you don't mind<br />
exposed fastener heads along the<br />
end legs, you can drive screws to<br />
secure then (glue is still required).<br />
MAIflNG THE RAITS<br />
Now return to your curve-cutting<br />
nrode so you can lay out and cut the<br />
boards for the crown rails and foot<br />
rails (an.CHED RArL ELEVATToNS).<br />
Start with 1x6 and 1x8 boards for<br />
these parts, respectively, and lay out<br />
HG EInIANONS<br />
(FRONT<br />
VIEW)<br />
Ilrive a small finish nail at each end of<br />
the arc layout on the crown rails and<br />
foot rails, then bend a yardstick or a<br />
thin slat of wood between them to<br />
mark the cutting line.<br />
the curves (FIG. 3). Due to the<br />
greater shrinkage in wider boards,<br />
you nlay find that the 1x8 stock you<br />
buy varies a little from the width in<br />
my plans. To avoid errors, always use<br />
the top edge of the boards as your<br />
reference when nreasuring for the<br />
curve layout (or the bolt hole loca-<br />
tions yet to come). Then nake the<br />
cuts with a jig saw (Etc.4).<br />
The other rails for the end<br />
frames have straight edges, so just<br />
cut thenl to length and set them on<br />
your workbench.Then grab the leg<br />
assemblies you put together earlier<br />
and dry-fit the parts required to<br />
(END VIEW) (REAR VrEW)<br />
Fasten safeg (and<br />
mounting) rails to<br />
inside of legs wath<br />
#8 x 17a" sqews.<br />
Mounting<br />
44 woRKBENcH tr MAy I JUNE 1999


![Til]tl](https://img.yumpu.com/45878240/1/190x245/tiltl.jpg?quality=85)


