

Trre OnIGINAL HONAE WOOOWORKING RruN ... - Wood Tools
Trre OnIGINAL HONAE WOOOWORKING RruN ... - Wood Tools
Trre OnIGINAL HONAE WOOOWORKING RruN ... - Wood Tools

Create successful ePaper yourself
Turn your PDF publications into a flip-book with our unique Google optimized e-Paper software.
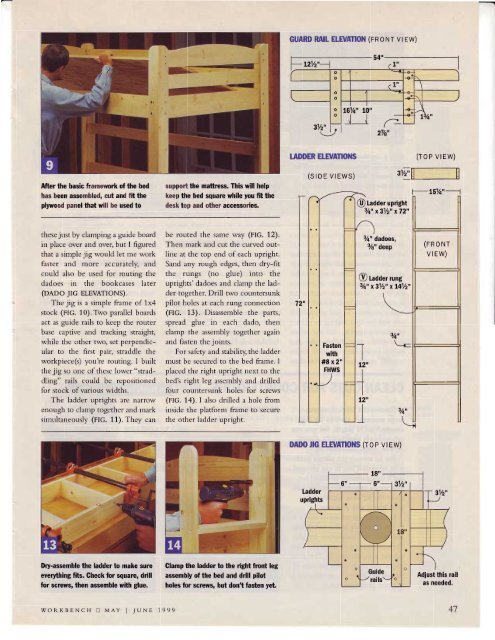
After the basic framework of the bed<br />
has been assembled, cut and fit the<br />
plylood panel that will be used to<br />
these just by clamping a guide board<br />
in place over and over, but I figured<br />
that a simple jig would let me work<br />
faster and more accurately, and<br />
could also be used for routing the<br />
dadoes in the bookcases later<br />
(DADO JrG ELEVATIONS).<br />
The jig is a simple frame of 1x4<br />
stock (rtc. 10).Two parallel boards<br />
act as guide rails to keep the router<br />
base captive and tracking straight,<br />
while the other two, set perpendicular<br />
to the first pair, straddle the<br />
workpiece(s) you're routing. I built<br />
the jig so one of these lower "straddling"<br />
rails could be repositioned<br />
for stock of various widths.<br />
The ladder uprights are narrow<br />
enough to clamp together and mark<br />
simultaneously (FIG. 11).They can<br />
Dry-assemble the ladder to make sure<br />
eyerything fits. Gheck for square, drill<br />
for scrcws, then assemble wtth glue.<br />
support the mattrtss. This will help<br />
keep the bed squarc while you fit the<br />
desk top and other accessories.<br />
be routed the same way (FIc. 12).<br />
Then mark and cut the curved out-<br />
line at the top end ofeach upright.<br />
Sand any rough edges, then dry-fit<br />
the rungs (no glue) into the<br />
uprights'dadoes and clamp the lad-<br />
der together. Drill two countersunk<br />
pilot holes at each rung connection<br />
(FIG. 13). Disassemble the parts,<br />
spread glue in each dado, then<br />
clamp the assembly together again<br />
and fasten the joints.<br />
For safety and stabiliry the ladder<br />
must be secured to the bed frame. I<br />
placed the right upright next to the<br />
bed's right leg assembly and drilled<br />
four countersunk holes for screws<br />
(FIG. 14). I also drilled a hole from<br />
inside the platform frame to secure<br />
the other ladder upright.<br />
Glamp the ladder to the dglrt front leg<br />
assembly of the bed and ddll pilot<br />
holes for screws, but dontt fasten yet.<br />
GUARD RAII ELEVANON (FRONT VIEW)<br />
3',/tt I<br />
LADDER EIWANOilS<br />
(srDE vrEWS)<br />
Fasten<br />
wlth<br />
#8x2"<br />
FHWS<br />
sw<br />
Oladder uprlght<br />
3/4"<br />
xgV2" x72"<br />
7+" dadoes,<br />
3/8,,<br />
deep<br />
@ !rdd., tung<br />
314n x31/2" xl4Vz"<br />
I 12"<br />
I 12"<br />
j<br />
DAIX)llc EtEllATlolils (roP vtEW)<br />
[;;r--l<br />
(roP vrEW)<br />
w----1<br />
l-\51/q"----<br />
WORKBENCH ! MAY I TUNE 1999 47


![Til]tl](https://img.yumpu.com/45878240/1/190x245/tiltl.jpg?quality=85)


