

Trre OnIGINAL HONAE WOOOWORKING RruN ... - Wood Tools
Trre OnIGINAL HONAE WOOOWORKING RruN ... - Wood Tools
Trre OnIGINAL HONAE WOOOWORKING RruN ... - Wood Tools

Create successful ePaper yourself
Turn your PDF publications into a flip-book with our unique Google optimized e-Paper software.
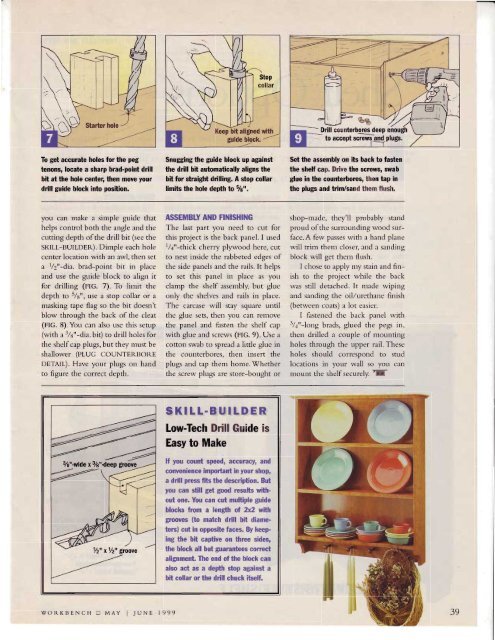
Iio get accurate holes for the peg<br />
tenons, locate a sharp brad-point ddll<br />
bit at the hole certer, then move your<br />
drill guide block irto position.<br />
you can make a simple guide that<br />
helps control both the angle and the<br />
cutting depth of the drill bit (see the<br />
SKILL-BUILDER). Dimple each hole<br />
center location with an awl, then set<br />
a 1/2"-dit. brad-point bit in place<br />
and use the guide block to align it<br />
for drilling (rIc. 7). To limit the<br />
depth to 5/8", use a stop collar or a<br />
masking tape flag so the bit doesn't<br />
blow through the back of the cleat<br />
(nc. 8).You can also use this setup<br />
(with a 3/e"-dia.bit) to drill holes for<br />
the shelf cap plugs, but they must be<br />
shallower (PLUG CoUNTERBoRE<br />
DETAIL). Have your plugs on hand<br />
to figure the correct depth.<br />
3/8"{lde x 3/a"{eep gruove<br />
Keep blt allgned wlth<br />
SnugEing the guide block up against<br />
the drill bit automatically aligns the<br />
bit for stralgiltt drilling. A stop collar<br />
limits the hole depth to 5/e".<br />
ASSEMBLY AND FINISHING<br />
The last part you need to cut for<br />
this project is the back panel. I used<br />
1/+"-thick cherry plywood here, cut<br />
to nest inside the rabbeted edges of<br />
the side panels and the rails. It helps<br />
to set this panel in place as you<br />
clamp the shelf assembly, but glue<br />
only the shelves and rails in place.<br />
The carcase will stay square until<br />
the glue sets, then you can remove<br />
the panel and fasten the shelf cap<br />
with glue and screws (rIc. 9). Use a<br />
cotton swab to spread a little glue in<br />
the counterbores, then insert the<br />
plugs and tap them home.Whether<br />
the screw plugs are store-bought or<br />
SKItt.BUILDER<br />
Low-Tech Drill Guide is<br />
Easy to Make<br />
lf you count speed, accuracy, and<br />
convenience important in your shop,<br />
a drill prcss fits the descrip,tion. But<br />
you can still get good results without<br />
one. You can cut multiple guide<br />
blocks from a length st M, wilh<br />
gnxrves lto match drill bit diameterc)<br />
cut in opposite faces. By keep<br />
ing the bit captive on three sides,<br />
the block all but guarartees correc't<br />
alignmert. The end of the block can<br />
also act as a depth stop against a<br />
bit collar or the drill chuck itself.<br />
Set the assembly on its back to fasten<br />
the shelf cap. Drive the scrcws, swab<br />
glue in the courterborcs, then tap in<br />
the plugs and trim/sand them flush.<br />
shop-made, they'll probably stand<br />
proud of the surrounding wood sur-<br />
face. A few passes with a hand plane<br />
will trim them closer, and a sanding<br />
block will get them flush.<br />
I chose to apply my stain and fin-<br />
ish to the project while the back<br />
was still detached. It made wiping<br />
and sanding the oillurethane finish<br />
(between coats) a lot easter.<br />
I fastened the back panel with<br />
3/4"-long brads, glued the pegs in,<br />
then drilled a couple of mounting<br />
holes through the upper rail. These<br />
holes should correspond to stud<br />
locations in your wall so you can<br />
mount the shelf securely. t[<br />
WORKBENCH ! MAY I IUNE 1999 39


![Til]tl](https://img.yumpu.com/45878240/1/190x245/tiltl.jpg?quality=85)


