21 TRV Fireplace - Lopi
21 TRV Fireplace - Lopi
21 TRV Fireplace - Lopi

Create successful ePaper yourself
Turn your PDF publications into a flip-book with our unique Google optimized e-Paper software.
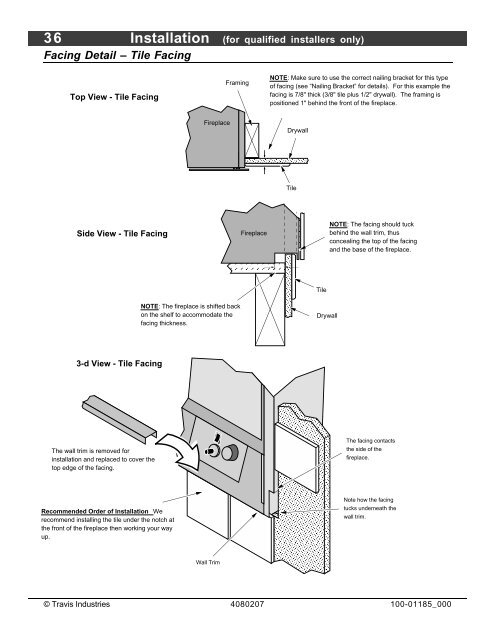
36 Installation (for qualified installers only)<br />
Facing Detail – Tile Facing<br />
Top View - Tile Facing<br />
Side View - Tile Facing<br />
3-d View - Tile Facing<br />
The wall trim is removed for<br />
installation and replaced to cover the<br />
top edge of the facing.<br />
Recommended Order of Installation We<br />
recommend installing the tile under the notch at<br />
the front of the fireplace then working your way<br />
up.<br />
<strong>Fireplace</strong><br />
Framing<br />
NOTE: Make sure to use the correct nailing bracket for this type<br />
of facing (see “Nailing Bracket” for details). For this example the<br />
facing is 7/8" thick (3/8" tile plus 1/2" drywall). The framing is<br />
positioned 1" behind the front of the fireplace.<br />
Drywall<br />
<br />
<br />
<br />
© Travis Industries 4080207 100-01185_000<br />
Tile<br />
<br />
<br />
<br />
<strong>Fireplace</strong> <br />
<br />
<br />
<br />
<br />
NOTE: The fireplace is shifted back<br />
on the shelf to accommodate the<br />
facing thickness. <br />
Wall Trim<br />
Tile<br />
Drywall<br />
<br />
<br />
<br />
<br />
<br />
<br />
<br />
<br />
<br />
<br />
<br />
<br />
<br />
<br />
<br />
<br />
<br />
<br />
<br />
<br />
<br />
<br />
NOTE: The facing should tuck<br />
behind the wall trim, thus<br />
concealing the top of the facing<br />
and the base of the fireplace.<br />
The facing contacts<br />
the side of the<br />
fireplace.<br />
Note how the facing<br />
tucks underneath the<br />
wall trim.