21 TRV Fireplace - Lopi
21 TRV Fireplace - Lopi
21 TRV Fireplace - Lopi

You also want an ePaper? Increase the reach of your titles
YUMPU automatically turns print PDFs into web optimized ePapers that Google loves.
e<br />
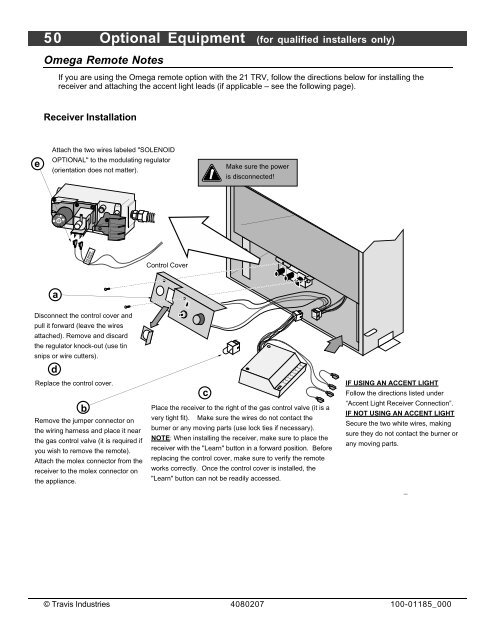
50 Optional Equipment (for qualified installers only)<br />
Omega Remote Notes<br />
If you are using the Omega remote option with the <strong>21</strong> <strong>TRV</strong>, follow the directions below for installing the<br />
receiver and attaching the accent light leads (if applicable – see the following page).<br />
Receiver Installation<br />
Attach the two wires labeled "SOLENOID<br />
OPTIONAL" to the modulating regulator<br />
(orientation does not matter).<br />
a<br />
SOLENOID<br />
(OPTIONAL)<br />
Disconnect the control cover and<br />
pull it forward (leave the wires<br />
attached). Remove and discard<br />
the regulator knock-out (use tin<br />
snips or wire cutters).<br />
d<br />
Replace the control cover.<br />
b<br />
Remove the jumper connector on<br />
the wiring harness and place it near<br />
the gas control valve (it is required if<br />
you wish to remove the remote).<br />
Attach the molex connector from the<br />
receiver to the molex connector on<br />
the appliance.<br />
Control Cover<br />
c<br />
Make sure the power<br />
is disconnected!<br />
Place the receiver to the right of the gas control valve (it is a<br />
very tight fit). Make sure the wires do not contact the<br />
burner or any moving parts (use lock ties if necessary).<br />
NOTE: When installing the receiver, make sure to place the<br />
receiver with the "Learn" button in a forward position. Before<br />
replacing the control cover, make sure to verify the remote<br />
works correctly. Once the control cover is installed, the<br />
"Learn" button can not be readily accessed.<br />
IF USING AN ACCENT LIGHT<br />
Follow the directions listed under<br />
“Accent Light Receiver Connection”.<br />
IF NOT USING AN ACCENT LIGHT<br />
Secure the two white wires, making<br />
sure they do not contact the burner or<br />
any moving parts.<br />
© Travis Industries 4080207 100-01185_000