Appendix A Standard Operating Procedures - University of Rhode ...
Appendix A Standard Operating Procedures - University of Rhode ...
Appendix A Standard Operating Procedures - University of Rhode ...

Create successful ePaper yourself
Turn your PDF publications into a flip-book with our unique Google optimized e-Paper software.
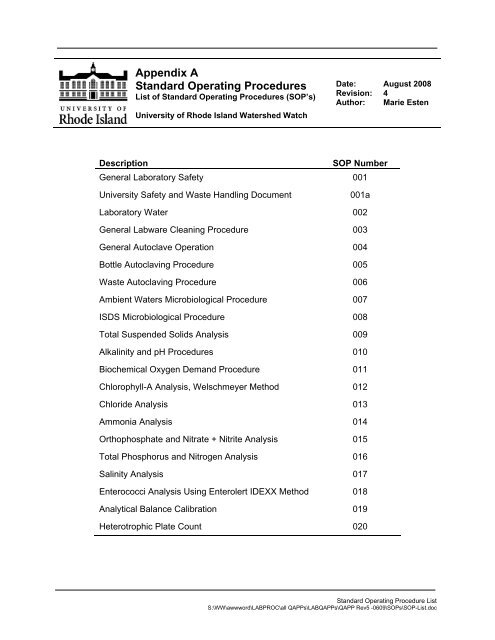
<strong>Appendix</strong> A<br />
<strong>Standard</strong> <strong>Operating</strong> <strong>Procedures</strong><br />
List <strong>of</strong> <strong>Standard</strong> <strong>Operating</strong> <strong>Procedures</strong> (SOP’s)<br />
<strong>University</strong> <strong>of</strong> <strong>Rhode</strong> Island Watershed Watch<br />
Date:<br />
Revision:<br />
Author:<br />
Description SOP Number<br />
General Laboratory Safety 001<br />
<strong>University</strong> Safety and Waste Handling Document 001a<br />
Laboratory Water 002<br />
General Labware Cleaning Procedure 003<br />
General Autoclave Operation 004<br />
Bottle Autoclaving Procedure 005<br />
Waste Autoclaving Procedure 006<br />
Ambient Waters Microbiological Procedure 007<br />
ISDS Microbiological Procedure 008<br />
Total Suspended Solids Analysis 009<br />
Alkalinity and pH <strong>Procedures</strong> 010<br />
Biochemical Oxygen Demand Procedure 011<br />
Chlorophyll-A Analysis, Welschmeyer Method 012<br />
Chloride Analysis 013<br />
Ammonia Analysis 014<br />
Orthophosphate and Nitrate + Nitrite Analysis 015<br />
Total Phosphorus and Nitrogen Analysis 016<br />
Salinity Analysis 017<br />
Enterococci Analysis Using Enterolert IDEXX Method 018<br />
Analytical Balance Calibration 019<br />
Heterotrophic Plate Count 020<br />
August 2008<br />
4<br />
Marie Esten<br />
<strong>Standard</strong> <strong>Operating</strong> Procedure List<br />
S:\WW\awwword\LABPROC\all QAPPs\LABQAPPs\QAPP Rev5 -0609\SOPs\SOP-List.doc
<strong>Standard</strong> <strong>Operating</strong> Procedure 001<br />
General Laboratory Safety<br />
<strong>University</strong> <strong>of</strong> <strong>Rhode</strong> Island Watershed Watch<br />
1.0 PURPOSE AND DESCRIPTION<br />
Date:<br />
Revision:<br />
Author:<br />
11/04<br />
1<br />
Linda Green<br />
LAB SAFETY IS EVERYBODY’S JOB! Please be sure to familiarize yourself with these general<br />
procedures, as well as the specific handling requirements included in the <strong>Standard</strong> <strong>Operating</strong><br />
Procedure (SOP) for each analysis/process. Further general information regarding <strong>University</strong> <strong>of</strong><br />
<strong>Rhode</strong> Island standards for health and safety are found in SOP 001a – <strong>University</strong> Safety and<br />
Waste Handling Document.<br />
2.0 HEALTH AND SAFETY<br />
2.1 Emergency Numbers:<br />
EMERGENCIES: 874-2121<br />
UNCONTAINED SPILLS: 874- 2618<br />
GENERAL HEALTH AND SAFETY INFORMATION<br />
URI SAFETY AND RISK: 874-2618<br />
2.2 General Health and Safety Information<br />
1. Eye protection, gloves and lab coats are REQUIRED in this laboratory when working with<br />
chemicals.<br />
2. Closed-toed shoes are REQUIRED whenever you are working in the lab. Even if you are<br />
just entering data.<br />
3. Know where the accident and safety equipment is:<br />
1 <strong>of</strong> 2<br />
First–aid kit:<br />
i. Behind the sink in room 018.<br />
ii. On top <strong>of</strong> the refrigerator in room 002.<br />
iii. On top <strong>of</strong> the refrigerator in room 019.<br />
Safety shower: next to the entry door <strong>of</strong> each laboratory.<br />
Eye wash: at main sink in each laboratory.<br />
Yellow Spill pads:<br />
i. Under the laboratory bench to the right <strong>of</strong> blue oven in room 018.<br />
ii. Next to the main sink in room 002.<br />
iii. On top <strong>of</strong> the refrigerator in room 019<br />
General Laboratory Safety SOP 001<br />
S:\WW\awwword\LABPROC\all QAPPs\LABQAPPs\QAPP Rev5 -0609\SOPs\SOP 001 Safety-mod.doc
4. Report ANY accidents IMMEDIATELY to Linda Green (874-2905) or Elizabeth Herron (874-<br />
4552). If neither are available, first contact staff in the Cooperative Extension Water Quality<br />
Suite (room 001), Dr. Art Gold (874-2903) or department secretary (874-2026). Report all<br />
emergencies to 874-2121.<br />
5. If you spill anything hazardous on yourself immediately flush it with water for 15 minutes.<br />
Report all emergencies to 874-2121. Uncontained spills should be reported to 874-2618.<br />
6. Concentrated acids and bases are ALWAYS handled in a fume hood, with the door below<br />
face level.<br />
7. Wastes are ALWAYS stored in the lab in which they are generated (i.e. acetone waste in the<br />
fluorometer lab, autoanalyzer waste in the instrument lab, etc.). Do not transport wastes<br />
from one lab to another. All wastes must have a <strong>University</strong> <strong>of</strong> <strong>Rhode</strong> Island (URI) Safety<br />
and Health label on them.<br />
8. Liquid wastes must have secondary containment adequate for the full volume <strong>of</strong> waste.<br />
9. When waste containers are nearing full (~ 80% for high volume wastes or 90% for low<br />
volume wastes), coordinate with Linda Green or Elizabeth Herron to have them removed.<br />
Be sure all waste containers are properly and completely labeled at all times.<br />
10. Whenever possible use a cart to transport water samples and/or reagents.<br />
11. All chemicals must be properly labeled and stored at all times. Hazardous labels must<br />
indicate in English what harm the chemical represents (ie corrosive).<br />
12. Liquid chemicals can not be stored above eye level.<br />
13. If you have any safety or environmental questions, call URI Safety and Risk at 874-2618.<br />
14. All URI Watershed Watch (WW) staff including student technicians are required to<br />
successfully complete URI’s “Environmental Awareness and Initial Waste Training” course<br />
within their first 6 months <strong>of</strong> employment. Subsequently, all URIWW staff including student<br />
technicians are required to successfully complete URI’s annual refresher course: “Prudent<br />
Practices and Laboratory Waste Management”. Certificates attesting to successful<br />
completion are posted in URIWW laboratories.<br />
2 <strong>of</strong> 2<br />
General Laboratory Safety SOP 001<br />
S:\WW\awwword\LABPROC\all QAPPs\LABQAPPs\QAPP Rev5 -0609\SOPs\SOP 001 Safety-mod.doc
<strong>Standard</strong> <strong>Operating</strong> Procedure<br />
001a<br />
<strong>University</strong> Safety and Waste<br />
Handling Document<br />
(downloaded 6/24/09)<br />
<strong>University</strong> <strong>of</strong> <strong>Rhode</strong> Island Watershed Watch<br />
Date:<br />
Revision:<br />
Author:<br />
5/99<br />
2<br />
URI Safety &<br />
Risk<br />
UNIVERSITY OF RHODE ISLAND DEPARTMENT OF SAFETY & RISK MANAGEMENT<br />
STANDARD OPERATING PROCEDURE<br />
SUBJECT: Hazardous Materials & Chemical Waste Number: 99-5-9<br />
POLICY: This policy provides for the disposal <strong>of</strong> hazardous materials and chemical waste in accordance<br />
with all Federal and State regulations.<br />
APPLICABILITY: Faculty, Staff, Employees, Students, Guests. This policy applies to URI Kingston Campus,<br />
Narragansett Bay Campus (GSO), W. Alton Jones Campus, and Providence CCE Campus. Further, it applies<br />
to all departments and organizations on each <strong>of</strong> these campuses. All laboratory chemicals, oil-based paint,<br />
paint solvents, photographic chemicals, preservatives used for biological specimens, and any hazardous<br />
waste material listed or identified in Title 40 Code <strong>of</strong> Federal Regulations, Part 261, or any materials which<br />
exhibits the characteristics <strong>of</strong> ignitability, corrosivity, reactivity, or toxicity is covered by this policy.<br />
PURPOSE: To provide for the proper disposal <strong>of</strong> hazardous materials and chemical waste according to<br />
Federal and State hazardous waste disposal regulations. Failure to comply may result in civil, criminal,<br />
or administrative penalties for the <strong>University</strong>.<br />
PROCEDURE:<br />
Federal law requires that once a chemical is declared to be hazardous chemical waste, it must be<br />
removed from the campus within ninety (90) days. The <strong>University</strong> <strong>of</strong> <strong>Rhode</strong> Island is not permitted to treat<br />
or dispose <strong>of</strong> hazardous waste locally. It is illegal to dispose <strong>of</strong> hazardous chemical waste by evaporation,<br />
disposal down the sink drain to the sewer, or throwing it in the trash. Personnel from the Department <strong>of</strong><br />
Safety and Risk Management collect, transport, and store hazardous chemical waste prior to final disposal<br />
by a licensed hazardous materials vendor.<br />
All faculty must establish laboratory waste management programs for the laboratories they teach.<br />
The waste should be collected at the end <strong>of</strong> each class and each student must be made responsible for<br />
disposing <strong>of</strong> the waste material to the appropriate containers. Principal Investigators are responsible for the<br />
waste generated in the research laboratories. A copy <strong>of</strong> the procedure that the Chemistry Department uses<br />
to instruct its teaching assistants is attached to this policy. Labels are available from the Department <strong>of</strong><br />
Safety & Risk Management.<br />
Departments are encouraged to share chemicals to reduce waste. Buy the minimum amount<br />
required to reduce acquisition and disposal costs. This will insure that you have fresh reagents. If you have<br />
good quality chemicals that you wish to donate, you may contact Andy Clapham, the Chemistry Department<br />
stockroom manager, at 874-5084 (e-mail: Aclapham@chm.uri.edu).<br />
URI Lab Waste Policy SOP 001a<br />
S:\WW\awwword\LABPROC\all QAPPs\LABQAPPs\QAPP Rev5 -0609\SOPs\SOP 001a - URI Waste Policy.doc
SUBJECT: Hazardous Materials and Chemical Waste<br />
POLICY NO. 99-5-9<br />
PAGE 2<br />
The Department <strong>of</strong> Safety and Risk Management picks up waste chemicals from individual<br />
laboratories. Please call the Hazardous Materials and Chemical Waste Unit (874-2618) to arrange a pickup.<br />
In the event <strong>of</strong> an emergency, please call S&RM’s main <strong>of</strong>fice number (874-2618). If you need to leave a<br />
voice mail, please speak clearly leaving your name, phone number, building name, room number, and a<br />
brief description <strong>of</strong> the waste to be picked up. If you have more than five (5) containers, the attached<br />
“Request for Hazardous Waste Disposal” form must be faxed in advance to the Department <strong>of</strong> Safety and<br />
Risk Management (Fax Number: 789-5126). All containers <strong>of</strong> chemicals to be picked up MUST be<br />
accompanied by a completed, typed form.<br />
ALL CONTAINERS MUST HAVE A PROPER LABEL. Responsibility for establishing the identity <strong>of</strong> any<br />
unknown materials rests with the department wishing to dispose <strong>of</strong> it. “Unknowns” may cost the <strong>University</strong><br />
in excess <strong>of</strong> $100 for each analysis. Costs for unknowns may be charged back to departments in the future.<br />
Other Considerations: ·<br />
For removal <strong>of</strong> radioactive materials, please contact the Radiation Safety Office at 874-6126. ·<br />
For removal <strong>of</strong> infectious and biological waste (also called biohazard or medical waste),<br />
including broken or intact hypodermic needles or syringes that are contaminated by chemicals<br />
or that have been used in chemical laboratories, please call the Department <strong>of</strong> Safety and Risk<br />
Management (874-2618). ·<br />
For disposal <strong>of</strong> potentially explosive materials such as picric acid, silanes, nitro compounds, and<br />
ethers, contact the Department <strong>of</strong> Safety and Risk Management (874-2618) for assistance. ·<br />
Disposal <strong>of</strong> all hazardous chemicals down the sink to the sewer is prohibited by Federal law. In<br />
addition, these substances are explicitly prohibited:<br />
Metals: Arsenic, Cadmium, Chromium, Copper, Lead, Mercury,<br />
Nickel, Silver, Zinc<br />
Materials with pH12.5, volatile organic compounds,<br />
Cyanide, sulfate, sulfide, oil, or grease.<br />
Also prohibited are: Solids or viscous substances in quantities or <strong>of</strong><br />
such size capable <strong>of</strong> causing obstruction to the flow in the<br />
sewers.<br />
UNDER NO CIRCUMSTANCES SHOULD ANY LABORATORY GLASSWARE OR ANY<br />
CHEMICAL CONTAINER EVER BE PLACED IN THE ALUMINUM OR GLASS<br />
RECYCLING BINS.<br />
URI Lab Waste Policy SOP 001a<br />
S:\WW\awwword\LABPROC\all QAPPs\LABQAPPs\QAPP Rev5 -0609\SOPs\SOP 001a - URI Waste Policy.doc
<strong>Standard</strong> <strong>Operating</strong> Procedure 002<br />
Laboratory Water<br />
<strong>University</strong> <strong>of</strong> <strong>Rhode</strong> Island Watershed Watch<br />
1.0 PURPOSE AND DESCRIPTION<br />
Date:<br />
Revision:<br />
Author:<br />
8/06<br />
2<br />
Linda Green<br />
There are three types <strong>of</strong> water in the URI Watershed Watch (URIWW) laboratories: tap water,<br />
deionized water and Ultrapure water. Each type <strong>of</strong> water is used for specific purposes.<br />
1.1 Tap Water<br />
Tap water is found at each sink and is used for the initial rinsing <strong>of</strong> labware.<br />
The <strong>University</strong> <strong>of</strong> <strong>Rhode</strong> Island is located in the Kingston Water District; water is stored in the<br />
water tower on Flagg Road.<br />
1.2 Deionized Water (DI)<br />
Deionized water (DI) is tap water that has had most ions removed. The deionizing process is<br />
done centrally for the building. Each laboratory has at least one DI water tap. In the URIWW<br />
laboratory there are two DI water taps: one at the main sink and another at the sink in the<br />
central laboratory bench.<br />
DI water is used for rinsing labware between pH and other laboratory measurements, rinsing<br />
labware after acid-soaking and for preparing certain reagents. It is obtained by turning on the<br />
tap.<br />
Do not leave the tap running. Do not leave the hose hanging in the sink when not in use, coil it<br />
up.<br />
1.3 Ultrapure Water.<br />
Ultrapure water is made from the further processing <strong>of</strong> DI water to remove almost all ions. Each<br />
laboratory has one Aries Vaponics filtration unit. The one in the URIWW laboratory is located at<br />
the main sink. This water is sometimes referred to as “Millipore water” since that was the brand<br />
<strong>of</strong> the purifying units in Woodward Hall (the location <strong>of</strong> the URIWW laboratory prior to moving to<br />
the Coastal Institute building).<br />
This water is used for final rinsing <strong>of</strong> all critical labware, such as total phosphorus/total nitrogen<br />
(TP/TN) vials, beakers and volumetric flasks.<br />
It is also used for making up critical reagents such as nutrient standards. It should not be<br />
wasted.<br />
1 <strong>of</strong> 3<br />
Laboratory Water SOP 002<br />
S:\WW\awwword\LABPROC\all QAPPs\LABQAPPs\QAPP Rev5 -0609\SOPs\SOP 002 Lab Water-MOD.doc
2.0 METHOD USED TO OBTAIN ULTRAPURE WATER<br />
1. Turn on the switch on the top right <strong>of</strong> the Aries Vaponics unit.<br />
2. Observe the digital number on the front right <strong>of</strong> the unit. Once the number reaches<br />
approximately 17 megaohms the water is ready for use.<br />
a. This should only take a few seconds.<br />
b. If it takes longer contact Linda Green as the cartridges may need to be replaced.<br />
3. Open the tap by turning the handle coming out <strong>of</strong> the right side <strong>of</strong> the unit near the hose<br />
up.<br />
4. When making reagents let at least 500 ml water flow into the sink before collecting water<br />
for use.<br />
a. This allows the system to flush out any possible contamination collected in the<br />
hose.<br />
b. It is not necessary to allow the system to flush when rinsing labware.<br />
5. Control the flow <strong>of</strong> water by the handle only. Do not try to slow the flow by pinching the<br />
hosing. The back pressure can damage the Aries Vaponics unit.<br />
6. The flow <strong>of</strong> water from the unit is fairly slow; therefore the two 20 gallon carboys next to<br />
the purifying units are routinely filled with Ultrapure water for general use.<br />
a. When filling a carboy, do not forget that water is flowing and leave the laboratory.<br />
Washing the floor with Ultrapure water is expensive!!!!<br />
b. One <strong>of</strong> the carboys leaks from the valve a bit, tighten the top cap when the<br />
carboy is not in use to stop the drip.<br />
7. Do not leave the hose from the Ultrapure unit hanging in the sink. It will pick up<br />
contaminants. Coil it up and place it over the tap when not in use.<br />
8. Turn <strong>of</strong>f the switch on the top right <strong>of</strong> the Aries-Vaptronics unit when done.<br />
2.1 Quality Assurance/Maintenance<br />
2.1.1 Daily Quality Assurance<br />
Each time that the Aries Vaponics unit is used the built-in digital Ohm meter will be checked.<br />
The Ohm meter should read approximately 17 megaohms. If the observed value is less than 17<br />
megaohms contact Linda Green or Elizabeth Herron to replace the filtration cartridges.<br />
The final filter will be replaced every year. The replacement date for the filtration cartridges as<br />
well as the final filter will be noted on the cartridge and filter, respectively.<br />
2 <strong>of</strong> 3<br />
Laboratory Water SOP 002<br />
S:\WW\awwword\LABPROC\all QAPPs\LABQAPPs\QAPP Rev5 -0609\SOPs\SOP 002 Lab Water-MOD.doc
3 <strong>of</strong> 3<br />
2.1.2 Annual Metals Testing<br />
Annually, water obtained from the Aries Vaponics units in Rooms 002 and Room 019 will be<br />
tested for lead, cadmium, chromium, copper, nickel and zinc. These contaminations will be at a<br />
level <strong>of</strong> less than 0.05 mg/L per contaminant and less than 0.1 mg/L when added together.<br />
Corrective Action<br />
If the annual metals testing reveals metal value(s) at a level greater than acceptable then the<br />
water will not be used for microbiological purposes until another sample is taken and returns an<br />
acceptable value.<br />
2.1.3 Monthly heterotrophic plate count<br />
Monthly a sample <strong>of</strong> water from Room 002 and 019 will be analyzed for heterotrophic plate<br />
count. The test results will be less than 500 CFU/ml.<br />
Corrective Action<br />
If the monthly heterotrophic plate count(s) return a value greater than 500 CFU/ml then the<br />
affected water source(s) will not be used for microbiological purposes until another sample is<br />
taken and returns an acceptable value.<br />
Laboratory Water SOP 002<br />
S:\WW\awwword\LABPROC\all QAPPs\LABQAPPs\QAPP Rev5 -0609\SOPs\SOP 002 Lab Water-MOD.doc
<strong>Standard</strong> <strong>Operating</strong> Procedure 003<br />
General Labware Cleaning<br />
Procedure<br />
<strong>University</strong> <strong>of</strong> <strong>Rhode</strong> Island Watershed Watch<br />
1.0 PURPOSE AND DESCRIPTION<br />
Date:<br />
Revision:<br />
Author:<br />
6*09<br />
2<br />
Linda Green<br />
Clean labware and sampling containers are necessary to obtain accurate results for the assays<br />
analyzed in the laboratory. Proper cleaning procedure is imperative to maintain the necessary<br />
level <strong>of</strong> cleanliness.<br />
2.0 HEALTH AND SAFETY<br />
Glassware & plasticware are soaked in a bath <strong>of</strong> dilute (10%) hydrochloric acid which is kept in<br />
the fume hood. Wear apron, heavy gloves and goggles when working with the acid baths.<br />
Aprons, gloves and goggles are stored in vicinity <strong>of</strong> the main sink and fume hood.<br />
3.0 METHOD DESCRIPTION<br />
3.1 Overview<br />
1. Labware is washed in non-phosphate detergents. Do not use any commercially<br />
available detergent. The laboratory uses Liqui-Nox brand. It is stored under the sink in<br />
a 1 gallon container. Pour a small amount into labeled squeeze bottles, dilute with DI<br />
water.<br />
2. Labware is acid soaked, large (500 ml) plastic bottles are not. Bacteria bottles are not<br />
acid-soaked. Ask if you have any questions.<br />
3. Tap water and deionized (DI) water can be obtained at each sink from the appropriately<br />
labeled tap.<br />
4. The Aries Vaponics system, referred to as Ultrapure water, is to the left <strong>of</strong> the main sink<br />
in the main <strong>University</strong> <strong>of</strong> <strong>Rhode</strong> Island Watershed Watch (URIWW) laboratory. To<br />
produce Ultrapure water, turn on at the switch, wait until the readout reaches<br />
approximately 17 megaohms and open the valve. Refer to SOP 002 - Laboratory Water<br />
for further details.<br />
5. In the URIWW laboratory, water samples are collected from lakes, ponds, streams and<br />
estuaries, which are generally referred to as “clean lakes” samples. Samples are also<br />
collected from septic systems for which there are dedicated “ISDS” bottles. There are<br />
dedicated sample bottles for clean lakes samples and ISDS samples. The bottles are<br />
always washed separately in tubs or buckets dedicated (and labeled) for each. Do not<br />
wash clean lakes sample bottles in ISDS tubs.<br />
6. Clean labware for clean lakes and ISDS samples are stored in separate areas <strong>of</strong> the<br />
laboratory in labeled boxes.<br />
1 <strong>of</strong> 4<br />
General Labware Cleaning Procedure SOP 003<br />
S:\WW\awwword\LABPROC\all QAPPs\LABQAPPs\QAPP Rev5 -0609\SOPs\SOP 003 GlasswareWashing-MOD.doc
7. In addition, there are glass vials used for total phosphorus/total nitrogen (TP/TN)<br />
digestion only. These vials have dedicated “label-soaking” and “soapy soak” tubs in the<br />
autoanalyzer room (room 018). These glass vials are not washed/soapy soaked with<br />
general labware. SOP 016 – Total Phosphorus and Nitrogen Analysis provides<br />
information on how to clean TP/TN vials.<br />
a. As with the water sample bottles, there are dedicated TP/TN vials for clean lakes<br />
samples and ISDS samples.<br />
b. The bottles are always washed separately in tubs or buckets dedicated (and<br />
labeled) for each. Do not wash clean lakes sample TP/TN vials in ISDS tubs.<br />
c. There are separate storage locations for ISDS and clean lakes TP/TN vials.<br />
8. Since there are multiple students working in the laboratory, it is important to keep track<br />
<strong>of</strong> which cleaning step has been completed to ensure that no steps are missed. Using<br />
scrap paper label the labware as:<br />
a. Clean lakes or ISDS<br />
b. Date<br />
c. The step the labware is in its washing regimen when leaving for soaking or<br />
drying, etc.<br />
3.2 Labware Cleaning Procedure<br />
3.2.1 Summary<br />
The following is a general summary <strong>of</strong> the steps involved in cleaning labware. Do not place any<br />
bottle caps in any acid bath.<br />
1. Empty (non-hazardous) contents <strong>of</strong> bottles down the drain and hazardous contents in<br />
the appropriate waste containers.<br />
2. Remove labels. This is expedited by soaking bottles in hot tap water. Label-soaking is<br />
a separate step, using a separate tub from soapy water soak/wash. We have<br />
discovered that some labels are high in phosphorus.<br />
3. Wash in soapy water in the appropriate tub. Use brush to scrub inside <strong>of</strong> bottles.<br />
4. Rinse with tap water.<br />
5. Soak for at least 24 hours in tub <strong>of</strong> 10% hydrochloric acid.<br />
6. Rinse thoroughly with with DI water, inside and out.<br />
7. Fill labwarre with DI or Ultrapure water and allow to soak for at least 24 hours.<br />
8. Rinse the inside and outside with Ultrapure water.<br />
9. Air dry, inverted.<br />
10. Put away in appropriate location.<br />
2 <strong>of</strong> 4<br />
General Labware Cleaning Procedure SOP 003<br />
S:\WW\awwword\LABPROC\all QAPPs\LABQAPPs\QAPP Rev5 -0609\SOPs\SOP 003 GlasswareWashing-MOD.doc
3.2.2 Full Description <strong>of</strong> Labware Cleaning Procedure.<br />
All labware including sample bottles, with the exception <strong>of</strong> beakers used for pH and alkalinity<br />
analysis are soaked in acid after the soapy water soak and rinse. Plasticware used for filtered<br />
samples is also acid-soaked after soapy water wash and rinse.<br />
TP/TN digestion vials have further cleaning requirements after the acid soaking, which is<br />
detailed in SOP 016 – Total Phosphorus and Nitrogen Analysis.<br />
1. Always wear an apron, heavy gloves and goggles when washing labware. This safety<br />
equipment is stored in the vicinity <strong>of</strong> the sinks and fume hood in each laboratory.<br />
2. Empty (non-hazardous) contents <strong>of</strong> bottles down the drain and hazardous contents into<br />
appropriate, labeled waste containers.<br />
3. Rinse labware with tap water.<br />
4. To remove labels fill a 5 gallon bucket, or the sink with (preferably) hot water and place<br />
labware into the water. The hot water expedites label removal. Note that hot water is<br />
<strong>of</strong>ten unavailable in the summer.<br />
5. Remove all traces <strong>of</strong> the labels as they are high in phosphorus. Rinse the outside <strong>of</strong> the<br />
labware where the label was. Empty any water from the labware.<br />
6. Dump out, rinse and re-use the bucket or fill another bucket with tap water and a squirt<br />
<strong>of</strong> detergent. Add labware and soak for at least a 1/2 hour. Use an appropriately sized<br />
brush to scrub bottles and labware.<br />
7. Rinse labware 3 times with tap water, inside and out.<br />
8. Put cleaned labware into a labware carrying tub and carry it to the acid baths, which are<br />
inside the fume hood (room 002).<br />
9. Remove the top from the acid-soaking tub. Carefully put labware into the tub minimizing<br />
splashing. Remember the tub contains 10% hydrochloric acid. Make sure the labware<br />
is completely covered by the acid solution. Label the tub with the date and time the<br />
labware was placed into the tub. Soak the labware for at least 24 hours.<br />
10. After acid soaking, carefully remove labware, emptying acid back into the bath. Put the<br />
labware into a labware carrying tub and bring it to a sink. Do not carry labware dripping<br />
with acid to the sink.<br />
11. Rinse each piece <strong>of</strong> labware 3 times, inside and out, with DI water.<br />
12. Fill each piece <strong>of</strong> labware with DI water and allow it to soak for at least 24 hours, be sure<br />
to label the piece <strong>of</strong> labware with the date <strong>of</strong> filling.<br />
13. After soaking, empty out and discard the soaking water and rinse 3 times with Ultrapure<br />
water.<br />
14. Invert to air dry on drying rack or on clean paper towels. Volumetric flasks are stored<br />
filled with Ultrapure water with parafilm across the opening so they do not have to be<br />
allowed to air dry.<br />
15. After drying, graduated cylinders are stored with either parafilm or aluminum foil across<br />
the top. Bottles are stored with caps loosely attached before storing in boxes in the<br />
appropriate area <strong>of</strong> the laboratory.<br />
3 <strong>of</strong> 4<br />
General Labware Cleaning Procedure SOP 003<br />
S:\WW\awwword\LABPROC\all QAPPs\LABQAPPs\QAPP Rev5 -0609\SOPs\SOP 003 GlasswareWashing-MOD.doc
4 <strong>of</strong> 4<br />
3.2.3 Plasticware & All Bottle Caps Cleaning Procedure<br />
Plasticware is used to hold samples for pH, alkalinity, chlorophyll filtration, total suspended<br />
solids (TSS), biological oxygen demand (BOD) and/or microbial analysis. This plasticware is<br />
never soaked in acid to minimize the potential for inadvertently acidifying the water samples.<br />
Bottles utilized in the microbiological assays are autoclaved after cleaning. The procedure for<br />
autoclaving plastic bottles for microbial analysis can be found in SOP 005 - Bottle Autoclaving<br />
Procedure.<br />
Bottle caps, especially those for glass bottles, are never soaked in acid because it may damage<br />
the surface <strong>of</strong> the cap.<br />
Plasticware and bottle caps are cleaned using the procedure outlined below:<br />
1. Follow steps 1 through 7 <strong>of</strong> the labware cleaning procedure.<br />
2. Follow steps 12 through 14 <strong>of</strong> the labware cleaning procedure.<br />
General Labware Cleaning Procedure SOP 003<br />
S:\WW\awwword\LABPROC\all QAPPs\LABQAPPs\QAPP Rev5 -0609\SOPs\SOP 003 GlasswareWashing-MOD.doc
<strong>Standard</strong> <strong>Operating</strong> Procedure 004<br />
General Autoclave Operation<br />
<strong>University</strong> <strong>of</strong> <strong>Rhode</strong> Island Watershed Watch<br />
1.0 PURPOSE AND DESCRIPTION<br />
Date:<br />
Revision:<br />
Author:<br />
08/08<br />
3<br />
Elizabeth<br />
Herron<br />
The autoclave is used to sterilize materials used for bacterial analysis. The procedure outlined<br />
below is for the autoclave in Coastal Institute only. This autoclave is sometimes referred to as<br />
the “NRS autoclave”.<br />
2.0 HEALTH AND SAFETY CONSIDERATIONS<br />
Be aware that materials that have been autoclaved will be extremely hot when the cycle is<br />
completed. Wear insulated gloves when handling materials.<br />
3.0 AUTOCLAVE OPERATION<br />
3.1 Overview & Maintenance<br />
Before operating the autoclave please take a few minutes to read through the operator’s<br />
manual.<br />
It is very important that the unit and area around it be kept clean, and that materials to be<br />
autoclaved are appropriate for this unit and properly packaged.<br />
The door to the autoclave should be kept open when it is not in use, with the power cord<br />
unplugged.<br />
Please complete the log sheet with each run (a sample log sheet is attached below). THE<br />
EXACT MATERIALS PLACED INTO THE AUTOCLAVE MUST BE RECORDED (ie: filter<br />
assemblies, pipettes, media, etc.)_Also be sure that required maintenance has been performed.<br />
Elizabeth Herron (room 001F, 4-4552) is responsible for maintaining the unit, contact her if there<br />
are any questions regarding the operation or maintenance <strong>of</strong> the autoclave.<br />
3.2 Operation<br />
The instructions below are to be used for the autoclave in the Kingston Coastal Institute only.<br />
1. Place items to be sterilized on the appropriate tray (see operators manual), and put into<br />
the autoclave, leaving the door open.<br />
2. Make sure that the maximum temperature recording thermometer is in the autoclave and<br />
the mercury is shaken down below 100 °C.<br />
3. Ensure that the water reservoir is filled to BOTTOM <strong>of</strong> the safety value. If not, add<br />
deionized (DI) water, being sure not to immerse the safety valve.<br />
4. Plug the power cord in, and turn the main switch to START.<br />
1 <strong>of</strong> 4<br />
General Autoclave Operation SOP 004<br />
S:\WW\awwword\LABPROC\all QAPPs\LABQAPPs\QAPP Rev5 -0609\SOPs\SOP 004 GenAutoclaveOps-MOD.doc
5. Fill the autoclave with water by turning the multi-purpose value (always turn this valve<br />
clockwise) to FILL. The water should reach most <strong>of</strong> the width <strong>of</strong> the “indicator channel” at<br />
the front <strong>of</strong> the chamber. Turn the multi-purpose valve to STE to stop the flow <strong>of</strong> water<br />
and prepare the unit for sterilization<br />
6. Close the door, and lock it by turning the handle clockwise. The door should be secure<br />
with a good seal, but only “hand tight”.<br />
7. Set the temperature at 250 °F / 121 °C with the thermostat knob. This is the temperature<br />
most <strong>of</strong>ten used for sterilization. If you are in doubt <strong>of</strong> the correct autoclave temperature<br />
or time, refer to the appropriate method SOP. If you are autoclaving waste materials, refer<br />
to SOP 006 – Waste Autoclaving Procedure, for correct temperatures and autoclave<br />
times.<br />
8. Set the STE timer to the correct sterilization period. Note: this unit takes about 30 minutes<br />
to get up to temperature/pressure so be sure to factor that into your time (set the time for<br />
the TOTAL time period = +/- 30 minute “heat up” + sterilization time needed (usually > 15<br />
minutes).<br />
9. Check on the unit after about 25 minutes to be sure that it is reaching temperature /<br />
pressure. Small bursts <strong>of</strong> steam may be evident from the water reservoir during the run;<br />
this is normal and necessary. Record the unit pressure on the Autoclave Use log. It is<br />
necessary to record the maximum pressure while the unit is running because the<br />
maximum pressure needle is broken (as <strong>of</strong> 2008).<br />
10. If the unit does not reach the set temperature contact Elizabeth Herron to arrange for<br />
pr<strong>of</strong>essional servicing <strong>of</strong> the unit. Until the unit is repaired, it should not be used to<br />
sterilize materials.<br />
11. When the timer reaches 0, the run is complete.<br />
12. Turn the multi-purpose knob to EXH + DRY.<br />
13. Follow the procedure below based on desired cycle (with or without drying)<br />
Cycle without drying:<br />
1. When the pressure gauge reads 0, turn the main switch to STOP, and the multi-purpose<br />
switch to 0.<br />
2. Carefully open the door – steam will escape so do not put any body parts near the edge <strong>of</strong><br />
the door while opening it.<br />
3. Remove the load using insulated gloves and unplug the unit if you are not running any<br />
more loads immediately.<br />
4. Record the temperature on the maximum temperature recording thermometer and the run<br />
time on the autoclave run sheet. The thermometer should read at least 121 °C. If it<br />
doesn’t contact Elizabeth Herron and assume the materials taken out <strong>of</strong> the autoclave are<br />
not sterile.<br />
Cycle with drying:<br />
1. When the pressure gauge reads 0, carefully open the door slightly to let the steam escape.<br />
Leave the door closed, but not locked down with the locking screw.<br />
2. Set the timer for 20 – 30 minutes; the drying indicator lamp will light.<br />
3. After the time has elapsed, turn the multi-purpose valve to 0, the main switch to STOP.<br />
2 <strong>of</strong> 4<br />
General Autoclave Operation SOP 004<br />
S:\WW\awwword\LABPROC\all QAPPs\LABQAPPs\QAPP Rev5 -0609\SOPs\SOP 004 GenAutoclaveOps-MOD.doc
4. Open the door and remove the load using insulated gloves.<br />
5. Unplug the unit if you are not running any more loads immediately.<br />
6. Record the temperature on the maximum temperature recording thermometer and the run<br />
time on the autoclave run sheet. The thermometer should read at least 121 °C. If it<br />
doesn’t contact Elizabeth Herron and assume the materials taken out <strong>of</strong> the autoclave are<br />
not sterile.<br />
3.3 Quality Assurance/Quality Control<br />
3.3.1 Monthly Spore Testing<br />
Each month Global Autocalve Compliance or a similar firm will provide URIWW with spore<br />
strips. These strips have active spores on them. The strips are placed into the autoclave and a<br />
normal sterilization run completed. The strips are then packaged and sent back to the firm<br />
providing the strips for analysis. The strips must exhibit no growth; this provides assurance that<br />
the autoclave is efficiently sterilizing materials.<br />
Corrective Action<br />
Spore strip testing must exhibit no growth. If the spore strips are found to exhibit growth after<br />
being sterilized then an additional round <strong>of</strong> spore strip testing should be completed. While<br />
awaiting the results <strong>of</strong> the second spore strip testing round the autoclave will not be used. If the<br />
second round <strong>of</strong> strips also exhibit growth the autoclave must be serviced and will not be used<br />
to sterilize materials until serviced and spore strip testing exhibits no growth.<br />
3 <strong>of</strong> 4<br />
General Autoclave Operation SOP 004<br />
S:\WW\awwword\LABPROC\all QAPPs\LABQAPPs\QAPP Rev5 -0609\SOPs\SOP 004 GenAutoclaveOps-MOD.doc
4.0 DOCUMENTATION<br />
4 <strong>of</strong> 4<br />
Autoclave Use / Maintenance Log<br />
To be completed for EACH run. This is CRITICAL to ensure that we perform<br />
maintenance at correct intervals. If you have ANY questions, please see Elizabeth<br />
Herron (Rm 001 F, 4-4552)<br />
Date Person/lab Materials autoclaved<br />
or maintenance<br />
performed<br />
Max.<br />
Temp.<br />
(C o )<br />
Max.<br />
Pressure<br />
(PSI)<br />
Run<br />
duration<br />
(Mins)<br />
General Autoclave Operation SOP 004<br />
S:\WW\awwword\LABPROC\all QAPPs\LABQAPPs\QAPP Rev5 -0609\SOPs\SOP 004 GenAutoclaveOps-MOD.doc<br />
Comments
<strong>Standard</strong> <strong>Operating</strong> Procedure 005<br />
Bottle Autoclaving Procedure<br />
<strong>University</strong> <strong>of</strong> <strong>Rhode</strong> Island Watershed Watch<br />
1.0 PURPOSE AND DESCRIPTION<br />
Plastic bottles must be sterilized prior to use in microbiological assays.<br />
2.0 HEALTH AND SAFETY<br />
Date:<br />
Revision:<br />
Author:<br />
08/08<br />
3<br />
Elizabeth<br />
Herron<br />
Be aware that materials that have been autoclaved will be extremely hot when the cycle is<br />
completed. Wear insulated gloves when handling materials.<br />
3.0 AUTOCLAVE OPERATION<br />
3.1 Preparation<br />
Clean the white HDPE plastic sampling bottles as per SOP 003 - General Labware Cleaning<br />
Procedure.<br />
Adjust the shelves <strong>of</strong> the autoclave, if necessary.<br />
Stand bottles in a metal tray, rest the caps on top <strong>of</strong> each bottle; do not engage the threads <strong>of</strong><br />
the cap.<br />
Note: Until the bottles are sterile it doesn’t matter if the tops/lids fall on the ground. Once they<br />
have been autoclaved, you must beware <strong>of</strong> the ever-present bacteria in our surroundings and<br />
re-autoclave bottles and tops if they are opened or fall onto the ground.<br />
3.2 Using Autoclave in the Kingston Coastal Institute Building<br />
1. Ensure that the water reservoir is filled to the bottom <strong>of</strong> the safety value. If not, add<br />
deionized (DI) water, being sure not to immerse the safety valve.<br />
2. Plug the power cord in, and turn the main switch to START.<br />
3. Fill the autoclave with water by turning the multi-purpose value (always turn this valve<br />
clockwise) to FILL. The water should reach most <strong>of</strong> the width <strong>of</strong> the indicator channel at<br />
the front <strong>of</strong> the chamber. Turn the multi-purpose valve to STE to stop the flow <strong>of</strong> water<br />
and prepare the unit for sterilization.<br />
4. Make sure that maximum temperature recording thermometer is in the autoclave. The<br />
mercury should be shaken down below 100 °C.<br />
5. Close the door, and lock it by turning the handle clockwise. The door should be secure<br />
with a good seal, but only hand tight.<br />
6. Set the temperature for 250 °F / 121 °C with the thermostat knob.<br />
1 <strong>of</strong> 3<br />
Bottle Autoclaving Procedure SOP 005<br />
S:\WW\awwword\LABPROC\all QAPPs\LABQAPPs\QAPP Rev5 -0609\SOPs\SOP 005 BottleAutocalve.doc
7. Set the STE timer to the correct sterilization period. If the autoclave is cold set it for 55<br />
minutes, if the autoclave is warm set for 45 minutes. Check on the unit after about 20 or<br />
25 minutes to be sure that it is reaching the correct temperature / pressure. Small bursts<br />
<strong>of</strong> steam may be evident from the water reservoir during the run; this is normal and<br />
necessary. Record the unit pressure on the Autoclave Use log. It is necessary to record<br />
the maximum pressure while the unit is running because the maximum pressure needle<br />
is broken (as <strong>of</strong> 2008).<br />
8. When the timer reaches 0, the run is complete.<br />
9. Turn the multi-purpose knob to EXH + DRY.<br />
10. When the pressure gauge reads 0, turn the main switch to STOP, and the multi-purpose<br />
switch to 0.<br />
11. Carefully open the door – steam will escape so do not put any body parts near the edge<br />
<strong>of</strong> the door while opening it.<br />
12. Allow to cool or remove the load immediately. Be sure to use insulated gloves when<br />
handling the tray. It will be hot!<br />
13. Record the temperature on the maximum temperature recording thermometer and the<br />
run time on the autoclave run log (attached below). If the temperature on the recording<br />
thermometer does not read at least 121 °C contact Elizabeth Herron.<br />
14. Unplug the unit if you are not running any more loads immediately.<br />
15. Do not tighten bottle caps until the bottles are cooled to room temperature or they will<br />
warp.<br />
16. Place a “STERILE” label over the cap so it connects to the bottle shoulder to indicate<br />
that the bottle has been sterilized.<br />
3.3 Using Autoclave in the Basement <strong>of</strong> Woodward Hall.<br />
1. Seal the door by pressing the button; wait for SEALED DOOR light to come on.<br />
2. Set EXPOSURE TIME for 20 minutes.<br />
3. Set EXHAUST TIME for 5 minutes.<br />
4. Select WRAPPED setting (temperature should be set for 121 C).<br />
5. Press START.<br />
6. The autoclave will print out a record <strong>of</strong> the sterilizing event. Write your initials, item<br />
being sterilized, room number and phone extension on the tape (so that you can be<br />
contacted in case there is a problem).<br />
7. The cycle will take about ½ hour to complete. You will be unable to open the door<br />
unless the autoclave has cooled to a safe temperature. Be sure to use insulated gloves<br />
when handling the tray. It will be hot!<br />
8. Once the bottles are cool to the touch, tighten the lids and put a “STERILE” label from<br />
the cap to the shoulder <strong>of</strong> the bottle (in effect sealing it).<br />
2 <strong>of</strong> 3<br />
Bottle Autoclaving Procedure SOP 005<br />
S:\WW\awwword\LABPROC\all QAPPs\LABQAPPs\QAPP Rev5 -0609\SOPs\SOP 005 BottleAutocalve.doc
3 <strong>of</strong> 3<br />
Autoclave Use / Maintenance Log<br />
To be completed for EACH run. This is CRITICAL to ensure that we perform<br />
maintenance at correct intervals. If you have ANY questions, please see Elizabeth<br />
Herron (Rm 001 F, 4-4552)<br />
Date Person/lab Materials autoclaved<br />
or maintenance<br />
performed<br />
Max.<br />
Temp.<br />
(C o )<br />
Max.<br />
Pressure<br />
(PSI)<br />
Run<br />
duration<br />
(Mins)<br />
Bottle Autoclaving Procedure SOP 005<br />
S:\WW\awwword\LABPROC\all QAPPs\LABQAPPs\QAPP Rev5 -0609\SOPs\SOP 005 BottleAutocalve.doc<br />
Comments
<strong>Standard</strong> <strong>Operating</strong> Procedure 006<br />
Waste Autoclaving Procedure<br />
<strong>University</strong> <strong>of</strong> <strong>Rhode</strong> Island Watershed Watch<br />
1.0 PURPOSE AND DESCRIPTION<br />
Date:<br />
Revision:<br />
Author:<br />
08/08<br />
2<br />
Elizabeth<br />
Herron<br />
This procedure is for autoclaving used media plates (mTec, mE, and EIA) and IDEXX trays<br />
using either the autoclave in the basement <strong>of</strong> Woodward Hall or in the Kingston Coastal<br />
Institute.<br />
2.0 HEALTH AND SAFETY<br />
Used media plates constitute a biological hazard, therefore wear plastic gloves when handling<br />
the used media plates.<br />
Be aware that materials that have been autoclaved will be extremely hot when the cycle is<br />
completed. The media may still be liquid when removed from the autoclave. Spilling liquid<br />
media onto any part <strong>of</strong> the body will cause a burn. If this occurs bathe the effected body part<br />
under cool water for 5-10 minutes. Refer to SOP 001a – <strong>University</strong> Safety and Waste Handling<br />
Document. Wear insulated gloves when handling materials.<br />
3.0 AUTOCLAVE OPERATION<br />
3.1 Preparation<br />
Used plates and trays are stored in autoclavable plastic bags in the labeled red waste bin<br />
beneath the 35 °C incubator in room 019 <strong>of</strong> the Coastal Institute. The bags are autoclaved<br />
when they appear half full. Do not wait until the bag is completely full.<br />
3.2 Using Autoclave in the Kingston Coastal Institute Building<br />
1. Adjust the shelves <strong>of</strong> the autoclave if necessary. Ensure there is adequate volume in<br />
the tray to handle the number and volume <strong>of</strong> plates/trays.<br />
2. Wearing gloves, remove the half filled bag <strong>of</strong> plates/trays and place them in an autoclave<br />
tray.<br />
3. Ensure that the water reservoir is filled to the bottom <strong>of</strong> the safety value. If not, add<br />
deionized (DI) water, being sure not to immerse the safety valve.<br />
4. Plug the power cord in, and turn the main switch to START.<br />
5. Fill the autoclave with water by turning the multi-purpose value (always turn this valve<br />
clockwise) to FILL. The water should reach most <strong>of</strong> the width <strong>of</strong> the indicator channel at<br />
the front <strong>of</strong> the chamber. Turn the multi-purpose valve to STE to stop the flow <strong>of</strong> water<br />
and prepare the unit for sterilization.<br />
6. Make sure that maximum temperature recording thermometer is in the autoclave. The<br />
mercury should be shaken down below 100 °C.<br />
1 <strong>of</strong> 3<br />
Waste Autoclaving Procedure SOP 006<br />
S:\WW\awwword\LABPROC\all QAPPs\LABQAPPs\QAPP Rev5 -0609\SOPs\SOP 006WasteAutoclave.doc
7. Close the door, and lock it by turning the handle clockwise. The door should be secure<br />
with a good seal, but only hand tight.<br />
8. Set the temperature for 250 °F / 121 °C with the thermostat knob for media plates<br />
(mTec, mE, and EIA) or 134 °C for IDEXX trays.<br />
9. Set the STE timer to the correct sterilization period. If the autoclave is cold set it for 60<br />
minutes, if the autoclave is warm set for 50 minutes. Check on the unit after about 20 or<br />
25 minutes to be sure that it is reaching the correct temperature / pressure. Small bursts<br />
<strong>of</strong> steam may be evident from the water reservoir during the run; this is normal and<br />
necessary. Record the unit pressure on the Autoclave Use log. It is necessary to record<br />
the maximum pressure while the unit is running because the maximum pressure needle<br />
is broken (as <strong>of</strong> 2008).<br />
10. When the timer reaches 0, the run is complete.<br />
11. Turn the multi-purpose knob to EXH + DRY.<br />
12. When the pressure gauge reads 0, turn the main switch to STOP, and the multi-purpose<br />
switch to 0.<br />
13. Carefully open the door – steam will escape so do not put any body parts near the edge<br />
<strong>of</strong> the door while opening it.<br />
14. Allow to cool or remove the load immediately. Be sure to use insulated gloves when<br />
handling the tray. It will be hot!<br />
15. Record the temperature on the maximum temperature recording thermometer and the<br />
run time on the autoclave run log (attached below). If the temperature on the recording<br />
thermometer does not read at least 121 °C for media plates and 134 °C for IDEXX trays<br />
contact Elizabeth Herron.<br />
16. Unplug the unit if you are not running any more loads immediately.<br />
17. If you were autoclaving plates, once they are cool enough to handle, bring the waste to<br />
the dumpster and carefully discard the plates, bag and all. The media may still be liquid,<br />
so be careful not to spill any on you – it will HURT! You must bring the bags to the<br />
dumpster, the janitors will not dispose <strong>of</strong> them.<br />
18. If you are autoclaving IDEXX trays, once they are cool enough, drain bags down the sink<br />
with running water and then discarded them in the dumpster. You must bring the bags<br />
to the dumpster, the janitors will not dispose <strong>of</strong> them.<br />
19. Place a new autoclave bag into the red waste container.<br />
3.3 Autoclaving Using Autoclave in Woodward Hall<br />
1. In the autoclave room, adjust the shelves <strong>of</strong> the autoclave if necessary. Ensure there is<br />
adequate volume in the tray to handle the number and volume <strong>of</strong> plates/trays.<br />
2. Wearing gloves, remove the half filled bag <strong>of</strong> plates/trays and place them in an autoclave<br />
tray.<br />
3. Close the door all the way.<br />
4. Seal the door by pressing the button; wait for SEALED DOOR light to come on.<br />
5. Set EXPOSURE TIME for 20 minutes (for both trays and plates).<br />
2 <strong>of</strong> 3<br />
Waste Autoclaving Procedure SOP 006<br />
S:\WW\awwword\LABPROC\all QAPPs\LABQAPPs\QAPP Rev5 -0609\SOPs\SOP 006WasteAutoclave.doc
6. Set EXHAUST TIME for 5 minutes (for both trays and plates).<br />
7. Select the UNWRAPPED setting. Temperature should be set for 132 C for both trays<br />
and plates.<br />
8. Press START.<br />
9. The autoclave will print out a record <strong>of</strong> the sterilizing event. Write your initials, item<br />
being sterilized, building and room number and phone extension on the tape (so that you<br />
can be contacted in case there is a problem).<br />
10. The cycle will take about ½ hour to complete. You will be unable to open the door<br />
unless the autoclave has cooled to a safe temperature. Be sure to use the insulated<br />
gloves when handling the tray. It will be hot!<br />
11. If you were autoclaving plates, once they are cool enough to handle, bring the waste to<br />
the dumpster and carefully discard the plates, bag and all. The media may still be liquid,<br />
so be careful not to spill any on you – it will HURT! You must bring the bags to the<br />
dumpster, the janitors will not dispose <strong>of</strong> them.<br />
12. If you are autoclaving IDEXX trays, once they are cool enough, drain bags down the sink<br />
with running water and then discarded them in the dumpster. You must bring the bags<br />
to the dumpster, the janitors will not dispose <strong>of</strong> them.<br />
13. Clean the autoclave tray with soap and hot water.<br />
14. Place a new autoclave bag into the red waste container.<br />
3 <strong>of</strong> 3<br />
Waste Autoclaving Procedure SOP 006<br />
S:\WW\awwword\LABPROC\all QAPPs\LABQAPPs\QAPP Rev5 -0609\SOPs\SOP 006WasteAutoclave.doc
<strong>Standard</strong> <strong>Operating</strong> Procedure 007<br />
(Prior number URIWW-SOP-4A)<br />
Ambient Waters Microbiological<br />
Procedure<br />
<strong>University</strong> <strong>of</strong> <strong>Rhode</strong> Island Watershed Watch<br />
TABLE OF CONTENTS<br />
Date:<br />
Revision:<br />
Author:<br />
08/08<br />
3<br />
Elizabeth<br />
Herron<br />
1.0 PURPOSE AND DESCRIPTION ......................................................................................................1<br />
2.0 HEALTH AND SAFETY CONSIDERATIONS..................................................................................1<br />
2.1 HAZARDS ........................................................................................................................................1<br />
2.2 TECHNICIAN TRAINING/QUALIFICATIONS...........................................................................................2<br />
3.0 REQUIRED MATERIALS .................................................................................................................2<br />
4.0 SAMPLE STORAGE, PRESERVATION AND DISPOSAL .............................................................5<br />
5.0 METHOD DESCRIPTION .................................................................................................................5<br />
5.1 SCHEDULING CONSIDERATIONS .......................................................................................................5<br />
5.2 QUALITY ASSURANCE/QUALITY CONTROL........................................................................................6<br />
5.2.1 Method Detection Limit .............................................................................................................6<br />
5.2.2 Method Blanks...........................................................................................................................6<br />
5.2.3 Sample Replication ...................................................................................................................6<br />
5.2.4 Positive Plates...........................................................................................................................7<br />
5.2.5 Incubators..................................................................................................................................7<br />
5.2.6 Germicidal Unit (UV Box) ..........................................................................................................7<br />
5.2.7 Sterility Check on Sample Bottles.............................................................................................7<br />
5.2.8 QA Check on New Plates..........................................................................................................8<br />
5.2.8.1 Preparation <strong>of</strong> QC samples for new batch <strong>of</strong> plates. .......................................................................8<br />
5.3 ANALYSIS METHOD .........................................................................................................................9<br />
5.3.1 Preparation – 1 Week Before Scheduled Sampling..................................................................9<br />
5.3.1.1 Preparation <strong>of</strong> mTEC Media Plates .................................................................................................9<br />
5.3.2 Preparation - At least 48 Hours Prior to Sampling Day (As Needed) .....................................11<br />
5.3.2.1 Preparation <strong>of</strong> 1L Sterile Phosphate Buffered Saline Solution (PBS) ............................................11<br />
5.3.2.2 Preparation <strong>of</strong> 4 L Sterile Phosphate Buffered Saline Solution (PBS) ...........................................11<br />
5.3.2.3 Preparation <strong>of</strong> Urea Substrate .......................................................................................................12<br />
5.3.2.4 Preparation <strong>of</strong> 1N NaOH ...............................................................................................................12<br />
5.3.2.5 Preparation <strong>of</strong> Stock KH2PO 4 solution ..........................................................................................12<br />
5.3.2.6 Preparation <strong>of</strong> Stock MgCl2 solution ..............................................................................................12<br />
5.3.3 Preparation - Day Before Sample Collection ..........................................................................13<br />
5.3.4 Procedure - Day <strong>of</strong> Sample Collection....................................................................................13<br />
5.3.4.1 Initial Preparation...........................................................................................................................13<br />
5.3.4.2 When Samples Arrive At The Laboratory ......................................................................................13<br />
5.3.4.3 Filtering Samples...........................................................................................................................14<br />
5.3.4.4 Clean-up........................................................................................................................................16<br />
5.3.4.5 Counting The Plates ......................................................................................................................16<br />
5.3.5 Disposal...................................................................................................................................17<br />
5.3.5.1 Used Plates ...................................................................................................................................17<br />
5.3.5.2 Sample Bottles ..............................................................................................................................17<br />
6.0 CALCULATIONS............................................................................................................................17<br />
6.1 CALCULATION OF FECAL COLIFORMS RESULTS...............................................................................17<br />
6.2 CALCULATION OF E. COLI RESULTS: ...............................................................................................17<br />
7.0 REFERENCES................................................................................................................................18<br />
8.0 DOCUMENTATION ........................................................................................................................19<br />
Ambient Waters Microbiological Procedure SOP 007<br />
S:\WW\awwword\LABPROC\all QAPPs\LABQAPPs\QAPP Rev5 -0609\SOPs\SOP 007AmbientMicrobes.doc
<strong>Standard</strong> <strong>Operating</strong> Procedure 007<br />
(Prior number URIWW-SOP-4A)<br />
Ambient Waters Microbiological<br />
Procedure<br />
<strong>University</strong> <strong>of</strong> <strong>Rhode</strong> Island Watershed Watch<br />
1.0 PURPOSE AND DESCRIPTION<br />
Date:<br />
Revision:<br />
Author:<br />
08/08<br />
3<br />
Elizabeth<br />
Herron<br />
The purpose <strong>of</strong> this method is to determine the concentration <strong>of</strong> Escherichia coli (E. coli) and<br />
fecal coliform bacteria within an ambient water sample. Samples are collected in sterile bottles,<br />
an aliquot <strong>of</strong> sample is filtered and the resulting filter placed into a media dish and incubated.<br />
After incubation the number <strong>of</strong> bacteria colonies are counted. This procedure is utilized for<br />
ambient water (lakes, ponds, rivers, etc.) only. Analysis <strong>of</strong> ISDS/septic samples is completed<br />
using SOP 008 - ISDS Microbiological Procedure. This method is applicable to undiluted<br />
samples in the range <strong>of</strong>
Several chemicals are utilized in this SOP. Potassium phosphate monobasic (KH2PO4),<br />
magnesium chloride hexahydrate (MgCl2·6H2O), sodium chloride (NaCl) and Phenol red may<br />
cause skin irritation after prolonged exposure as well as irritation <strong>of</strong> eyes, nose and throat if<br />
inhaled or allowed to make contact with the eyes. Wear a lab coat, gloves and goggles when<br />
handling these chemicals. Material Safety Data Sheets (MSDS) are located in each laboratory<br />
for the materials stored in the specific laboratory. MSDS are contained in plastic file folders in<br />
rooms 019 and 018 and a notebook in room 002.<br />
2.2 Technician Training/Qualifications<br />
General training in laboratory technique, use <strong>of</strong> an autoclave and sterile technique as well as<br />
specific training on the procedures contained in this method must be completed prior to<br />
analyzing samples. Technician training will be provided either by Elizabeth Herron (Laboratory<br />
Project Manager – Microbiology) or Linda Green (Laboratory Project Manager – Nutrients).<br />
3.0 REQUIRED MATERIALS<br />
Required Material Notes Re-order<br />
information<br />
Coastal Institute in Kingston, room 081<br />
Autoclave and maximum<br />
temperature thermometer<br />
<strong>University</strong> <strong>of</strong> <strong>Rhode</strong> Island (URI), Kingston Coastal Institute<br />
Watershed Watch (WW) Laboratory, room 002<br />
Autoclave safe white plastic<br />
bottles (125 – 500 mL)<br />
2 L autoclave safe flasks<br />
Insulated autoclave gloves<br />
Metal autoclave tray<br />
Combination hot plate and<br />
magnetic stirrer<br />
Magnetic stirring bar<br />
Microbiology worksheets Project data sheets are found on the<br />
URIWW computer. See Section 8.0<br />
Documentation<br />
Sodium Hydroxide (NaOH) Caustic. Causes eye, skin, digestive<br />
and respiratory tract burns.<br />
Hygroscopic (absorbs moisture from the<br />
air).<br />
Coastal Institute in Kingston, room 018<br />
Balance Calibration weights in drawer beneath<br />
the balance<br />
Coastal Institute in Kingston, room 019<br />
35 C Incubator Thermolyne Type 142300 Incubator<br />
44.5 C Water bath Precision fecal coliform bath 66855 Baxter catalog<br />
#W3182-2<br />
Petri dish rack (for water bath) Baxter catalog<br />
#W3182-11<br />
UV sterilization box<br />
2 <strong>of</strong> 23<br />
Ambient Waters Microbiological Procedure SOP 007<br />
S:\WW\awwword\LABPROC\all QAPPs\LABQAPPs\QAPP Rev5 -0609\SOPs\SOP 007AmbientMicrobes.doc
Required Material Notes Re-order<br />
information<br />
Vacuum pump and manifold<br />
Pipette-Aid filler/dispenser<br />
(electric)<br />
3 <strong>of</strong> 23<br />
Fisher catalog #<br />
13-681-15<br />
2 - Glass 400 mL beakers<br />
marked URIWW<br />
4 - Side arm filter flasks 500 mL or larger<br />
Coastal Institute in Kingston, room 019, URIWW refrigerator<br />
mTEC media plates less than a month old, stored media<br />
side up in a foil lined box in the<br />
refrigerator<br />
mTEC media mix Fisher catalog #<br />
DF0334-15-0<br />
Agar plate with E. coli QC sample American Type<br />
Culture<br />
Collection #<br />
35922<br />
Tryptic soy broth (TSB) tubes<br />
Agar mix Fisher catalog<br />
#BP1423-500<br />
Tryptic soy broth mix Fisher catalog<br />
#DF0370-17-3<br />
Stock KH2PO4 solution Preparation instructions: Section 5.3.2.5<br />
Stock MgCl2 solution Preparation instructions: Section 5.3.2.6<br />
Urea substrate Preparation instructions: Section 5.3.2.3<br />
Sticks - sterilized Fisher catalog<br />
#01-340<br />
Coastal Institute in Kingston, room 019, Supplies in or on the gray table to the left <strong>of</strong><br />
countertop<br />
95% Ethanol in a 500 mL plastic<br />
bottle<br />
Alcohol lamp Fisher catalog<br />
#04-245-1<br />
Envirocide or Conflict Disinfectant<br />
Fisher Catalog<br />
solution in squirt bottle<br />
#04-324-12<br />
Filter forceps<br />
Small beaker (~ 50 mL)<br />
Fisher catalog<br />
#09-753-30<br />
Indelible marker (Sharpie)<br />
Matches or igniter<br />
Magnetic filter funnels (9 –<br />
autoclaved and stored in sealed<br />
autoclave bags until used)<br />
Sterile buffer filled Nalgene wash<br />
bottles<br />
47 mm diameter, Gelman #4242,<br />
300 mL capacity, 50 mL gradations<br />
Fisher #09-735<br />
Fisher catalog #<br />
03-409-14C<br />
Ambient Waters Microbiological Procedure SOP 007<br />
S:\WW\awwword\LABPROC\all QAPPs\LABQAPPs\QAPP Rev5 -0609\SOPs\SOP 007AmbientMicrobes.doc
Required Material Notes Re-order<br />
information<br />
Sterile grid membrane filters Fisher catalog #<br />
09-719-1B or<br />
HAWG 047 S1<br />
Coastal Institute in Kingston, room 019, Plastic drawers or boxes beneath the lab<br />
countertop<br />
Sterile plastic Petri dishes Fisher catalog #<br />
08-757-19<br />
Sterile 1 mL pipettes Fisher catalog<br />
#13-678-25C<br />
Sterile 10 mL pipettes Fisher catalog<br />
#13-678-25F<br />
Sterile 25 mL pipettes Fisher catalog<br />
#13-676-29D<br />
Pipette sterilizing pouches Fisher catalog #<br />
01-812-53<br />
Coastal Institute in Kingston, room 019, Drawer or shelf beneath the lab countertop<br />
Reusable test tubes Fisher catalog #<br />
14-925J<br />
Test tube rack<br />
Aluminum foil<br />
Fisher catalog #<br />
14-809-24<br />
Coastal Institute in Kingston, room 019, In cabinet beneath the water bath<br />
Whirl-pak TM bags Fisher catalog #<br />
01-812-5C<br />
Clear biohazard autoclave bags Fisher catalog<br />
#01-826-5<br />
Coastal Institute in Kingston, room 019, On shelf above the water bath<br />
Plastic carboy filled with<br />
Preparation instructions: Section 5.3.2.1<br />
phosphate buffer saline solution and 5.3.2.2<br />
Coastal Institute in Kingston, room 019, In the upper cabinet<br />
Urea Fisher catalog<br />
#DF0190-17-1<br />
Phenol red Sigma catalog<br />
#P2417<br />
Magnesium chloride hexahydrate<br />
Fisher catalog<br />
(MgCl2·6H2O)<br />
#M33-500<br />
Potassium phosphate monobasic<br />
Fisher catalog<br />
(KH2PO4)<br />
#P382-500<br />
Sodium chloride (NaCl) Fisher catalog #<br />
S671-500<br />
1 N Sodium Hydroxide (NaOH) Causes eye, skin, digestive and<br />
respiratory tract burns. Caustic.<br />
Preparation instructions: 5.3.2.4.<br />
Coastal Institute in Kingston, room 019, In the chemical cabinet<br />
95% Ethanol<br />
Fisher catalog #<br />
S93231<br />
4 <strong>of</strong> 23<br />
Ambient Waters Microbiological Procedure SOP 007<br />
S:\WW\awwword\LABPROC\all QAPPs\LABQAPPs\QAPP Rev5 -0609\SOPs\SOP 007AmbientMicrobes.doc
Equipment is maintained by the <strong>University</strong> <strong>of</strong> <strong>Rhode</strong> Island Watershed Watch (URIWW)<br />
Laboratory and the Natural Resources Science department. Temporary replacement <strong>of</strong> large<br />
equipment such as incubators is available through arrangement with other scientists in the<br />
department maintaining similar equipment.<br />
4.0 SAMPLE STORAGE, PRESERVATION AND DISPOSAL<br />
Matrix Sample Container Preservation Volume Holding<br />
Time<br />
Water Autoclavable white plastic bottle - 250 mL Kept at 4 °C in<br />
Sterile Bottles<br />
100 mL 6 Hours<br />
Disposal<br />
Samples are archived for approximately 48 hours. Aqueous samples may only be disposed <strong>of</strong><br />
after final quality assurance checks are completed and the data found to be acceptable using<br />
criteria found in Section 5.2 <strong>of</strong> this SOP. Aqueous samples are considered a potential biological<br />
hazard. Samples may be rinsed down the drain with running water. Personnel will wear gloves,<br />
eye protection and a laboratory coat when disposing <strong>of</strong> samples.<br />
Disposal <strong>of</strong> used plates should be completed in accordance with SOP 006 - Waste Autoclaving<br />
Procedure. Plates are not archived and may be disposed <strong>of</strong> immediately after counting.<br />
Bottles are cleaned in accordance with SOP 003 - General Labware Cleaning Procedure and<br />
SOP 005 - Bottle Autoclaving Procedure.<br />
5.0 METHOD DESCRIPTION<br />
5.1 Scheduling Considerations<br />
Preparation <strong>of</strong> materials including plates should occur at least one week prior to the sampling<br />
day. If it is necessary to prepare additional plates then a Quality Assurance/ Quality Control<br />
(QA/QC) check should be completed on the new plates. This procedure is described in Section<br />
5.2.5 <strong>of</strong> this document. A check <strong>of</strong> the operation <strong>of</strong> the UV light box should also be completed<br />
at this time.<br />
At least 48 hours (2 days) prior to the sampling event, sampling bottles and sterile phosphate<br />
buffered saline solution (PBS) should be prepared.<br />
The day before a sampling event (24 hours) data sheets, QC samples and a final check <strong>of</strong><br />
equipment should be completed (refer to Section 5.3 for specific details)<br />
5 <strong>of</strong> 23<br />
Ambient Waters Microbiological Procedure SOP 007<br />
S:\WW\awwword\LABPROC\all QAPPs\LABQAPPs\QAPP Rev5 -0609\SOPs\SOP 007AmbientMicrobes.doc
5.2 Quality Assurance/Quality Control<br />
5.2.1 Method Detection Limit<br />
The method detection limit (MDL) for fecal coliforms and E. coli is related to the dilution factor<br />
used to determine the bacteria count. The following equation is utilized:<br />
MDL = 100 mL = Colonies<br />
Volume <strong>of</strong> sample filtered (mL) 100 mL<br />
Therefore if the volume <strong>of</strong> sample placed on the plate is 25 mL then the MDL is<br />
4 colonies/100 mL.<br />
The reporting limit (RL) is set at the MDL for this assay. Data are reported to the nearest whole<br />
number.<br />
5.2.2 Method Blanks<br />
Method blanks are determined by treating 100 mL <strong>of</strong> sterile PBS as a sample. The sterile PBS<br />
is filtered onto a sterile filter and placed onto a media plate.<br />
There will be 2 method blanks per 100 plates or 2 method blanks per run, whichever is greater.<br />
The first blank will be prepared at the beginning <strong>of</strong> the sample run and the second at the end <strong>of</strong><br />
the sample run. This is at the least 2% <strong>of</strong> the plates analyzed. The method blank shall be less<br />
than 1 colony/100 mL.<br />
Corrective Action<br />
If the method blank is equal or greater than 1 colony/100 mL then the sample run will be<br />
considered contaminated and the samples reanalyzed. The field samples will be out <strong>of</strong><br />
compliance with holding times if samples need to be reanalyzed. This will be noted on the data<br />
sheet.<br />
5.2.3 Sample Replication<br />
Sample replication is completed in one <strong>of</strong> two ways. Sample replication for projects in areas<br />
where it is not necessary to dilute the samples prior to filtering is completed by filtering a second<br />
aliquot <strong>of</strong> the sample and treating it as a regular sample. Sample replication is completed on 1<br />
sample in 4; 25% <strong>of</strong> the collected field samples. Analysis results for replicate samples should<br />
be with 20% relative percent deviation (%RPD). %RPD is calculated as follows:<br />
%RPD = Result <strong>of</strong> Replicate 1 (mg/L) – Result <strong>of</strong> Replicate 2 (mg/L) x 100<br />
Average <strong>of</strong> Result <strong>of</strong> Replicate 1 (mg/L) and Result <strong>of</strong> Replicate 2 (mg/L)<br />
Sample replication for projects in areas where it is necessary to analyze each sample at multiple<br />
dilutions is completed by comparing final results <strong>of</strong> samples at different dilutions. Results<br />
between dilutions should be within 20%RPD. %RPD is calculated as follows:<br />
%RPD = Result at Dilution 1 (colonies/100 mL) – Result at Dilution 2 (colonies/100 mL) x 100<br />
Average <strong>of</strong> Result <strong>of</strong> Dilution 1 (colonies/100 mL) and Result <strong>of</strong> Dilution 2 (colonies/100 mL)<br />
6 <strong>of</strong> 23<br />
Ambient Waters Microbiological Procedure SOP 007<br />
S:\WW\awwword\LABPROC\all QAPPs\LABQAPPs\QAPP Rev5 -0609\SOPs\SOP 007AmbientMicrobes.doc
Corrective Action<br />
If the %RPD is greater than 20% then the deviation is noted on the data sheet. The processing<br />
time to determine the sample value is greater than the holding time for the samples. Therefore<br />
the samples will not be reanalyzed unless contamination is suspected as shown through a non-<br />
compliant method blank.<br />
5.2.4 Positive Plates<br />
Calibration is completed in a qualitative way through an assessment <strong>of</strong> false negatives.<br />
Bacteria from a known plate <strong>of</strong> E. coli are plated at a dilution <strong>of</strong> 10 -7 using the procedure<br />
outlined under Section 5.2.5.1, steps 1 through 6 and 8 only. The inoculated plates are then<br />
treated as samples and referred to as positive plates; 2 positive plates are prepared per sample<br />
batch. After incubation these plates must exhibit growth.<br />
Corrective Action<br />
The inoculated plates (positive plates) must show growth after incubation. If the plates do not<br />
show growth then it is assumed that the run was in error and the batch <strong>of</strong> samples is<br />
reanalyzed. The field samples will be out <strong>of</strong> compliance with holding times if samples need to<br />
be reanalyzed. This will be noted on the data sheet<br />
5.2.5 Incubators<br />
The temperature <strong>of</strong> the 35 °C and 44.5 °C incubators are checked twice a day at least 4 hours<br />
apart, when in use. Initial and final temperatures for incubations <strong>of</strong> samples are recorded on the<br />
project data reporting sheet (see Section 8.0). The acceptable temperature range for the 35 °C<br />
incubator is 35 +/- 0.5 °C. Acceptable temperature for the 44.5 °C incubator is 44.5 +/- 0.2 °C.<br />
Corrective Action<br />
The incubator temperature must remain in the range specified above. If the incubator<br />
temperature is found to be outside the acceptable range, contact Elizabeth Herron and adjust<br />
the incubator temperature control. Pr<strong>of</strong>essional maintenance <strong>of</strong> the incubator may be<br />
necessary if adjustment <strong>of</strong> the temperature control does not rectify the problem.<br />
5.2.6 Germicidal Unit (UV Box)<br />
The UV light box efficiency will be tested quarterly with a UV light meter. Each lamp will be<br />
tested individually. A lamp will be replaced if it emits less than 70% <strong>of</strong> its initial output. All<br />
efficiency checks will be recorded on the “Quarterly UV Germicidal Tube Record” data sheet<br />
(see Section 8.0 Documentation) and will be available for review.<br />
Corrective Action<br />
If a UV lamp is found to emit less than 70% <strong>of</strong> its initial output then it will be replaced. The date<br />
<strong>of</strong> replacement will be recorded on the efficiency check data sheet.<br />
5.2.7 Sterility Check on Sample Bottles<br />
Sample bottles after sterilization must be checked for sterility before being placed with the<br />
general stock <strong>of</strong> sterilized bottles. A bottle sterility check will be completed at a frequency <strong>of</strong><br />
one sample bottle per sterilization run. Sterility checks will be completed by selecting one<br />
sterilized sample bottle at random after the sterilization run has been completed. The sample<br />
bottle will then be filled with Ultrapure water capped and mixed. Once the water has been<br />
7 <strong>of</strong> 23<br />
Ambient Waters Microbiological Procedure SOP 007<br />
S:\WW\awwword\LABPROC\all QAPPs\LABQAPPs\QAPP Rev5 -0609\SOPs\SOP 007AmbientMicrobes.doc
mixed it will be filtered and treated as a sample. The sample bottle sterility check must return a<br />
value <strong>of</strong> zero CFUs. All data will be recorded on the “Bacterial Sample Log & Worksheet:<br />
Bacteria Bottle Sterilization Confirmation” data sheet (see Section 8.0 Documentation).<br />
Corrective Action<br />
If the bottle blank returns a value greater than zero CFUs then all the sample bottles sterilized in<br />
the run must be re-sterilized and the bottle sterility check completed again after the second<br />
sterilization process. No sample bottles will be placed into the general laboratory stock <strong>of</strong><br />
sterilized bottles until the sterility check returns a value <strong>of</strong> zero.<br />
5.2.8 QA Check on New Plates<br />
E. coli bacterium is the dominant fecal coliform bacteria found in ambient water. Therefore, a<br />
maintained TSB tube <strong>of</strong> E. coil is used to assess the quality <strong>of</strong> new plates. Plates are assessed<br />
to determine if they are able to support the growth <strong>of</strong> E. coli by plating bacteria from the known<br />
tube <strong>of</strong> E. coli onto 5 plates <strong>of</strong> media that have been shown to produce colonies during a prior<br />
sample run and 5 plates <strong>of</strong> the new media. Refer to Section 5.2.8.1 for details on the procedure<br />
to QA check new plates.<br />
If the laboratory has received bacteria samples from a field site known to produce positive<br />
plates, then an aliquot from this sample may be used to check the new plates instead <strong>of</strong><br />
inoculating a TSB tube from the maintained E. coli culture. Preparation <strong>of</strong> QA check plates<br />
using an existing sample is completed using the procedure outlined below in Section 5.2.5.1<br />
skipping steps 1 through 5.<br />
8 <strong>of</strong> 23<br />
5.2.8.1 Preparation <strong>of</strong> QC samples for new batch <strong>of</strong> plates.<br />
1. Obtain the maintained E. coli culture from the refrigerator<br />
2. Using a sterile stick, gently touch the E. coli culture ONCE.<br />
3. Flame sterilize a TSB tube.<br />
4. Swish the contaminated stick in the TSB tube, re-sterile the neck <strong>of</strong> the tube,<br />
and set the tube cap – do not tighten the cap.<br />
5. Place the inoculated TSB tube in a test tube rack or beaker in the 35 °C<br />
incubator for 24 hours.<br />
6. Remove the TSB tube after incubation and use the tube to prepare serial<br />
dilutions <strong>of</strong> 10 -7 and 10 -8 .<br />
7. Filter 1.0 mL <strong>of</strong> the 10 -8 dilution using the sample filtration technique<br />
described in Section 5.3.4.2 and 5.3.4.3. Place the filter onto a new media<br />
plate and incubate as a sample.<br />
8. Filter 1.0 mL <strong>of</strong> the 10 -7 dilution using the sample filtration technique<br />
described in Section 5.3.4.2 and 5.3.4.3. Place the filter onto a new media<br />
plate and incubate as a sample.<br />
9. Repeat Steps 7 and 8 until 6 plates that are known to support bacteria (old<br />
batch) and 6 plates from the new batch have filters. Half <strong>of</strong> the new plates<br />
and half <strong>of</strong> the old plates should contain filters inoculated with the 10 -7<br />
dilution; the other half with the 10 -8 dilution.<br />
10. After incubation, remove the plates and visually inspect them to determine if<br />
approximately the same amount <strong>of</strong> bacteria grew on both the old and new<br />
plates.<br />
Ambient Waters Microbiological Procedure SOP 007<br />
S:\WW\awwword\LABPROC\all QAPPs\LABQAPPs\QAPP Rev5 -0609\SOPs\SOP 007AmbientMicrobes.doc
Corrective Action<br />
New and old plates must exhibit bacteria growth. If new plates do not exhibit bacteria growth,<br />
but the old plates do, then the batch <strong>of</strong> new plates is assumed to be unable to support bacteria<br />
and discarded. If both the new and old plates do not exhibit bacteria growth then it is assumed<br />
that the plates were not inoculated properly and the inoculation procedure is repeated.<br />
Notes regarding dilutions for QA samples<br />
Volume <strong>of</strong><br />
sample<br />
filtered<br />
(mL)<br />
Dilution tube preparation Volume<br />
placed on<br />
filter (mL)<br />
Calculated Result<br />
(# <strong>of</strong> colonies divided<br />
by calculated result =<br />
colonies/100 mL)<br />
0.1 1 mL E. coli inoculated TSB sample<br />
into 9 mL <strong>of</strong> PBS<br />
1 1,000 or 10 -3<br />
0.01 1 mL 10 3 sample into 9 mL <strong>of</strong> PBS 1 10,000 or 10 -4<br />
0.001 1 mL 10 4 sample into 9 mL <strong>of</strong> PBS 1 100,000 or 10 -5<br />
0.0001 1 mL 10 5 sample into 9 mL <strong>of</strong> PBS 1 1,000,000 or 10 -6<br />
0.00001 1 mL 10 6 sample into 9 mL <strong>of</strong> PBS 1 10,000,000 or 10 -7<br />
0.000001 1 mL 10 7 sample into 9 mL <strong>of</strong> PBS 1 100,000,000 or 10 -8<br />
5.3 Analysis Method<br />
5.3.1 Preparation – 1 Week Before Scheduled Sampling<br />
1. Check to be sure the UV box works. If the lights flash and turn on when the black button<br />
at the left end <strong>of</strong> the box is depressed – it works. Be sure not to stare at the light as it<br />
can burn your retinas! If it doesn’t work contact Elizabeth Herron to have the box<br />
repaired.<br />
2. Check to be sure there is an adequate supply <strong>of</strong> mTEC media plates that are less than 1<br />
month old. If there are not enough plates, more must be prepared. Preparation<br />
instructions are found in Section 5.3.1.1.<br />
Materials<br />
5.3.1.1 Preparation <strong>of</strong> mTEC Media Plates<br />
Envirocide or Conflict Magnetic stirring bar<br />
Sterile Petri dishes Magnetic stirring and heating plate<br />
Autoclave Metal tray<br />
2 - 2 L autoclave safe flasks Aluminum foil<br />
Insulated autoclave gloves Sterile 25 mL pipette<br />
Dehydrated mTEC media Empty foil lined cardboard box<br />
Deionized (DI) water Electronic pipette-aid<br />
9 <strong>of</strong> 23<br />
Ambient Waters Microbiological Procedure SOP 007<br />
S:\WW\awwword\LABPROC\all QAPPs\LABQAPPs\QAPP Rev5 -0609\SOPs\SOP 007AmbientMicrobes.doc
Procedure<br />
All equipment to come into contact with the Petri dishes must remain sterile. If contamination is<br />
introduced the Petri dishes must be discarded.<br />
1 L <strong>of</strong> media is enough for approximately 175 – 200 plates<br />
1. Weigh out 45.3 g <strong>of</strong> dehydrated mTEC media into a 2 L Erlenmeyer flask.<br />
2. Add 1 L DI H2O and a magnetic stirring bar.<br />
3. Heat and stir the re-hydrated mTEC media on the stirring/heating plate until the media is<br />
fully dissolved (to boiling if necessary).<br />
4. Pour approximately 500 mL <strong>of</strong> the liquid media into the second 2 L flask.<br />
5. Cover the mouth <strong>of</strong> the flasks loosely with aluminum foil, and place in metal tray.<br />
6. Autoclave the tray and media for approximately 40 minutes. Check the autoclave <strong>of</strong>ten<br />
to get the sterilization time correct without over cooking; the autoclave must be at 121 °C<br />
for 15 minutes to achieve sterilization. Directions on autoclave use are found in SOP<br />
004 – General Autoclave Operation.<br />
7. While the mTEC is autoclaving, sterilize the table top by wiping down the entire surface<br />
with the Envirocide or Conflict and allowing the surface to dry.<br />
8. Set up the electronic pipette aid at the work area. Have a sterilized 25 mL pipette ready,<br />
but leave it in its wrapper to maintain sterility.<br />
9. Set out the Petri dishes in rows <strong>of</strong> 5 to 10, bottom side down, leaving room for the flask<br />
along the edge <strong>of</strong> the countertop.<br />
10. Carefully remove the lids, <strong>of</strong>fsetting the lids from the bottoms so that the dishes are less<br />
than half-open. Do not touch the inside <strong>of</strong> the lid or bottom. If the inside <strong>of</strong> a dish comes<br />
in contact with anything other than the sterile counter top, discard the dish.<br />
11. Remove the tray from the autoclave when the cycle is completed. Be sure to wear the<br />
insulated autoclave gloves as the media will be very hot.<br />
12. Place the flask with the boiling hot media into the 44.5 °C water bath for about 5 minutes<br />
to allow the media to cool slightly. Be careful not to let the flask tip over! The Petri dish<br />
rack and stone may be used to keep the flask upright.<br />
13. Move the slightly cooled flask to the area where the Petri dishes are set-up using the<br />
insulated autoclave gloves. Place the hot flask next to the first row <strong>of</strong> plates (use a tall<br />
stool to set the flask on if needed).<br />
14. Remove the 25 mL pipette from its wrapper, being careful not to touch the pipette<br />
anywhere but at its neck. Attach the pipette aid to the pipette. Turn the pipette-aid on,<br />
and draw up about 25 mL <strong>of</strong> hot mTEC media from the flask.<br />
15. Dispense 4 to 5 mL <strong>of</strong> mTEC media into each <strong>of</strong> the plates in the first row.<br />
16. Repeat until all the media has been used.<br />
17. Once the media has cooled it will form a gelatin-like substance. At this point put the<br />
covers back on the Petri dishes completely. Stack the Petri dishes with the bottom<br />
(media-side) up in the foil lined box. Label the box with the date and type <strong>of</strong> media.<br />
18. QC check the plates against old plates using the procedure found in Section 5.2.5.1. If<br />
plates are found to be acceptable store them in the refrigerator for up to a month.<br />
10 <strong>of</strong> 23<br />
Ambient Waters Microbiological Procedure SOP 007<br />
S:\WW\awwword\LABPROC\all QAPPs\LABQAPPs\QAPP Rev5 -0609\SOPs\SOP 007AmbientMicrobes.doc
5.3.2 Preparation - At least 48 Hours Prior to Sampling Day (As Needed)<br />
1. Autoclave an appropriate number <strong>of</strong> bottles for sampling. (Review SOP 005 - Bottle<br />
Autoclaving Procedure). Put sterile labels and sample labels on the bottles.<br />
2. Make up sterile phosphate buffered saline solution (PBS) as needed; 1L <strong>of</strong> PBS is<br />
enough for approximately 25-50 samples. The solution must be room temperature when<br />
used and will need 24 hours to cool. Instructions for preparation <strong>of</strong> the PBS are located<br />
in Section 5.3.2.1.<br />
3. Make sure the water bath and incubator are set to and holding the correct temperatures.<br />
The flask with the thermometer in the white incubator should be full <strong>of</strong> DI water, with the<br />
temperature reading 35 +/- 0.5 C. The water bath should be approximately ¾ full <strong>of</strong> DI<br />
water, and set at 44.5 +/- 0.2 C.<br />
4. Make sure there is enough urea substrate for plate counting. Approximately 3 mL <strong>of</strong><br />
urea substrate is needed per plate. Preparation <strong>of</strong> urea substrate is in Section 5.3.2.3.<br />
5.3.2.1 Preparation <strong>of</strong> 1L Sterile Phosphate Buffered Saline Solution (PBS)<br />
1. Add the following into a 4 L Erlenmeyer flask:<br />
a. 1.25 mL Stock KH2PO4 solution (preparation information in Section 5.3.2.5)<br />
b. 5 mL Stock MgCl2 solution (preparation information in Section 5.3.2.6)<br />
c. 7 g NaCl<br />
d. 1 L DI H2O<br />
2. Stir the mixture using a stirring bar and magnetic stirrer until the NaCl is dissolved.<br />
3. Cover the mouth <strong>of</strong> the flask with aluminum foil and place it on a metal tray.<br />
4. Autoclave the tray and flask for 45 minutes at 121 C (refer to SOP 004 – General<br />
Autoclave Operation).<br />
5. Remove the flask and tray using insulated autoclave gloves as the PBS will be very hot.<br />
6. Leave the flask covered and allow it to cool to room temperature before using.<br />
5.3.2.2 Preparation <strong>of</strong> 4 L Sterile Phosphate Buffered Saline Solution (PBS)<br />
This procedure will prepare enough PBS to fill the safe plastic carboy<br />
1. Add the following to the 6 L plastic carboy<br />
a. 5 mL Stock KH2PO4 solution (preparation information in Section 5.3.2.5)<br />
b. 20 mL Stock MgCl2 solution (preparation information in Section 5.3.2.6)<br />
c. 28 g NaCl<br />
d. 4 L DI H2O<br />
2. Stir the mixture using a stirring bar and magnetic stirrer until the NaCl is dissolved.<br />
3. Set the carboy cap on the mouth <strong>of</strong> the carboy, but DO NOT thread. Place in a metal<br />
tray.<br />
4. Autoclave the tray and carboy for 60 minutes at 121 C. The carboy will have to be laid<br />
on it side to fit into the autoclave. Use beakers or bottles on either side <strong>of</strong> the carboy<br />
handle to brace it, preventing the carboy from rolling around on the tray (refer to SOP<br />
004 – General Autoclave Operation).<br />
11 <strong>of</strong> 23<br />
Ambient Waters Microbiological Procedure SOP 007<br />
S:\WW\awwword\LABPROC\all QAPPs\LABQAPPs\QAPP Rev5 -0609\SOPs\SOP 007AmbientMicrobes.doc
5. After completion <strong>of</strong> the autoclave cycle, remove the flask and tray using insulated<br />
autoclave gloves as the PBS will be very hot.<br />
6. If possible, leave the tray and carboy (with cap set on the mouth) on the cart opposite<br />
the autoclave overnight to cool. This is much safer than carrying the hot, loosely capped<br />
carboy.<br />
12 <strong>of</strong> 23<br />
5.3.2.3 Preparation <strong>of</strong> Urea Substrate<br />
1. Add the following to a 120 mL brown glass bottle<br />
a. 2.0 g Urea<br />
b. 10 mg Phenol Red<br />
c. 100 mL DI H2O<br />
2. Store excess solution in a labeled bottle in the URIWW Refrigerator in room 002 <strong>of</strong> the<br />
Kingston Coastal Institute.<br />
5.3.2.4 Preparation <strong>of</strong> 1N NaOH<br />
1. Obtain a 250 mL volumetric flask and fill it approximately ¾ full with ultrapure water.<br />
2. Weight out 10 g <strong>of</strong> NaOH.<br />
3. Slowly add the NaOH to the volumetric flask while mixing.<br />
4. Remember that once the NaOH starts to dissolve the flask will get hot! Run the flask<br />
under cool tap water if necessary, making sure not to get any <strong>of</strong> the tap water into the<br />
flask. Loosely cover the flask top with foil or parafilm while cooling the flask.<br />
5. Allow the flask to cool and add ultrapure water to bring the flask to volume once all the<br />
NaOH has dissolved.<br />
5.3.2.5 Preparation <strong>of</strong> Stock KH2PO4 solution<br />
1. Add the following to a 1 L Erlenmeyer flask<br />
a. 34.0 g KH2PO4<br />
b. 500 mL DI H20<br />
2. Adjust to pH 7.2 0.5 with 1N NaOH and dilute to 1 L with DI H20<br />
3. Record the initial pH reading as well as that after it has been adjusted to pH 7.2 0.5 on<br />
the “Buffered Dilution/Rinse Water KH2PO4 Reagent pH Record” data sheet (see<br />
Section 8.0 Documentation).<br />
4. Store excess solution in a labeled plastic bottle in the URIWW Refrigerator in room 002<br />
<strong>of</strong> the Kingston Coastal Institute<br />
5.3.2.6 Preparation <strong>of</strong> Stock MgCl2 solution<br />
Add 81.6 g MgCl2 6H2O to a 1 L Volumetric flask and dilute to 1 L with DI H20.<br />
Store excess solution in a labeled plastic bottle in the URIWW Refrigerator in room 002 <strong>of</strong> the<br />
Kingston Coastal Institute.<br />
Ambient Waters Microbiological Procedure SOP 007<br />
S:\WW\awwword\LABPROC\all QAPPs\LABQAPPs\QAPP Rev5 -0609\SOPs\SOP 007AmbientMicrobes.doc
5.3.3 Preparation - Day Before Sample Collection<br />
1. Make sure there is an adequate supply <strong>of</strong> sterile 1 mL, 10 mL and 25 mL pipettes and<br />
PBS filled sterile squirt bottles AS WELL AS FILTER ASSEMBLIES. If not, autoclave<br />
them.<br />
a. Pipettes are sterilized in the pipette pouches that are laid on an autoclavable<br />
tray.<br />
b. Squirt bottles are sterilized empty, with foil over the squirt caps. Caps should<br />
only be loosely placed in the bottle. Bottles should be placed on an autoclavable<br />
tray when placed into the autoclave. Once cooled, sterile squirt bottles can be<br />
filled with cool sterile PBS (refer to SOP 004 – General Autoclave Operation).<br />
c. Filter assemblies are sterilized in autoclavable bags that are laid on an<br />
autoclavable tray.<br />
2. Create data sheets from the template found on the WW computers. It is very helpful to<br />
include any known dilution information on the data sheet. An example data sheet is<br />
located in Section 8.0 Documentation.<br />
3. Prepare the TSB tube for the positive plate using the procedure outlined in Section<br />
5.2.4.1.<br />
5.3.4 Procedure - Day <strong>of</strong> Sample Collection<br />
5.3.4.1 Initial Preparation<br />
1. Take the appropriate number <strong>of</strong> mTEC media plates out <strong>of</strong> the fridge so that they can<br />
begin to warm up a little. Allowing the media plates to come to room temperature<br />
reduces condensation and ensures that the labels will not rub <strong>of</strong>f.<br />
2. Wipe down the bench in room 019 with Envirocide or Conflict; allow the bench tops to<br />
dry.<br />
3. Connect the side arm flasks to the vacuum manifold.<br />
4. Set up the alcohol lamp, beaker with alcohol and filter forceps, membrane filters, Sharpie<br />
marker, PBS squirt bottle, etc.<br />
5. Remember to use basic hygienic practices when handling samples. Latex gloves,<br />
laboratory coats and eye protection are required.<br />
5.3.4.2 When Samples Arrive At The Laboratory<br />
1. After logging in samples, store them in a cooler with ice packs or the refrigerator located<br />
in room 019.<br />
2. Sterilize the filter funnels and filtration bases in the UV box for at least two minutes.<br />
a. The cardboard has to be over the button in order for the unit to turn on when the<br />
door is closed.<br />
b. The latch must be engaged to keep the door closed. Peek in the side to be sure<br />
it is on – don’t stare at the light!<br />
3. Retrieve samples in batches <strong>of</strong> 4 from the cooler.<br />
4. Label the bottom (half holding the media) <strong>of</strong> mTEC media plates with the Sharpie. The<br />
label should include all the information present on the sample bottle, as well as any<br />
necessary sample dilution information.<br />
13 <strong>of</strong> 23<br />
Ambient Waters Microbiological Procedure SOP 007<br />
S:\WW\awwword\LABPROC\all QAPPs\LABQAPPs\QAPP Rev5 -0609\SOPs\SOP 007AmbientMicrobes.doc
5. Label at least one plate from each set <strong>of</strong> 4 for a replicate sample. Select that sample in<br />
a random fashion. If multiple dilutions are needed, try to make the replicate one <strong>of</strong> the<br />
anticipated “correct” dilutions.<br />
6. Stack labeled plates from least dilute to most, with most dilute on the top (as applicable).<br />
7. Enter the relevant data in the data sheet to help keep track <strong>of</strong> the samples.<br />
8. Light the alcohol lamp.<br />
9. Remove the sterilized filter funnels and base from the UV box, being careful to not touch<br />
the insides <strong>of</strong> the funnel or the base. Assemble the funnels and base (they are<br />
magnetic, so they will stay together without a clamp). Place one filter funnel setup on<br />
each <strong>of</strong> the side arm flasks, being careful not to touch the inside <strong>of</strong> the funnel or the<br />
base.<br />
10. Squirt a little PBS onto the base <strong>of</strong> each filter funnel.<br />
11. Remove the filter forceps (which should be soaking in 95% ethanol approximately 1<br />
centimeter deep) and sterilize them by passing them through the flame <strong>of</strong> the alcohol<br />
lamp. Do not hold them in the flame as they will get too hot. Be sure to keep the beaker<br />
<strong>of</strong> 95% ethanol behind or to the side <strong>of</strong> the alcohol lamp. A flaming drop <strong>of</strong> alcohol could<br />
cause the beaker <strong>of</strong> ethanol to explode if it is placed in front <strong>of</strong> the lamp.<br />
12. After lifting <strong>of</strong>f the top <strong>of</strong> the funnel, place membrane filters on the base <strong>of</strong> each <strong>of</strong> the<br />
filter funnels using the following procedure:<br />
a. Using the sterilized filter forceps, carefully remove a filter from the package. The<br />
filter should not touch anything but the filter forceps. If the filters are separated<br />
by blue liners remove the blue backing, and place the filter with its front liner on<br />
the wetted filter base gridded side up. The blue front liner should curl up making<br />
it easier to remove.<br />
b. If a filter is burned or ripped, discard the filter, and place a new one on the filter<br />
base.<br />
13. Provided the filter funnels are sterile (i.e. no sample has been introduced yet), the<br />
forceps do not need to be re-flamed between each placement <strong>of</strong> a filter onto each<br />
funnel. Touching anything other than the sterile filters with the forceps necessitates reflaming<br />
the forceps prior to continued use.<br />
5.3.4.3 Filtering Samples<br />
1. Set up the samples and media plates so there is one set in front <strong>of</strong> each <strong>of</strong> the prepared<br />
filter funnels.<br />
2. Loosen the lids on the media plates leaving the lid in place with the labeled bottom<br />
facing up.<br />
3. Shake the first sample vigorously (about 15 times in 7 seconds).<br />
4. Pour the sample into the filter funnel<br />
a. Generally, 100 mL <strong>of</strong> lake or river water is analyzed per site. The sample is<br />
poured directly into the filter funnel.<br />
i. The volume is determined using the markings on the side <strong>of</strong> the filter<br />
funnel.<br />
ii. Be sure to complete an entry on the data sheet for each sample including<br />
any dilution (volume) or replicate information as well as sample date and<br />
location.<br />
14 <strong>of</strong> 23<br />
Ambient Waters Microbiological Procedure SOP 007<br />
S:\WW\awwword\LABPROC\all QAPPs\LABQAPPs\QAPP Rev5 -0609\SOPs\SOP 007AmbientMicrobes.doc
. If a particular location has a history <strong>of</strong> high levels <strong>of</strong> fecal coliforms or if there is<br />
reason to suspect that high levels may be present due to events such as large<br />
rain storms, several sets <strong>of</strong> diluted plates should be prepared.<br />
Preparation <strong>of</strong> dilutions<br />
i. Ambient water samples that must be diluted are generally diluted to 1, 10<br />
and 100 mL.<br />
ii. Prepared dilutions should be filtered sequentially in a single filter funnel in<br />
the following order: 1 mL, 10 mL and 100 mL. This will ensure there is no<br />
cross-contamination. Remember, only one filter and one dilution per<br />
plate.<br />
iii. A sterile 1 mL or 10 mL pipette is used to dispense the appropriate<br />
volume. Approximately 10 mL <strong>of</strong> PBS should be added to the funnel prior<br />
to adding sample volumes less than or equal to 10 mL to ensure<br />
adequate dispersal <strong>of</strong> bacteria throughout the filter.<br />
iv. See Elizabeth Herron for guidance on appropriate sample dilution values<br />
as they may change over time.<br />
5. Repeat steps 3 and 4 until all 4 filter funnels have sample in them.<br />
6. Open the valve <strong>of</strong> each <strong>of</strong> the filter funnel setups, and turn on the vacuum pump.<br />
7. After all the samples have filtered through, use the squirt bottle containing PBS to rinse<br />
the inside <strong>of</strong> each funnel approximately three times to wash any stray bacteria onto the<br />
filter. Do not touch the tip <strong>of</strong> the squirt bottle to the inside <strong>of</strong> any <strong>of</strong> the funnels. This<br />
will contaminate other samples.<br />
8. Turn <strong>of</strong>f the vacuum pump.<br />
9. Flame sterilize the forceps and shut <strong>of</strong>f the valve for the first funnel.<br />
10. Carefully remove the filter from the first funnel with the sterilized forceps.<br />
11. Carefully place the filter onto the media <strong>of</strong> a labeled Petri dish, grid side up, so there are<br />
no bubbles apparent. Touch the outer edge <strong>of</strong> the filter with the forceps until it is<br />
completely flat. If it appears there are bubbles in the media pick up the filter and lay it<br />
onto the media again.<br />
12. Put the cover back on the plate, invert the plate and set it aside.<br />
13. If additional dilutions or replicates will be completed on the sample, place a sterile filter<br />
on the empty filter base and add the next dilution or replicate. The forceps do not have<br />
to be re-sterilized for this step provided they have not made contact with anything but the<br />
sterile media or a more dilute sample.<br />
14. Repeat steps 9 through 13 for the rest <strong>of</strong> the filter funnels.<br />
15. Once all dilutions and replicates for the first set <strong>of</strong> 4 samples have been filtered, place<br />
the plates with filters into the 35 ºC incubator for 2 hours. Plates should be inverted and<br />
stacked no higher than 2.<br />
16. Remove the filter funnels and base replacing them with sterilized ones from the UV box<br />
for the next set <strong>of</strong> samples. Put the non-sterile filter funnels into the UV box and turn the<br />
UV lights on by closing the lid and depressing the button.<br />
17. Repeat the procedure until all <strong>of</strong> the samples have been processed.<br />
15 <strong>of</strong> 23<br />
Ambient Waters Microbiological Procedure SOP 007<br />
S:\WW\awwword\LABPROC\all QAPPs\LABQAPPs\QAPP Rev5 -0609\SOPs\SOP 007AmbientMicrobes.doc
18. After 2 hours in the incubator place up to 8 to plates into a Whirl-pak TM bag, whirl shut<br />
being careful not to trap too much air. Tie bags onto shelves in the Petri dish rack using<br />
the wire ties <strong>of</strong> the bag. Be sure that the plates are inverted on the rack.<br />
19. Transfer the plates to the 44.5 °C water bath for 22 hours. Air trapped in the Whirl-pak TM<br />
bags may cause the test tube rack to float. Place the large granite slab onto the rack to<br />
keep it from floating, if necessary.<br />
5.3.4.4 Clean-up<br />
1. Discard the filtrate from the side arm flasks down the sink drain. Clean the side arm<br />
flasks with warm water and the angled bottle brush. They can be placed on the top <strong>of</strong><br />
the cart to dry<br />
2. Clean the filter funnels with warm water and a brush, then place them on the rack<br />
hanging from the right side <strong>of</strong> the 35 °C incubator to dry.<br />
3. Pour the alcohol from the beaker with the forceps back into the labeled plastic container<br />
and close tightly. This alcohol is re-used. Alcohol will evaporate very quickly if not<br />
stored in a sealed container.<br />
4. Wipe down the alcohol lamp, beaker with forceps, alcohol container, filters, pipette aid<br />
and anything else that has come into contact with sample with Envirocide or Conflict<br />
and put everything back where it is stored.<br />
5. Thoroughly wipe the counter, tabletops and incubator handles with Envirocide or<br />
Conflict.<br />
6. Be sure the UV box is <strong>of</strong>f and the door is slightly ajar.<br />
5.3.4.5 Counting The Plates<br />
1. After 20 - 22 hours, remove the Whirl-pak TM bags from the water bath.<br />
2. Organize the plates according to the data sheet for ease <strong>of</strong> data entry.<br />
3. Count and record the number <strong>of</strong> yellow or yellow-green colonies on each membrane<br />
filter. There is a digital hand-held counter available.<br />
a. Establish a system for counting (left to right, top to bottom, etc.) but be<br />
consistent!<br />
b. The ideal range for a plate is 20-80 colonies. Higher or lower plate counts can<br />
be used if necessary, with the average <strong>of</strong> replicate plates used when possible.<br />
c. Record the number <strong>of</strong> yellow and yellow-green colonies in the column marked<br />
“24 hour count” – this is the fecal coliforms value.<br />
4. Once all the plates have been counted, place a filter pad in the lid <strong>of</strong> the first plate using<br />
forceps. Pipette enough urea substrate media onto the pad to saturate the pad, being<br />
careful not to create a big puddle. Approximately 3 mL <strong>of</strong> urea should be sufficient.<br />
5. With the forceps, remove the membrane filter from the mTEC media, and place it onto<br />
the saturated filter pad grid side up. Leave it on the pad for 15 – 20 minutes.<br />
6. Repeat for the remaining filters<br />
7. After 15 – 20 minutes, starting with the first plate where the filter was placed on the urea<br />
saturated filter pad, count the number <strong>of</strong> yellow and yellow-brown colonies again exactly<br />
as discussed in step 3. Record this number in the column labeled “# Urea Negative”.<br />
a. This is the number <strong>of</strong> E. coli colonies on the plate.<br />
16 <strong>of</strong> 23<br />
Ambient Waters Microbiological Procedure SOP 007<br />
S:\WW\awwword\LABPROC\all QAPPs\LABQAPPs\QAPP Rev5 -0609\SOPs\SOP 007AmbientMicrobes.doc
. The other types <strong>of</strong> fecal coliform bacteria will have been turned a reddish –<br />
purple color by being in contact with the urea substrate media.<br />
8. Count the colonies on the remaining plates.<br />
5.3.5 Disposal<br />
5.3.5.1 Used Plates<br />
Place all <strong>of</strong> the used plates into a clear autoclavable bag located in the labeled red container.<br />
Never fill the autoclavable bags more than half full with plates. If necessary, obtain another<br />
autoclavable bag. Follow the instructions in SOP 006 – Waste Autoclaving Procedure for using<br />
either the Woodward Hall or the Kingston Coastal Institute autoclave to dispose <strong>of</strong> plates. Place<br />
the cooled bag into the dumpster (do not put in a trash can as the janitors will NOT dispose <strong>of</strong><br />
it).<br />
5.3.5.2 Sample Bottles<br />
Samples may only be disposed <strong>of</strong> after final quality assurance checks are completed and the<br />
data found to be acceptable using criteria found in Section 5.2 <strong>of</strong> this SOP. Wearing gloves,<br />
remove the sample bottles from the refrigerator in room 019. Empty samples down the drain,<br />
and wash bottles with hot soapy water in room 002 as discussed in SOP 003 - General Labware<br />
Cleaning Procedure.<br />
6.0 CALCULATIONS<br />
Fecal coliforms and E. coli are reported in terms <strong>of</strong> the number <strong>of</strong> bacteria per 100 mL. Fecal<br />
coliforms and E. coli counts <strong>of</strong> 0 are reported as
7.0 REFERENCES<br />
APHA, AWWA & WEF. <strong>Standard</strong> Methods for the Examination <strong>of</strong> Water and Wastewater. 19 th<br />
ed. Washington D.C: APHA, 1995.<br />
Methods referenced: Microbiological Examination (9000), Recreational Waters (9213-D)<br />
and Membrane Filtration Technique for Members <strong>of</strong> the Coliform Group (9222 A.)<br />
18 <strong>of</strong> 23<br />
Ambient Waters Microbiological Procedure SOP 007<br />
S:\WW\awwword\LABPROC\all QAPPs\LABQAPPs\QAPP Rev5 -0609\SOPs\SOP 007AmbientMicrobes.doc
8.0 DOCUMENTATION<br />
Example Data Sheet<br />
Bacterial Sample Log & Worksheet: Shickasheen (8/20/04)<br />
mTEC Membrane Filtration Method<br />
Analyst - set-up: Analyst - Counts:<br />
Incubator temp. start: Waterbath temp. start:<br />
Incubator temp. end: Waterbath temp. end:<br />
Setup Dil. 24 Hr # urea Total fecal Total E.coli<br />
Monitoring Location Date (mLs) Count neg (per 100mL) (per 100mL)<br />
Mud Brook<br />
Shick - a @ Rte 2<br />
Shick - b @ Miskiania<br />
Shick - c @ Barber Outlet<br />
Shick - d @ Rte 138<br />
Shick @ Potter - new dam<br />
Understanding the URIWW Bacterial Data Sheet<br />
Location: The name <strong>of</strong> the waterbody or specific site from which the sample was collected.<br />
Date Setup: The date on which the sample was filtered and placed on the media. This<br />
SHOULD be the same data as the sample date (the usual hold time for samples < 6 hours). In<br />
the event that it is not the same as the sample date, the sample date should be written in<br />
parenthesis next to the location identification.<br />
19 <strong>of</strong> 23<br />
Ambient Waters Microbiological Procedure SOP 007<br />
S:\WW\awwword\LABPROC\all QAPPs\LABQAPPs\QAPP Rev5 -0609\SOPs\SOP 007AmbientMicrobes.doc
Dil. (mLs): The volume <strong>of</strong> sample filtered, reported in milliliters. Typically 100 mL are filtered,<br />
although if the bacteria levels are expected to be high smaller volumes may be filtered as well.<br />
24 Hr Count: The number <strong>of</strong> yellow and yellow-brown colonies counted on that filter after a 24<br />
hour total incubation period. This number corresponds to the number <strong>of</strong> fecal coliform bacteria<br />
for that volume <strong>of</strong> water.<br />
# urea neg.: The number <strong>of</strong> yellow and yellow-brown colonies counted on that filter after being<br />
placed on a urea substrate media saturated pad for 15 minutes. This number corresponds to<br />
the number <strong>of</strong> E. coli bacteria for that volume <strong>of</strong> water.<br />
Total fecal coliforms (per 100 mL): The number <strong>of</strong> fecal coliform bacteria per 100 mL (the<br />
standard method <strong>of</strong> reporting fecal coliform bacteria). This was determined by dividing the 24<br />
Hr Count by the Dil. (mLs) and multiplying by 100.<br />
Total E. coli (per 100 mL): The number <strong>of</strong> E. coli bacteria per 100 mL (the standard method <strong>of</strong><br />
reporting E. coli bacteria). This was determined by dividing the # urea neg. by the Dil. (mLs),<br />
and multiplying by 100.<br />
20 <strong>of</strong> 23<br />
Ambient Waters Microbiological Procedure SOP 007<br />
S:\WW\awwword\LABPROC\all QAPPs\LABQAPPs\QAPP Rev5 -0609\SOPs\SOP 007AmbientMicrobes.doc
URI Watershed Watch Laboratory<br />
Quarterly UV germicidal Tube Record<br />
Date Tube # Intensity Date Tube # Intensity<br />
Initial intensity 1 4<br />
readings 2 5<br />
3 6<br />
Date<br />
Tech's<br />
Initials<br />
Tube #<br />
Reading<br />
(right side)<br />
Reading<br />
(center)<br />
Reading<br />
(left side)<br />
Average<br />
Reading<br />
Wear protective gear when<br />
measuring UV lamp intensity!<br />
Intensity<br />
Reduction<br />
Comments / Notes<br />
This form is intended to be used to maintain a quarterly record <strong>of</strong> the intensity <strong>of</strong> the germicidal UV labs in the<br />
sterilzing box in room 19. The intensity <strong>of</strong> EACH <strong>of</strong> the SIX tubes must be measured on a quarterly basis,<br />
with each tube measured four inches from each end, as well as in the center, wtih the average <strong>of</strong> those<br />
three readings used. Once this sheet is full it should be replaced with a new blank sheet. The full sheet<br />
should be returned to the URIWW Micro Laboratory Binder in Room 019; blank sheets are also located in this<br />
binder. Any maintenance activity should also be recorded on this sheet. See Elizabeth with questions.<br />
21 <strong>of</strong> 23<br />
Ambient Waters Microbiological Procedure SOP 007<br />
S:\WW\awwword\LABPROC\all QAPPs\LABQAPPs\QAPP Rev5 -0609\SOPs\SOP 007AmbientMicrobes.doc
Bacterial Sample Log & Worksheet: Bacteria Bottle Sterilization Confirmation<br />
mTEC Membrane Filtration Method<br />
Analyst - set-up: Analyst - Counts:<br />
Incubator temp. start: Waterbath temp. start:<br />
incubator temp. end: Waterbath temp. end:<br />
Setup Dil. 24 Hr Total fecal<br />
Monitoring Location Date (mls) Count (per 100ml) Comments<br />
Batch #4 100<br />
Batch #5 100<br />
Analyst - set-up:<br />
Enterolert IDEXX Method<br />
Analyst - Counts: Media Batch #:<br />
Incubator temp. start: Incubator temp. end:<br />
Notes: "-" = Quanti-tray used, no small wells<br />
Expiration:<br />
Final count determined by using the correct table<br />
(51 well Quanti-Tray lg wells only, Quanti-Tray / 2000 with small wells)<br />
22 <strong>of</strong> 23<br />
Setup Dil. # lg pos. # sm pos. Table<br />
Enterococci Date (mls) wells wells Value<br />
Batch #4 100 -<br />
Batch #5 100 -<br />
IDEXX Blank 100 -<br />
URIWW Sterilized 100 -<br />
Ambient Waters Microbiological Procedure SOP 007<br />
S:\WW\awwword\LABPROC\all QAPPs\LABQAPPs\QAPP Rev5 -0609\SOPs\SOP 007AmbientMicrobes.doc
Date<br />
23 <strong>of</strong> 23<br />
URI Watershed Watch Laboratory<br />
Buffered Dilution/rinse Water KH 2PO 4 reagent pH Record<br />
Tech's<br />
Initials<br />
Meter<br />
Letter<br />
(A or B)<br />
Calibration 2<br />
Intitial pH<br />
Volume 1N<br />
NaOH added<br />
(mL)<br />
Final pH Comments / Notes<br />
This form is intended to be used to maintain a record <strong>of</strong> pH and adjustment for the phosphate reagent for the fecal coliform dilution/rinse<br />
water. When new reagent is made up, the initial pH, amount <strong>of</strong> NaOH added, and final pH should be recorded on this sheet. Once this<br />
sheet is full it should be replaced with a new blank sheet. The full sheet should be returned to the URIWW Micro Laboratory Binder in<br />
Room 019; blank sheets are also located in this binder. Check the Laboratory QAPP, SOP 010 - Alkalinity and pH procedures, for<br />
details regarding the pH and alkalinity procedures.<br />
Calibration and Maintenance Information:<br />
1<br />
Each time the pH probe is used the filling solution level in the probe should be checked. The level should be within 1/4 inch <strong>of</strong> the top <strong>of</strong><br />
the electode. If it isn't, add enough filling solution to bring it up to that point.<br />
2 The meter should have a slope (Electrode Efficiency) <strong>of</strong> at least 96% after calibration. If the meter doesn't initially calibrate correctly,<br />
change the probe filling solution and replace the pH buffers, then recalibrate the probe. If this doesn't solve the problem replace the<br />
probe. See Linda or Elizabeth with questions.<br />
Ambient Waters Microbiological Procedure SOP 007<br />
S:\WW\awwword\LABPROC\all QAPPs\LABQAPPs\QAPP Rev5 -0609\SOPs\SOP 007AmbientMicrobes.doc
<strong>Standard</strong> <strong>Operating</strong> Procedure 008<br />
(Prior number URIWW-SOP-4B)<br />
ISDS Microbiological Procedure<br />
<strong>University</strong> <strong>of</strong> <strong>Rhode</strong> Island Watershed Watch<br />
TABLE OF CONTENTS<br />
Date:<br />
Revision:<br />
Author:<br />
08/08<br />
3<br />
Elizabeth<br />
Herron<br />
1.0 PURPOSE AND DESCRIPTION ......................................................................................................1<br />
2.0 HEALTH AND SAFETY CONSIDERATIONS..................................................................................1<br />
2.1 HAZARDS ........................................................................................................................................1<br />
2.2 TECHNICIAN TRAINING/QUALIFICATIONS............................................................................................2<br />
3.0 REQUIRED MATERIALS .................................................................................................................2<br />
4.0 SAMPLE STORAGE, PRESERVATION AND DISPOSAL .............................................................5<br />
5.0 METHOD DESCRIPTION .................................................................................................................5<br />
5.1 SCHEDULING CONSIDERATIONS........................................................................................................5<br />
5.2 QUALITY ASSURANCE/QUALITY CONTROL.........................................................................................6<br />
5.2.1 Method Detection Limit .............................................................................................................6<br />
5.2.2 Method Blanks...........................................................................................................................6<br />
5.2.3 Sample Replication ...................................................................................................................6<br />
5.2.4 Positive Plates...........................................................................................................................6<br />
5.2.5 Incubators..................................................................................................................................7<br />
5.2.6 Germicidal Unit (UV Box) ..........................................................................................................7<br />
5.2.7 Sterility Check on Sample Bottles.............................................................................................7<br />
5.2.8 QA Check on New Plates..........................................................................................................8<br />
5.2.8.1 Preparation <strong>of</strong> QC samples for new batch <strong>of</strong> plates. .......................................................................8<br />
5.3 ANALYSIS METHOD..........................................................................................................................9<br />
5.3.1 Preparation – 1 Week Before Scheduled Sampling..................................................................9<br />
5.3.1.1 Preparation <strong>of</strong> mTEC Media Plates .................................................................................................9<br />
5.3.2 Preparation - At least 48 Hours Prior to Sampling Day (As Needed) .....................................10<br />
5.3.2.1 Preparation <strong>of</strong> 1L Sterile Phosphate Buffered Saline Solution (PBS) ............................................11<br />
5.3.2.2 Preparation <strong>of</strong> 4 L Sterile Phosphate Buffered Saline Solution (PBS) ...........................................11<br />
5.3.2.3 Preparation <strong>of</strong> 1N NaOH ...............................................................................................................12<br />
5.3.2.4 Preparation <strong>of</strong> Stock KH2PO 4 solution ..........................................................................................12<br />
5.3.2.5 Preparation <strong>of</strong> Stock MgCl2 solution ..............................................................................................12<br />
5.3.3 Preparation - Day Before Sample Collection ..........................................................................12<br />
5.3.4 Procedure - Day <strong>of</strong> Sample Collection....................................................................................13<br />
5.3.4.1 Initial Preparation...........................................................................................................................13<br />
5.3.4.2 When Samples Arrive At The Laboratory ......................................................................................13<br />
5.3.4.3 Filtering Samples...........................................................................................................................14<br />
5.3.4.4 Clean-up........................................................................................................................................16<br />
5.3.4.5 Counting The Plates ......................................................................................................................16<br />
5.3.5 Disposal...................................................................................................................................16<br />
5.3.5.1 Used Plates ...................................................................................................................................16<br />
5.3.5.2 Sample Bottles ..............................................................................................................................17<br />
6.0 CALCULATIONS............................................................................................................................17<br />
7.0 REFERENCES................................................................................................................................17<br />
8.0 DOCUMENTATION ........................................................................................................................18<br />
ISDS Microbiological Analysis SOP 008<br />
S:\WW\awwword\LABPROC\all QAPPs\LABQAPPs\QAPP Rev5 -0609\SOPs\SOP 008 ISDSMicrobes.doc
<strong>Standard</strong> <strong>Operating</strong> Procedure 008<br />
(Prior number URIWW-SOP-4B)<br />
ISDS Microbiological Procedure<br />
<strong>University</strong> <strong>of</strong> <strong>Rhode</strong> Island Watershed Watch<br />
1.0 PURPOSE AND DESCRIPTION<br />
Date:<br />
Revision:<br />
Author:<br />
08/08<br />
3<br />
Elizabeth<br />
Herron<br />
The purpose <strong>of</strong> this method is to determine the concentration <strong>of</strong> fecal coliform bacteria within an<br />
Individual Sewage Disposal System (ISDS) sample. Samples are collected in sterile bottles, an<br />
aliquot <strong>of</strong> sample is filtered and the resulting filter placed into a media filled Petri dish and<br />
incubated. After incubation, the number <strong>of</strong> bacteria colonies are then counted, and the<br />
concentration calculated. This procedure is utilized for ISDS samples only. This method is<br />
applicable to undiluted samples in the range <strong>of</strong>
handling these chemicals. Material Safety Data Sheets (MSDS) are located in each laboratory<br />
for the materials stored in the specific laboratory. MSDS are contained in plastic file folders in<br />
rooms 019 and 018 and a notebook in room 002.<br />
2.2 Technician Training/Qualifications<br />
General training in laboratory technique, use <strong>of</strong> an autoclave and sterile technique as well as<br />
specific training regarding procedures specific to this method must be completed prior to<br />
analyzing samples using this method. Technician training will be provided either by Elizabeth<br />
Herron (Laboratory Project Manager – Microbiology) or Linda Green (Laboratory Project<br />
Manager – Nutrients).<br />
3.0 REQUIRED MATERIALS<br />
Required Material<br />
Notes Re-order information<br />
Coastal Institute in Kingston, room 081<br />
Autoclave and maximum<br />
temperature thermometer<br />
<strong>University</strong> <strong>of</strong> <strong>Rhode</strong> Island (URI), Kingston Coastal Institute<br />
Watershed Watch (WW) Laboratory, room 002<br />
Autoclave safe white plastic<br />
sample bottles<br />
125 – 500 mL<br />
Autoclave safe flasks<br />
Autoclave gloves (Insulated)<br />
Metal autoclave tray<br />
Combination hot plate and<br />
magnetic stirrer<br />
Magnetic stirring bar<br />
2 L<br />
Sodium Hydroxide (NaOH)<br />
URI – WW Computer<br />
Caustic. Causes eye, skin,<br />
digestive and respiratory tract<br />
burns. Hygroscopic (absorbs<br />
moisture from the air).<br />
Microbiology worksheets Project data sheets are found<br />
on the URIWW computer.<br />
See Section 8.0<br />
Documentation<br />
Coastal Institute in Kingston, room 018<br />
Balance<br />
Calibration weights in drawer<br />
beneath the balance<br />
Coastal Institute in Kingston, room 019<br />
35 C Incubator Thermolyne Type 142300<br />
Incubator<br />
Thomas catalog #6118L50<br />
44.5 C Water bath Precision Fecal coliform bath<br />
66855<br />
Baxter catalog #W3182-2<br />
Petri dish rack for water bath<br />
UV Sterilization box<br />
Vacuum pump and manifold<br />
Baxter catalog #W3182-11<br />
2 <strong>of</strong> 22<br />
ISDS Microbiological Analysis SOP 008<br />
S:\WW\awwword\LABPROC\all QAPPs\LABQAPPs\QAPP Rev5 -0609\SOPs\SOP 008 ISDSMicrobes.doc
Required Material<br />
Pipette-Aid filler/dispenser<br />
(electric)<br />
2 - Glass 400 mL beakers<br />
marked URIWW<br />
4 - Side arm filter flasks 500 mL or larger<br />
3 <strong>of</strong> 22<br />
Notes Re-order information<br />
Fisher catalog # 13-681-15<br />
Thermolyne Vortex Mixer Fisher catalog #12-814<br />
Coastal Institute in Kingston, room 019, URIWW refrigerator<br />
mTEC media plates<br />
Must be less than a month<br />
old, stored media side up in a<br />
foil lined box in the<br />
refrigerator<br />
mTEC media mix Fisher catalog # DF0334-<br />
15-0<br />
Agar plate with E. coli<br />
Blank media plates<br />
Tryptic soy broth tubes<br />
QC sample<br />
Agar mix Fisher catalog #BP1423-<br />
500<br />
Tryptic soy broth mix Fisher catalog #DF0370-<br />
17-3<br />
Stock KH2PO4 solution Preparation instructions:<br />
Section 5.3.2.4<br />
Stock MgCl2 solution Preparation instructions:<br />
Section 5.3.2.5<br />
Sticks - sterilized Fisher catalog #01-340<br />
Coastal Institute in Kingston, room 019, Supplies in or on the gray table to the left <strong>of</strong><br />
countertop<br />
95% Ethanol in a 500 mL plastic<br />
bottle<br />
Alcohol lamp Fisher catalog #04-245-1<br />
Envirocide or Conflict Disinfectant<br />
solution in squirt bottle<br />
Fisher Catalog #04-324-12<br />
Filter forceps<br />
Small beaker (~ 50 mL)<br />
Indelible marker (Sharpie)<br />
Matches<br />
Fisher catalog #09-753-30<br />
Magnetic filter funnels (9 – 47 mm diameter, Gelman Fisher #09-735<br />
hanging from drying rack on #4242, 300 mL capacity, 50<br />
incubator)<br />
mL gradations<br />
Sterile buffer filled Nalgene wash<br />
Fisher catalog # 03-409bottles<br />
14C<br />
Sterile grid membrane filters Fisher catalog # 09-719-1B<br />
or HAWG 047 S1<br />
ISDS Microbiological Analysis SOP 008<br />
S:\WW\awwword\LABPROC\all QAPPs\LABQAPPs\QAPP Rev5 -0609\SOPs\SOP 008 ISDSMicrobes.doc
Required Material<br />
4 <strong>of</strong> 22<br />
Notes Re-order information<br />
Coastal Institute in Kingston, room 019, Plastic drawers or boxes beneath the lab<br />
countertop<br />
Sterile plastic Petri dishes Fisher catalog # 08-757-19<br />
Sterile 1 mL pipettes Fisher catalog #13-678-<br />
25C<br />
Sterile 10 mL pipettes Fisher catalog #13-678-<br />
25F<br />
Sterile 25 mL pipettes Fisher catalog #13-676-<br />
29D<br />
Pipette sterilizing pouches Fisher catalog # 01-812-53<br />
Coastal Institute in Kingston, room 019, Drawer or shelf beneath the lab countertop<br />
Reusable test tubes Fisher catalog # 14-925J<br />
Test tube rack<br />
Aluminum foil<br />
Fisher catalog # 14-809-24<br />
Coastal Institute in Kingston, room 019, In cabinet beneath the water bath<br />
Whirl-pak TM bags Fisher catalog # 01-812-<br />
5C<br />
Clear biohazard autoclave bags Fisher catalog #01-826-5<br />
Coastal Institute in Kingston, room 019, On shelf above the water bath<br />
Plastic carboy filled with<br />
Preparation instructions:<br />
phosphate buffer saline solution Section 5.3.2.1 and 5.3.2.2<br />
Coastal Institute in Kingston, room 019, In the upper cabinet<br />
Phenol red Sigma catalog #P2417<br />
Sodium chloride Fisher catalog # S671-500<br />
Magnesium chloride hexahydrate<br />
(MgCl2·6H2O)<br />
Fisher catalog # M33-500<br />
Potassium phosphate monobasic<br />
(KH2PO4)<br />
Fisher catalog # P382-500<br />
1 N Sodium Hydroxide (NaOH) Causes eye, skin, digestive<br />
and respiratory tract burns.<br />
Caustic. Preparation<br />
instructions: Section 5.3.2.3.<br />
Coastal Institute in Kingston, room 019, In the chemical cabinet<br />
95% Ethanol in a 2 L glass bottle Available through the<br />
Agricultural Experiment<br />
Station <strong>of</strong>fice in Woodward<br />
Hall<br />
Equipment is maintained by the Watershed Watch Laboratory and the Natural Resources<br />
Science department. Temporary replacement <strong>of</strong> large equipment such as incubators is<br />
available through arrangement with other scientists in the department maintaining similar<br />
equipment.<br />
ISDS Microbiological Analysis SOP 008<br />
S:\WW\awwword\LABPROC\all QAPPs\LABQAPPs\QAPP Rev5 -0609\SOPs\SOP 008 ISDSMicrobes.doc
4.0 SAMPLE STORAGE, PRESERVATION AND DISPOSAL<br />
Matrix Sample Container Preservation Volume Holding<br />
Time<br />
Water Autoclavable 125 or 250 mL white Kept at 4 °C in sterile 100 mL 6 Hours<br />
plastic bottles. Sample bottle size<br />
is project dependent<br />
bottle<br />
Disposal<br />
ISDS bacterial samples are not archived; samples are disposed <strong>of</strong> after filtering as they degrade<br />
rapidly. Once outside the 6 hour holding time, bacteria in ISDS samples die <strong>of</strong>f quickly,<br />
resulting in reduced counts. Due to the potential presence <strong>of</strong> pathogens, the samples are<br />
considered a biological hazard and must be handled carefully. Samples may be rinsed down<br />
the drain with running water. Personnel will wear gloves, eye protection and a laboratory coat<br />
when disposing <strong>of</strong> samples.<br />
Disposal <strong>of</strong> used plates should be completed in accordance with SOP 006 - Waste Autoclaving<br />
Procedure. Plates are not archived and may be disposed <strong>of</strong> immediately after counting.<br />
Bottles are cleaned in accordance with SOP 003 - General Labware Cleaning Procedure and<br />
SOP 005 - Bottle Autoclaving Procedure.<br />
5.0 METHOD DESCRIPTION<br />
5.1 Scheduling Considerations<br />
The information provided below is a basic outline <strong>of</strong> tasks that must be completed prior to the<br />
sampling day. Step-by-step instructions to complete each task are provided under Section 5.2<br />
and 5.3.<br />
Preparation <strong>of</strong> materials including sterile dilution tubes and media plates should occur at least<br />
one week prior to the sampling day. If it is necessary to prepare new media plates then a<br />
Quality Assurance/Quality Control (QA/QC) check should be completed on the new plates prior<br />
to use. This procedure is described in Section 5.2.5 <strong>of</strong> this document. An operations check <strong>of</strong><br />
the UV light box should also be completed at this time.<br />
At least 48 hours (2 days) prior to the sampling event sample bottles and sterile phosphate<br />
buffered saline solution (PBS) should be prepared.<br />
The day before a sampling event (24 hours) data sheets, QC samples and a final check <strong>of</strong><br />
equipment should be completed (Refer to Section 5.3 for specific details)<br />
5 <strong>of</strong> 22<br />
ISDS Microbiological Analysis SOP 008<br />
S:\WW\awwword\LABPROC\all QAPPs\LABQAPPs\QAPP Rev5 -0609\SOPs\SOP 008 ISDSMicrobes.doc
5.2 Quality Assurance/Quality Control<br />
5.2.1 Method Detection Limit<br />
The method detection limit (MDL) for fecal coliforms is related to the dilution factor used to<br />
determine the bacteria count. The following equation is utilized:<br />
MDL = 100 mL = Colonies<br />
Volume <strong>of</strong> sample filtered (mL) 100 mL<br />
Therefore, if the volume <strong>of</strong> sample placed on the plate is 25 mL then the MDL is 4 colonies/100<br />
mL. The reporting limit (RL) is set at the level <strong>of</strong> the MDL. Final data are reported to the<br />
nearest whole number.<br />
5.2.2 Method Blanks<br />
Method blanks are determined by treating 100 mL <strong>of</strong> sterile buffer (PBS) as a sample. The<br />
sterile PBS is filtered onto a sterile filter and placed onto a media plate.<br />
There will be 2 method blanks per 100 plates or 2 method blanks per run, whichever is greater.<br />
The first blank will be prepared at the beginning <strong>of</strong> the sample run and the second at the end <strong>of</strong><br />
the sample run. This is at the least 2% <strong>of</strong> the plates analyzed or approximately 6% <strong>of</strong> the field<br />
samples analyzed, assuming each sample is prepared at three dilutions. The method blank<br />
shall be less than 1 colony/100 mL.<br />
Corrective Action<br />
If the method blank is equal to or greater than 1 colony/100 mL then the sample run will be<br />
considered contaminated and the data flagged accordingly on the data sheet. Since ISDS<br />
samples degrade rapidly once outside the holding time it is not possible to reanalyze the<br />
samples.<br />
5.2.3 Sample Replication<br />
Each sample is analyzed at multiple dilutions. The relative percent deviation (%RPD) is<br />
determined by comparing plates from the same sample but at different dilutions. Only plates<br />
that exhibit the ideal number <strong>of</strong> colonies (20-80 colonies per plate) are compared. Results<br />
between dilutions should be within 20%RPD. %RPD is calculated as follows:<br />
%RPD = Result at Dilution 1 (colonies/100 mL) – Result at Dilution 2 (colonies/100 mL) x 100<br />
Average <strong>of</strong> Result at Dilution 1 (colonies/100 mL) and Result at Dilution 2 (colonies/100 mL)<br />
Corrective Action<br />
If the %RPD is greater than 20% then the deviation is noted on the data sheet. The processing<br />
time to determine the sample value is greater than the holding time for the samples and ISDS<br />
samples degrade rapidly. Therefore, the samples will not be reanalyzed.<br />
5.2.4 Positive Plates<br />
Calibration is completed in a qualitative way through an assessment <strong>of</strong> false negatives.<br />
Bacteria from a known plate <strong>of</strong> Escherichia coli (E. coli) are plated at a dilution <strong>of</strong> 10 -7 using the<br />
procedure outlined under Section 5.2.5.1, steps 1 through 6 and 8 only. The inoculated plates<br />
6 <strong>of</strong> 22<br />
ISDS Microbiological Analysis SOP 008<br />
S:\WW\awwword\LABPROC\all QAPPs\LABQAPPs\QAPP Rev5 -0609\SOPs\SOP 008 ISDSMicrobes.doc
are then treated as samples and referred to as positive plates; 2 positive plates are prepared<br />
per sample batch. After incubation these plates must exhibit growth.<br />
Corrective Action<br />
The inoculated plates (positive plates) must exhibit growth after incubation. If the plates do not<br />
exhibit growth then it is assumed that the run was in error and the data are flagged accordingly<br />
on the data sheet. The time required for sample analysis is greater than the sample holding<br />
time; therefore, the samples will not be reanalyzed.<br />
5.2.5 Incubators<br />
The temperature <strong>of</strong> the 35 °C and 44.5 °C incubators are checked twice a day at least 4 hours<br />
apart, when in use. Initial and final temperatures for incubations <strong>of</strong> samples are recorded on the<br />
project data reporting sheet (see Section 8.0). The acceptable temperature range for the 35 °C<br />
incubator is 35 +/- 0.5 °C. Acceptable temperature for the 44.5 °C incubator is 44.5 +/- 0.2 °C.<br />
Corrective Action<br />
The incubator temperature must remain in the range specified above. If the incubator<br />
temperature is found to be outside the acceptable range, contact Elizabeth Herron and adjust<br />
the incubator temperature control. Pr<strong>of</strong>essional maintenance <strong>of</strong> the incubator may be<br />
necessary if adjustment <strong>of</strong> the temperature control does not rectify the problem.<br />
5.2.6 Germicidal Unit (UV Box)<br />
The UV light box efficiency will be tested quarterly with a UV light meter. Each lamp will be<br />
tested individually. A lamp will be replaced if it emits less than 70% <strong>of</strong> its initial output. All<br />
efficiency checks will be recorded on the “Quarterly UV Germicidal Tube Record” data sheet<br />
(see Section 8.0 Documentation) and will be available for review.<br />
Corrective Action<br />
If a UV lamp is found to emit less than 70% <strong>of</strong> its initial output then it will be replaced. The date<br />
<strong>of</strong> replacement will be recorded on the efficiency check data sheet.<br />
5.2.7 Sterility Check on Sample Bottles<br />
Sample bottles after sterilization must be checked for sterility before being placed with the<br />
general stock <strong>of</strong> sterilized bottles. A bottle sterility check will be completed at a frequency <strong>of</strong><br />
one sample bottle per sterilization run. Sterility checks will be completed by selecting one<br />
sterilized sample bottle at random after the sterilization run has been completed. The sample<br />
bottle will then be filled with Ultrapure water capped and mixed. Once the water has been<br />
mixed it will be filtered and treated as a sample. All data will be recorded on the “Bacterial<br />
Sample Log & Worksheet: Bacteria Bottle Sterilization Confirmation” data sheet (see Section<br />
8.0 Documentation).<br />
Corrective Action<br />
If the bottle blank returns a value greater than zero CFUs then all the sample bottles sterilized in<br />
the run must be re-sterilized and the bottle sterility check completed again after the second<br />
sterilization process. No sample bottles will be placed into the general laboratory stock <strong>of</strong><br />
sterilized bottles until the sterility check returns a value <strong>of</strong> zero.<br />
7 <strong>of</strong> 22<br />
ISDS Microbiological Analysis SOP 008<br />
S:\WW\awwword\LABPROC\all QAPPs\LABQAPPs\QAPP Rev5 -0609\SOPs\SOP 008 ISDSMicrobes.doc
5.2.8 QA Check on New Plates<br />
E. coli bacterium is the dominant fecal coliform bacteria found in ambient water. Therefore, a<br />
maintained plate <strong>of</strong> E. coil is used to assess the quality <strong>of</strong> new plates. Plates are assessed to<br />
determine if they are able to support the growth <strong>of</strong> E. coli by plating bacteria from the known<br />
plate <strong>of</strong> E. coli onto 6 plates <strong>of</strong> media that have been shown to produce colonies during a prior<br />
sample run and 6 plates <strong>of</strong> the new media. Refer to Section 5.2.5.1 for details on the procedure<br />
to QA check new plates.<br />
If the laboratory has received bacteria samples from a field site known to produce positive<br />
plates, then an aliquot from this sample may be used to check the new plates instead <strong>of</strong><br />
inoculating a TSB tube from the maintained E. coli culture. Preparation <strong>of</strong> QA check plates<br />
using an existing sample is completed using the procedure outlined below in Section 5.2.5.1<br />
skipping steps 1 through 5.<br />
5.2.8.1 Preparation <strong>of</strong> QC samples for new batch <strong>of</strong> plates.<br />
1. Obtain the maintained E. coli culture from the refrigerator<br />
2. Using a sterile stick, gently touch the E. coli culture ONCE.<br />
3. Flame sterilize a TSB tube.<br />
4. Swish the contaminated stick in the TSB tube, re-sterile the neck <strong>of</strong> the tube,<br />
and set the tube cap – do not tighten the cap.<br />
5. Place the inoculated TSB tube in a test tube rack or beaker in the 35 °C<br />
incubator for 24 hours.<br />
6. Remove the TSB tube after incubation and use the tube to prepare serial<br />
dilutions <strong>of</strong> 10 -7 and 10 -8 .<br />
7. Filter 1.0 mL <strong>of</strong> the 10 -8 dilution using the sample filtration technique<br />
described in Section 5.3.4.2 and 5.3.4.3. Place the filter onto a new media<br />
plate and incubate as a sample.<br />
8. Filter 1.0 mL <strong>of</strong> the 10 -7 dilution using the sample filtration technique<br />
described in Section 5.3.4.2 and 5.3.4.3. Place the filter onto a new media<br />
plate and incubate as a sample.<br />
9. Repeat Steps 7 and 8 until 6 plates that are known to support bacteria (old<br />
batch) and 6 plates from the new batch have filters. Half <strong>of</strong> the new plates<br />
and half <strong>of</strong> the old plates should contain filters inoculated with the 10 -7<br />
dilution; the other half with the 10 -8 dilution.<br />
10. After incubation, remove the plates and visually inspect them to determine if<br />
approximately the same amount <strong>of</strong> bacteria grew on both the old and new<br />
plates.<br />
Corrective Action<br />
New and old plates must exhibit bacteria growth. If new plates do not exhibit bacteria growth,<br />
but the old plates do, then the batch <strong>of</strong> new plates is assumed to be unable to support bacteria<br />
and discarded. If both the new and old plates do not exhibit bacteria growth then it is assumed<br />
that the plates were not inoculated properly and the inoculation procedure is repeated.<br />
8 <strong>of</strong> 22<br />
ISDS Microbiological Analysis SOP 008<br />
S:\WW\awwword\LABPROC\all QAPPs\LABQAPPs\QAPP Rev5 -0609\SOPs\SOP 008 ISDSMicrobes.doc
5.3 Analysis Method<br />
5.3.1 Preparation – 1 Week Before Scheduled Sampling<br />
1. Check to be sure the UV box works. If the lights flash and turn on when the black button<br />
at the left end <strong>of</strong> the box is depressed – it works. Be sure not to stare at the light as it<br />
can burn your retinas! If it doesn’t work contact Elizabeth Herron to have the box<br />
repaired.<br />
2. Check that enough sterile dilution tubes are prepared for the anticipated number <strong>of</strong><br />
samples to be analyzed. The project data sheet will provide a count <strong>of</strong> the number <strong>of</strong><br />
dilution tubes needed. If there are not enough dilution tubes available then using SOP<br />
004 – General Autoclave Operation, prepare more. Dilution tubes are autoclaved in the<br />
autoclavable bags.<br />
3. Check to be sure there is an adequate supply <strong>of</strong> mTEC media plates that are less than 1<br />
month old. If there are not enough plates, more must be prepared. Preparation<br />
instructions are found in Section 5.3.1.1.<br />
Materials<br />
5.3.1.1 Preparation <strong>of</strong> mTEC Media Plates<br />
Envirocide or Conflict Magnetic stirring bar<br />
Sterile Petri dishes Magnetic stirring and heating plate<br />
Autoclave Metal tray<br />
2 - 2 L autoclavable flasks Aluminum foil<br />
Insulated autoclave gloves Sterile 25 mL pipette<br />
Dehydrated mTEC media Empty foil lined cardboard box<br />
Deionized (DI) water Electronic pipette-aid<br />
Procedure<br />
Note: All equipment that contacts the Petri dishes must remain sterile. If contamination is<br />
introduced the Petri dishes must be discarded.<br />
Note : 1 L makes approx. 175 – 200 plates<br />
1. Weigh out 45.3 g <strong>of</strong> dehydrated mTEC media into a 2 L Erlenmeyer flask.<br />
2. Add 1 L DI H2O and a magnetic stirring bar.<br />
3. Heat and stir the re-hydrated mTEC media on the stirring/heating plate until the media is<br />
fully dissolved (to boiling if necessary).<br />
4. Pour approximately 500 mL <strong>of</strong> the liquid media into the second 2 L flask.<br />
5. Cover the mouth <strong>of</strong> the flasks loosely with aluminum foil, and place in metal tray.<br />
6. Autoclave the tray and media for approximately 40 minutes. Check the autoclave <strong>of</strong>ten<br />
to get the sterilization time correct without over-cooking; the autoclave must be at 121 °C<br />
for 15 minutes to achieve sterilization. Directions on autoclave use are found in SOP<br />
004 – General Autoclave Operation.<br />
9 <strong>of</strong> 22<br />
ISDS Microbiological Analysis SOP 008<br />
S:\WW\awwword\LABPROC\all QAPPs\LABQAPPs\QAPP Rev5 -0609\SOPs\SOP 008 ISDSMicrobes.doc
7. While the mTEC media is autoclaving, sterilize the table top by wiping down the entire<br />
surface with the Envirocide or Conflict and allowing the surface to dry.<br />
8. Set up the electronic pipette-aid at the work area. Have a sterilized 25 mL pipette ready<br />
but leave it in its wrapper to maintain sterility.<br />
9. Set out the sterile Petri dishes in rows <strong>of</strong> 5 to 10, bottom side down, leaving room for the<br />
flask along the edge <strong>of</strong> the countertop.<br />
10. Carefully remove the lids, <strong>of</strong>fsetting the lids from the bottoms so that the dishes are less<br />
than half-open. Do not touch the inside <strong>of</strong> the lid or bottom. If the inside <strong>of</strong> a Petri dish<br />
comes into contact with anything other than the sterile counter top, discard the Petri<br />
dish.<br />
11. Remove the tray from the autoclave when the cycle is complete. Be sure to wear the<br />
insulated autoclave gloves as the media will be very hot.<br />
12. Place the flask with the boiling hot media into the 44.5 °C water bath for approximately 5<br />
minutes to allow the media to cool slightly. Be careful not to let the flask tip over! The<br />
Petri dish rack and stone may be used to keep the flask upright.<br />
13. Move the slightly cooled flask to the area where the Petri dishes are set-up using the<br />
insulated autoclave gloves. Place the hot flask next to the first row <strong>of</strong> plates (use a tall<br />
stool to set the flask on if needed).<br />
14. Remove the 25 mL pipette from its wrapper, being careful not to touch the pipette<br />
anywhere but at its neck. Attach the pipette aid to the pipette. Turn the pipette aid on,<br />
and draw up about 25 mL <strong>of</strong> hot mTEC media from the flask.<br />
15. Dispense 4 to 5 mL <strong>of</strong> mTEC media into each <strong>of</strong> the plates in the first row.<br />
16. Repeat until all the media has been used.<br />
17. Once the media has cooled it will form a gelatin like substance. At this point put the<br />
covers back on the Petri dishes completely. Stack the Petri dishes with the bottom<br />
(media-side) up in the foil lined box. Label the box with the date and type <strong>of</strong> media.<br />
18. QC check the plates against old plates using the procedure found in Section 5.2.5.1. If<br />
plates are found to be acceptable store them in the refrigerator for up to a month.<br />
5.3.2 Preparation - At least 48 Hours Prior to Sampling Day (As Needed)<br />
1. Autoclave an appropriate number <strong>of</strong> bottles for sampling. (Review SOP 005 - Bottle<br />
Autoclaving Procedure). Put sterile labels and sample labels on the bottles.<br />
2. Make up sterile phosphate buffered saline solution (PBS) as needed; 1 L <strong>of</strong> PBS is<br />
enough for approximately 25-50 ISDS samples. The solution must be room temperature<br />
when used and will need 24 hours to cool. Instructions for preparation <strong>of</strong> the PBS are<br />
located in Section 5.3.2.1.<br />
3. Make sure the water bath and incubator are set to and holding the correct temperatures.<br />
The flask with the thermometer in the white incubator should be full <strong>of</strong> DI water, with the<br />
temperature reading 35 +/- 0.5 °C. The water bath should be approximately ¾ full <strong>of</strong> DI<br />
water and set at 44.5 +/- 0.2 °C.<br />
10 <strong>of</strong> 22<br />
ISDS Microbiological Analysis SOP 008<br />
S:\WW\awwword\LABPROC\all QAPPs\LABQAPPs\QAPP Rev5 -0609\SOPs\SOP 008 ISDSMicrobes.doc
5.3.2.1 Preparation <strong>of</strong> 1L Sterile Phosphate Buffered Saline Solution (PBS)<br />
1. Add the following into a 4 L Erlenmeyer flask:<br />
a. 1.25 mL Stock KH2PO4 solution (preparation information in Section 5.3.2.4)<br />
b. 5 mL Stock MgCl2 solution (preparation information in Section 5.3.2.5)<br />
c. 7 g NaCl<br />
d. 1 L DI H2O<br />
2. Stir the mixture using a stirring bar and magnetic stirrer until the NaCl is dissolved.<br />
3. Cover the mouth <strong>of</strong> the flask with aluminum foil and place it on a metal tray.<br />
4. Autoclave the tray and flask for 45 minutes at 121 C (Refer to SOP 004 – General<br />
Autoclave Operation)<br />
5. Remove the flask and tray using insulated autoclave gloves as the PBS will be very hot.<br />
6. Leave the flask covered and allow it to cool to room temperature before using.<br />
5.3.2.2 Preparation <strong>of</strong> 4 L Sterile Phosphate Buffered Saline Solution (PBS)<br />
This procedure will prepare enough PBS to fill the safe plastic carboy<br />
1. Add the following to the 6 L plastic carboy<br />
a. 5 mL Stock KH2PO4 solution (preparation information in Section 5.3.2.4)<br />
b. 20 mL Stock MgCl2 solution (preparation information in Section 5.3.2.5)<br />
c. 28 g NaCl<br />
d. 4 L DI H2O<br />
2. Stir the mixture using a stirring bar and magnetic stirrer until the NaCl is dissolved.<br />
3. Set the carboy cap on the mouth <strong>of</strong> the carboy, but DO NOT thread. Place on a metal<br />
tray.<br />
4. Autoclave the tray and carboy for 60 minutes at 121 C. The carboy will have to be laid<br />
on it side to fit into the autoclave. Use beakers or bottles on either side <strong>of</strong> the carboy<br />
handle to brace it, preventing the carboy from rolling around on the tray. (Refer to SOP<br />
004 – General Autoclave Operation)<br />
5. After completion <strong>of</strong> the autoclave cycle, remove the flask and tray using insulated<br />
autoclave gloves as the PBS will be very hot.<br />
6. If possible, leave the tray and carboy (with cap set on the mouth) on the cart opposite<br />
the autoclave overnight to cool. This is much safer than carrying the hot, loosely capped<br />
carboy.<br />
11 <strong>of</strong> 22<br />
ISDS Microbiological Analysis SOP 008<br />
S:\WW\awwword\LABPROC\all QAPPs\LABQAPPs\QAPP Rev5 -0609\SOPs\SOP 008 ISDSMicrobes.doc
12 <strong>of</strong> 22<br />
5.3.2.3 Preparation <strong>of</strong> 1N NaOH<br />
1. Obtain a 250 mL volumetric flask and fill it approximately ¾ full with ultrapure water.<br />
2. Weight out 10 g <strong>of</strong> NaOH.<br />
3. Slowly add the NaOH to the volumetric flask while mixing.<br />
4. Remember that once the NaOH starts to dissolve the flask will get hot! Run the flask<br />
under cool tap water if necessary, making sure not to get any <strong>of</strong> the tap water into the<br />
flask. Loosely cover the flask top with foil or parafilm while cooling the flask.<br />
5. Allow the flask to cool and add ultrapure water to bring the flask to volume once all the<br />
NaOH has dissolved.<br />
5.3.2.4 Preparation <strong>of</strong> Stock KH2PO4 solution<br />
1. Add the following to a 1 L Erlenmeyer flask<br />
a. 34.0 g KH2PO4<br />
b. 500 mL DI H20<br />
2. Adjust to pH 7.2 0.5 with 1N NaOH and dilute to 1 L with DI H20.<br />
3. Record the initial pH reading as well as that after it has been adjusted to pH 7.2 0.5 on<br />
the “Buffered Dilution/Rinse Water KH2PO4 Reagent pH Record” data sheet (see<br />
Section 8.0 Documentation).<br />
4. Store excess solution in a labeled container in the URI WW Refrigerator in room 019 <strong>of</strong><br />
the Kingston Coastal Institute<br />
5.3.2.5 Preparation <strong>of</strong> Stock MgCl2 solution<br />
Add 81.6 g MgCl2 6H2O to a 1 L Volumetric flask and dilute to 1 L with DI H20.<br />
Store excess solution in a labeled container in the URI WW Refrigerator in room 019 <strong>of</strong> the<br />
Kingston Coastal Institute<br />
5.3.3 Preparation - Day Before Sample Collection<br />
1. Make sure there is an adequate supply <strong>of</strong> sterile 1 mL, 10 mL and 25 mL pipettes and<br />
PBS filled sterile squirt bottles AS WELL AS FILTER ASSEMBLIES. If not, autoclave<br />
them.<br />
a. Pipettes are sterilized in the pipette pouches in an autoclavable tray.<br />
b. Squirt bottles are sterilized empty, with foil over the squirt caps. Caps should<br />
only be loosely placed in the bottle. Bottles should be placed on an autoclavable<br />
tray when placed into the autoclave. Once cooled, sterile squirt bottles can be<br />
filled with cool sterile PBS. (Refer to SOP 004 – General Autoclave Operation).<br />
c. Filter assemblies are sterilized in autoclavable bags on an autoclavable tray.<br />
ISDS Microbiological Analysis SOP 008<br />
S:\WW\awwword\LABPROC\all QAPPs\LABQAPPs\QAPP Rev5 -0609\SOPs\SOP 008 ISDSMicrobes.doc
2. Create data sheets from the template found on the WW computers. It is very helpful to<br />
include any known dilution information on the data sheet. An example data sheet is<br />
located in Section 8.0 Documentation.<br />
3. Prepare the TSB tube for the Positive plate using the procedure outlined in Section<br />
5.2.4.1.<br />
5.3.4 Procedure - Day <strong>of</strong> Sample Collection<br />
5.3.4.1 Initial Preparation<br />
1. Set up sterile test tubes by placing them into the test tube rack. Remember to touch<br />
only the outside <strong>of</strong> each tube. A large piece <strong>of</strong> aluminum foil can be used to cover the<br />
top <strong>of</strong> the tubes. Sterilize the aluminum foil in the UV box.<br />
2. Sterilize a beaker in the UV box for 2 minutes.<br />
3. Fill the beaker with sterile PBS.<br />
4. Using a sterile pipette and the electric filler/dispenser, pipette 9 mL <strong>of</strong> PBS into the<br />
appropriate number <strong>of</strong> test tubes.<br />
5. Fill the sterile squirt bottles with PBS if necessary.<br />
6. Take the appropriate number <strong>of</strong> mTEC media plates out <strong>of</strong> the fridge so that they can<br />
begin to warm up a little. This reduces condensation and ensures that the labels will not<br />
rub <strong>of</strong>f.<br />
7. Wipe down the benchtops in room 019 with Envirocide or Conflict; allow the bench tops<br />
to dry.<br />
8. Connect the side arm flasks to the vacuum manifold.<br />
9. Set up the alcohol lamp, beaker with alcohol and filter forceps, membrane filters, Sharpie<br />
marker, PBS squirt bottle, etc<br />
10. Remember to use basic hygienic practices when handling ISDS samples. Latex gloves,<br />
lab coats and eye protection are required.<br />
5.3.4.2 When Samples Arrive At The Laboratory<br />
1. After logging in samples, store them in a cooler with ice packs or the refrigerator located<br />
in room 019.<br />
2. Sterilize the filter funnels and funnel base in the UV box for at least two minutes.<br />
a. The cardboard has to be over the button in order for the UV box to turn on when<br />
the door is closed.<br />
b. The latch must be engaged to keep the door closed. Peek in the side to be sure<br />
the light is on – don’t stare at the light!<br />
3. Organize the samples. For ease <strong>of</strong> filtering, try to setup samples so that each ISDS site<br />
is grouped together, with components moving from most to least contaminated. The<br />
more contaminated samples are more difficult to filter, therefore filter these first.<br />
13 <strong>of</strong> 22<br />
ISDS Microbiological Analysis SOP 008<br />
S:\WW\awwword\LABPROC\all QAPPs\LABQAPPs\QAPP Rev5 -0609\SOPs\SOP 008 ISDSMicrobes.doc
4. Label the bottom (half holding the media) <strong>of</strong> mTEC media plates with a Sharpie. The<br />
label should include all the information present on the sample bottle, as well as the<br />
sample dilution.<br />
5. Stack labeled plates from least to most dilute, with most dilute on the top.<br />
6. Enter the relevant data on the data sheet to help keep track <strong>of</strong> the samples.<br />
7. Light the alcohol lamp.<br />
8. Set the sterile filter funnels on the side arm flasks, being careful not to touch the inside <strong>of</strong><br />
the funnel or the base.<br />
9. Squirt a little PBS onto the base <strong>of</strong> each filter funnel.<br />
10. Remove the filter forceps (which should be soaking in 95% ethanol only up to the tips)<br />
and sterilize them by passing them through the flame <strong>of</strong> the lamp. Do not hold them in<br />
the flame as they will get too hot. Be sure to keep the beaker <strong>of</strong> 95% Ethanol and the<br />
alcohol lamp separated. The beaker <strong>of</strong> ethanol could explode if it comes into contact<br />
with an open flame.<br />
11. After lifting <strong>of</strong>f the top <strong>of</strong> the funnel, place membrane filters on the base <strong>of</strong> each <strong>of</strong> the<br />
filter funnels using the following procedure:<br />
a. Using the sterilized filter forceps, carefully remove a filter from the package. The<br />
filter should not touch anything but the filter forceps. If the filters are separated<br />
by blue liners remove the blue backing, and place the filter with its front liner on<br />
the wetted filter base gridded side up. The blue front liner should curl up making<br />
it easier to remove.<br />
b. If a filter is burned or ripped, discard the filter, and place a new one on the filter<br />
base.<br />
12. Provided the filter funnels are sterile (i.e. no sample has been introduced yet), the<br />
forceps do not need to be re-flamed between placement <strong>of</strong> a filter on each funnel.<br />
Touching anything other than the sterile filters with the forceps necessitates re-flaming<br />
the forceps prior to continued use.<br />
5.3.4.3 Filtering Samples<br />
1. Set up samples and media plates so there is one set in front <strong>of</strong> each prepared filter<br />
funnel.<br />
2. Loosen the lids on the media plates – but leave the lid in place with the labeled bottom<br />
facing up.<br />
3. Shake the first sample vigorously (about 25 times in 7 seconds).<br />
4. If this is to be a serial dilution sample, carefully draw up 1 mL <strong>of</strong> homogenized sample<br />
using the pipette-aide and a sterile 1 mL pipette.<br />
a. Carefully discharge the sample into a prepared test tube containing 9 mL <strong>of</strong> PBS.<br />
b. Rinse the pipette by drawing in about 1 mL <strong>of</strong> diluted sample, then discharging<br />
back into the test tube, being sure to blow out the entire sample.<br />
c. Use the Vortex mixer to thoroughly mix the sample.<br />
14 <strong>of</strong> 22<br />
ISDS Microbiological Analysis SOP 008<br />
S:\WW\awwword\LABPROC\all QAPPs\LABQAPPs\QAPP Rev5 -0609\SOPs\SOP 008 ISDSMicrobes.doc
d. Then remove 1 mL <strong>of</strong> diluted sample, add it to the next tube, etc. until all <strong>of</strong> the<br />
dilutions for the sample are prepared. Refer to Section 6.0 - Calculations for<br />
information on preparation <strong>of</strong> serial dilutions.<br />
e. The number and value <strong>of</strong> dilutions to be run per sample is found on the project<br />
data sheet. Dilutions for a new sample or a new project should be determined by<br />
consultation with Elizabeth Herron.<br />
f. Once the most diluted sample dilution tube has been thoroughly mixed, pipette 1<br />
mL <strong>of</strong> this dilution into the appropriate filter funnel. Approximately 10 mL <strong>of</strong> PBS<br />
should have already been added to the filter funnel to pre-wet the filter.<br />
g. Place the 1 mL pipette into the next lowest dilution tube for that sample.<br />
5. If a serial dilution is not necessary filter the volume <strong>of</strong> sample noted on the project data<br />
sheet.<br />
6. Repeat steps 3, 4 and 5 until each filter funnel has a sample in it.<br />
7. Open the valve <strong>of</strong> each <strong>of</strong> the filter funnel setups, and turn on the vacuum pump.<br />
8. After all the samples have filtered through, use the sterile squirt bottle filled with PBS to<br />
rinse the inside <strong>of</strong> each funnel approximately three times to wash any stray bacteria onto<br />
the filter. Do not touch the tip <strong>of</strong> the squirt bottle to the inside <strong>of</strong> any <strong>of</strong> the funnels, this<br />
will contaminate other samples.<br />
9. Turn <strong>of</strong>f the vacuum pump.<br />
10. Flame sterilize the forceps and shut <strong>of</strong>f the valve for the first funnel.<br />
11. Carefully remove the filter with the sterilized forceps.<br />
12. Carefully place the filter onto the media <strong>of</strong> a labeled Petri dish, grid side up, so no<br />
bubbles are apparent. Touch the outer edge <strong>of</strong> the filter with your forceps until it is<br />
completely flat. If it appears there are bubbles in the media pick up the filter and lay it<br />
into the media again.<br />
13. Put the cover back on the plate, invert the plate and set it aside.<br />
14. If additional dilutions will be completed on the sample, place a sterile filter on the empty<br />
filter base corresponding to the sample and add the next diluted sample. The forceps do<br />
not have to be re-sterilized provided they have not made contact with anything but the<br />
sterile media or a more dilute sample.<br />
15. Repeat steps 10 through 14 for the rest <strong>of</strong> the filter funnels.<br />
16. Once all dilutions and replicates for the first set <strong>of</strong> samples have been filtered, place the<br />
plates with filters into the 35 °C incubator for 2 hours. Plates should be inverted, and<br />
stacked no higher than 2.<br />
17. Remove the filter funnels and base replacing them with sterilized ones from the UV box<br />
for the next set <strong>of</strong> samples. Put the non-sterile filter funnels and bases into the UV box<br />
and turn the UV light on.<br />
18. Repeat this procedure until all <strong>of</strong> the samples have been processed.<br />
19. After 2 hours in the incubator place up to 8 to plates into a Whirl-pak bag, whirl shut<br />
being careful not to trap a large amount air. Tie the bags onto shelves in the Petri dish<br />
rack using the wire ties <strong>of</strong> the bag. Be sure that the plates are inverted on the rack.<br />
15 <strong>of</strong> 22<br />
ISDS Microbiological Analysis SOP 008<br />
S:\WW\awwword\LABPROC\all QAPPs\LABQAPPs\QAPP Rev5 -0609\SOPs\SOP 008 ISDSMicrobes.doc
20. Transfer the plates to the 44.5 °C water bath for 22 hours. Air trapped in the Whirl-pak<br />
bags may cause the test tube rack to float. If necessary, place the large granite slab<br />
onto the rack to keep it from floating.<br />
5.3.4.4 Clean-up<br />
1. Discard the filtrate from the side arm flasks down the sink drain, then clean the side arm<br />
flasks with warm water and the angled bottle brush. They can be placed on the top <strong>of</strong><br />
the cart to dry.<br />
2. Clean the filter funnels with warm water and a brush, then place them on the rack<br />
hanging from the right side <strong>of</strong> the 35 °C incubator to dry.<br />
3. Pour the alcohol from the beaker with the forceps back into the labeled plastic container<br />
and close tightly. This alcohol is re-used. Alcohol evaporates very quickly if not stored<br />
in a sealed container.<br />
4. Wipe down the alcohol lamp, beaker containing the forceps, alcohol container, filters,<br />
pipette-aid and anything else that has come into contact with sample with Envirocide or<br />
Conflict and put everything back where it is stored.<br />
5. Thoroughly wipe the counter, tabletops and incubator handles with Envirocide or<br />
Conflict.<br />
6. Be sure the UV box is <strong>of</strong>f and the door is slightly ajar.<br />
5.3.4.5 Counting The Plates<br />
1. After 20 - 22 hours, remove the Whirl-pak bags from the water bath.<br />
2. Organize the plates according to the data sheet for ease <strong>of</strong> data entry.<br />
3. Count and record the number <strong>of</strong> yellow or yellow-green colonies on the membrane<br />
filters. There is a digital hand-held counter available.<br />
a. Establish a system for counting (left to right, top to bottom, etc.) but be<br />
consistent!<br />
b. The ideal range for a plate is 20-80 colonies. Higher or lower plate counts can<br />
be used if necessary. Ideally, the results from different dilutions <strong>of</strong> the same<br />
sample are averaged.<br />
5.3.5 Disposal<br />
5.3.5.1 Used Plates<br />
Place all <strong>of</strong> the used plates into a clear autoclavable bag located in the labeled red container.<br />
Never fill the autoclavable bags more than half full with plates. If necessary, obtain another<br />
autoclavable bag. Follow the instructions in SOP 006 – Waste Autoclaving Procedure for plate<br />
disposal using either the Woodward Hall or the Kingston Coastal Institute autoclave. Place the<br />
cooled bag into the dumpster (do not put in a trash can as the janitors will NOT dispose <strong>of</strong> it).<br />
16 <strong>of</strong> 22<br />
ISDS Microbiological Analysis SOP 008<br />
S:\WW\awwword\LABPROC\all QAPPs\LABQAPPs\QAPP Rev5 -0609\SOPs\SOP 008 ISDSMicrobes.doc
5.3.5.2 Sample Bottles<br />
Samples may be disposed <strong>of</strong> after filtering. Wearing gloves, empty samples down the drain and<br />
then wash the bottles with hot soapy water in room 002. Wash bottles in accordance with SOP<br />
003 – General Labware Cleaning Procedure.<br />
6.0 CALCULATIONS<br />
Fecal coliforms are reported in terms <strong>of</strong> the number <strong>of</strong> bacteria per 100 mL. Select the<br />
membrane filter with the number <strong>of</strong> colonies closest to the acceptable range (20 – 80<br />
colonies) from the 24 hour count column on the data sheet, and calculate the count per 100<br />
mL according to the general formula shown below. Results are reported as the number <strong>of</strong><br />
fecal coliforms colonies per 100 mL to the nearest whole number. Fecal coliforms counts <strong>of</strong><br />
0 are reported as
8.0 DOCUMENTATION<br />
Example Project Data Sheet<br />
Sample Date: 36 Tubes<br />
Community: Block Island 69 Plates<br />
Analyst – set-up: Analyst – counts:<br />
Incubator temp. start: Waterbath temp. start:<br />
Incubator temp. end: Waterbath temp. end:<br />
Site Location<br />
Setup<br />
Date Dilution<br />
Vol.<br />
Filtered (Yields)<br />
BI - 3 Rea STE – 1 10 -2 1 10 -3<br />
BI - 3 Rea STE – 1 10 -3 1 10 -4<br />
BI - 3 Rea STE – 1 10 -4 1 10 -5<br />
BI - 3 Rea RTE 1 1 10 -2<br />
BI - 3 Rea RTE 10 -2 1 10 -3<br />
BI - 3 Rea RTE 10 -3 1 10 -4<br />
BI - 3 Rea AXE 1 10 10 -1<br />
BI - 3 Rea AXE 1 1 10 -2<br />
BI - 3 Rea AXE 10 -2 1 10 -3<br />
Lab Positive<br />
Lab Positive<br />
Lab Positive<br />
Field Blank 1 100 1<br />
Start Blank 1 100 1<br />
End Blank 1 100 1<br />
18 <strong>of</strong> 22<br />
24 Hr.<br />
Count<br />
Count per<br />
100 mL<br />
ISDS Microbiological Analysis SOP 008<br />
S:\WW\awwword\LABPROC\all QAPPs\LABQAPPs\QAPP Rev5 -0609\SOPs\SOP 008 ISDSMicrobes.doc
Understanding the URIWW ISDS Bacterial Data Sheet<br />
Site: Project ID – site #, then homeowner ID<br />
Location: The ID <strong>of</strong> the component <strong>of</strong> the septic system from which the sample was collected.<br />
Setup Date: The date on which the sample was filtered and placed on the media plate. This<br />
SHOULD be the same date as the sample date (the usual hold time for samples < 6 hours).<br />
ISDS samples degrade much more rapidly than do ambient waters, so every effort must be<br />
made to setup samples within 6 hours <strong>of</strong> collection. In the rare event that it is not the same as<br />
the sample date, the sample date should be written in parenthesis next to the location<br />
identification.<br />
Dilution: The concentration <strong>of</strong> sample filtered, reported in milliliters. A 1 indicates that this<br />
sample was drawn directly from the sample bottle. Anything else indicates that a dilution tube<br />
was used.<br />
Vol. Filtered: The volume <strong>of</strong> sample filtered for that plate. From dilution tubes, this will<br />
generally be 1 mL. For dilutions <strong>of</strong> 1, this could vary from 1 mL all the way up to 100 mL.<br />
(Yields): This is the “final” dilution value used in the total coliform value calculation. This value<br />
is referred to as the “calculated result” in the Dilution Notes table<br />
24 Hr Count: The number <strong>of</strong> yellow and yellow-brown colonies counted on that filter after a 24<br />
hour total incubation period. This number corresponds to the number <strong>of</strong> fecal coliform bacteria<br />
for the given volume <strong>of</strong> water.<br />
Count per 100: The number <strong>of</strong> fecal coliform bacteria per 100 mL (the standard method <strong>of</strong><br />
reporting fecal coliform bacteria). This is determined by dividing the 24 Hr Count by the Yields<br />
column.<br />
19 <strong>of</strong> 22<br />
ISDS Microbiological Analysis SOP 008<br />
S:\WW\awwword\LABPROC\all QAPPs\LABQAPPs\QAPP Rev5 -0609\SOPs\SOP 008 ISDSMicrobes.doc
URI Watershed Watch Laboratory<br />
Quarterly UV germicidal Tube Record<br />
Date Tube # Intensity Date Tube # Intensity<br />
Initial intensity 1 4<br />
readings 2 5<br />
3 6<br />
Date<br />
Tech's<br />
Initials<br />
Tube #<br />
Reading<br />
(right side)<br />
Reading<br />
(center)<br />
Reading<br />
(left side)<br />
Average<br />
Reading<br />
Wear protective gear when<br />
measuring UV lamp intensity!<br />
Intensity<br />
Reduction<br />
Comments / Notes<br />
This form is intended to be used to maintain a quarterly record <strong>of</strong> the intensity <strong>of</strong> the germicidal UV labs in the<br />
sterilzing box in room 19. The intensity <strong>of</strong> EACH <strong>of</strong> the SIX tubes must be measured on a quarterly basis,<br />
with each tube measured four inches from each end, as well as in the center, wtih the average <strong>of</strong> those<br />
three readings used. Once this sheet is full it should be replaced with a new blank sheet. The full sheet<br />
should be returned to the URIWW Micro Laboratory Binder in Room 019; blank sheets are also located in this<br />
binder. Any maintenance activity should also be recorded on this sheet. See Elizabeth with questions.<br />
20 <strong>of</strong> 22<br />
ISDS Microbiological Analysis SOP 008<br />
S:\WW\awwword\LABPROC\all QAPPs\LABQAPPs\QAPP Rev5 -0609\SOPs\SOP 008 ISDSMicrobes.doc
Bacterial Sample Log & Worksheet: Bacteria Bottle Sterilization Confirmation<br />
mTEC Membrane Filtration Method<br />
Analyst - set-up: Analyst - Counts:<br />
Incubator temp. start: Waterbath temp. start:<br />
incubator temp. end: Waterbath temp. end:<br />
Setup Dil. 24 Hr Total fecal<br />
Monitoring Location Date (mls) Count (per 100ml) Comments<br />
Batch #4 100<br />
Batch #5 100<br />
Analyst - set-up:<br />
Enterolert IDEXX Method<br />
Analyst - Counts: Media Batch #:<br />
Incubator temp. start: Incubator temp. end:<br />
Notes: "-" = Quanti-tray used, no small wells<br />
Expiration:<br />
Final count determined by using the correct table<br />
(51 well Quanti-Tray lg wells only, Quanti-Tray / 2000 with small wells)<br />
21 <strong>of</strong> 22<br />
Setup Dil. # lg pos. # sm pos. Table<br />
Enterococci Date (mls) wells wells Value<br />
Batch #4 100 -<br />
Batch #5 100 -<br />
IDEXX Blank 100 -<br />
URIWW Sterilized 100 -<br />
ISDS Microbiological Analysis SOP 008<br />
S:\WW\awwword\LABPROC\all QAPPs\LABQAPPs\QAPP Rev5 -0609\SOPs\SOP 008 ISDSMicrobes.doc
Date<br />
22 <strong>of</strong> 22<br />
URI Watershed Watch Laboratory<br />
Buffered Dilution/rinse Water KH 2PO 4 reagent pH Record<br />
Tech's<br />
Initials<br />
Meter<br />
Letter<br />
(A or B)<br />
Calibration 2<br />
Intitial pH<br />
Volume 1N<br />
NaOH added<br />
(mL)<br />
Final pH Comments / Notes<br />
This form is intended to be used to maintain a record <strong>of</strong> pH and adjustment for the phosphate reagent for the fecal coliform dilution/rinse<br />
water. When new reagent is made up, the initial pH, amount <strong>of</strong> NaOH added, and final pH should be recorded on this sheet. Once this<br />
sheet is full it should be replaced with a new blank sheet. The full sheet should be returned to the URIWW Micro Laboratory Binder in<br />
Room 019; blank sheets are also located in this binder. Check the Laboratory QAPP, SOP 010 - Alkalinity and pH procedures, for<br />
details regarding the pH and alkalinity procedures.<br />
Calibration and Maintenance Information:<br />
1<br />
Each time the pH probe is used the filling solution level in the probe should be checked. The level should be within 1/4 inch <strong>of</strong> the top <strong>of</strong><br />
the electode. If it isn't, add enough filling solution to bring it up to that point.<br />
2 The meter should have a slope (Electrode Efficiency) <strong>of</strong> at least 96% after calibration. If the meter doesn't initially calibrate correctly,<br />
change the probe filling solution and replace the pH buffers, then recalibrate the probe. If this doesn't solve the problem replace the<br />
probe. See Linda or Elizabeth with questions.<br />
ISDS Microbiological Analysis SOP 008<br />
S:\WW\awwword\LABPROC\all QAPPs\LABQAPPs\QAPP Rev5 -0609\SOPs\SOP 008 ISDSMicrobes.doc
<strong>Standard</strong> <strong>Operating</strong> Procedure 009<br />
(Prior number URIWW-SOP-009)<br />
Total Suspended Solids Analysis<br />
<strong>University</strong> <strong>of</strong> <strong>Rhode</strong> Island Watershed Watch<br />
TABLE OF CONTENTS<br />
Date:<br />
Revision:<br />
Author:<br />
12/06<br />
3<br />
Linda Green<br />
1.0 PURPOSE AND DESCRIPTION .......................................................................................1<br />
2.0 HEALTH AND SAFETY CONSIDERATIONS ...................................................................1<br />
2.1 HAZARDS.........................................................................................................................1<br />
2.2 TECHNICIAN TRAINING/QUALIFICATIONS ............................................................................1<br />
3.0 REQUIRED MATERIALS ..................................................................................................1<br />
4.0 SAMPLE STORAGE, PRESERVATION AND DISPOSAL ...............................................2<br />
5.0 METHOD DESCRIPTION ..................................................................................................3<br />
5.1 SCHEDULING CONSIDERATIONS........................................................................................3<br />
5.2 QUALITY ASSURANCE/QUALITY CONTROL ........................................................................3<br />
5.2.1 Method Detection Limit & Reporting Limit...................................................................3<br />
5.2.2 Method Blanks ............................................................................................................3<br />
5.2.3 Sample Replication .....................................................................................................3<br />
5.2.4 Calibration...................................................................................................................4<br />
5.2.5 Laboratory Control <strong>Standard</strong>.......................................................................................4<br />
5.2.6 Drying Oven ................................................................................................................4<br />
5.3 ANALYSIS METHOD ..........................................................................................................4<br />
5.3.1 Preparation – Filter Preparation - Day Before Samples Arrive or Earlier....................4<br />
5.3.2 Procedure – Collection Day ........................................................................................5<br />
5.3.2.1 Preparation <strong>of</strong> Samples for Filtering ....................................................................5<br />
5.3.2.2 Filtering Samples .................................................................................................6<br />
5.3.2.3 Drying and Weighing TSS Samples ....................................................................7<br />
5.3.2.4 Cleanup ...............................................................................................................7<br />
6.0 CALCULATIONS...............................................................................................................8<br />
6.1 CALCULATION IF MEASURED WEIGHTS ARE RECORDED IN GRAMS....................................8<br />
6.2 CALCULATION IF MEASURED WEIGHTS ARE RECORDED IN MILLIGRAMS ............................8<br />
7.0 REFERENCES...................................................................................................................8<br />
8.0 DOCUMENTATION ...........................................................................................................9<br />
Total Suspended Solids SOP 009<br />
S:\WW\awwword\LABPROC\all QAPPs\LABQAPPs\QAPP Rev5 -0609\SOPs\SOP 009 TSS-mod3.doc
<strong>Standard</strong> <strong>Operating</strong> Procedure 009<br />
(Prior number URIWW-SOP-009)<br />
Total Suspended Solids Analysis<br />
<strong>University</strong> <strong>of</strong> <strong>Rhode</strong> Island Watershed Watch<br />
1.0 PURPOSE AND DESCRIPTION<br />
Date:<br />
Revision:<br />
Author:<br />
12/06<br />
3<br />
Linda Green<br />
The Total Suspended Solids (TSS) Assay allows the determination <strong>of</strong> the amount <strong>of</strong> solids<br />
contained in an aqueous sample. The final value is expressed as the mass <strong>of</strong> solids per volume<br />
<strong>of</strong> sample. This method is applicable to Individual Sewage Disposal Systems (ISDS) and<br />
ambient water (ponds, lakes and rivers) samples. This method is applicable to undiluted<br />
samples in the range <strong>of</strong>
Required Material Description Notes<br />
PVC filter manifold<br />
6 Magnetic filter<br />
funnels<br />
2 <strong>of</strong> 9<br />
Homemade apparatus. Six place<br />
manifold with individual stopcocks,<br />
attached to a vacuum apparatus<br />
connected to a water faucet.<br />
47 mm diameter filter funnels,<br />
300 mL capacity, 50 mL gradations<br />
Gelman #4242<br />
Plastic elasticized food covers are<br />
used to cover filter holders when<br />
they are not in use.<br />
Sample bottles 500 mL HDPE wide mouth bottle<br />
Filters 47 mm diameter filters<br />
Aluminum weigh dishes Dishes are reused<br />
Aluminum<br />
featherweight forceps<br />
Aluminum baking trays<br />
(approx. 10"X16")<br />
Squeeze bottle filled<br />
with deionized (DI)<br />
water<br />
500-1000 mL beaker<br />
for DI water<br />
Equipment<br />
Manufacturers<br />
Fisher Scientific Co.<br />
3970 John's Creek<br />
Court, Suite 500,<br />
Suwanee, GA 30024,<br />
phone 1-800-766-7000<br />
Capable <strong>of</strong> holding 4 rows <strong>of</strong> 6<br />
aluminum weigh dishes<br />
Bioquip Products<br />
17803 LaSalle Ave<br />
Gardena CA 90248<br />
phone 310-324-0620<br />
Comparable apparatus<br />
commercially available: Fisher<br />
Scientific #09-753-39B<br />
$950.00<br />
Fisher Scientific #09-735<br />
$130/funnel<br />
Fisher Scientific #02-893-5E<br />
pack <strong>of</strong> 12/$35.00<br />
Millipore AP40 GFF for TCLP<br />
#AP4002500<br />
Fisher Scientific # 08-732<br />
Pack <strong>of</strong> 144/$20<br />
Bioquip Products Item #4750<br />
Approximately $4.00 each.<br />
Cookie sheets purchased at<br />
local food store<br />
Equipment is maintained by the <strong>University</strong> <strong>of</strong> <strong>Rhode</strong> Island Watershed Watch (URIWW)<br />
Laboratory. Temporary replacement <strong>of</strong> equipment may be obtained through arrangement with<br />
other scientists in the Natural Resources Science department maintaining similar equipment.<br />
4.0 SAMPLE STORAGE, PRESERVATION AND DISPOSAL<br />
Matrix Sample<br />
Container<br />
Water 500 mL HDPE<br />
Bottle<br />
Preservation Volume Holding Time<br />
Kept at 4 °C 500 mL 1 week<br />
Total Suspended Solids SOP 009<br />
S:\WW\awwword\LABPROC\all QAPPs\LABQAPPs\QAPP Rev5 -0609\SOPs\SOP 009 TSS-mod3.doc
Disposal<br />
Samples are archived for approximately 1 month. Aqueous samples and filters may only be<br />
disposed <strong>of</strong> after final quality assurance checks are completed and the data found to be<br />
acceptable using criteria found in Section 5.2 <strong>of</strong> this SOP. Aqueous samples are not<br />
considered hazardous and may be disposed <strong>of</strong> by rinsing down the drain. Bottles are cleaned<br />
per SOP 003 - General Labware Cleaning Procedure.<br />
Aluminum weighting dishes are saved for re-ruse and do not have to be washed. Filters may be<br />
placed into the garbage.<br />
5.0 METHOD DESCRIPTION<br />
5.1 Scheduling Considerations<br />
Preparations for the analysis <strong>of</strong> TSS samples should begin the day before analysis is<br />
scheduled. Refer to Section 5.3.<br />
5.2 Quality Assurance/Quality Control<br />
5.2.1 Method Detection Limit & Reporting Limit<br />
The Method Detection Limit (MDL) and Reporting Limit (RL) for the TSS analysis are set at 1<br />
mg/L. Data are reported to the nearest whole number.<br />
5.2.2 Method Blanks<br />
The method blank is determined by filtering 200 mL <strong>of</strong> DI water through a pre-weighed filter and<br />
then treating the method blank as a field sample. There shall be one method blank per 24<br />
samples or approximately 4% <strong>of</strong> the samples analyzed. The method blank shall be less than or<br />
equal to 1 mg/L.<br />
Corrective Action<br />
If the method blank is greater than 1 mg/L the method blank is placed back into the desiccator<br />
for 5-10 minutes and re-weighed. If the value is still greater than 1 mg/L the deviation is noted<br />
on the data sheet.<br />
5.2.3 Sample Replication<br />
Sample replicates are completed by filtering two aliquots <strong>of</strong> the same sample and processing<br />
the resulting filters as two separate samples. Sample replication is completed on 100% <strong>of</strong> field<br />
samples.<br />
Analysis results for replicate samples should be within 30% relative percent deviation (%RPD).<br />
%RPD is calculated as follows:<br />
%RPD = Value <strong>of</strong> Replicate 1 (mg/L) – Value <strong>of</strong> Replicate 2 (mg/L) x 100<br />
Average <strong>of</strong> Result <strong>of</strong> Replicate 1 (mg/L) and Result <strong>of</strong> Replicate 2 (mg/L)<br />
3 <strong>of</strong> 9<br />
Total Suspended Solids SOP 009<br />
S:\WW\awwword\LABPROC\all QAPPs\LABQAPPs\QAPP Rev5 -0609\SOPs\SOP 009 TSS-mod3.doc
Corrective Action<br />
If the %RPD is greater than 30% then the samples are re-analyzed by placing the filter into the<br />
desiccator for 5-10 minutes and re-weighing the sample. If the samples are still not within 30%<br />
the deviation is noted on the data sheet.<br />
5.2.4 Calibration<br />
Balance calibration is checked using a standard 1 g weight prior to each use. Values returned<br />
by the balance should be within 10 percent difference (%D) <strong>of</strong> the actual calibration value.<br />
Percent difference is calculated as follows:<br />
%D = Reported value X 100<br />
Known value<br />
Corrective Action<br />
If a deviation <strong>of</strong> greater than 10%D is noted then the balance will be serviced and re-calibrated.<br />
If the balance is found to be outside <strong>of</strong> the acceptable calibration range then it will not be used<br />
in this procedure.<br />
5.2.5 Laboratory Control <strong>Standard</strong><br />
Environmental Protection Agency Water Pollution Pr<strong>of</strong>iciency Test Study<br />
The laboratory participates in the Environmental Protection Agency Water Pollution Pr<strong>of</strong>iciency<br />
Test Study yearly. Unknown samples are purchased and analyzed for TSS. The results <strong>of</strong> the<br />
analysis are compared to the actual value and a performance evaluation provided by the<br />
vendor. Study results are maintained by the laboratory.<br />
5.2.6 Drying Oven<br />
The temperature <strong>of</strong> the drying oven is checked daily, when in use. Drying oven temperatures<br />
are recorded on the temperature recording data sheet attached to the front <strong>of</strong> the drying oven.<br />
Initial and final temperatures for drying <strong>of</strong> TSS samples are recorded on the project data sheet.<br />
Drying oven temperature must be between 103 and 105 °C.<br />
Corrective Action<br />
The drying oven temperature must remain in the range specified above. If the drying oven<br />
temperature is found to be outside the acceptable range, contact Linda Green and adjust the<br />
drying oven temperature control. Pr<strong>of</strong>essional maintenance <strong>of</strong> the drying oven may be<br />
necessary if adjustment <strong>of</strong> the temperature control does not rectify the problem.<br />
5.3 Analysis Method<br />
5.3.1 Preparation – Filter Preparation - Day Before Samples Arrive or Earlier<br />
1. Print data sheets.<br />
2. Determine the number <strong>of</strong> filters and aluminum weigh dishes needed. Each sample<br />
will be analyzed twice (replicated). One method blank will be analyzed per 24<br />
samples. It is a good idea to have a few extra filters in case <strong>of</strong> clogging.<br />
4 <strong>of</strong> 9<br />
Total Suspended Solids SOP 009<br />
S:\WW\awwword\LABPROC\all QAPPs\LABQAPPs\QAPP Rev5 -0609\SOPs\SOP 009 TSS-mod3.doc
3. Aluminum weigh dishes, pans, and desiccator are located in room 018.<br />
4. Place labeled aluminum weigh dishes in sequential order on an aluminum pan. Each<br />
pan will hold 24 dishes. Note that the weigh dishes are re-used.<br />
5. Set up the filter manifold in the URIWW laboratory.<br />
6. Move the cart with the filtering manifold in front <strong>of</strong> the fume hood and attach the outlet<br />
hose to the large white vacuum flask and the flask to the vacuum port in fume hood. Be<br />
sure that the base <strong>of</strong> the magnetic filter funnels are well seated on the filtering manifold.<br />
7. Filters are kept in the TSS drawer to the left <strong>of</strong> the fume hood.<br />
8. Center a filter on the black grid <strong>of</strong> the magnetic funnel base, gridded side down. Set the<br />
top <strong>of</strong> filter funnel onto the base. The magnets hold the 2 parts together. Set up<br />
remaining filters on funnel bases. Six (6) filters can be processed at a time.<br />
9. Close the stopcocks on the manifold under each filter apparatus.<br />
10. Turn on the vacuum port in the fume hood by turning the handle to the marked position.<br />
Turn on vacuum to line marked on dial.<br />
11. Pour approximately 50 mL <strong>of</strong> DI water into each funnel, open the stopcock and allow the<br />
water to drain. Repeat this process 2 more times to rinse the filters.<br />
12. Allow vacuum to dry filters.<br />
13. Use forceps (tweezers) to remove each filter from the manifold, closing the stopcock as<br />
the filter is removed to shut <strong>of</strong>f the vacuum. Each filter should be placed into a separate<br />
aluminum weigh dish.<br />
14. Place aluminum weigh dishes on aluminum pans in sequential order.<br />
15. Place in pre-heated 105 °C oven for at least 1 hour. It is acceptable to leave filters in the<br />
drying oven for more than 1 hour. The temperature <strong>of</strong> the drying oven should range<br />
from 105 +/- 5 °C. If the oven is not able to maintain temperature within this range then<br />
contact Linda Green or Elizabeth Herron to obtain pr<strong>of</strong>essional maintenance service <strong>of</strong><br />
the oven.<br />
16. After filters have been dried store them in the electronic desiccator.<br />
5.3.2 Procedure – Collection Day<br />
5.3.2.1 Preparation <strong>of</strong> Samples for Filtering<br />
1. Samples are usually collected in 500 mL HDPE wide mouth bottles. They should be<br />
kept on ice until delivery to the lab. If possible, do not analyze samples on humid or<br />
rainy days because the filters absorb moisture rapidly from the air after removal from the<br />
desiccator.<br />
2. Bring samples to room temperature before analysis.<br />
3. Check the calibration <strong>of</strong> the analytical balance in room 018 using the 1 g weight.<br />
a. The calibration weights are located in the drawer under the balance. Never<br />
touch the calibration weights with anything but forceps. The oils on the fingers<br />
may change the weight <strong>of</strong> the standard.<br />
5 <strong>of</strong> 9<br />
Total Suspended Solids SOP 009<br />
S:\WW\awwword\LABPROC\all QAPPs\LABQAPPs\QAPP Rev5 -0609\SOPs\SOP 009 TSS-mod3.doc
. Values returned by the balance should be within 10% <strong>of</strong> the actual calibration<br />
weight value. If a deviation <strong>of</strong> greater than 10% is noted then the balance will be<br />
serviced and re-calibrated. If the balance is found to be outside <strong>of</strong> the<br />
acceptable calibration range then it will not be used in this procedure.<br />
4. Remove aluminum weight dishes holding the clean dried filters from the desiccator<br />
immediately prior to weighing.<br />
5. Weigh a sufficient number <strong>of</strong> previously clean dried filters in their weight dishes to 0.5<br />
mg. Always handle the filters and weight dishes with forceps. Never use fingers.<br />
6. Record the sample number and weight on the data sheet as “initial weight”.<br />
a. Remember to have enough dried filters for at least two replicates per sample and<br />
one “blank” per 24 samples.<br />
b. It is a good idea to have a few extra filters in case <strong>of</strong> clogging.<br />
5.3.2.2 Filtering Samples<br />
1. Return to room 002; place a weighed filter grid side down on the bottom <strong>of</strong> the filter<br />
funnel. Set the top half <strong>of</strong> the filter funnel onto the bottom half. Keep the aluminum<br />
weigh dish associated with the filter in front <strong>of</strong> the appropriate filter funnel.<br />
a. Only touch the weigh dishes and filters with forceps.<br />
b. Set-up 6 filters in this manner<br />
2. Vigorously shake the sample bottle a minimum <strong>of</strong> 10 seconds, uncap and then<br />
immediately pour an aliquot <strong>of</strong> the sample into the magnetic filter funnel. Use the<br />
volume markings on the filter funnel to measure sample volume.<br />
a. The table below provides information regarding the appropriate volume <strong>of</strong> ISDS<br />
sample to filter as do the project specific data sheets.<br />
b. Use a sample volume <strong>of</strong> 200 mL for Watershed Watch samples.<br />
c. If the sample volume is less than 50 mL, use a graduated cylinder to measure<br />
out the appropriate amount <strong>of</strong> sample and then pour the sample into the filter<br />
funnel.<br />
c. If the sample volume is less than 25 mL, pour approximately 25 mL <strong>of</strong> DI water<br />
into the filter funnel prior to adding the sample. After adding the sample, rinse<br />
the graduated cylinder into the filter funnel.<br />
Sample Filter Volume Guide for ISDS Samples<br />
ISDS Volume to Sample ID Volume to<br />
Sample ID Filter (mL)<br />
Filter (mL)<br />
STE-R 10-100 RSFE 200 mL<br />
RTFE 200 RTE 100 mL<br />
SFE 200 BFE 150-200 mL<br />
STE-S 25-100<br />
NOTE: DO NOT BE TEMPTED TO USE > 100mL FOR STE-R!<br />
If STE-R is thick and chunky use less sample.<br />
3. Turn on the vacuum and open the filter funnel stopcock to filter the sample.<br />
6 <strong>of</strong> 9<br />
Total Suspended Solids SOP 009<br />
S:\WW\awwword\LABPROC\all QAPPs\LABQAPPs\QAPP Rev5 -0609\SOPs\SOP 009 TSS-mod3.doc
a. If a sample clogs a filter, remove the filter unit from the filter manifold, discard the<br />
filter, rinse the funnel and repeat the filtration procedure with a smaller sample<br />
volume.<br />
4. Record sample ID and volume filtered on the data sheet.<br />
a. Be sure that the weigh dish number matches the number on data sheet and the<br />
sample ID is correlated with the weigh dish number on the data sheet.<br />
5. When the sample has filtered through, rinse the sidewalls <strong>of</strong> the filter funnel 2-3 times<br />
with DI water from a squeeze bottle.<br />
6. Continue to allow a vacuum on the sample until the filter is dry.<br />
7. When filtering is complete remove the top half <strong>of</strong> the filter funnel and close the stopcock.<br />
8. Use forceps to carefully remove the filter from the filter holder. Place the filter back into<br />
its aluminum weigh dish.<br />
9. Discard any obvious large pieces <strong>of</strong> debris, such as grass clippings, worms, etc.<br />
10. Check to make sure the sample ID and weight dish number are recorded correctly!<br />
11. Repeat filtering procedure with replicate sample and remaining water samples.<br />
5.3.2.3 Drying and Weighing TSS Samples<br />
1. Dry filters in the aluminum weight dishes on an aluminum pan in a drying oven set a<br />
105 °C for at least 1 hour.<br />
2. Filters can stay overnight in the oven if needed.<br />
3. Once filters are dry, cool them to room temperature in the electronic desiccator<br />
(approximately 5-10 minutes).<br />
4. Check the calibration <strong>of</strong> the balance using the procedure outlined in Section 5.3.2.1<br />
5. Remove samples from desiccator and weigh filters and weigh dishes at once.<br />
6. Record weight in “final weight 1” column on data sheet.<br />
7. Place filters back on the aluminum pan and place them back into the drying oven for at<br />
least 1 hour. Repeat the weighing procedure, recording the weight in the “final weight 2”<br />
column on the data sheet.<br />
a. The difference between “final weight 1” and “final weight 2” must be less than or<br />
equal to 0.5 mg.<br />
b. If the difference is greater than 0.5 mg, place the appropriate filters back into the<br />
drying oven and complete drying/weighing cycle over. If the difference between<br />
“final weight 2” and “final weight 3” is still greater than 0.5 mg complete the cycle<br />
again and keep doing it until the difference between the two most recent filter<br />
weights is less than 0.5 mg.<br />
5.3.2.4 Cleanup<br />
1. Once all filtering is completed, thoroughly rinse all materials including the filter manifold<br />
with clean water.<br />
7 <strong>of</strong> 9<br />
Total Suspended Solids SOP 009<br />
S:\WW\awwword\LABPROC\all QAPPs\LABQAPPs\QAPP Rev5 -0609\SOPs\SOP 009 TSS-mod3.doc
2. If septic samples were filtered, spray the manifold and counter with disinfectant.<br />
3. Separate the halves <strong>of</strong> the filter funnels. Wash them in soapy water using a brush to<br />
clean all surfaces, including the filter grid. Rinse with tap and then DI water, invert to<br />
dry, separated.<br />
6.0 CALCULATIONS<br />
6.1 Calculation if Measured Weights are Recorded in Grams<br />
TSS in mg/l = ((A - B) X 1,000,000)<br />
mL sample<br />
A = final weight (g) = weigh dish + filter containing dried residue (g)<br />
B = initial weight (g) = clean filter + weigh dish (g).<br />
Final data are reported to the nearest whole number. Values less than 1 mg/L TSS are reported<br />
as
8.0 DOCUMENTATION<br />
Example Data Sheet<br />
TOTAL SUSPENDED SOLIDS ANALYSIS<br />
9 <strong>of</strong> 9<br />
Initial Weight Date: Final Weight 1 Date:<br />
Initial Weight Analyst: Final Weight 1 Analyst:<br />
Oven Temp. Start: Final Weight 2 Date:<br />
Oven Temp. End Weight 1:<br />
Oven Temp. End Weight 2:<br />
Final Weight 2 Analyst:<br />
Sample # Location<br />
Sample<br />
Date<br />
Initial Blank 300<br />
Final Blank 300<br />
Volume<br />
Filtered (ml) Initial Weight Final Weight 1 Final Weight 2*<br />
* Difference between final weight 1 and final weight 2 must not be more than 0.5 mg. Otherwise, re-dry filter again.<br />
Total Suspended Solids SOP 009<br />
S:\WW\awwword\LABPROC\all QAPPs\LABQAPPs\QAPP Rev5 -0609\SOPs\SOP 009 TSS-mod3.doc
<strong>Standard</strong> <strong>Operating</strong> Procedure 010<br />
(Prior number URIWW SOP 7A&7B)<br />
Alkalinity and pH <strong>Procedures</strong><br />
<strong>University</strong> <strong>of</strong> <strong>Rhode</strong> Island Watershed Watch<br />
TABLE OF CONTENTS<br />
Date:<br />
Revision:<br />
Author:<br />
6/09<br />
3<br />
Linda Green<br />
1.0 PURPOSE AND DESCRIPTION .......................................................................................1<br />
2.0 HEALTH AND SAFETY CONSIDERATIONS ...................................................................1<br />
2.1 HAZARDS.........................................................................................................................1<br />
2.2 TECHNICIAN TRAINING/QUALIFICATIONS ...........................................................................1<br />
3.0 REQUIRED MATERIALS ..................................................................................................2<br />
4.0 SAMPLE STORAGE, PRESERVATION AND DISPOSAL ...............................................2<br />
4.1 PH ONLY..........................................................................................................................2<br />
4.2 PH AND ALKALINITY .........................................................................................................3<br />
5.0 METHOD DESCRIPTION ..................................................................................................3<br />
5.1 SCHEDULING CONSIDERATIONS........................................................................................3<br />
5.2 QUALITY ASSURANCE/QUALITY CONTROL ........................................................................3<br />
5.2.1 Method Detection Limit ...............................................................................................3<br />
5.2.2 Method Blanks ............................................................................................................3<br />
5.2.3 Sample Replication .....................................................................................................4<br />
5.2.4 Calibration and <strong>Standard</strong>s ..........................................................................................4<br />
5.2.4.1 Laboratory <strong>Standard</strong>s ..........................................................................................4<br />
5.2.4.2 Daily Calibration...................................................................................................4<br />
5.2.4.3 New Electrode Preparation..................................................................................5<br />
5.2.5 Calibration Check/Laboratory Control <strong>Standard</strong> .........................................................6<br />
5.3 ANALYSIS ........................................................................................................................6<br />
5.3.1 Daily Electrode Maintenance ......................................................................................6<br />
5.3.2 Electrode Storage .......................................................................................................6<br />
5.3.2.1 Extended Storage ................................................................................................6<br />
5.3.3 Procedure – Analysis <strong>of</strong> pH only.................................................................................7<br />
5.4 ANALYSIS METHOD PH AND ALKALINITY...........................................................................7<br />
5.4.1 Preparation – 1 Week Before Scheduled Sampling (as needed) ...............................7<br />
5.4.1.1 Preparation and <strong>Standard</strong>ization <strong>of</strong> the Alkalinity Titrant.....................................7<br />
5.4.2 Procedure - Analysis <strong>of</strong> pH and Alkalinity ...................................................................8<br />
6.0 CALCULATIONS...............................................................................................................9<br />
6.1 PH ...................................................................................................................................9<br />
6.2 ALKALINITY....................................................................................................................10<br />
7.0 REFERENCES.................................................................................................................10<br />
8.0 DOCUMENTATION .........................................................................................................11<br />
Alkalinity and pH <strong>Procedures</strong> SOP 010<br />
S:\WW\awwword\LABPROC\all QAPPs\LABQAPPs\QAPP Rev5 -0609\SOPs\SOP 010 Alkalinity&pH-mod.doc
<strong>Standard</strong> <strong>Operating</strong> Procedure 010<br />
(Prior number URIWW SOP 7A&7B)<br />
Alkalinity and pH <strong>Procedures</strong><br />
<strong>University</strong> <strong>of</strong> <strong>Rhode</strong> Island Watershed Watch<br />
1.0 PURPOSE AND DESCRIPTION<br />
Date:<br />
Revision:<br />
Author:<br />
8/06<br />
2<br />
Linda Green<br />
The purpose <strong>of</strong> this method is to determine the pH and/or alkalinity <strong>of</strong> both Individual Sewage<br />
Disposal System (ISDS) samples as well as ambient water samples (lakes, ponds, streams).<br />
The pH <strong>of</strong> marine samples may also be determined using this method. This method is<br />
applicable to samples in the range <strong>of</strong> 1 to 14 standard units (SU) and
3.0 REQUIRED MATERIALS<br />
Equipment and Supplies<br />
Required Material Notes Re-order Information<br />
Fisher Model AR 20 laboratory<br />
pH meter<br />
Capable <strong>of</strong> reading to 0.01<br />
unit with automatic<br />
temperature compensation<br />
electrode<br />
Combination pH electrode Recommended by Fisher<br />
Tech Support<br />
Saturated potassium chloride This solution is used as the<br />
(KCl) solution.<br />
electrode filling solution<br />
Fisher certified color-coded pH Note the expiration data<br />
buffers - pH 4,7 & 10<br />
before using the buffers<br />
Magnetic stirrer and magnetic stir<br />
bars<br />
10 mL micro-buret, 0.02 mL<br />
subdivisions<br />
2 L <strong>of</strong> 0.02 N H2SO4 (Sulfuric<br />
Acid)<br />
Tubing and stoppers to connect<br />
the bottle containing the acid<br />
titrant to the buret.<br />
250 mL graduated cylinders<br />
250 mL beakers<br />
NIST traceable, with 3-way<br />
plug<br />
Preparation instructions:<br />
Section 5.4.1.1<br />
Fisher #13-620-185<br />
Fisher #SP138-500.<br />
pH 7 (yellow) #SB107-500<br />
pH 4.0 (pink) #SB101-500<br />
pH 10 (blue) #SB115-500.<br />
Fisher # 17115F-10.<br />
Spare Equipment is maintained by the <strong>University</strong> <strong>of</strong> <strong>Rhode</strong> Island Watershed Watch (URIWW)<br />
laboratory and the Natural Resources Science department.<br />
4.0 SAMPLE STORAGE, PRESERVATION AND DISPOSAL<br />
4.1 pH Only<br />
Matrix Sample<br />
Container<br />
Ambient Water 250-500 mL<br />
white HDPE or<br />
brown glass<br />
bottle<br />
ISDS Sample 125 white HDPE<br />
bottle<br />
2 <strong>of</strong> 12<br />
Preservation Volume Holding Time<br />
Kept at 4 °C Measured<br />
directly in<br />
sample bottle<br />
Kept at 4 °C Measured<br />
directly in<br />
sample bottle<br />
Analyze<br />
immediately<br />
Analyze<br />
immediately<br />
Alkalinity and pH <strong>Procedures</strong> SOP 010<br />
S:\WW\awwword\LABPROC\all QAPPs\LABQAPPs\QAPP Rev5 -0609\SOPs\SOP 010 Alkalinity&pH-mod.doc
4.2 pH and Alkalinity<br />
Matrix Sample<br />
Container<br />
Ambient Water 500 mL white<br />
HDPE bottle<br />
ISDS Sample 125 mL white<br />
HDPE bottle<br />
Disposal<br />
Preservation Volume Holding Time<br />
Kept at 4 °C 200 mL 24 Hours<br />
Kept at 4 °C 35-40 mL 24 Hours<br />
Samples are archived for approximately 48 hours. Aqueous samples may only be disposed <strong>of</strong><br />
after final quality assurance checks are completed and the data found to be acceptable using<br />
criteria found in Section 5.2 <strong>of</strong> this SOP. Aqueous samples associated with ISDS projects are<br />
considered a potential biological hazard. Gloves, goggles and a laboratory coat should be worn<br />
when disposing <strong>of</strong> ISDS samples. Both ISDS and ambient samples may be rinsed down the<br />
drain with running water.<br />
Bottles are cleaned in accordance with SOP 003 – General Labware Cleaning Procedure.<br />
5.0 METHOD DESCRIPTION<br />
5.1 Scheduling Considerations<br />
A week before alkalinity samples are expected to arrive at the laboratory the amount <strong>of</strong> titrant<br />
(0.02 N H2SO4 (sulfuric acid)) available should be checked. Approximately 5 mL <strong>of</strong> titrant are<br />
used per sample. Preparation <strong>of</strong> titrant is discussed in Section 5.4.1.1.<br />
A check <strong>of</strong> the status <strong>of</strong> the pH electrode must be preformed at least 48 hours before<br />
anticipated sample arrival. The preparation <strong>of</strong> a new electrode will take at least 24 hours. Data<br />
sheets should be printed as well.<br />
5.2 Quality Assurance/Quality Control<br />
5.2.1 Method Detection Limit<br />
The method detection limit (MDL) for the pH analysis is controlled by the pH meter. The meter<br />
utilized in this SOP reports pH values to 0.01 SU. The MDL for determination <strong>of</strong> pH is 1.00 SU<br />
The upper limit <strong>of</strong> detection is 14.00 SU The reporting limit (RL) for the pH assay is 1.0 SU and<br />
the upper RL is 14.0 SU Data are reported to 1 decimal place.<br />
The MDL for the alkalinity analysis is controlled by the pH meter as well as the titration method.<br />
The MDL is 0 mg/L. Alkalinity <strong>of</strong> a sample may be reported as 0 mg/L when the initial pH <strong>of</strong> the<br />
sample is at or below the titration endpoint <strong>of</strong> 4.5 SU. The RL is set at 0.1 mg/L. Data are<br />
reported to 1 decimal place.<br />
5.2.2 Method Blanks<br />
Method blanks are not applicable to this method<br />
3 <strong>of</strong> 12<br />
Alkalinity and pH <strong>Procedures</strong> SOP 010<br />
S:\WW\awwword\LABPROC\all QAPPs\LABQAPPs\QAPP Rev5 -0609\SOPs\SOP 010 Alkalinity&pH-mod.doc
5.2.3 Sample Replication<br />
Replicates are completed on at least 10% <strong>of</strong> samples (1 sample in 10) for both alkalinity and pH<br />
assays. The difference between the replicates must be not greater than +/-0.5 S.U. for the pH<br />
assay and 25%RPD (relative percent difference) for the alkalinity assay.<br />
%RPD is calculated as follows:<br />
%RPD = Result <strong>of</strong> Replicate 1 (µg/L) – Result <strong>of</strong> Replicate 2 (µg/L) x 100<br />
Average <strong>of</strong> Result <strong>of</strong> Replicate 1 (µg/L) and Result <strong>of</strong> Replicate 2 (µg/L)<br />
Corrective Action<br />
If the %RPD is greater than 25% for the alkalinity analysis or +/- 0.5 S.U. for the pH assay, then<br />
the sample is analyzed again. If the samples are still not within the acceptable range the<br />
deviation is noted on the project data sheet. If several replicate pairs are not within the<br />
acceptable range then the pH meter calibration should be rechecked and the meter recalibrated<br />
if necessary. If the recalibration <strong>of</strong> the pH meter does not solve errors associated with the<br />
alkalinity assay it may be necessary to recheck the titrant.<br />
5.2.4 Calibration and <strong>Standard</strong>s<br />
5.2.4.1 Laboratory <strong>Standard</strong>s<br />
The laboratory participates annually in the Environmental Protection Agency Water Pollution<br />
Pr<strong>of</strong>iciency Test Study. Unknown samples are purchased and analyzed for pH and alkalinity.<br />
The results <strong>of</strong> the analysis are compared to the actual value and a performance evaluation<br />
provided. Study results are maintained by the laboratory.<br />
5.2.4.2 Daily Calibration<br />
The two pH meters utilized in the URIWW laboratory are Fisher Scientific Accumet Research<br />
AR20 models. Both meters use AccupHast rugged bulb combination pH and automatic<br />
temperature compensation electrodes. According to Fisher Technical Services, the average life<br />
<strong>of</strong> an electrode is 18 - 24 months. If the electrode cannot be calibrated or can be initially<br />
calibrated but doesn’t hold calibration, it must be replaced. The serial number on the electrode<br />
provides Fisher with the date <strong>of</strong> manufacture/sale <strong>of</strong> the electrode. A piece <strong>of</strong> tape on each<br />
electrode contains the electrode installation date.<br />
Calibration <strong>of</strong> the pH meters is competed each day prior to use. The meters are always left<br />
plugged in and in standby mode.<br />
The instruction manuals for the pH meter and electrodes are kept in a drawer below the pH<br />
meter.<br />
1. Check the internal filling solution in the electrode to be sure it is within ¼ inch <strong>of</strong> the top<br />
<strong>of</strong> the electrode. If the solution is below this level, add the saturated potassium chloride<br />
filling solution until the solution is at the appropriate level. Leave fill hole open during<br />
electrode use.<br />
2. A two point calibration with pH 4 and pH 7 buffers is completed. The buffers are color<br />
coded (pH 7 = yellow, pH 4 = pink) and are purchased from Fisher Scientific. Buffers<br />
4 <strong>of</strong> 12<br />
Alkalinity and pH <strong>Procedures</strong> SOP 010<br />
S:\WW\awwword\LABPROC\all QAPPs\LABQAPPs\QAPP Rev5 -0609\SOPs\SOP 010 Alkalinity&pH-mod.doc
are stored in bulk in the cabinet above and to the right <strong>of</strong> the pH meters. Put a small<br />
amount <strong>of</strong> each buffer into a small NON-ACID WASHED beaker and add a magnetic<br />
stirrer.<br />
a. Fresh buffer is used for each calibration. DO NOT REUSE BUFFERS, once the<br />
pH and/or alkalinity run is completed, dispose <strong>of</strong> the buffers by rinse them down<br />
the sink with plenty <strong>of</strong> water.<br />
b. Check the expiration date <strong>of</strong> the buffers before using them. If the expiration date<br />
has passed or there is any precipitate in the bottle, DO NOT USE THEM.<br />
Dispose <strong>of</strong> the buffer by rinsing it down the sink and use a newer bottle <strong>of</strong> buffer.<br />
3. Remove the pH electrode from the storage buffer and rinse with DI water. Rinse water<br />
should be collected in a waste container and disposed <strong>of</strong> by rinsing down the drain.<br />
4. Place the electrode into the pH 4 calibration buffer. The electrode should be immersed<br />
approximately 1 inch into the buffer, but must be immersed to at least the liquid junction<br />
or white ceramic dot on the side <strong>of</strong> the glass body <strong>of</strong> the electrode just above the glass<br />
bulb.<br />
5. Turn on the magnetic stirrer. The stirring rod should be rotating rapidly enough to form a<br />
smooth current, not hopping around like a jumping bean. This generally means starting<br />
the magnetic stirrer at a very low setting and gradually adjusting the speed upward as<br />
needed.<br />
6. If the meter is in standby mode (i.e. the screen is dark) touch the screen to activate.<br />
Touch it again for the menu screen. Select pH.<br />
7. Touch STD on the pH measure screen to access the standardize screen.<br />
8. Touch clear to delete previous calibrations. If the screen says "Not <strong>Standard</strong>ized" it is<br />
already clear and you are ready for the next step.<br />
9. Touch STD again to calibrate the meter with the pH 4 buffer. The word Measuring will<br />
flash on the screen until the signal is stable. Once it is, the word Stable will appear,<br />
along with a beaker icon and the pH buffer entered value (4.02).<br />
10. Turn <strong>of</strong>f the magnetic stirrer, lift the electrode out <strong>of</strong> the buffer and rinse the electrode<br />
with DI water. Place the 7.00 buffer on the stirrer and set the electrode into the buffer,<br />
repeat step 9.<br />
11. Once standardization with the pH 4 and 7 buffers is complete, record the Slope value<br />
from the box in the lower part <strong>of</strong> the pH meter screen, right hand column. This is the<br />
Electrode Efficiency and the slope should be 96% or greater. Record this value on the<br />
project data sheet.<br />
Corrective Action<br />
If the electrode efficiency is not 96% or greater check the electrode, replace buffers and<br />
recalibrate. If the electrode efficiency is still not 96% or greater after re-calibration, prepare a<br />
new electrode for use following instructions found under Section 5.2.4.3 or Section 5.3.2.1.<br />
5.2.4.3 New Electrode Preparation<br />
Follow the instructions that come with the electrode. If a previously used and stored electrode is<br />
available it can be reactivated using instructions found in Section 5.3.2.1.<br />
5 <strong>of</strong> 12<br />
Alkalinity and pH <strong>Procedures</strong> SOP 010<br />
S:\WW\awwword\LABPROC\all QAPPs\LABQAPPs\QAPP Rev5 -0609\SOPs\SOP 010 Alkalinity&pH-mod.doc
5.2.5 Calibration Check/Laboratory Control <strong>Standard</strong><br />
A check <strong>of</strong> the calibration <strong>of</strong> the pH probe is accomplished at the beginning and end <strong>of</strong> each pH<br />
or alkalinity run by placing the pH probe in the pH 7 buffer. The resulting observation is<br />
recorded on the data sheet. The pH meter should read 7.00 +/- 0.2 S.U.<br />
Corrective Action<br />
If the 7 buffer when re-checked at the beginning or end <strong>of</strong> the pH or alkalinity run is not within<br />
the range <strong>of</strong> 7.00 +/- 0.2 S.U. then re-check the value <strong>of</strong> the pH 7 buffer again. If the pH 7<br />
buffer is still not within 7.00 +/- 0.2 S.U. then recalibrate the instrument and re-run the affected<br />
samples.<br />
5.3 Analysis<br />
5.3.1 Daily Electrode Maintenance<br />
Before use each day:<br />
1. Check to see that the internal filling solution is about ¼ inch below the top <strong>of</strong> the<br />
electrode and that filling hole is OPEN.<br />
2. Re-fill as needed with saturated KCl solution.<br />
5.3.2 Electrode Storage<br />
If it is anticipated that the electrode will be used daily or weekly store the electrode as follows:<br />
1. Store the electrode in pH 4 buffer with the filling hole open.<br />
2. Place the electrode in a 100 mL beaker filled approximately half way with pH 4 buffer.<br />
Drape a piece <strong>of</strong> parafilm around the top <strong>of</strong> beaker and electrode to slow evaporation <strong>of</strong><br />
the buffer.<br />
3. On a weekly basis, replace evaporated buffer with water. Replace the storage buffer<br />
monthly, if it becomes cloudy or has a precipitate. Do not use this buffer solution for pH<br />
calibration.<br />
5.3.2.1 Extended Storage<br />
If it is anticipated that the electrode will NOT BE used daily or weekly store the electrode as<br />
follows:<br />
1. Fill the electrode nearly full with filling solution (saturated KCl).<br />
2. Close the filling hole and rinse <strong>of</strong>f the outside <strong>of</strong> the electrode. Tape a cotton ball over<br />
the electrode bulb and store it in its box. (pers. comm. Fisher Tech. Support, 4/98)<br />
Reactivation after Extended Storage<br />
24 hours before the first use <strong>of</strong> the electrode empty out the KCl filling solution and replace it with<br />
new filling solution. Leave the filling hole open and place the electrode in pH 4 buffer.<br />
6 <strong>of</strong> 12<br />
Alkalinity and pH <strong>Procedures</strong> SOP 010<br />
S:\WW\awwword\LABPROC\all QAPPs\LABQAPPs\QAPP Rev5 -0609\SOPs\SOP 010 Alkalinity&pH-mod.doc
5.3.3 Procedure – Analysis <strong>of</strong> pH only<br />
1. Water samples should be allowed to warm to room temperature.<br />
2. Shake the sample bottle to mix well.<br />
3. If the sample will be analyzed for pH only (typically river or estuarine sites), the<br />
measurement will take place directly in the sample bottle (brown glass or plastic).<br />
4. Add a magnetic stirring bar to either the sample bottle or beaker. Turn on magnetic<br />
stirrer, adjusting to a gentle stirring, not a jumping bean!<br />
5. Immerse the rinsed electrode into the sample to a depth <strong>of</strong> approximately one inch or at<br />
least to cover the white ceramic dot on the side <strong>of</strong> the glass body just above the glass<br />
bulb.<br />
6. Activate the meter and begin measuring pH.<br />
a. Touch Meas to begin measuring your sample.<br />
b. The word Stable will appear once the meter recognizes that the measurement is<br />
stable and it will beep. Record measurements to 0.01 pH unit on the project data<br />
sheet.<br />
7. Raise electrode out <strong>of</strong> sample and remove the stir bar.<br />
8. Re-cap the sample bottle and place to the side. The remaining sample is utilized for the<br />
determination <strong>of</strong> nutrients.<br />
9. Rinse the electrode with DI water.<br />
10. At the end <strong>of</strong> the run check the pH meter calibration by immersing the pH probe in the<br />
pH 7 buffers and recording the result on the data sheet. Values <strong>of</strong> the buffer should not<br />
change more than +/- 0.2 SU, refer to Section 5.2.5 <strong>of</strong> this SOP for corrective actions.<br />
11. When all samples have been analyzed put the pH electrode back into the storage buffer.<br />
Then touch Mode and then Standby. Do not leave the pH meter (beeping) in the<br />
measure mode or the electrode out <strong>of</strong> solution for an extended period <strong>of</strong> time.<br />
12. Rinse down the sink any left over calibration buffer.<br />
5.4 Analysis Method pH and Alkalinity<br />
5.4.1 Preparation – 1 Week Before Scheduled Sampling (as needed)<br />
5.4.1.1 Preparation and <strong>Standard</strong>ization <strong>of</strong> the Alkalinity Titrant<br />
1. Prepared dried anhydrous sodium carbonate (Na2CO3) by placing approximately 2 g <strong>of</strong><br />
Na2CO3 in the drying oven at 250 °C (480 °F) for 4 hours. After drying, remove the<br />
material from the drying oven and place into a desiccator to cool.<br />
a. Na2CO3 gram formula weight (gfw) = 106 g<br />
b. Na2CO3 gram-equivalent weight (geqw) = 53 g<br />
2. Prepare a Na2CO3 solution <strong>of</strong> approx. 0.025 N<br />
a. Place 1.33 g <strong>of</strong> Na2CO3 in a 1 L volumetric flask<br />
b. Dilute with Ultrapure water<br />
c. N = weight Na2CO3 used = 1.33 g = 0.025 N<br />
geqw 53 g<br />
d. Preparation <strong>of</strong> 500 mL <strong>of</strong> solution: 0.665 g Na2CO3 to 500 mL Ultrapure water<br />
e. Preparation <strong>of</strong> 250 mL <strong>of</strong> solution: 0.332 g Na2CO3 to 250 mL Ultrapure water<br />
7 <strong>of</strong> 12<br />
Alkalinity and pH <strong>Procedures</strong> SOP 010<br />
S:\WW\awwword\LABPROC\all QAPPs\LABQAPPs\QAPP Rev5 -0609\SOPs\SOP 010 Alkalinity&pH-mod.doc
3. Prepare a sulfuric acid (H2SO4) solution <strong>of</strong> approximately 0.02 N<br />
Dilute 40 mL <strong>of</strong> 1 N H2SO4 to 2 L using Ultrapure water<br />
4. Put the 0.02 N H2SO4 solution into the clear glass bottle located on the shelf in room<br />
002, above the pH meters. Pace the filled bottle back on the shelf above the pH meters<br />
and reattach the buret fill hoses.<br />
5. Drain and fill the 10 mL micro buret several times to ensure that it is filled with the new<br />
acid.<br />
6. Using a 5 mL glass pipette, measure 5 mL <strong>of</strong> sodium carbonate solution into a 50 mL<br />
beaker. Add 20 mL <strong>of</strong> Ultrapure water. Prepare a minimum <strong>of</strong> 3 beakers.<br />
7. Calibrate the pH electrode as usual (refer to Section 5.2.4.2).<br />
8. Put electrodes into one <strong>of</strong> the 50 mL beakers. Let the pH equilibrate for only 1-2<br />
minutes.<br />
9. While stirring add 0.02 N sulfuric acid to the beaker.<br />
10. After each 0.5 mL addition, record the amount <strong>of</strong> acid used and the pH. Do this until the<br />
final pH is just above 5.0 SU.<br />
11. Remove the beaker and place aside. Repeat the procedure from step 8 with the<br />
remaining beakers. When the procedure has been completed with all the beakers, cover<br />
the beakers with watch glasses and use a hot plate to boil the contents <strong>of</strong> the beakers<br />
for 3-5 minutes.<br />
12. Cool the beakers to room temperature using ice bath to hasten the process.<br />
13. Slowly add more acid, 0.1 mL at a time. Record the volume (mL) <strong>of</strong> acid and resulting<br />
pH for each small addition <strong>of</strong> acid. Continue the addition <strong>of</strong> acid until the inflection point<br />
(maximum pH change per unit acid) has been passed. This step is called the<br />
“retitration.” Repeat this procedure for the remaining beakers.<br />
14. Neutralize the solution in each beaker with 1N sodium hydroxide (NaOH) before rinsing<br />
down the sink drain, flushing with water for about 1 minute.<br />
15. Calculate the exact normality <strong>of</strong> the acid using the following equation:<br />
N = (A x B)<br />
(53.00 x C)<br />
where:<br />
A = grams sodium carbonate weighed into 1000 mL flask (should be 1.33 g).<br />
B = mL sodium carbonate solution used for titration (should be 5 mL).<br />
C = mL acid titrated to reach inflection point.<br />
16. Label the clear glass acid bottle with the exact normality <strong>of</strong> the acid, the date calculated,<br />
in which lab notebook the calculations can be found, and your initials. Be sure top save<br />
all data.<br />
5.4.2 Procedure - Analysis <strong>of</strong> pH and Alkalinity<br />
1. Drain <strong>of</strong>f ~20 mL H2SO4 through side drain <strong>of</strong> the alkalinity micro-buret. Empty and fill<br />
buret. This rinses the buret and tubing.<br />
2. Zero the acid in the buret by overfilling slightly and draining until the bottom <strong>of</strong> the<br />
meniscus on the buret is at 0.00.<br />
3. Water samples should be allowed to warm to room temperature.<br />
4. Shake the sample bottle to mix well.<br />
8 <strong>of</strong> 12<br />
Alkalinity and pH <strong>Procedures</strong> SOP 010<br />
S:\WW\awwword\LABPROC\all QAPPs\LABQAPPs\QAPP Rev5 -0609\SOPs\SOP 010 Alkalinity&pH-mod.doc
5. Use a non-acid washed graduated cylinder to measure the water sample. Pour into a<br />
non-acid washed 250 mL beaker. Sample Volumes:<br />
a. 200 mL for lake samples<br />
b. 35 - 40 mL for ISDS samples<br />
6. Add a magnetic stirring bar to the beaker. Turn on the magnetic stirrer, adjusting it to a<br />
gentle stirring, not a jumping bean!<br />
7. Record the sample volume on the data sheet and the exact normality <strong>of</strong> the H2SO4<br />
titrant.<br />
8. Immerse the rinsed electrode into the sample to a depth <strong>of</strong> approximately one inch or at<br />
least to the white ceramic dot on the side <strong>of</strong> the glass body just above the glass bulb.<br />
9. Press pH, then meas to activate the AR 20 meter.<br />
10. Once the meter has stabilized on the pH <strong>of</strong> the sample record the value as pH.<br />
11. Slowly add acid from the micro-buret to lower the pH to approximately 4.5 (4.3 - 4.7 is<br />
acceptable). Pause between additions <strong>of</strong> acid to allow the meter to stabilize.<br />
a. When the sample reaches the correct pH, record the volume <strong>of</strong> acid dispensed<br />
and the pH <strong>of</strong> the sample. Remember to read the buret from the bottom <strong>of</strong> the<br />
meniscus and to record the value to 2 decimal places.<br />
b. The volume <strong>of</strong> acid dispensed is “B - volume to pH 4.5” in the alkalinity<br />
calculation (Section 6.0 Calculations)<br />
12. Add acid until the sample is at a pH 0.3 units less than that recorded in previous step.<br />
Record total volume <strong>of</strong> acid used. This value is C – “volume to pH 4.2” in the alkalinity<br />
calculation.<br />
13. Raise the electrodes out <strong>of</strong> the sample and rinse the electrode.<br />
14. Re-fill the buret with acid.<br />
15. Rinse the sample down the drain and rinse the beaker with DI water.<br />
16. Repeat the procedure from Step 2 with the next sample.<br />
17. At the end <strong>of</strong> the run check the pH meter calibration by immersing the pH probe in the<br />
pH 7 buffers and recording the result on the data sheet. Values <strong>of</strong> the buffer should not<br />
change more than +/- 0.2 SU, refer to Section 5.2.5 <strong>of</strong> this SOP for corrective actions.<br />
18. When all samples have been analyzed put the pH electrode back into the storage buffer.<br />
Then touch Mode and then Standby. Do not leave the pH meter (beeping) in the<br />
measure mode or the electrode out <strong>of</strong> solution for an extended period <strong>of</strong> time.<br />
19. Field samples are archived and disposed <strong>of</strong> in accordance with Section 4.0.<br />
20. Any left over buffer should be rinsed down the drain.<br />
6.0 CALCULATIONS<br />
6.1 pH<br />
The pH <strong>of</strong> a sample is recorded directly from the pH meter. Values are reported to 1 decimal<br />
place by rounding the value obtained from the pH meter. Values less than 1 SU are reported as<br />
< 1 SU and values greater than 14 SU are reported as >14 SU.<br />
9 <strong>of</strong> 12<br />
Alkalinity and pH <strong>Procedures</strong> SOP 010<br />
S:\WW\awwword\LABPROC\all QAPPs\LABQAPPs\QAPP Rev5 -0609\SOPs\SOP 010 Alkalinity&pH-mod.doc
6.2 Alkalinity<br />
Alkalinity (mg/L) = [(2B - C) X (N H2SO4) X (50,000)]<br />
Volume <strong>of</strong> water sample (mL)<br />
Where:<br />
B = volume to pH ~4.5<br />
C = volume to pH ~4.2<br />
N = normality <strong>of</strong> titrant (H2SO4) (approx. 0.02N)<br />
The exact normality <strong>of</strong> the H2SO4 is determined through the alkalinity standardization procedure<br />
detailed in Section 5.4.1.1.<br />
Final data is reported to 1 decimal place. Values less than 0.1 mg/L CaCO3 are reported as<br />
< 0.1 mg/L CaCO3.<br />
7.0 REFERENCES<br />
<strong>Standard</strong> Methods for the Examination <strong>of</strong> Water and Wastewater, 1995 edition. Alkalinity<br />
Titration Method (2320B) and pH Value – Electrometric Method (4500-H + B)<br />
<strong>Standard</strong> Methods 1985 for the Examination <strong>of</strong> Water and Wastewater, Method 403, pp 268-<br />
273.<br />
10 <strong>of</strong> 12<br />
Alkalinity and pH <strong>Procedures</strong> SOP 010<br />
S:\WW\awwword\LABPROC\all QAPPs\LABQAPPs\QAPP Rev5 -0609\SOPs\SOP 010 Alkalinity&pH-mod.doc
8.0 DOCUMENTATION<br />
Data sheet for analysis <strong>of</strong> pH and alkalinity<br />
SUPPLEMENTAL COLLECTION - AUGUST 2006<br />
Please fill-in your initials, and the appropriate value. There should be something in each space.<br />
Remember to note deep sample depth, and pH, alkalinity is not done on deep samples.<br />
Meter A or B Tech's<br />
& Electrode Sample Sample Initials vol. Initial ml acid ml acid N <strong>of</strong><br />
Efficiency Date Monitoring Location depth (m) & date (ml) pH to ~4.5 to ~4.2 acid<br />
Alton Pond 1<br />
11 <strong>of</strong> 12<br />
Asa Pond 1<br />
Barber Pond 1<br />
Belleville Pond - Lower 1<br />
Belleville P - Lower<br />
REPLICATE<br />
1<br />
Belleville Pond - upper 0.5<br />
Blackamore Pond 1<br />
Blue Lake 1<br />
Boone Lake 1<br />
Boone Lake X X X X<br />
Bowdish Reservoir 1<br />
Browning Mill Pond 1<br />
Carbuncle Pond 1<br />
Carbuncle Pond X X X X<br />
Carr Pond (NK) 1<br />
Carr Pond (NK)<br />
REPLICATE<br />
1<br />
Carr Pond (NK) X X X X<br />
Carr Pond (WG) 1<br />
Carr Pond (WG) X X X X<br />
Clarkville Pond 1<br />
Deep Pond 1<br />
Deep Pond X X X X<br />
Fenner Pond 1<br />
Flat River Reservoir 1<br />
Flat River Reservoir X X X X<br />
Georgiaville Pond 1<br />
Alkalinity and pH <strong>Procedures</strong> SOP 010<br />
S:\WW\awwword\LABPROC\all QAPPs\LABQAPPs\QAPP Rev5 -0609\SOPs\SOP 010 Alkalinity&pH-mod.doc
Data sheet for analysis <strong>of</strong> pH only<br />
Meter A or B &<br />
SECOND TRISEASON COLLECTION - JULY 2006<br />
Please fill-in your initials, and the appropriate value.<br />
There should be something in each space, except where X'd.<br />
Tech's<br />
Electrode Sample Sample Initials replicate<br />
Efficiency Date Monitoring Location depth (m) & Date pH pH<br />
Tributaries - no alkalinity only pH<br />
Asseconk Swamp 0.2 X<br />
Barber - Mud Brook 0.2 X<br />
Belleville @ RR Xing 0.2 X<br />
12 <strong>of</strong> 12<br />
Belleville @ Sluiceway 0.2<br />
Carr Inlet (NK) 0.2 X<br />
Geo @ Capron Pond 0.2 X<br />
Geo @ Harris 0.2 X<br />
Pasquisett Tributary 0.2 X<br />
Secret - Oak Hill East 0.2<br />
Secret - Oak Hill West 0.2 X<br />
Secret - Shore Dr. 0.2 X<br />
Shunock River @ Babacock 0.2 X<br />
Shunock River @ Hewitt 0.2<br />
S&S @ Keech 0.2 X<br />
S&S @ Balcom 0.2 X<br />
S&S @ O'Donnel 0.2 X<br />
Staf Inlet - Downstream 0.2 X<br />
Stafford - NE Cove 0.2<br />
Watchaug - Perry Healy 0.2 X<br />
Waterman - Rt 44 0.2 X<br />
Waterman - Sawmill 0.2 X<br />
Waterman - Golf Course 0.2 X<br />
Waterman - Aldrich 0.2 X<br />
White Brook Pond Inlet 0.2<br />
Alkalinity and pH <strong>Procedures</strong> SOP 010<br />
S:\WW\awwword\LABPROC\all QAPPs\LABQAPPs\QAPP Rev5 -0609\SOPs\SOP 010 Alkalinity&pH-mod.doc
<strong>Standard</strong> <strong>Operating</strong> Procedure 011<br />
(Prior number URIWW-SOP-6)<br />
Biochemical Oxygen Demand<br />
(BOD) Procedure<br />
<strong>University</strong> <strong>of</strong> <strong>Rhode</strong> Island Watershed Watch<br />
TABLE OF CONTENTS<br />
Date:<br />
Revision:<br />
Author:<br />
8/06<br />
2<br />
Linda Green<br />
1.0 PURPOSE AND DESCRIPTION .......................................................................................1<br />
2.0 HEALTH AND SAFETY CONSIDERATIONS ...................................................................1<br />
2.1 HAZARDS .........................................................................................................................1<br />
2.2 TECHNICIAN TRAINING/QUALIFICATIONS............................................................................1<br />
3.0 REQUIRED MATERIALS ..................................................................................................2<br />
4.0 SAMPLE STORAGE, PRESERVATION AND DISPOSAL ...............................................3<br />
5.0 METHOD DESCRIPTION ..................................................................................................3<br />
5.1 SCHEDULING CONSIDERATIONS ........................................................................................3<br />
5.2 QUALITY ASSURANCE/QUALITY CONTROL .........................................................................3<br />
5.2.1 Method Detection Limit ...............................................................................................3<br />
5.2.2 Method Blanks ............................................................................................................3<br />
5.2.2.1 Method Blank.......................................................................................................3<br />
5.2.2.2 Field Blank ...........................................................................................................3<br />
5.2.3 Sample Replication .....................................................................................................4<br />
5.2.4 Glucose-Glutamic Acid Check ....................................................................................4<br />
5.2.5 Seed Control ...............................................................................................................5<br />
5.2.6 Calibration and <strong>Standard</strong>s ..........................................................................................5<br />
5.2.6.1 Laboratory <strong>Standard</strong>s ..........................................................................................5<br />
5.2.6.2 Incubator..............................................................................................................5<br />
5.2.6.3 Calibration <strong>of</strong> the DO Meter .................................................................................5<br />
5.3 ANALYSIS METHOD...........................................................................................................7<br />
5.3.1 Preparation – At least 24 hours prior to sampling day ................................................7<br />
5.3.1.1 Preparation <strong>of</strong> 19 L <strong>of</strong> Nutrient Buffer ..................................................................7<br />
5.3.2 Procedure – Day <strong>of</strong> Sample Collection .......................................................................8<br />
5.3.2.1 Preparation <strong>of</strong> BOD Seed ..................................................................................10<br />
5.3.3 Procedure – End <strong>of</strong> the incubation (5 days after initial sample preparation) .............10<br />
6.0 CALCULATIONS.............................................................................................................11<br />
7.0 REFERENCES.................................................................................................................12<br />
8.0 DOCUMENTATION .........................................................................................................13<br />
Biochemical Oxygen Demand SOP 011<br />
filename S:\WW\awwword\LABPROC\all QAPPs\LABQAPPs\QAPP Rev5 -0609\SOPs\SOP 011 BOD-MOD.doc
<strong>Standard</strong> <strong>Operating</strong> Procedure 011<br />
(Prior number URIWW-SOP-6)<br />
Biochemical Oxygen Demand<br />
(BOD) Procedure<br />
<strong>University</strong> <strong>of</strong> <strong>Rhode</strong> Island Watershed Watch<br />
1.0 PURPOSE AND DESCRIPTION<br />
Date:<br />
Revision:<br />
Author:<br />
8/06<br />
2<br />
Linda Green<br />
The purpose <strong>of</strong> this method is to determine the oxygen requirements <strong>of</strong> Individual Sewage<br />
Disposal System (ISDS) or polluted water samples. A sample <strong>of</strong> water is placed into a specially<br />
designed Biochemical Oxygen Demand (BOD) bottle and the dissolved oxygen (DO)<br />
concentration is determined. This value is reported as the initial DO value. The bottle is then<br />
incubated for five days in the dark at 20 °C. At the end <strong>of</strong> the incubation period the DO<br />
concentration in the bottle is again measured. The difference in DO recorded during the five<br />
day period corrected for sample dilution is the BOD. This method is appropriate for undiluted<br />
samples ranging from less than 2 to 20 mg/L BOD and samples diluted to return values in this<br />
range.<br />
2.0 HEALTH AND SAFETY CONSIDERATIONS<br />
2.1 Hazards<br />
ISDS samples should be treated as a potential biological hazard. All personnel handling ISDS<br />
samples should wear a laboratory coat, gloves and goggles.<br />
General laboratory good housekeeping procedures should be practiced as outlined in <strong>Standard</strong><br />
<strong>Operating</strong> Procedure (SOP) 001 - General Laboratory Safety. The only chemical utilized in this<br />
SOP is the Hach BOD nutrient buffer pillow. The chemical inside the pillow may cause irritation<br />
to the skin and eyes if exposed. Since the material is in a powder form, inhalation can also<br />
cause irritation to the nose, throat and lungs. Always wear protective clothing in the form <strong>of</strong><br />
gloves, a laboratory coat and goggles when working with this chemical. Further information<br />
regarding this chemical may be found in the laboratory Material Safety Data Sheet (MSDS)<br />
binder found in the laboratory where the chemical <strong>of</strong> interest is stored. General laboratory<br />
information regarding safe handling <strong>of</strong> chemicals is located in SOP 001a - <strong>University</strong> Safety and<br />
Waste Handling.<br />
2.2 Technician Training/Qualifications<br />
General training in laboratory technique and the use <strong>of</strong> the DO meter must be completed prior to<br />
analyzing samples using this method. Technician training will be provided by Linda Green,<br />
Laboratory Project Manager – Nutrients or Elizabeth Herron Project Manager – Microbiology.<br />
1 <strong>of</strong> 14<br />
Biochemical Oxygen Demand SOP 011<br />
filename S:\WW\awwword\LABPROC\all QAPPs\LABQAPPs\QAPP Rev5 -0609\SOPs\SOP 011 BOD-MOD.doc
3.0 REQUIRED MATERIALS<br />
Required Material Notes Re-order information<br />
Incubator set at 20 +/- 1 °C Capable <strong>of</strong> maintaining +/-<br />
0.02 °C<br />
Fisher Low Temperature<br />
Incubator Model 307C<br />
Fisher #11-679-25C<br />
List price $3400<br />
DO meter YSI 5000 Fisher #13-298-21<br />
List price $1300<br />
BOD DO probe YSI 5010<br />
Fisher #13-298-23<br />
Self-stirring with 3 1/4" paddle List price $525<br />
BOD bottles Clear 300 mL flared neck with Fisher #09-926<br />
a ground glass stopper Case <strong>of</strong> 24 $190<br />
20 L Carboy HDPE with spigot in bottom Fisher #02-963-5C<br />
for nutrient buffer water List price $110<br />
Hach BOD nutrient buffer<br />
Hach Chemical Company<br />
pillows<br />
#14863-98<br />
25 per box List price $30<br />
BOD Seed Inoculum Hach Chemical Company<br />
#2471200<br />
BOD <strong>Standard</strong> Solution Hach Chemical Company<br />
#1486510<br />
Aquarium bubbler<br />
Deionized (DI) water<br />
Purchased from local pet<br />
store - $5<br />
Pipette filler Preferably electric Drummond #4-000-110,<br />
Fisher #13-681-15<br />
List price $180<br />
Glass pipettes 1, 10 and 25 mL<br />
Graduated cylinders<br />
Squeeze bottle full <strong>of</strong> DI water<br />
100 and 250 mL<br />
2 beakers<br />
Paper towels, safety goggles,<br />
lab gloves<br />
1 for clean water to rinse<br />
pipettes between use<br />
1 for dirty rinse water.<br />
Equipment is maintained by the <strong>University</strong> <strong>of</strong> <strong>Rhode</strong> Island Watershed Watch (URIWW)<br />
Laboratory and the Natural Resources Science department. Temporary replacement <strong>of</strong> large<br />
equipment such as incubators is available through arrangement with other scientists in the<br />
department maintaining similar equipment.<br />
2 <strong>of</strong> 14<br />
Biochemical Oxygen Demand SOP 011<br />
filename S:\WW\awwword\LABPROC\all QAPPs\LABQAPPs\QAPP Rev5 -0609\SOPs\SOP 011 BOD-MOD.doc
4.0 SAMPLE STORAGE, PRESERVATION AND DISPOSAL<br />
Matrix Sample<br />
Container<br />
Water (Ambient and White 500<br />
ISDS samples) mL HDPE<br />
Preservation Volume Holding Time<br />
Kept at 4 ºC 500 mL 24 hours max<br />
6 hours ideal<br />
Disposal<br />
Field samples are not archived after sample preparation is complete because the sample<br />
holding time is very short and they degrade rapidly once outside the holding time.<br />
Field samples may be disposed <strong>of</strong> by rinsing down the drain with running water. ISDS samples<br />
are considered a potential biological hazard. Technicians disposing <strong>of</strong> ISDS samples should<br />
wear goggles, gloves and a laboratory coat.<br />
5.0 METHOD DESCRIPTION<br />
5.1 Scheduling Considerations<br />
At least 24 hours in advance <strong>of</strong> expected sample arrival, nutrient buffer water and project data<br />
sheets should be prepared. The calibration and status <strong>of</strong> the DO meter should be checked and<br />
it should be confirmed that an appropriate number <strong>of</strong> BOD bottles are prepared.<br />
5.2 Quality Assurance/Quality Control<br />
5.2.1 Method Detection Limit<br />
The method detection limit (MDL) is 2.0 mg/L BOD. The reporting limit (RL) is 2 mg/L BOD.<br />
Final results are reported to the nearest whole number. Ideally, each incubated sample will<br />
experience a change in DO <strong>of</strong> at least 2 mg/L over the 5 day incubation period and contain at<br />
least 1 mg/L <strong>of</strong> DO at the end <strong>of</strong> the incubation.<br />
5.2.2 Method Blanks<br />
5.2.2.1 Method Blank<br />
The method blank consists <strong>of</strong> a BOD bottle filled with the nutrient buffer solution, and then<br />
treated as a sample; 2 method blanks are completed per sample run.<br />
Corrective Action<br />
The change in dissolved oxygen for the method blank must not be greater than 0.2 mg/L. If the<br />
change in dissolved oxygen is greater than 0.2 mg/L then the sample run will be considered<br />
contaminated and the data deemed in error. This will be noted on the project data sheet. The<br />
samples will not be re-analyzed as they will be substantially outside the acceptable holding time.<br />
5.2.2.2 Field Blank<br />
The field blank consists <strong>of</strong> a sample bottle filled with laboratory DI water and transported to the<br />
field site with the empty sample bottles. The field blank is then returned to the laboratory with<br />
the filled sample bottles. The field blank is prepared by filling a BOD bottle with 200 mL <strong>of</strong> the<br />
3 <strong>of</strong> 14<br />
Biochemical Oxygen Demand SOP 011<br />
filename S:\WW\awwword\LABPROC\all QAPPs\LABQAPPs\QAPP Rev5 -0609\SOPs\SOP 011 BOD-MOD.doc
field blank water and 100 mL <strong>of</strong> the nutrient buffer and then treating it as a sample. The number<br />
<strong>of</strong> field blanks analyzed per sample run shall be 1. This will be at least 2% <strong>of</strong> the field samples<br />
collected.<br />
Corrective Action<br />
If the BOD for the field blank is greater than 2 mg/L the sample run will be considered<br />
contaminated and the data deemed in error. This will be noted on the project data sheet. The<br />
samples will not be re-analyzed as they will be substantially outside the acceptable holding time.<br />
5.2.3 Sample Replication<br />
Each sample is analyzed at a minimum <strong>of</strong> two different dilutions. Some samples are analyzed<br />
at three different dilutions because they exhibit highly variable BOD values. Information<br />
regarding the number <strong>of</strong> dilutions to be prepared is located on the project data sheet.<br />
After the five day incubation, an ideal sample will exhibit a decrease in oxygen <strong>of</strong> at least 2 mg/L<br />
and the final DO value will be greater than or equal to 1 mg/L. If each sample dilution exhibits<br />
an acceptable change in oxygen and the final oxygen value is greater than 1 mg/L then the<br />
samples are considered acceptable and compared to determine the %RPD. Results between<br />
dilutions should be within 20%RPD. These values are then averaged and reported as the final<br />
BOD value.<br />
Otherwise, only the samples exhibiting the accepted characteristics are used in the %RPD<br />
calculation. If only two dilutions were incubated and one is not acceptable then no %RPD is<br />
calculated. If no dilution exhibits the ideal characteristics, then the dilution closest to ideal is<br />
reported.<br />
%RPD is calculated as follows:<br />
%RPD = Result at Dilution 1 (mg/L) – Result at Dilution 2 (mg/L) x 100<br />
Average <strong>of</strong> Result at Dilution 1 (mg/L) and Result at Dilution 2 (mg/L)<br />
Corrective Action<br />
If the %RPD is greater than 20% for samples that exhibit an acceptable change in oxygen and<br />
the final oxygen value is greater than or equal to 1 mg/L then this will be noted on the project<br />
data sheet. The sample will not be re-analyzed as it will be outside the sample holding time.<br />
5.2.4 Glucose-Glutamic Acid Check<br />
Three glucose-glutamic acid checks will be completed with each run <strong>of</strong> BOD samples. The<br />
glucose-glutamic acid checks provide assurance that the dilution water is not contaminated in a<br />
way that will reduce the microbiological population <strong>of</strong> the unknown samples. Additionally, the<br />
check also ensures that there is an appropriate microbiological community in the unknown<br />
sample that will produce an appropriate result. The final BOD value for glucose-glutamic acid<br />
check samples should be 400 mg/L +/- 30 mg/L BOD.<br />
Corrective Action<br />
If the final BOD for glucose-glutamic acid check samples is not within 400 mg/L +/- 30 mg/L<br />
BOD then this deviation will be noted on the project data sheet. The associated samples will<br />
not be re-analyzed as they will be substantially outside the sample holding time.<br />
4 <strong>of</strong> 14<br />
Biochemical Oxygen Demand SOP 011<br />
filename S:\WW\awwword\LABPROC\all QAPPs\LABQAPPs\QAPP Rev5 -0609\SOPs\SOP 011 BOD-MOD.doc
5.2.5 Seed Control<br />
Four seed controls will be completed with each sample run. The seed control assures that the<br />
seed bacterial community is viable. The calculated seed control factor should fall between 0.60<br />
and 1.0.<br />
Corrective Action<br />
If the seed control factor does not fall between 0.60 and 1.0 then the associated control is not<br />
used in the final calculations for BOD. If more than two <strong>of</strong> the seed controls produce seed<br />
control factors that do not fall between 0.60 and 1.0 then this deviation will be noted on the<br />
project data sheet. The associated samples will not be re-analyzed as they will be substantially<br />
outside the sample holding time.<br />
5.2.6 Calibration and <strong>Standard</strong>s<br />
5.2.6.1 Laboratory <strong>Standard</strong>s<br />
The laboratory participates yearly in the Environmental Protection Agency Water Pollution<br />
Pr<strong>of</strong>iciency Test Study. Unknown samples are purchased and analyzed for BOD. The results<br />
<strong>of</strong> the analysis are compared to the actual value and a performance evaluation provided by the<br />
vendor. Study results are maintained by the laboratory.<br />
5.2.6.2 Incubator<br />
The incubator temperature at the beginning and end <strong>of</strong> the BOD incubation is recorded on the<br />
project data sheet. The incubator should be set at 20 +/- 1 C. The temperature is measured<br />
using 2 thermometers inside the incubator, not from the reading on the door.<br />
Corrective Action<br />
If the incubator temperature is found to fluctuate greater than 1 C over the incubation period,<br />
then this error is recorded on the project data sheet and the incubator is serviced.<br />
5.2.6.3 Calibration <strong>of</strong> the DO Meter<br />
The information below pertains to the URIWW YSI 5000 meter only. Detailed instructions are<br />
available in the instrument instruction manual found in room 002 in the BOD supply drawer.<br />
Calibration and equipment checks <strong>of</strong> the DO meter must be completed: 24 hours before<br />
samples arrive in the laboratory, on the day <strong>of</strong> sample collection and on the final day <strong>of</strong><br />
incubation when the samples are removed from the incubator.<br />
Calibration <strong>of</strong> the DO meter is completed as follows:<br />
1. Check the condition <strong>of</strong> the membrane located on the bottom <strong>of</strong> the probe. There should<br />
be no air bubbles under the membrane. If there are air bubbles, change the membrane<br />
following the procedure outlined in Step 3.<br />
2. Check the date the membrane was last changed. This information is located on the<br />
label sheet on the bottom <strong>of</strong> the BOD clipboard and on the DO meter. Change the<br />
membrane if the current one is greater than two months old using the procedure outlined<br />
in Step 3. If the membrane does not need to be replaced, skip to Step 4 <strong>of</strong> the<br />
5 <strong>of</strong> 14<br />
Biochemical Oxygen Demand SOP 011<br />
filename S:\WW\awwword\LABPROC\all QAPPs\LABQAPPs\QAPP Rev5 -0609\SOPs\SOP 011 BOD-MOD.doc
procedure. The DO probe should not be used for 24 hours after the membrane is<br />
replaced.<br />
3. Changing the membrane<br />
a. Pull out the stirrer.<br />
b. Unscrew the membrane cap at the end <strong>of</strong> the probe and discard.<br />
c. Use the provided sand paper to lightly sand the bottom <strong>of</strong> the probe.<br />
d. Rinse the probe with filling solution.<br />
e. Fill the new membrane cap with filling solution and screw the cap onto the probe.<br />
f. Record the date <strong>of</strong> membrane replacement on the log sheet located on the<br />
bottom <strong>of</strong> the BOD clipboard and on the DO meter.<br />
g. Re-attach the stirrer.<br />
h. Rinse the exterior <strong>of</strong> the probe with DI water.<br />
i. Place the probe in the storage bottle (BOD bottle). The storage bottle has<br />
approximately 1 inch <strong>of</strong> DI water in it. The probe sits above the water, not in it.<br />
j. Ideally, let the membrane equilibrate overnight before using.<br />
4. Continue calibration set-up as per instruction manual. The barometric pressure is set at<br />
753 mm Hg, with a maximum calibration <strong>of</strong> 99% (see p 62 <strong>of</strong> instruction manual)<br />
5. Turn meter on. Let the meter warm up for at least 30 minutes before calibrating.<br />
a. The probe is stored in a BOD bottle that is 1/4 full <strong>of</strong> water.<br />
b. The probe should be in air, not water. This creates the proper conditions for air<br />
saturated calibration.<br />
6. Remove the probe from the BOD bottle. Make sure the end <strong>of</strong> the probe is dry; if not<br />
carefully blot dry with a Kim wipe. Also make sure that there are no air bubbles under<br />
the membrane on the end <strong>of</strong> the DO probe.<br />
a. If air bubbles are visible under the membrane, the membrane must be replaced.<br />
b. See Step 3 for the membrane replacement protocol.<br />
7. Put the probe back into the BOD bottle.<br />
8. Press the fourth key on the DO meter. This key is correlated with “Calibrate”.<br />
a. On the YSI 5000 meter the function <strong>of</strong> the 4 s<strong>of</strong>t keypads is displayed just above<br />
the "s<strong>of</strong>t key" keypad. This display will change when you use the s<strong>of</strong>t keys.<br />
b. The instruction manual is in the drawer below the meter.<br />
9. Allow the meter to stabilize. It is stable when the meter beeps and an asterisk is visible<br />
next to the displayed value.<br />
10. Press the first s<strong>of</strong>t keypad. This key is correlated with “Auto Cal”. The meter will take a<br />
moment to stabilize. The meter is now calibrated. Record the DO, temperature, %<br />
saturation, date and time on the data sheet.<br />
11. Press the “Mode” keypad to return to the main menu. It may be necessary to press the<br />
“Mode” key several times to return to the main menu. The mode button is in the top right<br />
<strong>of</strong> the display.<br />
6 <strong>of</strong> 14<br />
Biochemical Oxygen Demand SOP 011<br />
filename S:\WW\awwword\LABPROC\all QAPPs\LABQAPPs\QAPP Rev5 -0609\SOPs\SOP 011 BOD-MOD.doc
12. The instrument is now ready for use.<br />
Corrective Action<br />
Corrective action if the DO meter membrane is damaged, contains an air bubble or is greater<br />
than two months old is described in the calibration procedure. If the meter is not functioning<br />
properly, it can not be used in the BOD analysis. Inform Linda Green or Elizabeth Herron and<br />
use an alternate DO meter.<br />
5.3 Analysis Method<br />
5.3.1 Preparation – At least 24 hours prior to sampling day<br />
1. Set up the BOD workstation in room 002 with pipettes, beakers, paper towels, gloves,<br />
etc.<br />
2. Print data sheets.<br />
3. Make sure the BOD bottles are clean. The number <strong>of</strong> BOD bottles necessary is<br />
recorded on the project data sheet. Assemble the bottles in numerical order near the<br />
BOD work station.<br />
4. Prepare the nutrient buffer (see Section 5.3.1.1).<br />
5. Set-up and check the calibration and operation <strong>of</strong> the DO meter (see Section 5.2.4.3).<br />
5.3.1.1 Preparation <strong>of</strong> 19 L <strong>of</strong> Nutrient Buffer<br />
Prepare 19 L <strong>of</strong> nutrient buffer water in a 20 L carboy at least 24 hours before the nutrient buffer<br />
is needed. The buffer should be air-saturated prior to and during use. Air-saturation <strong>of</strong> the<br />
buffer is achieved by bubbling air through the buffer after it is prepared. An aquarium doublebubbler<br />
is available to provide air. Preparation <strong>of</strong> 19 L <strong>of</strong> nutrient buffer is completed as follows:<br />
1. Rinse the 20 L carboy with DI water.<br />
2. Begin filling the carboy with DI water.<br />
3. Obtain a white plastic Hach brand BOD nutrient buffer packet. Packets are stored in the<br />
cabinet above the pH meter. Shake the packet to suspend the salts.<br />
4. Open one end <strong>of</strong> the packet with scissors, and pour the contents into the 20 L carboy.<br />
5. Rinse the packet with DI water from a squeeze bottle to be sure all the material is rinsed<br />
into the carboy.<br />
6. Fill the carboy to the 19 L mark with DI water.<br />
7. Move the carboy to the BOD workstation. Plug in the aquarium bubblers and suspend<br />
the bubblers in the nutrient buffer solution. The bubblers should now be aerating the<br />
nutrient buffer solution.<br />
7 <strong>of</strong> 14<br />
Biochemical Oxygen Demand SOP 011<br />
filename S:\WW\awwword\LABPROC\all QAPPs\LABQAPPs\QAPP Rev5 -0609\SOPs\SOP 011 BOD-MOD.doc
5.3.2 Procedure – Day <strong>of</strong> Sample Collection<br />
1. Prepare BOD seed (see Section 5.3.2.1).<br />
2. Turn on the DO meter to allow a 30 minute warm-up period.<br />
3. Calibrate the DO meter using the method outlined in Section 5.2.4.3.<br />
4. Allow the samples to warm to room temperature.<br />
5. Prepare the initial method blank by filling the first BOD bottle with nutrient buffer water to<br />
1-2 mm above the base <strong>of</strong> the ground glass neck.<br />
a) Record the bottle number on the project data sheet.<br />
b) Record the initial DO according to Step 7 and place the bottle into the incubating<br />
refrigerator.<br />
6. Prepare three glucose-glutamic acid checks. Obtain a Hach BOD <strong>Standard</strong> Solution<br />
ampule.<br />
a) Open the ampule, it contains 300 mg/L <strong>of</strong> glucose and 300 mg/L <strong>of</strong> glutamic acid.<br />
b) Pipette 3.0 mL <strong>of</strong> the standard into each <strong>of</strong> three BOD bottles. Remember to<br />
check the 3.0 mL pipette to make sure it is calibrated correctly.<br />
c) Pipette 4.0 mL <strong>of</strong> the BOD seed solution into each <strong>of</strong> the three BOD bottles.<br />
Remember to check the 4.0 mL pipette to make sure it is calibrated correctly.<br />
d) Record the BOD bottle number on the project data sheet.<br />
e) Fill the remaining volume in each BOD bottle with nutrient buffer water to 1-2 mm<br />
above the base <strong>of</strong> ground glass neck.<br />
f) Record the initial DO <strong>of</strong> each bottle according to Step 7 and place the bottles into<br />
the incubating refrigerator.<br />
7. Prepare samples:<br />
For each sample analyze at least 2 replicates, each with a different sample volume. The<br />
number <strong>of</strong> replicates as well as the dilution volumes can be found on the project data<br />
sheet. Each replicate requires its own BOD bottle. The sample volume is determined by<br />
the source <strong>of</strong> the sample (refer to the project data sheet).<br />
a) Record the BOD bottle numbers to be used on the data sheet.<br />
b) Vigorously shake the first sample bottle for a minimum <strong>of</strong> 10 seconds, uncap,<br />
and immediately remove a sample aliquot using a pipette or graduated cylinder.<br />
c) Pipette/pour replicate samples directly into each BOD bottle.<br />
i) Keep a beaker <strong>of</strong> DI water handy to use for rinsing pipettes between<br />
samples.<br />
ii) It is not necessary to rinse the pipette between replicates <strong>of</strong> the same<br />
sample.<br />
d) Pipette 4.0 mL <strong>of</strong> the BOD seed solution into each <strong>of</strong> the three BOD bottles.<br />
Remember to check the 4.0 mL pipette to make sure it is calibrated correctly.<br />
8 <strong>of</strong> 14<br />
Biochemical Oxygen Demand SOP 011<br />
filename S:\WW\awwword\LABPROC\all QAPPs\LABQAPPs\QAPP Rev5 -0609\SOPs\SOP 011 BOD-MOD.doc
e) Fill the remaining volume in each BOD bottle with nutrient buffer water to 1-2 mm<br />
above the base <strong>of</strong> ground glass neck.<br />
f) Record the initial DO <strong>of</strong> each bottle according to Step 7 and place the bottles into<br />
the incubating refrigerator.<br />
8. Determine initial DO <strong>of</strong> the blanks, seed controls, glucose-glutamic acid checks and<br />
samples according to the following steps: Remember: do not turn <strong>of</strong>f the DO probe<br />
between readings.<br />
a) Place the DO probe into the BOD bottle.<br />
b) Switch on the stirrer using the red switch on the top <strong>of</strong> the DO probe.<br />
i) The meter takes about 1 minute to equilibrate.<br />
ii) The DO meter is stable when it emits a beep and an asterisk is present<br />
next to the DO reading.<br />
c) While the meter is equilibrating, fill the remaining volume in the next BOD bottle<br />
with nutrient solution.<br />
d) The DO meter should have reached stability at this point. Record the DO meter<br />
reading to two decimal places on the project data sheet once it has stabilized.<br />
This value is the “initial DO reading”.<br />
e) Remove the probe from the BOD bottle. Remember, turn <strong>of</strong>f the stirrer before<br />
taking the probe out <strong>of</strong> the bottle!<br />
f) Rinse the DO probe using a squeeze bottle filled with DI water. Catch the waste<br />
water in the wastewater beaker.<br />
g) Place the DO probe into the next bottle and switch on the stirrer.<br />
h) Cap the first BOD bottle with a ground glass stopper. Make sure no air bubbles<br />
are trapped below the ground glass stopper.<br />
i) Put the BOD bottle in the BOD incubating refrigerator. The BOD bottle should be<br />
water sealed. Water sealing <strong>of</strong> a BOD bottle is accomplished by using the DI<br />
water filled squeeze bottle to completely fill the flared neck <strong>of</strong> the BOD bottle with<br />
water. This ensures that if the volume <strong>of</strong> the water in the BOD bottle were to<br />
change due to changes in temperature that no air would be introduced into the<br />
bottle.<br />
j) Keep alternating DO meter readings and filling bottles until all the BOD replicates<br />
for a sample are complete.<br />
k) Place the samples into the incubating refrigerator.<br />
9. Prepare the next sample starting from Step 6.<br />
10. Once all samples have been prepared, prepare the final method blank (refer to Step 4).<br />
11. All BOD samples should be located in the light-excluding refrigerated incubator. This<br />
incubator is set at 20 °C. The time the final sample is placed into the incubator is noted<br />
on the project data sheet. Samples are incubated for 5 days.<br />
12. Turn <strong>of</strong>f the DO meter.<br />
9 <strong>of</strong> 14<br />
Biochemical Oxygen Demand SOP 011<br />
filename S:\WW\awwword\LABPROC\all QAPPs\LABQAPPs\QAPP Rev5 -0609\SOPs\SOP 011 BOD-MOD.doc
13. The water seal <strong>of</strong> the BOD bottles must be checked and re-filled daily, as needed. The<br />
technician that completes this task should record the date and time the water seals were<br />
checked and their initials on the project data sheet.<br />
14. Field sample disposal is completed in accordance with Section 4.0.<br />
5.3.2.1 Preparation <strong>of</strong> BOD Seed<br />
1. Place the contents <strong>of</strong> one Hach PolySeed capsule into 500 mL <strong>of</strong> the nutrient buffer<br />
water. Do not put the gelatin capsule into the buffer water, throw it away.<br />
2. Aerate and stir the solution for one hour.<br />
3. Decant the supernatant into another clean beaker so that the bran (particles on the<br />
bottom <strong>of</strong> the beaker are left behind). Place a sterile stir bar into this beaker and gently<br />
stir for the remainder <strong>of</strong> the test.<br />
4. The remaining bran can be disposed <strong>of</strong> by rinsing down the drain.<br />
5. The bacterial solution should be used within six hours <strong>of</strong> rehydration.<br />
5.3.3 Procedure – End <strong>of</strong> the incubation (5 days after initial sample preparation)<br />
After the 5 day incubation DO levels in the BOD bottles are recorded in accordance with the<br />
following procedure:<br />
1. Allow the DO meter to warm up at least 30 minutes.<br />
2. Calibrate the DO meter (see Section 5.2.4.3).<br />
3. Remove BOD bottles from the incubating refrigerator.<br />
4. Determine the DO value for each BOD bottle using the following procedure:<br />
a. Place the DO probe into the BOD bottle.<br />
b. Switch on the stirrer using the red switch on the top <strong>of</strong> the DO probe.<br />
i. The meter takes about 1 minute to equilibrate.<br />
ii. The DO meter is stable when it emits a beep and an asterisk is present<br />
next to the DO reading.<br />
c. Once the DO meter is stable, record the DO meter reading to two decimal places<br />
as “final DO reading” on the project data sheet.<br />
d. Remove the probe from the BOD bottle. Remember, turn <strong>of</strong>f the stirrer before<br />
taking the probe out <strong>of</strong> the bottle!<br />
e. Rinse the DO probe using a squeeze bottle filled with DI water. Catch the waste<br />
water in the wastewater beaker.<br />
f. Place the DO probe into the next bottle and switch on the stirrer.<br />
5. Turn <strong>of</strong>f DO meter once all samples have been analyzed.<br />
Disposal <strong>of</strong> incubated samples<br />
Discard the contents <strong>of</strong> each BOD bottle by rinsing it down the drain with running water. BOD<br />
bottles are cleaned by rinsing 3 times with tap water, 3 times with DI water and inverting to dry.<br />
10 <strong>of</strong> 14<br />
Biochemical Oxygen Demand SOP 011<br />
filename S:\WW\awwword\LABPROC\all QAPPs\LABQAPPs\QAPP Rev5 -0609\SOPs\SOP 011 BOD-MOD.doc
BOD samples are a potential biological hazard. Technicians should wear goggles, gloves and a<br />
laboratory coat when disposing <strong>of</strong> ISDS samples.<br />
6.0 CALCULATIONS<br />
Ideally, samples should exhibit a decrease in DO <strong>of</strong> 2 mg/L over the 5 day incubation and still<br />
retain at least 1 mg/L <strong>of</strong> DO. If each dilution for a given sample exhibits the ideal decrease in<br />
oxygen and an acceptable final DO value, then the result from each acceptable dilution is<br />
averaged to produce the final average BOD value. Otherwise, only the sample(s) exhibiting the<br />
accepted characteristics are used in determining the final BOD value. If none <strong>of</strong> the sample<br />
dilutions exhibit the desired characteristics then the sample value closest to exhibiting the<br />
required changes is reported and this is noted on the project data sheet.<br />
BOD results are reported to the nearest whole numbers. Values less than 2 mg/L BOD are<br />
reported as
7.0 REFERENCES<br />
100 – 350<br />
350 – 500<br />
>= 500<br />
6, 8, 10 300<br />
1, 3, 5 300<br />
0.5, 1, 2 300<br />
APHA, AWWA, WEF. <strong>Standard</strong> Methods for the Examination <strong>of</strong> Water and Wastewater. 19 th ed.<br />
Washington D.C.: APHA, 1995.<br />
Method referenced: Biochemical Oxygen Demand (5210), 5-Day BOD Test (5210 B).<br />
#5210.<br />
YSI Inc. YSI Model 5000/5100 Dissolved Oxygen, Temperature Operations Manual. Yellow<br />
Springs, OH: YSI 1998.<br />
InterLab “PolySeed ® Application Procedure BOD5 Seed Inoculum” informational pamphlet.<br />
12 <strong>of</strong> 14<br />
Biochemical Oxygen Demand SOP 011<br />
filename S:\WW\awwword\LABPROC\all QAPPs\LABQAPPs\QAPP Rev5 -0609\SOPs\SOP 011 BOD-MOD.doc
8.0 DOCUMENTATION<br />
Example <strong>of</strong> project data sheet<br />
Set-up analyst: 5-day analyst:<br />
Initial DO meter: Final DO meter:<br />
Into incubator date/time: from incub. Date/time:<br />
Inside <strong>of</strong> Incubator temp.: Inside <strong>of</strong> Incubator temp.:<br />
BOD<br />
mL<br />
Bottle Site Location<br />
lab<br />
nutrient<br />
Sample Initial DO 5-Day DO Comments<br />
INITIAL<br />
Glucose-<br />
BLANK 300<br />
Glutamic<br />
3 mL <strong>of</strong><br />
Acid check<br />
Glucosestandard<br />
Glutamic<br />
3 mL <strong>of</strong><br />
Acid check<br />
Glucosestandard<br />
Glutamic<br />
3 mL <strong>of</strong><br />
Acid check<br />
standard<br />
10 <strong>of</strong><br />
Seed Control<br />
seed<br />
Seed Control<br />
15 <strong>of</strong><br />
seed<br />
Seed Control<br />
20 <strong>of</strong><br />
seed<br />
Seed Control<br />
25 <strong>of</strong><br />
seed<br />
13 <strong>of</strong> 14<br />
BI - 3 Rea STE – 1 4<br />
BI - 3 Rea STE – 1 6<br />
BI - 3 Rea STE – 1 8<br />
BI - 3 Rea AXE 50<br />
BI - 3 Rea AXE 100<br />
BI - 11 Der AXE 50<br />
BI - 11 Der AXE 100<br />
Biochemical Oxygen Demand SOP 011<br />
filename S:\WW\awwword\LABPROC\all QAPPs\LABQAPPs\QAPP Rev5 -0609\SOPs\SOP 011 BOD-MOD.doc
14 <strong>of</strong> 14<br />
BI - 12 Fla STE –S 5<br />
BI - 12 Fla STE –S 7<br />
FIELD<br />
FINAL<br />
Water<br />
BLANK 200<br />
Lab<br />
nutrient<br />
BLANK 300<br />
Biochemical Oxygen Demand SOP 011<br />
filename S:\WW\awwword\LABPROC\all QAPPs\LABQAPPs\QAPP Rev5 -0609\SOPs\SOP 011 BOD-MOD.doc
<strong>Standard</strong> <strong>Operating</strong> Procedure 012<br />
(Prior number URIWW-SOP-5)<br />
Chlorophyll-a Analysis –<br />
Welschmeyer Method<br />
<strong>University</strong> <strong>of</strong> <strong>Rhode</strong> Island Watershed Watch<br />
TABLE OF CONTENTS<br />
Date:<br />
Revision:<br />
Author:<br />
06/09<br />
3<br />
Linda Green<br />
1.0 PURPOSE AND DESCRIPTION .......................................................................................1<br />
2.0 HEALTH AND SAFETY CONSIDERATIONS ...................................................................1<br />
2.1 HAZARDS.........................................................................................................................1<br />
2.2 TECHNICIAN TRAINING/QUALIFICATIONS ...........................................................................1<br />
3.0 REQUIRED MATERIALS ..................................................................................................2<br />
4.0 SAMPLE STORAGE, PRESERVATION AND DISPOSAL ...............................................4<br />
5.0 METHOD DESCRIPTION ..................................................................................................4<br />
5.1 SCHEDULING CONSIDERATIONS........................................................................................4<br />
5.2 QUALITY ASSURANCE/QUALITY CONTROL ........................................................................4<br />
5.2.1 Method Detection Limit ...............................................................................................4<br />
5.2.2 Blanks .........................................................................................................................4<br />
5.2.3 Sample Replication .....................................................................................................5<br />
5.2.4 Calibration...................................................................................................................5<br />
5.2.4.1 Initial Calibration Procedure.................................................................................6<br />
5.2.4.2 Daily Calibration Procedure .................................................................................8<br />
5.2.5 Calibration Check/Laboratory Control <strong>Standard</strong> .........................................................9<br />
5.3 ANALYSIS METHOD ..........................................................................................................9<br />
5.3.1 Laboratory Filtration Procedure ..................................................................................9<br />
5.3.2 Extraction <strong>of</strong> Chlorophyll-a Filters – Day Before Analysis.........................................10<br />
5.3.2.1 Preparation <strong>of</strong> 500 mL <strong>of</strong> 90% Acetone.............................................................12<br />
5.3.2.2 Preparation <strong>of</strong> 100 mL <strong>of</strong> 1N NaHCO 3 (sodium bicarbonate) ............................13<br />
5.3.3 Analysis <strong>of</strong> Extracted Chlorophyll-a Samples ...........................................................13<br />
5.3.3.1 Procedure for Diluting Off-Scale Samples .........................................................15<br />
5.3.3.2 Alternate Procedure for <strong>of</strong>f-scale samples.........................................................15<br />
5.3.4 Washing Chlorophyll-a Vials .....................................................................................16<br />
6.0 CALCULATIONS.............................................................................................................16<br />
7.0 REFERENCES.................................................................................................................17<br />
8.0 DOCUMENTATION .........................................................................................................18<br />
Chlorophyll-a Analysis – Welschmeyer Method SOP 012<br />
S:\WW\awwword\LABPROC\all QAPPs\LABQAPPs\QAPP Rev5 -0609\SOPs\SOP 012 Chlorophyll-MOD.doc
<strong>Standard</strong> <strong>Operating</strong> Procedure 012<br />
(Prior number URIWW-SOP-5)<br />
Chlorophyll-a Analysis Procedure –<br />
Welschmeyer Method<br />
<strong>University</strong> <strong>of</strong> <strong>Rhode</strong> Island Watershed Watch<br />
1.0 PURPOSE AND DESCRIPTION<br />
Date:<br />
Revision:<br />
Author:<br />
04/05<br />
2<br />
Linda Green<br />
The purpose <strong>of</strong> this method is to determine the concentration <strong>of</strong> chlorophyll-a in ambient water<br />
samples from both marine and freshwater systems. The concentration <strong>of</strong> chlorophyll-a can be<br />
used to estimate phytoplankton biomass. Samples are collected and either filtered in the field or<br />
upon arrival at the laboratory. The filtered samples are then kept frozen until they are extracted<br />
and analyzed using a fluorometer. The value returned by the fluorometer is the raw chlorophylla<br />
concentration. The final chlorophyll-a concentration is determined through calculation. This<br />
method is appropriate for undiluted samples up to 100 µg/L chlorophyll-a and for samples<br />
diluted to return values in this range.<br />
2.0 HEALTH AND SAFETY CONSIDERATIONS<br />
2.1 Hazards<br />
General laboratory good housekeeping procedures should be practiced as outlined in <strong>Standard</strong><br />
<strong>Operating</strong> Procedure (SOP) 001 – General Laboratory Safety. Several chemicals are utilized in<br />
this SOP. Acetone is a flammable liquid; it should always be used in the hood. Sodium<br />
bicarbonate and magnesium carbonate are also utilized in this SOP, both are considered a<br />
possible skin, eye and respiratory tract irritant. The liquid chlorophyll-a standards are flammable<br />
as they are prepared in acetone. Always wear gloves, a laboratory coat and goggles when<br />
working with any chemical. Further information regarding these chemicals may be found in the<br />
laboratory Material Safety Data Sheet (MSDS) binder found in the laboratory where the<br />
chemical <strong>of</strong> interest is stored. General laboratory information regarding safe handling <strong>of</strong><br />
chemicals is located in SOP 001a – <strong>University</strong> Safety and Waste Handling.<br />
2.2 Technician Training/Qualifications<br />
General training in laboratory technique and the use <strong>of</strong> the fluorometer must be completed prior<br />
to analyzing samples using this method. Technician training will be provided by Linda Green,<br />
Program Director or Elizabeth Herron, Program Coordinator.<br />
1 <strong>of</strong> 21<br />
Chlorophyll-a Analysis – Welschmeyer Method SOP 012<br />
S:\WW\awwword\LABPROC\all QAPPs\LABQAPPs\QAPP Rev5 -0609\SOPs\SOP 012 Chlorophyll-MOD.doc
3.0 REQUIRED MATERIALS<br />
Required Material Notes Re-order information<br />
Fluorometer Turner Designs model TD-<br />
700. Excitation filter 436nm,<br />
emission filter 680 nm<br />
Freezer Maintained at -80 °C<br />
Walk-in cold room or<br />
Maintained at 4 °C<br />
refrigerator<br />
Balance Capable <strong>of</strong> weighing to 0.1 g<br />
room 018<br />
Repipet Volume range to 20 mL, set to<br />
dispense 5 mL<br />
90% Acetone 90% acetone is found in the<br />
repipet labeled "90% acetone"<br />
Magnetic stirrer and stir bar<br />
dedicated to 90% acetone<br />
preparation<br />
Preparation instructions for<br />
90% acetone are found in<br />
Section 5.3.2.1.<br />
Located on the laboratory<br />
bench in room 002. Stir bar is<br />
always left in graduated<br />
cylinder used to prepare the<br />
90% acetone.<br />
Turner Designs, 845 W<br />
Maude St, Sunnyvale, CA<br />
94086, 408-749-0998.<br />
Barnstead/Thermolyne<br />
Fume hood, room 019a<br />
Magnetic stirrer and 1” stir bar Located on side laboratory<br />
bench, room 002<br />
13x100 mm disposable glass Stored in room 019A Fisher # 14-958-10C, case <strong>of</strong><br />
test tubes<br />
1000<br />
Vial caps Stored in room 019A Fisher “Tainer Tops”<br />
#02-706-28<br />
40 place test tube racks<br />
Deionized (DI) water<br />
10 - 100 mL graduated<br />
cylinders<br />
Holes should fit 13x100 mm<br />
test tubes<br />
Dedicated 500 mL graduated 500 mL graduated cylinder Fume hood or center lab<br />
cylinder<br />
labeled "chl only"<br />
bench room 002<br />
250 mL beaker<br />
10-25 mL to contain (TC)<br />
graduated cylinder<br />
Located in the non-acid<br />
washed glassware cabinet<br />
Dropper pipette Left in small flask next to<br />
bottle <strong>of</strong> sodium bicarbonate<br />
Filters Pall type A/E glass fiber filter<br />
#61630 (preferable) or<br />
Millipore AP40 GFF for TCLP<br />
#AP4002500 or<br />
Filter Housings (holders) Pall 25 mm Easy Pressure<br />
Filter Holder #4320, pk <strong>of</strong> 6<br />
2 <strong>of</strong> 21<br />
Chlorophyll-a Analysis – Welschmeyer Method SOP 012<br />
S:\WW\awwword\LABPROC\all QAPPs\LABQAPPs\QAPP Rev5 -0609\SOPs\SOP 012 Chlorophyll-MOD.doc
Required Material Notes Re-order information<br />
DI saturated solution <strong>of</strong><br />
magnesium carbonate<br />
(MgCO3)<br />
Forceps<br />
Primary chlorophyll-a<br />
standard<br />
Secondary chlorophyll-a<br />
standard<br />
3 <strong>of</strong> 21<br />
Stored in a drawer by the<br />
center sink in room 002<br />
Liquid chlorophyll-a<br />
standards. The two standards<br />
are approximately 155 µg/l<br />
(high standard) and 15.5 µg/l<br />
(low standard). They are<br />
stored in aluminum foilcovered<br />
chlorophyll-a vials in<br />
a 4 °C refrigerator in room<br />
019.<br />
This standard is a dark grey<br />
rod and has an indefinite shelf<br />
life. It is stored in room 019A<br />
next to the fluorometer.<br />
Acetone Located in the flammable<br />
storage cabinet in room 002<br />
Sodium bicarbonate<br />
Located on the top shelf <strong>of</strong> the<br />
(NaHCO3)<br />
glass chemical cabinet.<br />
1N NaHCO3 Located in the cabinet to the<br />
left <strong>of</strong> BOD incubator room<br />
002 or next to the fume hood.<br />
Preparation Instructions in<br />
Section 5.3.2.2.<br />
Chlorophyll-a data sheets Stored in a drawer in room<br />
019A.<br />
Filter remover wire 6" aluminum wire with bent tip<br />
located in room 019A.<br />
Kim-wipe tissues<br />
Aluminum foil<br />
Turner Designs # 10-850<br />
Turner Designs<br />
Fisher Optima #A-929<br />
Fisher, Certified ACS, #S-233<br />
Equipment is maintained by the <strong>University</strong> <strong>of</strong> <strong>Rhode</strong> Island Watershed Watch (URIWW)<br />
Laboratory and the Natural Resources Science department. Temporary replacement <strong>of</strong> large<br />
equipment such as balances is available through arrangement with other scientists in the<br />
department maintaining similar equipment.<br />
Chlorophyll-a Analysis – Welschmeyer Method SOP 012<br />
S:\WW\awwword\LABPROC\all QAPPs\LABQAPPs\QAPP Rev5 -0609\SOPs\SOP 012 Chlorophyll-MOD.doc
4.0 SAMPLE STORAGE, PRESERVATION AND DISPOSAL<br />
Samples for chlorophyll-a analysis may arrive in the laboratory as filters or raw (unfiltered) water<br />
samples. Aqueous samples are filtered upon arrival at the laboratory.<br />
Matrix Sample<br />
Container<br />
Preservation Volume Holding Time<br />
Glass Fiber Filter Aluminum Foil Frozen NA 6 months<br />
Water 500 mL brown<br />
glass or plastic<br />
bottle<br />
4 °C 100 mL 24 hours<br />
Sample Disposal<br />
Glass vials used for sample extraction are washed and re-used. Used glass fiber filters are<br />
placed on an absorbent material (paper towel) in the hood and allowed to dry. Once filters are<br />
dry they are disposed <strong>of</strong> in the garbage. The 90% acetone extractant is disposed <strong>of</strong> into the<br />
labeled acetone waste container located in the fumehood in room 019A. Once the container is<br />
approximately 80% full contact Linda Green or Elizabeth Herron to coordinate a waste removal<br />
request. Ensure that the container is appropriately and completely labeled.<br />
5.0 METHOD DESCRIPTION<br />
5.1 Scheduling Considerations<br />
Chlorophyll-a filters must be extracted for 18 - 24 hours prior to analysis using the fluorometer.<br />
Check that enough 90% acetone is available for the extraction (5 mL <strong>of</strong> acetone are needed per<br />
sample). Preparation instructions for 90% acetone are in Section 5.3.2.1.<br />
5.2 Quality Assurance/Quality Control<br />
5.2.1 Method Detection Limit<br />
The method detection limit (MDL) is 1.0 µg/L chlorophyll-a as read on the fluorometer. This is<br />
equivalent to 0.1 µg/L chlorophyll-a in a 50 mL aliquot <strong>of</strong> water. The reporting limit (RL) is 2.0<br />
µg/L chlorophyll-a as read on the fluorometer; equivalent to 0.2 µg/L chlorophyll-a in a 50 mL<br />
aliquot <strong>of</strong> water. The upper RL is 50 µg/L chlorophyll-a for the normal calibration and 100 µg/L<br />
chlorophyll-a for a high level calibration, assuming no dilution <strong>of</strong> the sample. Data are reported<br />
to 1 decimal place.<br />
5.2.2 Blanks<br />
Method Blank<br />
Method blanks consist <strong>of</strong> an aliquot <strong>of</strong> the 90% acetone used to extract the sample filters in a<br />
given run. Method blanks are prepared at a ratio <strong>of</strong> 1 method blank per 38 samples,<br />
approximately 3% <strong>of</strong> samples analyzed. This ratio corresponds to 1 method blank per rack <strong>of</strong><br />
chlorophyll-a samples. The method blank must be less than or equal to 0.03 µg/L chlorophyll-a<br />
as read on the fluorometer.<br />
4 <strong>of</strong> 21<br />
Chlorophyll-a Analysis – Welschmeyer Method SOP 012<br />
S:\WW\awwword\LABPROC\all QAPPs\LABQAPPs\QAPP Rev5 -0609\SOPs\SOP 012 Chlorophyll-MOD.doc
Filter Blank<br />
Filter blanks consist <strong>of</strong> an unused filter extracted as a regular sample. Filter blanks are<br />
prepared at a ratio <strong>of</strong> 1 filter blank per 38 samples, approximately 3% <strong>of</strong> samples analyzed.<br />
This ratio corresponds to 1 field blank per rack <strong>of</strong> chlorophyll-a samples. The filter blank must<br />
be less than or equal to 0.03 µg/L chlorophyll-a as read on the fluorometer.<br />
Corrective Actions<br />
If the method blank or filter blank is found to be greater than 0.03 µg/L chlorophyll-a as read on<br />
the fluorometer the blank shall be re-analyzed by the fluorometer. If the returned value is still<br />
greater than 0.03 µg/L chlorophyll-a as read on the fluorometer then the samples associated<br />
with this blank shall be considered suspect and flagged as such on the final data sheet. It is not<br />
possible to re-extract the filters, therefore the samples can not be re-analyzed.<br />
5.2.3 Sample Replication<br />
Each extracted sample is measured on the fluorometer twice. The acceptable relative percent<br />
difference (%RPD) between replicate readings <strong>of</strong> the same sample is 20%. %RPD is calculated<br />
as follows:<br />
%RPD = Result <strong>of</strong> Replicate 1 (µg/L) – Result <strong>of</strong> Replicate 2 (µg/L) x 100<br />
Average <strong>of</strong> Result <strong>of</strong> Replicate 1 (µg/L) and Result <strong>of</strong> Replicate 2 (µg/L)<br />
Corrective Action<br />
If the %RPD is greater than 20%, then the sample is re-analyzed by the fluorometer. If the<br />
%RPD between the two new readings is still greater than 20%, then the discrepancy is noted on<br />
the project data sheet. It is not possible to re-prepare samples as the original field sample is not<br />
available and once the filter is extracted it is not possible to re-extract it.<br />
Additionally, sample duplication is completed in the field. At each field site 2 samples are<br />
collected, and 2 aliquots from each field sample are filtered, resulting in a total <strong>of</strong> 4 filters. The<br />
%RPD between samples collected must be less than 100%RPD using the average <strong>of</strong> all the<br />
filter results as the denominator in the %RPD calculation.<br />
Corrective Action<br />
If the %RPD is greater then the established goal then the deficiency will be noted in the final<br />
data as once the samples are extracted it is not possible to re-extract them.<br />
5.2.4 Calibration<br />
The calibration procedure sets the instrument sample concentration range and sensitivity based<br />
on the chosen fluorescent standards. In addition, the direct calibration mode assigns a digital<br />
value to the known standard so that subsequent standards or samples can be referenced to the<br />
original standards. Two liquid pure chlorophyll-a standards are purchased from Turner Designs<br />
at the beginning <strong>of</strong> each monitoring season. The two standards are approximately 155.0 µg/L<br />
chlorophyll-a (high standard) and 15.5 µg/L chlorophyll-a (low standard). The actual<br />
concentration <strong>of</strong> the standard is listed on the certificate <strong>of</strong> analysis shipped with each set <strong>of</strong><br />
standards and kept on file in room 002. <strong>Standard</strong>s are stored in aluminum foil-covered<br />
chlorophyll-a vials in a 4 °C refrigerator. These standards are used to calibrate the instrument<br />
at the beginning <strong>of</strong> the monitoring season and then used to check the calibration <strong>of</strong> the<br />
instrument each day it is used.<br />
5 <strong>of</strong> 21<br />
Chlorophyll-a Analysis – Welschmeyer Method SOP 012<br />
S:\WW\awwword\LABPROC\all QAPPs\LABQAPPs\QAPP Rev5 -0609\SOPs\SOP 012 Chlorophyll-MOD.doc
Additionally, a solid secondary standard, also from Turner Designs is read immediately after the<br />
initial calibration procedure to determine the formula for calculating chlorophyll-a in a sample.<br />
This standard consists <strong>of</strong> a dark grey rod and has an indefinite shelf life. The secondary<br />
standard is also used to check the calibration <strong>of</strong> the instrument each day it is used.<br />
The percent difference (%D) between the known value <strong>of</strong> the standard and the instrument<br />
reported value <strong>of</strong> the standard must be not greater than 15%. The calculation <strong>of</strong> %D is<br />
provided below:<br />
%D = | Known Value – Reported Value | x 100<br />
Known Value<br />
Corrective Action<br />
If %D is greater than 15% for a liquid or solid standard then the standard should be re-analyzed.<br />
If the %D is still greater than 15% then the deviation should be reported to Linda Green –<br />
Laboratory Manager – Nutrients and the instrument re-calibrated. If the instrument does not<br />
maintain the calibration <strong>of</strong> the solid secondary standard it will be considered to be<br />
malfunctioning and in need <strong>of</strong> repair.<br />
5.2.4.1 Initial Calibration Procedure<br />
Chlorophyll-a procedures must be completed in a darkened room. Keep overhead lights <strong>of</strong>f and<br />
the door closed to limit the light entering the room. The fluorometer is not turned <strong>of</strong>f except<br />
when it is expected that it will not be used for more than 1 month.<br />
Initial Calibration with liquid primary standards<br />
Note: A sufficient quantity <strong>of</strong> pure chlorophyll-a in 90% acetone is received with each standard<br />
to fill 2 vials, so that analysis <strong>of</strong> each (<strong>of</strong> two) standards can be completed in duplicate.<br />
1. Remove standards from refrigerator and bring to room temperature. All materials<br />
analyzed must be at room temperature. The fluorometric value is temperature<br />
dependent. Additionally, condensation may form on the sample vial and affect sample<br />
analysis.<br />
2. Pour each liquid standard into 2 vials. Wrap each vial with aluminum foil and label each<br />
vial with the contents. The labels should be “High-std A” and “High-std B” for the 2 vials<br />
containing the high standard and ”Low-std A” and “Low-std B” for the 2 vials containing<br />
the low standard.<br />
3. Prepare a blank <strong>of</strong> 90% acetone, wrap the vial with aluminum foil and label as “Blank”.<br />
4. Press on Home screen, press for set-up, press for Mode. Toggle to<br />
choose Multi-optional Mode.<br />
5. Press to return to previous screen, press to choose calibration procedure.<br />
Toggle to the “Direct Concentration” choice.<br />
6. Press to return to previous screen, press to choose the units. Toggle to<br />
“µg/l”. Press twice to return to set-up/Cal screen.<br />
7. Press . The Direct Concentration calibration sequence will appear.<br />
6 <strong>of</strong> 21<br />
Chlorophyll-a Analysis – Welschmeyer Method SOP 012<br />
S:\WW\awwword\LABPROC\all QAPPs\LABQAPPs\QAPP Rev5 -0609\SOPs\SOP 012 Chlorophyll-MOD.doc
8. When the fluorometer calls for the maximum range press and then enter 500. This<br />
sets the maximum linear range <strong>of</strong> the fluorometer.<br />
9. Key in the number <strong>of</strong> standards (2), press .<br />
10. When the fluorometer calls for the “HiStd Conc”, press then enter the concentration<br />
and press .<br />
11. Remove the high standard vial from the aluminum foil. Wipe the vial dry, insert it into the<br />
cuvette holder and press.<br />
12. Repeat steps 10 - 11 for the low standard, entering its concentration. Press <br />
when finished.<br />
13. Remove the calibration blank (90% acetone) from the aluminum foil. Wipe the vial dry,<br />
insert it into the cuvette holder when prompted and press . When the blank has<br />
stabilized press . The instrument will read the blank and then return to the Home<br />
screen.<br />
14. The initial calibration is now complete.<br />
15. Measure each <strong>of</strong> the 2 high and 2 low standards and the calibration blank a minimum <strong>of</strong><br />
3 times. Record the results on the “Calibration Day Calculations” data sheet as a record<br />
<strong>of</strong> the calibration procedure (see Section 8.0 Documentation). The numbers recorded<br />
should be very close in value. If the recorded values exhibit drift then the instrument is<br />
in need <strong>of</strong> maintenance.<br />
Initial Calibration with the Solid Secondary <strong>Standard</strong><br />
Calibrate the solid secondary standard after calibration with the liquid standards is complete.<br />
1. Remove the cuvette holder to allow placement <strong>of</strong> the solid standard.<br />
2. Place the solid standard in the cuvette holder with “L” on the left side.<br />
3. Press to read the value. Record this number as the low standard.<br />
4. Remove the standard from the holder, rotate it 180 degrees and place in the holder<br />
again, so that “H” is on the left side.<br />
5. Press to read the value. Record this value as the high concentration.<br />
6. The secondary calibration is now complete.<br />
7. Measure the high and low solid standard a minimum <strong>of</strong> 3 times. Record the results on<br />
the “Calibration Day Calculations” data sheet as a record <strong>of</strong> the calibration procedure<br />
(see Section 8.0 Documentation).<br />
a. The numbers recorded should be very close in value. If the recorded values<br />
exhibit drift then the instrument is in need <strong>of</strong> maintenance.<br />
b. The average <strong>of</strong> the readings for the high solid standard is used to calculate<br />
chlorophyll-a concentration (see Section 6.0 Calculations).<br />
8. Remove the standard and replace the cuvette holder. Be sure to insert it correctly, with<br />
the metal prong to the left and clear prong to the right.<br />
7 <strong>of</strong> 21<br />
Chlorophyll-a Analysis – Welschmeyer Method SOP 012<br />
S:\WW\awwword\LABPROC\all QAPPs\LABQAPPs\QAPP Rev5 -0609\SOPs\SOP 012 Chlorophyll-MOD.doc
5.2.4.2 Daily Calibration Procedure<br />
The procedure for calibration outlined below assumes that standards have been previously<br />
poured into vials for use in the primary standardization procedure. Each analysis day the liquid<br />
primary standards and solid secondary standard are analyzed as standards. Liquid primary<br />
standards are only analyzed at the beginning <strong>of</strong> the run. The solid secondary standard is<br />
analyzed at the beginning <strong>of</strong> the run and at the end <strong>of</strong> each rack <strong>of</strong> samples. The daily<br />
calibration procedure to be completed prior to sample analysis is presented below:<br />
1. Bring standards to room temperature.<br />
2. Wipe the outside <strong>of</strong> liquid primary standard vials dry with a Kimwipe.<br />
3. Insert a liquid primary standard into the sample holder and close the lid.<br />
4. Immediately press .<br />
This initiates the following sequence: a 7 second delay for signal stabilization (DLY<br />
on display), a 12 second averaging period (AVG on display), then a 5 second display<br />
<strong>of</strong> readout (END on display.)<br />
5. Record the value returned on the Chlorophyll-a Daily <strong>Standard</strong>s record sheet.<br />
The liquid primary standard value should not be greater than 15%D from the actual<br />
standard value.<br />
6. Repeat this procedure with the next liquid primary standard and then the standard blank.<br />
7. Check the calibration <strong>of</strong> the fluorometer using the solid secondary standard using the<br />
procedure outlined below:<br />
a. Remove the cuvette holder to allow placement <strong>of</strong> the solid standard.<br />
b. Place the solid secondary standard in the cuvette holder with “L” on the left side.<br />
Press to read the value. Record this number as the low standard.<br />
The solid secondary standard value should not be greater than 15%D from<br />
the actual standard value.<br />
c. Remove the standard from the holder, rotate it 180 degrees and place in the<br />
holder again, so that “H” is on the left side.<br />
The solid secondary standard value should not be greater than 15%D from<br />
the actual standard value.<br />
d. Press to read the value. Record as the high concentration.<br />
e. Remove the standard and replace cuvette holder. Be sure to insert it correctly,<br />
with the metal prong to the left and clear prong to the right.<br />
8. The daily calibration procedure is now complete.<br />
8 <strong>of</strong> 21<br />
Chlorophyll-a Analysis – Welschmeyer Method SOP 012<br />
S:\WW\awwword\LABPROC\all QAPPs\LABQAPPs\QAPP Rev5 -0609\SOPs\SOP 012 Chlorophyll-MOD.doc
5.2.5 Calibration Check/Laboratory Control <strong>Standard</strong><br />
The solid secondary standard is used as a calibration check or laboratory control standard. The<br />
solid secondary standard is analyzed at the end <strong>of</strong> each rack <strong>of</strong> 38 chlorophyll-a samples (3% <strong>of</strong><br />
the samples analyzed). The resulting observation is recorded on the data sheet. The %D for<br />
the calibration check must not be greater than 15%.<br />
Corrective action<br />
If the %D for the solid secondary standard is greater than 15% then the calibration check will be<br />
considered in error and re-analyzed. If the value is still in error the liquid primary standards will<br />
be re-analyzed. If the liquid standard is also in error the instrument will be re-calibrated after<br />
discussions with Linda Green (Laboratory Manager – Nutrients) and all the samples analyzed<br />
between the acceptable calibration check and the unacceptable calibration check will be reanalyzed<br />
by the fluorometer. If the liquid standard is not in error, the deviation <strong>of</strong> the solid<br />
secondary standard will be noted on the data sheet and the analysis <strong>of</strong> samples will continue.<br />
5.3 Analysis Method<br />
5.3.1 Laboratory Filtration Procedure<br />
Chlorophyll-a samples generally arrive at the laboratory in the form <strong>of</strong> frozen filters. If<br />
chlorophyll-a samples arrive at the laboratory as aqueous samples then they must be filtered<br />
upon acceptance into the laboratory. Chlorophyll-a samples are filtered using the following<br />
procedure:<br />
1. This procedure must be completed in an area without direct sunlight and the lights<br />
turned <strong>of</strong>f.<br />
2. Prepare a filter housing by placing one glass fiber filter, gridded side down, onto the<br />
metal screen on the bottom <strong>of</strong> the filter assembly.<br />
3. Always use the tweezers to handle filters.<br />
4. Place the black rubber gasket on top <strong>of</strong> the filter, and screw the filter holder back<br />
together.<br />
5. Shake the sample bottle well.<br />
6. Use a syringe to draw up approximately 20 mL <strong>of</strong> sample into the syringe. Use this<br />
water to rinse the syringe and then discard the water.<br />
7. Take apart the syringe by pulling the plunger all the way out.<br />
8. Attach the filter holder to the syringe barrel.<br />
9. Mix the sample bottle again and obtain the sample to be filtered by pouring water from<br />
the bottle into the syringe (with the filter holder facing down).<br />
10. Note the volume <strong>of</strong> water poured into the syringe. This volume should be recorded as<br />
the “volume filtered”.<br />
11. Shake the bottle <strong>of</strong> magnesium carbonate, and add four drops <strong>of</strong> the solution into the<br />
water sample in the syringe.<br />
12. Attach the syringe plunger, and slowly push the water through the filter housing with<br />
even pressure. Discard the filtered water unless this will be used for nutrient analysis.<br />
9 <strong>of</strong> 21<br />
Chlorophyll-a Analysis – Welschmeyer Method SOP 012<br />
S:\WW\awwword\LABPROC\all QAPPs\LABQAPPs\QAPP Rev5 -0609\SOPs\SOP 012 Chlorophyll-MOD.doc
13. If the filter becomes clogged, remove the filter and start the procedure over with a<br />
smaller amount <strong>of</strong> sample.<br />
14. After filtering all the water take the filter holder <strong>of</strong>f the syringe and unscrew the two<br />
halves.<br />
15. Use forceps to lift out the black rubber gasket.<br />
16. Remove the filter from the housing using the forceps, and place the filter on a piece <strong>of</strong><br />
blotting paper or paper towel.<br />
17. If the filter breaks while being removed, place all the pieces onto the blotting paper<br />
18. Fold the filter circle in half with the chlorophyll-a sample on the inside and wrap the<br />
blotting paper over the filter<br />
19. Place the filter and blotting paper on a piece <strong>of</strong> aluminum foil and cover it loosely with<br />
the foil.<br />
20. Repeat the procedure to obtain another filtered sample from the same raw water<br />
sample.<br />
21. Securely wrap the piece <strong>of</strong> aluminum foil around the filters and attach a label with the<br />
sampling location, technician’s name, date, volume filtered and the number <strong>of</strong> filters.<br />
22. Place the aluminum foil packet in a re-sealable plastic bag containing desiccant chips<br />
and place into the freezer.<br />
23. Take apart the syringe and filter assembly. Rinse all apparatus with DI water only.<br />
Place upside down on a paper towel to dry.<br />
5.3.2 Extraction <strong>of</strong> Chlorophyll-a Filters – Day Before Analysis<br />
1. Gather the needed supplies. The white test tube racks, disposable test tubes and caps,<br />
forceps, data sheets and the repipette containing the buffered 90% acetone solution are<br />
all located in room 019A (fluorometer room). The frozen chlorophyll-a filters are located<br />
in the URIWW freezer in room 019 or 002.<br />
2. Organize data sheets; blank data sheets are kept next to the fluorometer in room 019A<br />
Coastal Institute-Kingston (CIK), URI, referred to as "the chlorophyll-a closet."<br />
a. The data sheets are set up to correspond to the sample rack.<br />
b. A maximum <strong>of</strong> forty samples and blanks can be accommodated in each rack<br />
(and on each data sheet.) It is recommended that no more than 4 racks be<br />
analyzed in one sitting.<br />
3. Turn on the fume hood fan.<br />
4. Fill in top <strong>of</strong> the data sheet. Sheets are numbered in consecutive order, 2000-1, 2000-2,<br />
etc.<br />
5. If needed, make up buffered 90% acetone solution and place into the labeled Repipette.<br />
(Preparation instructions are located in Section 5.3.2.1)<br />
10 <strong>of</strong> 21<br />
Chlorophyll-a Analysis – Welschmeyer Method SOP 012<br />
S:\WW\awwword\LABPROC\all QAPPs\LABQAPPs\QAPP Rev5 -0609\SOPs\SOP 012 Chlorophyll-MOD.doc
6. Check the calibration <strong>of</strong> the repipette.<br />
a. Pump several times to remove air bubbles, then dispense into a “to contain” (TC)<br />
graduated cylinder.<br />
b. Check to see that the volume is 5.0 mL. If not, adjust dispensing volume and recheck.<br />
i. Please note that this is an update from the previous instructions where<br />
the calibration <strong>of</strong> the repipette was checked using the weight <strong>of</strong> the 90%<br />
acetone.<br />
ii. 5.0 mL <strong>of</strong> 90% acetone is approximately 6.15 g.<br />
7. Bring several ziplock bag(s) full <strong>of</strong> frozen sample filters into the fluorometer lab when<br />
ready to set up for extraction. Samples filters are stored in the URIWW freezers in room<br />
019 or 002.<br />
8. Remove foil filter packs from the ziplock bags and sort by date. Set foil packets in<br />
chronological order.<br />
9. Enter information from sample label onto the chlorophyll-a analysis data sheets. Be sure<br />
to read and enter the information carefully. Initial and date the chlorophyll “Storage<br />
Location” data sheet corresponding to the monitoring location being prepared for<br />
analysis (see Section 8 Documentation).<br />
a. While most foil packets will contain only one filter per packet, some may contain<br />
more, and should have been labeled as such.<br />
b. Location, date, volume filtered and sample depth must be entered for each filter.<br />
Rack ID number and setup date must be indicated on the data sheet.<br />
10. Turn out the room lights. The filters must not be exposed to light.<br />
11. Once the data sheet has been completed for a row <strong>of</strong> 10 samples, using the forceps,<br />
remove the filter(s) from the aluminum foil and place one filter in the bottom <strong>of</strong> each<br />
glass vial.<br />
a. Do not touch the filter with anything but the forceps!<br />
b. The vial containing the filter should then be placed in the test tube rack matching<br />
the position identified on the data sheet.<br />
12. Continue until the rack has been filled. The second to last spot should contain an<br />
unused filter, for a filter blank. The last spot on the rack should contain an empty vial.<br />
This vial will be filled with the 90% acetone used to extract the filters in the rack and<br />
considered a method blank.<br />
13. Dispense 5 mL <strong>of</strong> buffered 90% acetone into each vial using the Repipette, and secure a<br />
snap cap onto the top <strong>of</strong> each vial.<br />
14. Vigorously shake each vial, making sure that the filter remains completely submerged in<br />
acetone at the end.<br />
15. Cover the rack completely with aluminum foil. Tape the data sheet to the rack it<br />
corresponds to.<br />
16. Place the covered, labeled racks into the URIWW refrigerator in room 019. Allow 18-24<br />
hours for complete extraction <strong>of</strong> chlorophyll-a from the filter.<br />
11 <strong>of</strong> 21<br />
Chlorophyll-a Analysis – Welschmeyer Method SOP 012<br />
S:\WW\awwword\LABPROC\all QAPPs\LABQAPPs\QAPP Rev5 -0609\SOPs\SOP 012 Chlorophyll-MOD.doc
17. Complete the procedure with the rest <strong>of</strong> the chlorophyll-a filters being prepared.<br />
18. Turn on the fluorometer if it is not already on. Typically the fluorometer is left on unless<br />
it will not be used for more than 1 month. Let the instrument warm up for at least 1 hour<br />
prior to use if it was necessary to turn the instrument on.<br />
Clean-up<br />
1. Place desiccant chips from ziplock bags into the bottle under the fume hood. The desiccant<br />
chips will be regenerated later. Desiccant bottles are stored on cabinets in room 002,<br />
labeled as to whether they need to be regenerated or not.<br />
2. Clean <strong>of</strong>f work surface.<br />
3. Put empty ziplock bags in the labeled box for later re-use or discard if warranted.<br />
4. Save aluminum foil for recycling.<br />
5.3.2.1 Preparation <strong>of</strong> 500 mL <strong>of</strong> 90% Acetone<br />
Preparation <strong>of</strong> reagents used in the analysis <strong>of</strong> chlorophyll-a should be completed in room 002.<br />
Prepare 500 mL <strong>of</strong> 90% acetone using the following procedure:<br />
1. Add the following to the 500 mL graduated cylinder labeled “chl only”<br />
a. 450 mL acetone<br />
b. 50 mL DI water<br />
2. Once the DI water is added to the graduated cylinder the volume in the graduated<br />
cylinder will read slightly less than 500 mL due to density differences between acetone<br />
and water.<br />
3. 5 drops 1N NaHCO 3 (sodium bicarbonate)<br />
a. Add 1 drop <strong>of</strong> 1N NaHCO3 per 100 mL <strong>of</strong> solution.<br />
b. Since 500 mL <strong>of</strong> 90% acetone was prepared, 5 drops <strong>of</strong> 1N NaHCO3 are added<br />
to the final solution.<br />
4. Preparation instructions for 1N NaHCO3 are in Section 5.3.2.2.<br />
5. Cover the graduated cylinder loosely with aluminum foil, place it onto a magnetic stirrer,<br />
turn the stirrer on and stir the contents <strong>of</strong> the graduated cylinder well.<br />
6. Store the solution in the labeled acetone repipette bottle.<br />
12 <strong>of</strong> 21<br />
Chlorophyll-a Analysis – Welschmeyer Method SOP 012<br />
S:\WW\awwword\LABPROC\all QAPPs\LABQAPPs\QAPP Rev5 -0609\SOPs\SOP 012 Chlorophyll-MOD.doc
5.3.2.2 Preparation <strong>of</strong> 100 mL <strong>of</strong> 1N NaHCO3 (sodium bicarbonate)<br />
Preparation <strong>of</strong> reagents used in the analysis <strong>of</strong> chlorophyll-a should be completed in room 002.<br />
Prepare 100 mL <strong>of</strong> 1N NaHCO3 using the following procedure:<br />
1. Add 8.4 g <strong>of</strong> NaHCO3 to a 250 mL non-acid washed glass beaker.<br />
2. Fill the beaker with DI water until it reaches 100 mL.<br />
3. Stir using the 1” magnetic stir bar until the NaHCO3 has dissolved.<br />
4. Pour the solution into the 125 mL brown glass bottled labeled 1N NaHCO3. Add a label<br />
to the bottle with the data <strong>of</strong> preparation and the initials <strong>of</strong> the technician that prepared<br />
the solution. The solution will last indefinitely.<br />
5.3.3 Analysis <strong>of</strong> Extracted Chlorophyll-a Samples<br />
1. Gather the needed supplies.<br />
a. Extracted chlorophyll-a samples in the aluminum foil covered white racks located<br />
in the refrigerator in room 019.<br />
b. Filter remover (6" piece aluminum wire, with bent tip) – room 019A<br />
c. Liquid chlorophyll-a standards and calibration blank - refrigerator in room 019.<br />
d. Solid secondary standard - box in drawer under fluorometer.<br />
e. Repipette containing 90% acetone for dilution - fume hood in chlorophyll closet.<br />
f. 1 mL Brinkmann pipette, with blue tip - borrowed daily from room 018.<br />
2. Allow at least 30 minutes for extracted samples and standards to reach room<br />
temperature prior to analysis. Fluorometric readings are temperature dependent.<br />
3. Remember to keep the lights <strong>of</strong>f during analysis and preparation. The door to the<br />
chlorophyll closet may be left open if there is no one in room 019 and the lights are <strong>of</strong>f.<br />
This is recommended to provide ventilation.<br />
4. While the samples are warming to room temperature, shake the first sample vigorously.<br />
Remove the cap and using the filter remover, remove the filter. The acetone soaked<br />
filter should be placed on a Kimwipe, and left in the fume hood until completely dried.<br />
This takes only a few minutes. The old dry filters are then thrown away.<br />
5. Replace the cap on the vial, and wipe outside <strong>of</strong> vial with a Kimwipe (removes<br />
fingerprints/moisture which interfere with readings).<br />
6. Place the tube back in the rack.<br />
7. Repeat Steps 4 through 6 for the remaining samples on the rack.<br />
8. By the time Steps 4 through 6 have been completed for all the samples, the samples<br />
should have reached room temperature.<br />
9. Check the calibration <strong>of</strong> the instrument using both the primary liquid standards as well as<br />
the solid standard. Refer to Section 5.2.4.2 for a description <strong>of</strong> the procedure.<br />
13 <strong>of</strong> 21<br />
Chlorophyll-a Analysis – Welschmeyer Method SOP 012<br />
S:\WW\awwword\LABPROC\all QAPPs\LABQAPPs\QAPP Rev5 -0609\SOPs\SOP 012 Chlorophyll-MOD.doc
10. Load the first sample vial into the fluorometer:<br />
a. Open the fluorometer sample holder lid.<br />
b. Insert cuvette holder if necessary (metal prong to the left, clear prong to the<br />
right). Check to make sure that the holder is properly seated.<br />
c. Wipe <strong>of</strong>f any fingerprints on the vial.<br />
d. Hold the sample vial by its cap and gently place it into the fluorometer sample<br />
holder.<br />
e. Close sample holder lid.<br />
11. Immediately press .<br />
This initiates the following sequence: a 7 second delay for signal stabilization (DLY<br />
on display), a 12 second averaging period (AVG on display), then a 5 second display<br />
<strong>of</strong> readout (END on display.)<br />
12. Record the reading on the data sheet. If the fluorometer reads “over” the sample must<br />
be diluted and re-analyzed using the procedure found in Section 5.3.3.1 or 5.3.3.2.<br />
13. Analyze all the samples & blanks on the rack and then repeat to obtain a second<br />
(replicate) value.<br />
a. If the method blank or filter blank returns a value greater than 0.03 µg/L<br />
chlorophyll-a as read on the fluorometer then this should be noted on the project<br />
data sheet.<br />
b. Refer to Section 5.2.2 for corrective action necessary if the blanks are greater<br />
than 0.03 µg/L chlorophyll-a as read on the fluorometer.<br />
14. Once all the samples on the rack have been analyzed a second time, remove the<br />
cuvette holder and analyze the solid secondary standard. This value should be less<br />
than or equal to 15%D from the know value. Refer to Section 5.2.5 for information on<br />
procedure to follow if this value is greater than 15%D.<br />
15. Repeat steps 10 – 14 for the remaining racks.<br />
Clean-up<br />
1. Pour acetone extract from the vials into the waste acetone bottle located in the fume<br />
hood in the fluorometer room. Make sure to recap the bottle when done (see Section<br />
4.0 for the waste disposal procedure.<br />
2. Leave the test tubes in racks in the fume hood until they are to be washed. See Section<br />
5.3.4 for information on the vial washing procedure.<br />
3. Clean <strong>of</strong>f the work surface.<br />
4. Return the liquid primary standards and standard blank to the aluminum foil box and<br />
place them back into the refrigerator.<br />
5. Make a copy <strong>of</strong> the completed data sheets. Put the original data sheet in the<br />
chlorophyll-a file in room 002. Place the copy <strong>of</strong> the data sheet in the “Chl to be entered”<br />
file in the in-basket next to the computer in room 002.<br />
6. Fill out the chlorophyll log book in room 019A.<br />
14 <strong>of</strong> 21<br />
Chlorophyll-a Analysis – Welschmeyer Method SOP 012<br />
S:\WW\awwword\LABPROC\all QAPPs\LABQAPPs\QAPP Rev5 -0609\SOPs\SOP 012 Chlorophyll-MOD.doc
5.3.3.1 Procedure for Diluting Off-Scale Samples<br />
If the fluorometer reads “over” the affected sample must be diluted and re-analyzed using the<br />
procedure below:<br />
1. Obtain chlorophyll-a test tubes, caps and test tube rack from the cabinet above the<br />
fluorometer and the 1.0 mL pipette from room 018.<br />
2. Mix the over range sample by inverting the sample vial several times.<br />
3. Set the over range sample in a rack with a clean empty vial in front <strong>of</strong> the existing<br />
sample.<br />
4. Pipette 1.0 mL <strong>of</strong> the over range sample into the clean vial.<br />
5. Add 5.0 mL <strong>of</strong> 90% acetone to the diluted sample using the acetone repipette.<br />
a. Be sure to check the calibration <strong>of</strong> the repipettor as described in Section 5.3.2<br />
Step 6.<br />
6. Cap the vial and shake it.<br />
7. Indicate on the data sheet which samples have been diluted and how.<br />
a. Record sample dilutions on the data sheet in the following manner: 1.0 mL<br />
sample + 5.0 mL acetone.<br />
8. Read the samples on the fluorometer as described in Section 5.3.3.<br />
9. If the sample is still over range repeat the dilution procedure using 1 mL <strong>of</strong> the diluted<br />
sample and 5.0 mL <strong>of</strong> 90% acetone following steps 2 – 8.<br />
5.3.3.2 Alternate Procedure for <strong>of</strong>f-scale samples<br />
Use this procedure if it is known that a large number <strong>of</strong> samples (ie: greater than 10 samples)<br />
will be <strong>of</strong>f-scale due to high chlorophyll-a concentrations.<br />
1. Recalibrate the fluorometer. Calibration instructions are found in Section 5.2.4.<br />
a. During the recalibration when asked for the maximum range, press 9 to change<br />
and enter 1000. This will double the linear range <strong>of</strong> the fluorometer (which<br />
means you will be able to read concentrations twice as high).<br />
b. Note on the project data sheet that the instrument was calibrated at the higher<br />
level.<br />
2. Run the samples as usual (refer to Section 5.3.3).<br />
3. At the end <strong>of</strong> the run either re-calibrate using the 500 maximum range or leave a note on<br />
fluorometer indicating the new setting.<br />
15 <strong>of</strong> 21<br />
Chlorophyll-a Analysis – Welschmeyer Method SOP 012<br />
S:\WW\awwword\LABPROC\all QAPPs\LABQAPPs\QAPP Rev5 -0609\SOPs\SOP 012 Chlorophyll-MOD.doc
5.3.4 Washing Chlorophyll-a Vials<br />
Although the vials are disposable, they are washed to allow for re-use using the following<br />
procedure:<br />
1. Allow acetone to evaporate from vials in the fume hood.<br />
2. Soak vials and caps in soapy water. Do not acid soak.<br />
3. Use a brush to gently scrub the vials (vials break easily).<br />
4. Rinse vials with tap water, then 3 times with DI water.<br />
5. Store vials inverted in a test tube rack to dry.<br />
6. Dry caps inverted on a paper towel.<br />
6.0 CALCULATIONS<br />
The equation below is used to determine the final chlorophyll-a concentration <strong>of</strong> a single<br />
undiluted sample. All data are reported to one decimal place. Values less than 0.2 µg/L<br />
chlorophyll-a are reported as
7.0 REFERENCES<br />
APHA, AWWA, WEF. <strong>Standard</strong> Methods for the Examination <strong>of</strong> Water and Wastewater. 19 th ed.<br />
Washington D.C.: APHA, 1995.<br />
Method referenced: Chlorophyll (10200 H).<br />
Arar, A.J. and G.B. Collins. EPA Method 445.0 - In Vitro Determination <strong>of</strong> Chlorophyll a and<br />
Phaeophytin a in Marine and Freshwater Algae by Fluorescence. Cincinnati OH: US<br />
EPA National Exposure Research Laboratory, Office <strong>of</strong> Research and Development,<br />
1997.<br />
Turner Designs. Measuring Extracted Chlorophyll a Free from the Errors Associated with<br />
Chlorophyll b and Phaeopigments. Sunnyvale CA: Turner Designs.<br />
Turner Designs. Operation Manual for Model TD-700. Sunnyvale CA: Turner Designs.<br />
Welschmeyer, N.A. “Fluorometric Analysis <strong>of</strong> Chlorophyll a in the Presence <strong>of</strong> Chlorophyll b<br />
and Phaeophytins.” Limnology and Oceanography 39 (1994):1985-1992.<br />
17 <strong>of</strong> 21<br />
Chlorophyll-a Analysis – Welschmeyer Method SOP 012<br />
S:\WW\awwword\LABPROC\all QAPPs\LABQAPPs\QAPP Rev5 -0609\SOPs\SOP 012 Chlorophyll-MOD.doc
8.0 DOCUMENTATION<br />
Chlorophyll-a Daily <strong>Standard</strong>s Record<br />
Chlorophyll-a <strong>Standard</strong>s Records<br />
CHL 90% Low High Low High<br />
Date Tech. Sheet # Acetone Solid Stnd Solid Stnd Liquid Stnd Liquid Stnd Comments<br />
18 <strong>of</strong> 21<br />
Chlorophyll-a Analysis – Welschmeyer Method SOP 012<br />
S:\WW\awwword\LABPROC\all QAPPs\LABQAPPs\QAPP Rev5 -0609\SOPs\SOP 012 Chlorophyll-MOD.doc
Chlorophyll-a Calibration Record<br />
Calibration Data Sheet for liquid standards<br />
filename:c://aawwexcel/labproc/chlorophyll/chl standards log.xls, 8/3/04 ltg<br />
<strong>Standard</strong>s are purchased from Turner Designs<br />
Date <strong>of</strong> standardization: by:<br />
lot #:<br />
low chl conc:<br />
high chl conc:<br />
Range setting: 500<br />
90% acetone blank<br />
Vial A (18.1ug/l)<br />
Vial B (18.1ug/l)<br />
Vial C (181 ug/l)<br />
Vial D (181 ug/l)<br />
low solid standard<br />
high solid standard<br />
Range setting: _____<br />
90% acetone blank<br />
Vial A (18.1ug/l)<br />
Vial B (18.1ug/l)<br />
Vial C (181 ug/l)<br />
Vial D (181 ug/l)<br />
low solid standard<br />
high solid standard<br />
19 <strong>of</strong> 21<br />
Vial Contents rep1 rep2 rep3 Average<br />
µg/l<br />
µg/l<br />
Shaded cell is the value “High Solid<br />
Calibrant (initial)” used in the calculation <strong>of</strong><br />
chlorophyll-a<br />
Vial Contents rep1 rep2 rep3 Average<br />
Chlorophyll-a Analysis – Welschmeyer Method SOP 012<br />
S:\WW\awwword\LABPROC\all QAPPs\LABQAPPs\QAPP Rev5 -0609\SOPs\SOP 012 Chlorophyll-MOD.doc
Data sheets for storage <strong>of</strong> chlorophyll-a samples<br />
Storage Location:<br />
Monitoring<br />
Location<br />
Almy Pond<br />
Alton Pond<br />
Arnold Pond<br />
Barber Pond<br />
Belleville P - Lower<br />
Belleville P - upper<br />
Blackamore Pond<br />
Bowdish Reservoir<br />
Breakheart Pond<br />
Brickyard Pond<br />
Browning Mill Pond<br />
Carbuncle Pond<br />
Carr Pond (NK)<br />
Carr Pond (WG)<br />
Chapman Pond<br />
Fenner Pond<br />
20 <strong>of</strong> 21<br />
Sign in Sign Out Sign in Sign Out<br />
Initials/Date Initials/Date<br />
Monitoring<br />
Location<br />
Saugatucket Pond<br />
Initials/Date Initials/Date<br />
Round Pond<br />
Sand Pond<br />
Saugatucket Pond<br />
Saw Mill Pond<br />
Scott Pond<br />
Secret Lake<br />
Silver Lake<br />
Silver Spring Lake<br />
Simmon Mills Pond<br />
Sisson P. (Coventry)<br />
Sisson P. (Ports.)<br />
Slack's Reservoir<br />
Slater Pond<br />
Slatersville Res. - U<br />
Smith & Sayles Res.<br />
Chlorophyll-a Analysis – Welschmeyer Method SOP 012<br />
S:\WW\awwword\LABPROC\all QAPPs\LABQAPPs\QAPP Rev5 -0609\SOPs\SOP 012 Chlorophyll-MOD.doc
Chlorophyll-a Analysis Data Sheet<br />
Name <strong>of</strong> rack:<br />
CHLOROPHYLL-A<br />
SHEET # 2004 -<br />
____ START END<br />
90% Acetone<br />
Blank<br />
Set up date: Low Solid <strong>Standard</strong><br />
Set up Technician: samples diluted: ____________<br />
Analysis Date: how diluted: ________________<br />
Analysis Technician:<br />
entire rack once (Fo1), then re-read (Fo2). Record both readings.<br />
Sample Date<br />
Sample Location<br />
Volume Filtered<br />
High Solid<br />
<strong>Standard</strong><br />
Low Liquid<br />
<strong>Standard</strong><br />
High Liquid<br />
<strong>Standard</strong><br />
Linear Range (set<br />
at calibration)<br />
1 2 3 4 5 6 7 8 9 10<br />
Fo1 / Fo2 / / / / / / / / / /<br />
11 12 13 14 15 16 17 18 19 20<br />
Sample Date<br />
Sample Location<br />
Volume Filtered<br />
Fo1 / Fo2 / / / / / / / / / /<br />
21 22 23 24 25 26 27 28 29 30<br />
Sample Date<br />
Sample Location Acetone Filter<br />
Volume Filtered Blank Blank<br />
Fo1 / Fo2 / / / / / / / / / /<br />
31 32 33 34 35 36 37 38 39 40<br />
Sample Date<br />
Sample Location<br />
Volume Filtered<br />
Fo1 / Fo2 / / / / / / / / / /<br />
filename c:\awwexcel\lab proc\chlorophyll\chlorophyll data sheet.xls<br />
Comments: updated 7/25/03 ltg<br />
21 <strong>of</strong> 21<br />
Chlorophyll-a Analysis – Welschmeyer Method SOP 012<br />
S:\WW\awwword\LABPROC\all QAPPs\LABQAPPs\QAPP Rev5 -0609\SOPs\SOP 012 Chlorophyll-MOD.doc
<strong>Standard</strong> <strong>Operating</strong> Procedure 013<br />
(Prior number URIWW-SOP-8)<br />
Chloride Analysis<br />
<strong>University</strong> <strong>of</strong> <strong>Rhode</strong> Island Watershed Watch<br />
TABLE OF CONTENTS<br />
Date:<br />
Revision:<br />
Author:<br />
6/09<br />
4<br />
Linda Green<br />
1.0 PURPOSE AND DESCRIPTION .......................................................................................1<br />
2.0 HEALTH AND SAFETY CONSIDERATIONS ...................................................................1<br />
2.1 HAZARDS.........................................................................................................................1<br />
2.2 TECHNICIAN TRAINING/QUALIFICATIONS ...........................................................................2<br />
3.0 REQUIRED MATERIALS ..................................................................................................2<br />
4.0 SAMPLE STORAGE, PRESERVATION AND DISPOSAL ...............................................3<br />
5.0 METHOD DESCRIPTION ..................................................................................................3<br />
5.1 SCHEDULING CONSIDERATIONS........................................................................................3<br />
5.2 QUALITY ASSURANCE/QUALITY CONTROL ........................................................................3<br />
5.2.1 Method Detection Limit ...............................................................................................3<br />
5.2.2 Method Blanks ............................................................................................................4<br />
5.2.3 Sample Replication .....................................................................................................4<br />
5.2.4 Calibration...................................................................................................................4<br />
5.2.5 Calibration Check/Laboratory Control <strong>Standard</strong>s .......................................................5<br />
5.2.6 Matrix Spikes ..............................................................................................................5<br />
5.3 ANALYSIS METHOD ..........................................................................................................6<br />
5.3.1 Preparation – At Least Two Days Prior to Analysis ...................................................6<br />
5.3.1.1 Preparation <strong>of</strong> 1000 ppm NaCl Stock Solution ....................................................7<br />
5.3.1.2 Preparation <strong>of</strong> 100 mL <strong>of</strong> Working <strong>Standard</strong>s......................................................7<br />
5.3.2 Procedure – Day <strong>of</strong> Analysis.......................................................................................8<br />
5.3.2.1 Sample Filtration..................................................................................................8<br />
5.3.2.2 Matrix Spikes .......................................................................................................9<br />
5.3.2.3 Sample Analysis ................................................................................................11<br />
6.0 CALCULATIONS.............................................................................................................12<br />
7.0 REFERENCES.................................................................................................................13<br />
8.0 DOCUMENTATION .........................................................................................................13<br />
Chloride Analysis SOP 013<br />
filename S:\WW\awwword\LABPROC\all QAPPs\LABQAPPs\QAPP Rev5 -0609\SOPs\SOP 013 chloride.doc
<strong>Standard</strong> <strong>Operating</strong> Procedure 013<br />
(Prior number URIWW-SOP-8)<br />
Chloride Analysis<br />
<strong>University</strong> <strong>of</strong> <strong>Rhode</strong> Island Watershed Watch<br />
1.0 PURPOSE AND DESCRIPTION<br />
Date:<br />
Revision:<br />
Author:<br />
7/08<br />
3<br />
Linda Green<br />
The purpose <strong>of</strong> this method is to determine the concentration <strong>of</strong> chloride in freshwater or<br />
Individual Sewage Disposal System (ISDS) samples. This method is not appropriate for<br />
estuarine or marine samples. Samples are filtered and then analyzed on an autoanalyzer using<br />
a colorimetric technique to determine chloride concentration. This method is appropriate for<br />
undiluted samples ranging from less than 5 to 50 mg/L Cl - and samples diluted to return values<br />
in this range.<br />
2.0 HEALTH AND SAFETY CONSIDERATIONS<br />
2.1 Hazards<br />
General laboratory good housekeeping procedures should be practiced as outlined in <strong>Standard</strong><br />
<strong>Operating</strong> Procedure (SOP) 001 – General Laboratory Safety.<br />
ISDS samples should be treated as a potential biological hazard. All personnel handling ISDS<br />
samples should wear a laboratory coat, gloves and goggles.<br />
Several chemicals are utilized in this procedure. Two <strong>of</strong> the chemicals have minimal hazards:<br />
sodium chloride (NaCl) and the Brij-35% surfactant solution. Sodium chloride may cause eye<br />
irritation on contact. The Brij-35% solution is not listed for a specific hazard. General safe<br />
handling practices should be used when working with both these chemicals.<br />
The following chemicals should be used in the laboratory hood only. Technicians working with<br />
these chemicals must wear laboratory goggles, a laboratory coat and gloves. The fume funnel<br />
above the autoanalyzer must be turned on before using the mercuric thiocyanide reagent.<br />
Nitric Acid (HNO3) is corrosive and can cause severe burns to exposed body parts.<br />
Methanol (CH3OH) is a flammable liquid that should be kept away from all open flames.<br />
Exposure <strong>of</strong> the skin and eyes may cause irritation. Methanol should be used in the hood as<br />
inhalation <strong>of</strong> the vapors may cause irritation and damage to the nervous system.<br />
Mercuric thiocyanide is extremely toxic, it may be fatal if swallowed. It is harmful if inhaled or<br />
absorbed through the skin and causes irritation and burns to skin, eyes and respiratory tract.<br />
Extreme caution should be exercised when using this chemical.<br />
Ferric nitrate nonahydrate (Fe(NO3)3·9H2O) is an oxidizer that can cause severe burns to eyes<br />
and skin. Inhalation <strong>of</strong> material may cause respiratory irritation.<br />
1 <strong>of</strong> 14<br />
Chloride Analysis SOP 013<br />
filename S:\WW\awwword\LABPROC\all QAPPs\LABQAPPs\QAPP Rev5 -0609\SOPs\SOP 013 chloride.doc
Further information regarding chemicals utilized in this procedure is found in the laboratory<br />
Material Safety Data Sheet (MSDS) binder found in the laboratory where the chemical <strong>of</strong><br />
interest is stored. General laboratory information regarding safe handling <strong>of</strong> chemicals is<br />
located in SOP 001a – <strong>University</strong> Safety and Waste Handling.<br />
Waste Reagents<br />
Waste reagents must be collected for later disposal by URI Safety and Health.<br />
2.2 Technician Training/Qualifications<br />
General training in laboratory technique and use <strong>of</strong> the Astoria-Pacific Model 303a Astoria ®<br />
Analyzer (autoanalyzer) must be completed prior to analyzing samples using this method.<br />
Technician training will be provided by Linda Green, Laboratory Project Manager – Nutrients.<br />
No Technician is allowed to use the autoanalyzer without the permission <strong>of</strong> Linda Green.<br />
3.0 REQUIRED MATERIALS<br />
Required Material Notes Re-order information<br />
Astoria-Pacific Model 303a<br />
Astoria ® Analyzer<br />
(autoanalyzer)<br />
Personal computer<br />
Refrigerator Set at 4 °C<br />
Ultrapure water<br />
Drying oven<br />
Balance<br />
Equipped with a 480 nm filter<br />
for analysis <strong>of</strong> chloride<br />
Capable <strong>of</strong> weighing to<br />
0.0001 g<br />
120 mL HDPE plastic bottles Sample storage<br />
Brinkman pipettes and tips 0-100 µl and 100-1000 µl<br />
10 – 200/250 mL Class A<br />
volumetric flasks<br />
2 to 4 – 1L Class A volumetric<br />
flasks<br />
Nitric acid (HNO3)<br />
Methanol (CH3OH)<br />
Mercuric Thiocyanide<br />
(Hg(SCN)2)<br />
Ferric nitrate nonahydrate<br />
(Fe(NO3)3·9H2O)<br />
Brij-35% solution surfactant Available from Astoria-Pacific<br />
Sodium chloride (NaCl)<br />
External standards Obtained from Accu<strong>Standard</strong><br />
or other outside vendor<br />
Millipore AP40 glass fiber<br />
filters (GFF) for TCLP<br />
2 <strong>of</strong> 14<br />
Gelman Type A/E Millipore #AP4002500<br />
Chloride Analysis SOP 013<br />
filename S:\WW\awwword\LABPROC\all QAPPs\LABQAPPs\QAPP Rev5 -0609\SOPs\SOP 013 chloride.doc
Required Material Notes Re-order information<br />
Filter forceps<br />
Filter housings<br />
60 mL Syringe<br />
Equipment is maintained by the <strong>University</strong> <strong>of</strong> <strong>Rhode</strong> Island Watershed Watch (URIWW)<br />
Laboratory. Temporary replacement <strong>of</strong> the autoanalyzer may be made through arrangement<br />
with Astoria-Pacific. Other equipment may be obtained through arrangement with other<br />
scientists in the department maintaining similar equipment.<br />
4.0 SAMPLE STORAGE, PRESERVATION AND DISPOSAL<br />
Matrix Sample<br />
Container<br />
Water (Ambient 120 mL acid<br />
and ISDS) washed plastic<br />
bottle<br />
3 <strong>of</strong> 14<br />
Preservation Volume Holding Time<br />
Filtered and then<br />
frozen<br />
10 mL 1 year<br />
Disposal<br />
Samples may be disposed <strong>of</strong> only after final quality assurance checks are completed and the<br />
data found to be acceptable using criteria found in Section 5.2 <strong>of</strong> this SOP. Samples may be<br />
disposed <strong>of</strong> by rinsing down the drain with water. ISDS samples are considered a potential<br />
biological hazard, a laboratory coat, gloves and goggles should be worn when disposing <strong>of</strong><br />
these samples.<br />
5.0 METHOD DESCRIPTION<br />
5.1 Scheduling Considerations<br />
Preparation <strong>of</strong> the stock standard, if necessary, must be completed at least two days prior to<br />
sample analysis. Check to be sure enough color reagent is available. If necessary prepare<br />
more reagent using instructions found in the Astoria-Pacific manual.<br />
Remove samples to be analyzed from the freezer and place in the refrigerator to thaw at least 1<br />
day prior to planned analysis.<br />
5.2 Quality Assurance/Quality Control<br />
5.2.1 Method Detection Limit<br />
The Method Detection Limit (MDL) for this assay is determined annually and has been 0.3 mg/L<br />
chloride (Cl - ) or less. The Limit <strong>of</strong> Quantitation or Reporting Limit (RL) for this assay is 3 mg/L<br />
Cl - or lower. The upper limit <strong>of</strong> reporting is 50 mg/L Cl - without dilution and is set by the upper<br />
standard. Results are reported to the nearest whole number. Updated MDL and RL values are<br />
calculated on an annual basis, check with the Laboratory Manager for the most up-to-date<br />
values<br />
Chloride Analysis SOP 013<br />
filename S:\WW\awwword\LABPROC\all QAPPs\LABQAPPs\QAPP Rev5 -0609\SOPs\SOP 013 chloride.doc
5.2.2 Method Blanks<br />
Method blanks consist <strong>of</strong> Ultrapure water treated as a sample. A method blank is analyzed after<br />
every 15 samples. This is approximately 6% <strong>of</strong> the samples analyzed. Method blanks must not<br />
be greater than 2 mg/L Cl - .<br />
Corrective Action<br />
If any method blank is found to be greater than 2 mg/L Cl - then the method blank is re-analyzed.<br />
If the method blank is still greater than 2 mg/L Cl - then the instrument is re-calibrated and any<br />
samples analyzed between the accepted method blank and the unacceptable method blank are<br />
re-analyzed.<br />
5.2.3 Sample Replication<br />
Sample replication is completed in two ways. The autoanalyzer analyzes two aliquots from<br />
every sample cup for Cl - . The relative percent deviation (%RPD) between the values obtained<br />
from the same sample cup must not be greater than 15%.<br />
If the samples being analyzed originated from an ISDS project then two aliquots <strong>of</strong> the same<br />
sample are poured into two separate autoanalyzer cups for 100% <strong>of</strong> the samples. The %RPD<br />
for values obtained for the same sample in two separate cups is 20%.<br />
If the samples being analyzed originated from an ambient water site then 10% (1 sample in 10)<br />
are analyzed in duplicate cups. The %RPD must not be greater than 20% for these samples.<br />
%RPD is calculated as follows:<br />
%RPD = Result <strong>of</strong> Replicate 1 (µg/L) – Result <strong>of</strong> Replicate 2 (µg/L) x 100<br />
Average <strong>of</strong> Result <strong>of</strong> Replicate 1 (µg/L) and Result <strong>of</strong> Replicate 2 (µg/L)<br />
Corrective Action<br />
If the %RPD is greater than 15% for an analysis from the same sample cup or greater than 20%<br />
when comparing sample values between duplicates placed in different sample cups then the<br />
sample is re-analyzed. If the sample replicates are still not within 15%RPD and 20%RPD and<br />
the instrument check standards are within the acceptable Quality Assurance/Quality Control<br />
guidelines then the deviation is noted on the project data sheet and the run continued.<br />
5.2.4 Calibration<br />
Instrument standardization is completed by determining the absorbance <strong>of</strong> a series <strong>of</strong> known<br />
working standards. The autoanalyzer s<strong>of</strong>tware performs a standard linear regression analysis<br />
<strong>of</strong> the standard concentration versus the absorbance and returns a standard equation for a line<br />
(y = mx + b) and a graph. The autoanalyzer is standardized with a minimum <strong>of</strong> 6 working<br />
standards including a blank (see Section 5.3.1.2). An acceptable linear regression for a<br />
calibration sequence will have a coefficient <strong>of</strong> determination (R 2 ) value <strong>of</strong> at least 0.990.<br />
Corrective Action<br />
If the R 2 value returned by the standardization procedure is less than 0.990 due to only 1<br />
standard, then the standard may be removed and the calibration accepted. If the R 2 value is<br />
less than 0.990 due to more than 1 standard, then the autoanalyzer is re-calibrated. No<br />
4 <strong>of</strong> 14<br />
Chloride Analysis SOP 013<br />
filename S:\WW\awwword\LABPROC\all QAPPs\LABQAPPs\QAPP Rev5 -0609\SOPs\SOP 013 chloride.doc
samples are analyzed until an acceptable R 2 value is recorded. Trouble shooting information is<br />
located in the autoanalyzer manual.<br />
5.2.5 Calibration Check/Laboratory Control <strong>Standard</strong>s<br />
Environmental Protection Agency Water Pollution Pr<strong>of</strong>iciency Test Study<br />
The laboratory participates in the Environmental Protection Agency Water Pollution Pr<strong>of</strong>iciency<br />
Test Study on a yearly basis. Unknown samples are purchased from an outside vendor and<br />
analyzed for chloride. URIWW results are sent to the vendor who provides a comparison to the<br />
actual value and a performance evaluation. Study results are maintained by the laboratory.<br />
Daily Calibration Check<br />
External standards are purchased from an outside vendor and are analyzed as samples during<br />
each analysis batch at a ratio <strong>of</strong> 2% <strong>of</strong> the samples run (1-2 standards per 90 samples). The<br />
percent difference (%D) must not be greater than 20% for the external standards. External<br />
standards are prepared by diluting the purchased high concentration standard with UltraPure<br />
water to a value approximately at the middle <strong>of</strong> the range <strong>of</strong> the standards being used for<br />
calibration.<br />
Check calibrants consisting <strong>of</strong> the middle standard from the standards used to calibrate the<br />
instrument are run at a ratio <strong>of</strong> 1 check standard per 15 samples, or approximately 7% <strong>of</strong> the<br />
samples analyzed. The %D must not be greater than 20% for the check standards.<br />
Percent difference is calculated as follows:<br />
%D = Reported value X 100<br />
Known value<br />
Corrective Action<br />
If the %D is greater than 20% for either an external standard or check calibrant then the<br />
standard is re-analyzed. If the %D is still greater than 20% then the instrument is re-calibrated<br />
and the samples analyzed between the acceptable check calibrant or external standard and the<br />
unacceptable check calibrant or external standard are re-analyzed.<br />
5.2.6 Matrix Spikes<br />
Matrix spikes are used to verify that the chemical and physical characteristics <strong>of</strong> the samples<br />
being analyzed are not sufficiently different from the standards used in calibration to cause the<br />
analyte <strong>of</strong> interest to respond differently in the sample when compared to the calibrant.<br />
There are two main ways to prepare matrix spikes. The more commonly used method is to pour<br />
a water sample into a volumetric flask and add a small amount <strong>of</strong> a highly concentrated<br />
standard. The amount <strong>of</strong> standard added allows the final solution to be approximately double<br />
the original concentration <strong>of</strong> the sample. The second method, used by URIWW involves<br />
measuring a known volume <strong>of</strong> water sample into an autoanalyzer cup, adding a known volume<br />
<strong>of</strong> a high calibrant or standard to the cup and calculating the expected final concentration. In<br />
both cases, using the Astoria-Analyzer system the spike concentration is calculated and entered<br />
in the CC/QC area. The unspiked sample is run, immediately followed by the spiked sample,<br />
and the autoanalyzer system calculates the spike recovery, which should be between 80 –<br />
120%. Sample spikes are run on 30% <strong>of</strong> samples or one sample in 30.<br />
5 <strong>of</strong> 14<br />
Chloride Analysis SOP 013<br />
filename S:\WW\awwword\LABPROC\all QAPPs\LABQAPPs\QAPP Rev5 -0609\SOPs\SOP 013 chloride.doc
The percent recovery is calculated as follows:<br />
% recovery = {SR-UR[V3/(V1+V3)]} / [(V1 x C1)/(V3+V1)]<br />
Where:<br />
C1 = concentration <strong>of</strong> spiking solution<br />
V3 = volume <strong>of</strong> unspiked sample (=1900 ul)<br />
V1 = volume <strong>of</strong> spike solution (=100 ul)<br />
SR = spiked result<br />
UR = unspiked result<br />
The matrix spike procedure utilized by URIWW is based on 1/1992 Astoria Pacific Technical<br />
Bulletin <strong>Appendix</strong> which states that “If higher dilutions <strong>of</strong> the sample matrix by the spike solution<br />
have been demonstrated not to change the matrix significantly, a rapid procedure <strong>of</strong> spiking<br />
directly into the sample cup can be used … an appropriate volume and concentration <strong>of</strong> spike<br />
solution is accurately pipetted to into the cup then mixed and analyzed.” This approach is also<br />
based on personal communication with Allen Clement, Astoria-Pacific International Technical<br />
Support, June 2006.<br />
Corrective Action<br />
If the % recovery for a spiked sample is not between 80 and 120% the sample and associated<br />
sample matrix spike will be re-analyzed. If the value is still not within the acceptable range but<br />
all other spiked samples are within QA/QC limits and calibration checks are also acceptable<br />
then the sample data will be flagged, but no further action will be taken. If more than one spiked<br />
sample is not within acceptable percent recovery then additional samples will be spiked to<br />
determine if the sample matrix is causing interference. Appropriate corrective action will be<br />
determined in consultation with the laboratory manager.<br />
5.3 Analysis Method<br />
5.3.1 Preparation<br />
At least two days prior to analysis, check to be sure enough color reagent is available. If the<br />
reagent must be prepared refer to the Astoria-Pacific manual for instructions.<br />
Preparation <strong>of</strong> standards takes two days to complete, therefore check to determine if it is<br />
necessary to prepare new stock standard prior to the expected sample analysis date.<br />
Move samples to be analyzed from the freezer to the refrigerator at least a day before analysis,<br />
to allow them time to thaw.<br />
This method utilizes several types <strong>of</strong> water. Ultrapure water refers to highly purified water which<br />
is prepared by further purifying DI water using the URIWW Aries-Vaptronics system. SOP 002<br />
– Laboratory Water provides information regarding the different types <strong>of</strong> laboratory water<br />
available and the methods to obtain each type <strong>of</strong> water.<br />
Glassware preparation for preparation <strong>of</strong> standards<br />
All glassware used to prepare standards must be soapy water washed, DI water rinsed, 10%<br />
HCl soaked overnight and then soaked in Ultrapure water overnight. Never use glassware that<br />
has just come from acid soaking. It must equilibrate in DI water first.<br />
6 <strong>of</strong> 14<br />
Chloride Analysis SOP 013<br />
filename S:\WW\awwword\LABPROC\all QAPPs\LABQAPPs\QAPP Rev5 -0609\SOPs\SOP 013 chloride.doc
5.3.1.1 Preparation <strong>of</strong> 1000 ppm NaCl Stock Solution<br />
1. Dry approximately 5 g <strong>of</strong> sodium chloride (NaCl) at 140 °C (284 °F) in the drying oven for<br />
4 hours.<br />
a. After it has been dried place it into a desiccator immediately. It should be stored<br />
in the desiccator until use.<br />
b. Note: Na = 22.99 g Na /mole NaCl<br />
Cl = 35.45 g Cl /mole NaCl<br />
NaCl = 58.44 g/mole<br />
Ratio <strong>of</strong> NaCl/Cl = 58.44/35.45 = 1.648<br />
1.648 g NaCl is equal to 1.0 g Cl.<br />
2. Check the calibration <strong>of</strong> the balance using the 1 g weight. Use a balance that weighs to<br />
at least 0.0001 g.<br />
a. The calibration weights are located in the drawer under the balance. Never<br />
touch calibration weights with anything but forceps. The oils on fingers may<br />
change the weight <strong>of</strong> the standard.<br />
b. Values returned by the balance should be within 10% <strong>of</strong> the actual calibration<br />
weight value. If a deviation <strong>of</strong> greater than 10% is noted then the balance will be<br />
serviced and re-calibrated. The balance should not be used in this procedure.<br />
3. Refer to the table below to prepare varying amounts <strong>of</strong> the stock standard. Dilute to the<br />
final volume using Ultrapure water. This solution requires no special preservative and<br />
will last indefinitely.<br />
Mass <strong>of</strong> dried NaCl (g) Final Volume (mL)<br />
1.648 g 1000<br />
0.824 g 500<br />
0.412g 250<br />
5.3.1.2 Preparation <strong>of</strong> 100 mL <strong>of</strong> Working <strong>Standard</strong>s<br />
1. Check the calibration <strong>of</strong> the balance using the 1 g weight. Use a balance that weighs to<br />
at least 0.0001 g.<br />
7 <strong>of</strong> 14<br />
a. The calibration weights are located in the drawer under the balance. Never<br />
touch calibration weights with anything but forceps. The oils on fingers may<br />
change the weight <strong>of</strong> the standard.<br />
b. Values returned by the balance should be within 10% <strong>of</strong> the actual calibration<br />
weight value. If a deviation <strong>of</strong> greater than 10% is noted then the balance will be<br />
serviced and re-calibrated. The balance should not be used in this procedure.<br />
Chloride Analysis SOP 013<br />
filename S:\WW\awwword\LABPROC\all QAPPs\LABQAPPs\QAPP Rev5 -0609\SOPs\SOP 013 chloride.doc
2. Calibrate the pipette. The nominal volume on the pipettes is not always accurate.<br />
Adjust pipette as needed and recheck the calibration with each change in pipette<br />
delivery volume.<br />
a. Pipettes are calibrated by setting the pipette at the desired volume and the<br />
pipetting this amount <strong>of</strong> Ultrapure water onto a weighting dish on the calibrated<br />
balance. The density <strong>of</strong> water at room temperature is essentially 1, therefore the<br />
weight <strong>of</strong> the delivered Ultrapure water in mg equals the volume delivered in µl.<br />
b. If the volume delivered is not the desired volume, adjust the pipette and repeat<br />
the check <strong>of</strong> volume until it is correct. Recheck the pipette with each change in<br />
pipette delivery volume.<br />
3. Fill the 100 mL volumetric flasks part way with Ultrapure water. Use appropriate sized<br />
and calibrated micropipette to add stock solution to the volumetric flask, according to<br />
chart below.<br />
Preparation <strong>of</strong> Working <strong>Standard</strong>s<br />
Note: All information contained in this table is for the preparation <strong>of</strong> working standards in 100<br />
mL volumetric flasks.<br />
Desired Concentration Volume <strong>of</strong> 1000 mg/L stock to add to Dilution<br />
(mg/L or ppm)<br />
100 mL volumetric flask<br />
Factor<br />
µl mL<br />
5 500 0.5 200<br />
10 1000 1.0 100<br />
15 1500 1.5 66.7<br />
20 2000 2.0 50<br />
25 2500 2.5 40<br />
30 3000 3.0 33.3<br />
40 4000 4.0 25<br />
50 5000 5.0 20<br />
4. Bring the volumetric flask to volume with Ultrapure water.<br />
5. Cover the volumetric flask with parafilm and mix by inverting the flask.<br />
6. Allow the standard to sit at least 1/2 hr. before using.<br />
7. Store working standards in the 4 °C refrigerator.<br />
5.3.2 Procedure – Day <strong>of</strong> Analysis<br />
5.3.2.1 Sample Filtration<br />
Samples may arrive in the laboratory as filtered or unfiltered samples. Unfiltered samples must<br />
be filtered immediately using Millipore AP40 GFF for TCLP filters. After samples are filtered<br />
they must be placed in the freezer until they are analyzed. The procedure for filtering samples<br />
is described below:<br />
1. Locate previously cleaned bottle(s) that will be used to hold the filtered water. Label the<br />
bottle with the sample location, sample depth, date <strong>of</strong> sample collection and the text<br />
“filtered”.<br />
8 <strong>of</strong> 14<br />
Chloride Analysis SOP 013<br />
filename S:\WW\awwword\LABPROC\all QAPPs\LABQAPPs\QAPP Rev5 -0609\SOPs\SOP 013 chloride.doc
2. Prepare a filter housing by placing one glass fiber filter, gridded side down, onto the<br />
metal screen on the bottom <strong>of</strong> the filter assembly.<br />
3. Always use the tweezers to handle filters.<br />
4. Place the black rubber gasket on top <strong>of</strong> the filter, and screw the filter holder back<br />
together.<br />
5. Shake the unfiltered sample bottle well.<br />
6. Use a syringe to draw up approximately 20 mL <strong>of</strong> sample into the syringe. Use this<br />
water to rinse the syringe and then discard the water.<br />
7. Take apart the syringe by pulling the plunger all the way out.<br />
8. Attach the filter holder to the syringe.<br />
9. Mix the sample bottle again and obtain the sample to be filtered by pouring water from<br />
the bottle into the syringe (with the filter holder facing down).<br />
a. Pour approximately 50 mL <strong>of</strong> water from the sample bottle into the syringe.<br />
b. At least 50 mL <strong>of</strong> water must be left in the sample bottle as this remaining water<br />
will be used for other assays.<br />
c. The exact volume filtered is not important unless the filter is to be utilized for<br />
chlorophyll-a analysis (see SOP 012 – Chlorophyll-a Analysis, Welschmeyer<br />
Method).<br />
10. Attach the syringe plunger, and slowly push the water through the filter housing with<br />
even pressure catching the filtered water in the bottle labeled “filtered”.<br />
11. If the filter becomes clogged, remove the filter and start the procedure over with another<br />
aliquot <strong>of</strong> sample.<br />
12. After filtering the water take the filter holder <strong>of</strong>f the syringe and unscrew the two halves.<br />
Discard the filter unless it is to be used for chlorophyll-a analysis.<br />
13. Take apart the syringe.<br />
14. Rinse all apparatus with DI water. Place upside down on a paper towel to dry.<br />
5.3.2.2 Matrix Spikes<br />
Matrix spikes are completed on 30% <strong>of</strong> samples. Use the procedure outlined below to prepare<br />
matrix spikes:<br />
1. Use a matrix spike solution that is 500 ppm Cl - , instructions for making the solution are<br />
below.<br />
2. Check and confirm the calibration <strong>of</strong> the following pipettes and volumes on the Mettler<br />
0.5 mg balance using Ultrapure water:<br />
a. 100 µl (yellow tip Brinkmann)<br />
b. 900 µl (black Eppendorf, blue tip)<br />
c. 1000 µl (blue tip Brinkmann)<br />
3. Select a water sample to spike that is known to have detectable results and is not at or<br />
below the limit <strong>of</strong> detection. Ideally it should be at the low end <strong>of</strong> mid-range. Remember<br />
that Cl - is on-scale up to 40-50 ppm.<br />
9 <strong>of</strong> 14<br />
Chloride Analysis SOP 013<br />
filename S:\WW\awwword\LABPROC\all QAPPs\LABQAPPs\QAPP Rev5 -0609\SOPs\SOP 013 chloride.doc
4. First fill a cup with the unspiked sample. Put on sample rack.<br />
5. Next pipette 1900 µl <strong>of</strong> the sample into another 2 ml sample cup.<br />
6. Add 100 µl <strong>of</strong> the 500 ppm spike solution to the 1900 µl <strong>of</strong> sample (instructions for<br />
making spike solution are below). This will give you a solution that is spiked with 25 ppm<br />
Cl - . In other words with 100% recovery your spiked samples will be 25 ppm Cl - higher<br />
than the unspiked sample. (See below for more details.)<br />
7. Mix using pipette. Put the spiked sample on the rack right after the unspiked sample.<br />
8. (Optional) Set up a replicate spiked cup.<br />
9. To use the autoanalyzer matrix spike automatic calculation, edit the chloride method.<br />
This doesn’t have to be repeated each time, once you have set it up.<br />
a. Go to edit for your chloride method<br />
b. Go to Channel Properties, CC/QC tab<br />
c. Enter SPK1 for spike number<br />
d. Enter 25 for spike concentration<br />
10. The matrix spike result will be printed on the sample run report, right after the spiked<br />
sample.<br />
11. Calculate results as an alternative to the AP s<strong>of</strong>tware method.<br />
a. See 06 AMM 1 st tri may 03.xls for the formula in excel to cut and paste,<br />
remembering to use appropriate cells for the calculation.<br />
b. Calculation is also below:<br />
% recovery = {SR-UR[V3/(V1+V3)]} / [(V1 x C1)/(V3+V1)]<br />
Excel formula:<br />
= {[SR(V3+V1)] – (UR x V3)} / (V1 x C1) X100<br />
= 100 x {[SR(2000) – UR(1900)] / [(100)C1]}<br />
Where:<br />
C1 = concentration <strong>of</strong> spiking solution<br />
V3 = volume <strong>of</strong> unspiked sample (=1900 ul)<br />
V1 = volume <strong>of</strong> spike solution (=100 ul)<br />
SR = spiked result<br />
UR = unspiked result<br />
Matrix spike solution for Chloride<br />
These instruction allow for the creation <strong>of</strong> 100 ml <strong>of</strong> matrix spike solution that is 500 ppm Cl -<br />
1. Fill a 100 ml volumetric flask about ½ full with Ultrapure water<br />
2. Pipette in 50 ml <strong>of</strong> chloride stock solution (it is 1,000 ppm Cl - )<br />
a. df= 2 (100 ml / 50 ml)<br />
b. final Cl - concentration is 1000/2 = 500 ppm Cl -<br />
3. Fill volumetric flask to the line with MQ water, shake repeatedly to mix<br />
To spike your water sample (also above)<br />
1. Pipette 1000 µl <strong>of</strong> the water sample into a 2 ml autoanalyzer sample cup<br />
10 <strong>of</strong> 14<br />
Chloride Analysis SOP 013<br />
filename S:\WW\awwword\LABPROC\all QAPPs\LABQAPPs\QAPP Rev5 -0609\SOPs\SOP 013 chloride.doc
2. Pipette 100 µl <strong>of</strong> the chloride spike solution into the water sample in the sample cup<br />
3. Pipette 900 µl water sample (more <strong>of</strong> the same one) into sample cup<br />
4. Mix by using the pipette used in (3) to withdraw and push back in mixed sample/spike<br />
solution in sample cup. Repeat 3-4 times.<br />
5. Remember to place the matching unspiked sample right before the spiked sample<br />
in the sample tray!<br />
5.3.2.3 Sample Analysis<br />
Detailed instructions regarding operation <strong>of</strong> the Astoria-Pacific automated spectrometer<br />
(autoanalyzer) will not be repeated here. This information is located in the autoanalyzer<br />
operation manuals. A summary <strong>of</strong> the analytical procedure is found below:<br />
1. Allow all filtered samples, standards and blanks to warm to room temperature. This<br />
takes place while the autoanalyzer is being prepared.<br />
2. Obtain reagents needed for the analysis. The chloride analysis only utilizes a color<br />
reagent. This reagent should be allowed to warm to room temperature prior to use. The<br />
color reagent contains mercuric thiocyanide, a highly toxic chemical. The fume funnel<br />
above the autoanalyzer must be on before this reagent (color reagent) is used.<br />
a. Lab personnel must wear gloves, lab coat and eye protection when using this<br />
reagent. Waste reagents must be collected for later disposal by URI Safety and<br />
Health.<br />
b. Further information regarding this reagent is located in the Laboratory MSDS<br />
binder. Further information regarding health and safety is located in SOP 001 –<br />
General Laboratory Safety and SOP 001a – <strong>University</strong> Safety and Waste<br />
Handling Document.<br />
3. A summary <strong>of</strong> Autoanalyzer Operation is provided below:<br />
a. A calibrated volume <strong>of</strong> sample is introduced into the autoanalyzer by the<br />
sampler.<br />
b. The sample is delivered to the analytical cartridge by a peristaltic pump. It is<br />
then combined with reagents and air bubbles in a continuously moving stream.<br />
c. As the sample moves through the cartridge it passes through mixing coils and a<br />
heating bath, as specified by test conditions.<br />
d. A color is produced by the specific analyte in the sample. The intensity <strong>of</strong> the<br />
color is determined by the amount <strong>of</strong> analyte present.<br />
e. This colored stream then flows to the photometer where the color intensity is<br />
measured and converted to an electronic signal. The electronic signal is sent to<br />
a computer where the Astoria-Pacific FASPac II® s<strong>of</strong>tware program processes<br />
the signal to create a standard curve and numerical results for the standards and<br />
samples as well as a real-time recorder tracing <strong>of</strong> peaks.<br />
4. Each autoanalyzer rack has 90 places for samples, blanks and QC samples. A sample<br />
run can have up to three racks (270 samples).<br />
11 <strong>of</strong> 14<br />
a. <strong>Standard</strong>s are set up on their own rack. A set <strong>of</strong> standards is run at the<br />
beginning <strong>of</strong> each run. A separate set <strong>of</strong> standards is run at the end, and are<br />
averaged with those run at the beginning.<br />
Chloride Analysis SOP 013<br />
filename S:\WW\awwword\LABPROC\all QAPPs\LABQAPPs\QAPP Rev5 -0609\SOPs\SOP 013 chloride.doc
. A check calibrant and blank are run after every 15 samples and are used to<br />
monitor the run (see Section 5.2 for further information).<br />
c. Each sample and standard are recorded on a sample log sheet as they are<br />
poured into analytical sample cups. 1 sample out <strong>of</strong> 15 is analyzed in duplicate<br />
(two separate analyzer sample cups).<br />
d. The autoanalyzer is set to analyze each sample cup twice.<br />
5. The autoanalyzer is connected to a personal computer. The Astoria-Pacific FASPac II ®<br />
program analyzes the data reported by the autoanalyzer. The program performs a linear<br />
regression on the standards and determines sample concentrations.<br />
a. A graph <strong>of</strong> concentration vs. absorbance <strong>of</strong> standards is displayed and can be<br />
manipulated to remove obvious outliers.<br />
b. The standard curve is typically rejected if R 2 is less than 0.95 unless this is due to<br />
1 standard in the suite. (see Section 5.2 for further information)<br />
c. During the run the real time peak tracing are monitored to check for in-range<br />
heights, proper shapes and any irregularities, so that samples can be reanalyzed,<br />
space permitting during the current run, or saved for re-analysis in a<br />
later run.<br />
d. At the end <strong>of</strong> a run each peak is checked to make sure the marker is in the<br />
proper spot and any irregularities are accounted for (analytical blips, empty<br />
sample cups, etc). Once each peak in a run has been reviewed, the results <strong>of</strong><br />
the run are exported and saved as Excel files, and printed.<br />
6. After the computer results are printed, they are again compared to the peak tracing,<br />
particularly to take note <strong>of</strong> carryover <strong>of</strong> high to low peaks and correct any keyboarding<br />
errors.<br />
7. QC results are compared to previous results as well as "true values". If the results <strong>of</strong> the<br />
run meet the QA/QC criteria set forth in this SOP then the results <strong>of</strong> the run are deemed<br />
acceptable.<br />
8. After the printout has been approved the data are entered into appropriate Excel<br />
spreadsheet files, where it is subsequently re-checked for data entry errors.<br />
9. After the data is approved samples may be disposed <strong>of</strong> in accordance with Section 4.0.<br />
10. Sample bottles are cleaned by acid washing following SOP 003 – General Labware<br />
Cleaning Procedure.<br />
6.0 CALCULATIONS<br />
Chloride concentrations are calculated in the Astoria Pacific FASPac II program from the<br />
average <strong>of</strong> standard curves. Data are reported to the nearest whole number. Values less than<br />
the reporting limit are reported as < (numerical value <strong>of</strong> the) RL mg/L Cl - .<br />
12 <strong>of</strong> 14<br />
Chloride Analysis SOP 013<br />
filename S:\WW\awwword\LABPROC\all QAPPs\LABQAPPs\QAPP Rev5 -0609\SOPs\SOP 013 chloride.doc
7.0 REFERENCES<br />
APHA, AWWA, WEF. <strong>Standard</strong> Methods for the Examination <strong>of</strong> Water and Wastewater. 19 th ed.<br />
Washington D.C.: APHA, 1995.<br />
Method referenced: Chloride (4500-Cl - ) and Automated Ferricyanide Method (4500-Cl -<br />
E).<br />
Astoria-Pacific Inc. Astoria Analyzer Operations Manual. Clackamas, OR: Astoria-Pacific Inc,<br />
2002.<br />
U S. Environmental Protection Agency. EPA Method 365 Series, EPA 600/4-79, rev. March<br />
1983. Cincinnati, OH: Environmental Monitoring and Support Laboratory, 2001.<br />
8.0 DOCUMENTATION<br />
Data consisting <strong>of</strong> the sample results, peaks and calibration curves are exported from the<br />
computer running the autoanalyzer into Excel data files. The excel files are then printed and<br />
saved electronically. Data are reported to the nearest whole number.<br />
13 <strong>of</strong> 14<br />
Chloride Analysis SOP 013<br />
filename S:\WW\awwword\LABPROC\all QAPPs\LABQAPPs\QAPP Rev5 -0609\SOPs\SOP 013 chloride.doc
Sample Log Sheet<br />
SR1 SYNC (High std) SR6 C3= SR11 C8= File/run name: Analyst:<br />
SR2 CO (carryover-blank) SR7 C4= SR12 C9= Method name: Source <strong>of</strong> <strong>Standard</strong>s:<br />
SR3 W (wash) SR8 C5= SR13 C10= Date: Conc. Range <strong>of</strong> <strong>Standard</strong>s:<br />
SR4 C1= SR9 C6= SR14 C11= Analysis <strong>of</strong>/in: %light: ref ______ ch1 _____ ch2 _____<br />
SR5 C2= SR10 C7= SR15 C12= SYNC abs: ch 1 _________ ch2 __________<br />
Check Calibrant # & concentration(CC# _____) = ______ ug/l filename c:\awwexcel\labproc\RFArelated \Astoria Analyzer sample cup log<br />
Pos# Contents & Date DF Pos# Contents & Date DF Pos# Contents & Date DF Pos# Contents & Date DF Pos# Contents & Date DF Pos#<br />
1 16 31 46 61 76<br />
2 17 32 47 62 77<br />
3 18 33 48 63 78<br />
4 19 34 49 64 79<br />
5 20 35 50 65 80<br />
6 21 36 51 66 81<br />
7 22 37 52 67 82<br />
8 23 38 53 68 83<br />
9 24 39 54 69 84<br />
10 25 40 55 70 85<br />
11 26 41 56 71 86<br />
12 27 42 57 72 87<br />
13 28 43 58 73 88<br />
14 29 44 59 74 89<br />
15 30 45 60 75 90<br />
14 <strong>of</strong> 14<br />
Chloride Analysis SOP 013<br />
filename S:\WW\awwword\LABPROC\all QAPPs\LABQAPPs\QAPP Rev5 -0609\SOPs\SOP 013 chloride.doc
<strong>Standard</strong> <strong>Operating</strong> Procedure 014<br />
(Prior number URIWW-SOP-3)<br />
Ammonia Analysis<br />
<strong>University</strong> <strong>of</strong> <strong>Rhode</strong> Island Watershed Watch<br />
TABLE OF CONTENTS<br />
Date:<br />
Revision:<br />
Author:<br />
6/09<br />
4<br />
Linda Green<br />
1.0 PURPOSE AND DESCRIPTION .......................................................................................1<br />
2.0 HEALTH AND SAFETY CONSIDERATIONS ...................................................................1<br />
2.1 HAZARDS.........................................................................................................................1<br />
2.2 TECHNICIAN TRAINING/QUALIFICATIONS ...........................................................................2<br />
3.0 REQUIRED MATERIALS ..................................................................................................2<br />
4.0 SAMPLE STORAGE, PRESERVATION AND DISPOSAL ...............................................3<br />
5.0 METHOD DESCRIPTION ..................................................................................................3<br />
5.1 SCHEDULING CONSIDERATIONS........................................................................................3<br />
5.2 QUALITY ASSURANCE/QUALITY CONTROL ........................................................................4<br />
5.2.1 Method Detection Limit ...............................................................................................4<br />
5.2.2 Method Blanks ............................................................................................................4<br />
5.2.3 Sample Replication .....................................................................................................4<br />
5.2.4 Calibration...................................................................................................................5<br />
5.2.5 Calibration Check/Laboratory Control <strong>Standard</strong> .........................................................5<br />
5.2.6 Matrix Spikes ..............................................................................................................6<br />
5.3 ANALYSIS METHOD ..........................................................................................................7<br />
5.3.1 Preparation - At Least 2 days Before Analysis ...........................................................7<br />
5.3.1.1 Preparation <strong>of</strong> 100 mg/L NH3-N Primary Ammonia <strong>Standard</strong> .............................7<br />
5.3.1.2 Preparation <strong>of</strong> Working <strong>Standard</strong>s.......................................................................8<br />
5.3.2 Procedure – Day <strong>of</strong> Analysis.......................................................................................9<br />
5.3.2.1 Sample Filtration..................................................................................................9<br />
5.3.2.2 Matrix Spikes .....................................................................................................10<br />
5.3.2.3 Sample Analysis ................................................................................................12<br />
6.0 CALCULATIONS.............................................................................................................13<br />
7.0 REFERENCES.................................................................................................................14<br />
8.0 DOCUMENTATION .........................................................................................................14<br />
Ammonia Analysis SOP 014<br />
filename S:\WW\awwword\LABPROC\all QAPPs\LABQAPPs\QAPP Rev5 -0609\SOPs\SOP 014 Ammonia.doc
1 <strong>of</strong> 15<br />
<strong>Standard</strong> <strong>Operating</strong> Procedure 014<br />
(Prior number URIWW-SOP-3)<br />
Ammonia Analysis<br />
<strong>University</strong> <strong>of</strong> <strong>Rhode</strong> Island Watershed Watch<br />
1.0 PURPOSE AND DESCRIPTION<br />
Date:<br />
Revision:<br />
Author:<br />
7/08<br />
3<br />
Linda Green<br />
This method determines the concentration <strong>of</strong> ammonia in an ambient (river, pond, lake), marine<br />
or Individual Sewage Disposal System (ISDS) samples. Samples are filtered and then analyzed<br />
on an autoanalyzer using a colorimetric technique to determine ammonia concentration.<br />
Results are reported as µg <strong>of</strong> ammonia (NH3) as Nitrogen (N) per Liter. This method is<br />
appropriate for undiluted samples ranging from less than 40 to 2000 µg/L NH3-N and samples<br />
diluted to return values in this range.<br />
2.0 HEALTH AND SAFETY CONSIDERATIONS<br />
2.1 Hazards<br />
General laboratory good housekeeping procedures should be practiced as outlined in <strong>Standard</strong><br />
<strong>Operating</strong> Procedure (SOP) 001 – General Laboratory Safety.<br />
ISDS samples should be treated as a potential biological hazard. All personnel handling ISDS<br />
samples should wear a laboratory coat, gloves and goggles.<br />
Several chemicals are utilized in this procedure that should be treated with extreme caution.<br />
Technicians working with these chemicals must wear laboratory goggles, a laboratory coat and<br />
gloves. The fume funnel above the autoanalyzer must be turned on before using the phenol<br />
reagent or the sodium nitr<strong>of</strong>erriccyanide reagent. The following chemicals should be used only<br />
in the laboratory funnel ventilation or laboratory hood.<br />
Liquid phenol (carbolic acid) (C6H5OH) – Phenol is corrosive and toxic. Phenol may cause<br />
irritation or burns to skin, eyes, respiratory and digestive tract if exposed. Phenol is readily<br />
absorbed through the skin and may be fatal if inhaled, absorbed through the skin or swallowed.<br />
Phenol exposure may cause liver and kidney damage and central nervous system depression.<br />
Phenol is a mutagen, hygroscopic (absorbs moisture from the air) and light sensitive. Liquid<br />
phenol and phenol vapors are combustible.<br />
Sodium nitr<strong>of</strong>erriccyanide (sodium nitroprusside dihydrate), (Na2Fe(CN)5(NO)·2H2O) – Sodium<br />
nitr<strong>of</strong>erriccyanide is toxic. It may cause eye, skin and respiratory tract irritation on contact. It is<br />
harmful if swallowed, inhaled, or absorbed through the skin. Contact with acids liberates<br />
hydrogen cyanide, an extremely toxic gas.<br />
The following chemicals should be treated with caution. Ammonia sulfate ((NH4)2SO4), sodium<br />
citrate dihydrate (Na3C6H5O7·2H2O) and sodium potassium tartrate (NaKC4H4O6.4H2O) may<br />
cause eye, skin and respiratory tract irritation upon exposure. Sodium hydroxide (NaOH) and<br />
sodium hypochlorite (bleach) (NaOHCl) are corrosive and may cause burns to exposed body<br />
Ammonia Analysis SOP 014<br />
filename S:\WW\awwword\LABPROC\all QAPPs\LABQAPPs\QAPP Rev5 -0609\SOPs\SOP 014 Ammonia.doc
parts and eyes. Sulfuric Acid (H2SO4) is corrosive and may burn exposed body parts and eyes.<br />
The Brij-35% surfactant solution is not listed for a specific hazard. General safe handling<br />
practices should be used when working with this chemical.<br />
Further information regarding chemicals utilized in this procedure is found in the laboratory<br />
Material Safety Data Sheet (MSDS) binder found in the laboratory where the chemical <strong>of</strong><br />
interest is stored. General laboratory information regarding safe handling <strong>of</strong> chemicals is<br />
located in SOP 001a – <strong>University</strong> Safety and Waste Handling.<br />
Waste Reagents<br />
Waste reagents must be collected for later disposal by URI Safety and Health.<br />
2.2 Technician Training/Qualifications<br />
General training in laboratory technique and use <strong>of</strong> the Astoria ® -Analyzer Model 303A<br />
Segmented Continuous Flow Autoanalyzer (autoanalyzer) must be completed prior to analyzing<br />
samples using this method. Technician training will be provided by Linda Green, Laboratory<br />
Project Manager – Nutrients. No Technician is allowed to use the autoanalyzer without the<br />
permission <strong>of</strong> Linda Green.<br />
3.0 REQUIRED MATERIALS<br />
Required Material Notes Re-order information<br />
Astoria ® -Analyzer Model 303A<br />
Segmented Continuous Flow<br />
Autoanalyzer (autoanalyzer)<br />
Personal computer<br />
2 <strong>of</strong> 15<br />
Equipped with a 630 nm filter<br />
for analysis <strong>of</strong> ammonianitrogen<br />
Refrigerator Set at 4 °C<br />
Balance<br />
Source <strong>of</strong> Ultrapure water<br />
Capable <strong>of</strong> weighing to 0.0001<br />
g<br />
Brinkman adjustable pipettes<br />
10 200-250 mL Class A<br />
volumetric flasks<br />
2-4 1 L Class A volumetric<br />
flasks<br />
0-100 µL and 100-1000 µL<br />
Plastic bottles Sample storage 120 mL HDPE plastic bottles<br />
Ammonia sulfate ((NH4)2SO4) Primary <strong>Standard</strong><br />
Brij-35% solution surfactant<br />
Liquid phenol (carbolic acid)<br />
(C6H5OH)<br />
Sodium citrate dihydrate<br />
(Na3C6H5O7·2H2O)<br />
Sodium hydroxide (NaOH)<br />
Alpkem Inc.<br />
Sodium hypochlorite (bleach)<br />
(NaOHCl)<br />
Purchased locally (CVS or<br />
supermarket)<br />
Ammonia Analysis SOP 014<br />
filename S:\WW\awwword\LABPROC\all QAPPs\LABQAPPs\QAPP Rev5 -0609\SOPs\SOP 014 Ammonia.doc
Required Material Notes Re-order information<br />
Sodium nitr<strong>of</strong>erriccyanide<br />
(sodium nitroprusside<br />
dehydrate<br />
(Na2Fe(CN)5(NO)·2H2O)<br />
Sodium potassium tartrate<br />
(NaKC4H4O6.4H2O)<br />
Sulfuric acid (H2SO4)<br />
Sodium chloride (NaCl) For preparation <strong>of</strong> Artificial<br />
Seawater needed to analyze<br />
marine samples<br />
Magnesium sulfate (MgSO4) For preparation <strong>of</strong> Artificial<br />
Seawater needed to analyze<br />
Sodium bicarbonate<br />
(NaHCO3)<br />
3 <strong>of</strong> 15<br />
marine samples<br />
For preparation <strong>of</strong> Artificial<br />
Seawater needed to analyze<br />
marine samples<br />
Spare Equipment<br />
Equipment is maintained by the <strong>University</strong> <strong>of</strong> <strong>Rhode</strong> Island Watershed Watch (URIWW)<br />
Laboratory. Temporary replacement <strong>of</strong> the autoanalyzer may be made through arrangement<br />
with Astoria-Pacific. Other equipment may be obtained through arrangement with scientists in<br />
the Natural Resources Science department maintaining similar equipment.<br />
4.0 SAMPLE STORAGE, PRESERVATION AND DISPOSAL<br />
Matrix Sample<br />
Container<br />
Water 120 mL acid<br />
washed plastic<br />
bottle<br />
Preservation Volume Holding Time<br />
Filtered and<br />
frozen<br />
20 mL 12 months<br />
Disposal<br />
Samples may be disposed <strong>of</strong> only after final quality assurance checks are completed and the<br />
data found to be acceptable using criteria found in Section 5.2 <strong>of</strong> this SOP. Samples may be<br />
disposed <strong>of</strong> by rinsing down the drain with water. ISDS samples are considered a potential<br />
biological hazard, a laboratory coat, gloves and goggles must be worn when disposing <strong>of</strong> these<br />
samples.<br />
5.0 METHOD DESCRIPTION<br />
5.1 Scheduling Considerations<br />
The amount <strong>of</strong> primary ammonia standard previously prepared should be checked at least two<br />
days prior to the date <strong>of</strong> expected sample analysis. If necessary, prepare the primary standard<br />
as discussed in Section 5.3.1.1. Approximately 100 mL <strong>of</strong> the primary standard is necessary to<br />
prepare the working standards.<br />
Samples to be analyzed should be removed from the freezer and placed in the refrigerator to<br />
thaw at least a day before the date <strong>of</strong> expected sample analysis.<br />
Ammonia Analysis SOP 014<br />
filename S:\WW\awwword\LABPROC\all QAPPs\LABQAPPs\QAPP Rev5 -0609\SOPs\SOP 014 Ammonia.doc
The available volume <strong>of</strong> each reagent utilized in this analysis should also be assessed at least<br />
two days prior to the date <strong>of</strong> expected sample analysis. Four reagents are needed for the NH3<br />
analysis: the sodium phenate solution, sodium hypochlorite solution, EDTA reagent and sodium<br />
nitroprusside solution. Additionally, Artificial Seawater is used as a rinse, carrier and to prepare<br />
standards when analyzing marine samples. If necessary, prepare more reagent using<br />
instructions found in the Astoria-Pacific manual.<br />
5.2 Quality Assurance/Quality Control<br />
5.2.1 Method Detection Limit<br />
The Method Detection Limit (MDL) is set at 3.0 µg/L NH3-N. The Limit <strong>of</strong> Quantitation or<br />
Reporting Limit (RL) is set at 30 µg/L NH3-N. The maximum concentration reported without<br />
dilution is 2000 µg/L NH3-N for ISDS samples and 1000 µg/L NH3-N for ambient and marine<br />
samples, based on the highest calibration standard. Values reported for NH3-N are reported to<br />
the nearest 10 (ie: 152 µg/L NH3-N is reported as 150 µg/L NH3-N and 66 µg/L NH3-N is<br />
reported as 70 µg/L NH3-N). Updated MDL and RL values are calculated on an annual basis,<br />
check with the Laboratory Manager for the most up-to-date values.<br />
5.2.2 Method Blanks<br />
Method blanks consist <strong>of</strong> Ultrapure water treated as a sample for all samples except marine<br />
samples. Method blanks for marine samples consist <strong>of</strong> Artificial Seawater treated as a sample.<br />
A method blank is analyzed after every 15 samples; this corresponds to 6% <strong>of</strong> the samples<br />
analyzed. Method blanks must not be greater than 30 µg/L NH3-N.<br />
Corrective Action<br />
If any method blank is found to be greater than 30 µg/L NH3-N then the method blank is reanalyzed.<br />
If the method blank is still greater than the acceptable value then the instrument is recalibrated<br />
and any samples analyzed between the accepted method blank and the<br />
unacceptable method blank are re-analyzed.<br />
5.2.3 Sample Replication<br />
Sample replication is completed in two ways. The autoanalyzer analyzes two aliquots from<br />
every sample cup for NH3. The relative percent deviation (%RPD) between the values obtained<br />
from the same sample cup must not be greater than 15%.<br />
If the samples being analyzed originated from an ISDS project then two aliquots <strong>of</strong> the same<br />
sample are poured into two separate autoanalyzer cups for 100% <strong>of</strong> the samples. The %RPD<br />
for values obtained for the same sample in two separate cups is 20%.<br />
If the samples being analyzed originated from an ambient water or marine site then 10% (1<br />
sample in 10) are analyzed in duplicate cups. The %RPD must not be greater than 20% for<br />
these samples.<br />
%RPD is calculated as follows:<br />
%RPD = Result <strong>of</strong> Replicate 1 (µg/L) – Result <strong>of</strong> Replicate 2 (µg/L) x 100<br />
Average <strong>of</strong> Result <strong>of</strong> Replicate 1 (µg/L) and Result <strong>of</strong> Replicate 2 (µg/L)<br />
4 <strong>of</strong> 15<br />
Ammonia Analysis SOP 014<br />
filename S:\WW\awwword\LABPROC\all QAPPs\LABQAPPs\QAPP Rev5 -0609\SOPs\SOP 014 Ammonia.doc
Corrective Action<br />
If the %RPD is greater than 15% for an analysis from the same sample cup or greater than 20%<br />
when comparing sample values between duplicates placed in different sample cups then the<br />
sample is re-analyzed. If the sample replicates are still not within 15%RPD and 20%RPD and<br />
the instrument check standards are within the acceptable Quality Assurance/Quality Control<br />
guidelines then the deviation is noted on the project data sheet and the run continued.<br />
5.2.4 Calibration<br />
Instrument standardization is completed by determining the absorbance <strong>of</strong> a series <strong>of</strong> known<br />
working standards. The autoanalyzer s<strong>of</strong>tware performs a standard linear regression analysis<br />
<strong>of</strong> the standard concentration versus absorbance and returns a standard equation for a line (y =<br />
mx + b) and a graph. The autoanalyzer is standardized with a minimum <strong>of</strong> 4 working standards<br />
and a blank (see Section 5.3.1.2). An acceptable linear regression for a calibration sequence<br />
will have a coefficient <strong>of</strong> determination (R 2 ) value <strong>of</strong> at least 0.990.<br />
Corrective Action<br />
If the R 2 value returned by the standardization procedure is less than 0.990 due to only 1<br />
standard, then the standard may be removed and the calibration accepted. If the R 2 value is<br />
less than 0.990 due to more than 1 standard, then the autoanalyzer is re-calibrated. No<br />
samples are analyzed until an acceptable R 2 value is recorded. Trouble shooting information is<br />
located in the autoanalyzer manual.<br />
5.2.5 Calibration Check/Laboratory Control <strong>Standard</strong><br />
Environmental Protection Agency Water Pollution Pr<strong>of</strong>iciency Test Study<br />
The laboratory participates in the Environmental Protection Agency Water Pollution Pr<strong>of</strong>iciency<br />
Test Study on a yearly basis. Unknown samples are purchased from an outside vendor and<br />
analyzed for NH3. URIWW results are sent to the vendor who provides a comparison to the<br />
actual value and a performance evaluation. Study results are maintained by the laboratory.<br />
Daily Calibration Check<br />
External standards are purchased from an outside vendor and are analyzed as samples during<br />
each analysis batch at a ratio <strong>of</strong> 2% <strong>of</strong> the samples run (1-2 standards per 90 samples). The<br />
percent difference (%D) must not be greater than 20% for the external standards. External<br />
standards are prepared by diluting the purchased high concentration standard with either<br />
UltraPure water (all samples except marine samples) or Artificial Seawater (for marine samples)<br />
to a value approximately at the middle <strong>of</strong> the range <strong>of</strong> the standards being used for calibration.<br />
Check calibrants consisting <strong>of</strong> the middle standard from the standards used to calibrate the<br />
instrument are run at a ratio <strong>of</strong> 1 check calibrant per 15 samples, or approximately 7% <strong>of</strong> the<br />
samples analyzed. The %D must not be greater than 20% for the check calibrant.<br />
Percent difference is calculated as follows:<br />
%D = Reported value X 100<br />
Known value<br />
5 <strong>of</strong> 15<br />
Ammonia Analysis SOP 014<br />
filename S:\WW\awwword\LABPROC\all QAPPs\LABQAPPs\QAPP Rev5 -0609\SOPs\SOP 014 Ammonia.doc
Corrective Action<br />
If the %D is greater than 20% for either an external standard or check calibrant then the<br />
standard is re-analyzed. If the %D is still greater than 20% then the instrument is re-calibrated<br />
and the samples analyzed between the acceptable check calibrant or external standard and the<br />
unacceptable check calibrant or external standard are re-analyzed.<br />
5.2.6 Matrix Spikes<br />
Matrix spikes are used to verify that the chemical and physical characteristics <strong>of</strong> the samples<br />
being analyzed are not sufficiently different from the standards used in calibration to cause the<br />
analyte <strong>of</strong> interest to respond differently in the sample when compared to the calibrant.<br />
There are two main ways to prepare matrix spikes. The more commonly used method is to pour<br />
a water sample into a volumetric flask and add a small amount <strong>of</strong> a highly concentrated<br />
standard. The amount <strong>of</strong> standard added allows the final solution to be approximately double<br />
the original concentration <strong>of</strong> the sample. The second method, used by URIWW involves<br />
measuring a known volume <strong>of</strong> water sample into an autoanalyzer cup, adding a known volume<br />
<strong>of</strong> a high calibrant or standard to the cup and calculating the expected final concentration. In<br />
both cases, using the Astoria-Analyzer system the spike concentration is calculated and entered<br />
in the CC/QC area. The unspiked sample is run, immediately followed by the spiked sample,<br />
and the autoanalyzer system calculates the spike recovery, which should be between 80 –<br />
120%. Sample spikes are run on 30% <strong>of</strong> samples or one sample in 30.<br />
The percent recovery is calculated as follows:<br />
% recovery = {SR-UR[V3/(V1+V3)]} / [(V1 x C1)/(V3+V1)]<br />
Where:<br />
C1 = concentration <strong>of</strong> spiking solution<br />
V3 = volume <strong>of</strong> unspiked sample (=1900 ul)<br />
V1 = volume <strong>of</strong> spike solution (=100 ul)<br />
SR = spiked result<br />
UR = unspiked result<br />
The matrix spike procedure utilized by URIWW is based on 1/1992 Astoria Pacific Technical<br />
Bulletin <strong>Appendix</strong> which states that “If higher dilutions <strong>of</strong> the sample matrix by the spike solution<br />
have been demonstrated not to change the matrix significantly, a rapid procedure <strong>of</strong> spiking<br />
directly into the sample cup can be used … an appropriate volume and concentration <strong>of</strong> spike<br />
solution is accurately pipetted to into the cup then mixed and analyzed.” This approach is also<br />
based on personal communication with Allen Clement, Astoria-Pacific International Technical<br />
Support, June 2006.<br />
Corrective Action<br />
If the % recovery for a spiked sample is not between 80 and 120% the sample and associated<br />
sample matrix spike will be re-analyzed. If the value is still not within the acceptable range but<br />
all other spiked samples are within QA/QC limits and calibration checks are also acceptable<br />
then the sample data will be flagged, but no further action will be taken. If more than one spiked<br />
sample is not within acceptable percent recovery then additional samples will be spiked to<br />
determine if the sample matrix is causing interference. Appropriate corrective action will be<br />
determined in consultation with the laboratory manager.<br />
6 <strong>of</strong> 15<br />
Ammonia Analysis SOP 014<br />
filename S:\WW\awwword\LABPROC\all QAPPs\LABQAPPs\QAPP Rev5 -0609\SOPs\SOP 014 Ammonia.doc
5.3 Analysis Method<br />
7 <strong>of</strong> 15<br />
5.3.1 Preparation<br />
At least 2 days before analysis, the amount <strong>of</strong> each reagent needed for the analysis should be<br />
checked. Four reagents are needed for the NH3 analysis: the sodium phenate solution, sodium<br />
hypochlorite solution, EDTA reagent and sodium nitroprusside solution. If necessary, prepare<br />
more reagent using instructions found in the Astoria-Pacific manual. Additionally, if the samples<br />
are from a marine system, Artificial Seawater will need to be prepared, instructions are located<br />
in the Astoria Pacific manual “Saline Water Automated Analysis <strong>of</strong> Sea, Estuarine, and Brackish<br />
Water”.<br />
Preparation <strong>of</strong> the primary standard takes two days to complete, therefore check to determine if<br />
it is necessary to prepare new primary standard prior to the expected sample analysis date.<br />
The primary standard can be stored for up to 6 months. Working standards are replaced after 2<br />
months.<br />
Samples to be analyzed should be removed from the freezer and placed in the refrigerator to<br />
thaw at least a day before the date <strong>of</strong> expected sample analysis.<br />
This method utilizes several types <strong>of</strong> water. Ultrapure water refers to highly purified water which<br />
is prepared by further purifying deionized (DI) water using the URIWW Aries-Vaponics system.<br />
SOP 002 – Laboratory Water provides information regarding the different types <strong>of</strong> laboratory<br />
water available and the method to obtain water.<br />
Glassware preparation for preparation <strong>of</strong> standards<br />
All glassware utilized for standard preparation must be soapy water washed using nonphosphorus<br />
containing detergent, DI water rinsed, 10% HCl soaked overnight and then soaked<br />
in Ultrapure water overnight.<br />
Never use glassware that has just come from acid soaking; it must equilibrate in Ultrapure water<br />
first.<br />
5.3.1.1 Preparation <strong>of</strong> 100 mg/L NH3-N Primary Ammonia <strong>Standard</strong><br />
1. Store standard grade ammonium sulfate ((NH4)2SO4) in the desiccator.<br />
a. The formula weight <strong>of</strong> (NH4)2SO4 is 132.14 g/ mole<br />
b. There are 2 moles <strong>of</strong> N per 1 mole <strong>of</strong> (NH4)2SO4 for a total nitrogen mass <strong>of</strong><br />
28.02 g N per 1 mole (NH4)2SO4.<br />
2. The 100 mg/L (ppm) primary NH3 standard is prepared using the following formula:<br />
100 mg/L primary NH3 standard = 0.4716 g (NH4)2SO4 per liter<br />
100 ppm N x formula weight (NH4)2SO4 = 0.1 g/L x 132.14 g = 0.4716 g (NH4)2SO4 /L<br />
Weight <strong>of</strong> N in (NH4)2SO4 28.02 g<br />
3. Check the calibration <strong>of</strong> the balance using the 1 g weight. Use a balance that weighs to<br />
at least 0.0001 g.<br />
a. The calibration weights are located in the drawer under the balance. Never<br />
touch the calibration weights with anything but forceps. The oils on the fingers<br />
may change the weight <strong>of</strong> the standard.<br />
Ammonia Analysis SOP 014<br />
filename S:\WW\awwword\LABPROC\all QAPPs\LABQAPPs\QAPP Rev5 -0609\SOPs\SOP 014 Ammonia.doc
. Values returned by the balance should be within 10% <strong>of</strong> the actual calibration<br />
weight value. If a deviation <strong>of</strong> greater than 10% is noted then the balance will be<br />
serviced and re-calibrated. If the balance is found to be outside <strong>of</strong> the<br />
acceptable calibration range then it will not be used in this procedure.<br />
4. To prepare varying amounts <strong>of</strong> the primary standard refer to the table below. Dilute to<br />
the final volume using Ultrapure water.<br />
a. Note: 100 mg/L NH3-N = 100 µg/mL NH3-N = 100 ppm NH3-N<br />
Mass <strong>of</strong> (NH4)2SO4 to be<br />
added to flask<br />
(g)<br />
Final Volume<br />
(mL)<br />
0.4716 1000<br />
0.2358 500<br />
0.1179 250<br />
0. 0943 100<br />
5. Cover the volumetric flask with parafilm and mix by inverting the flask at least 30 times.<br />
6. Place a label on the flask indicating the contents <strong>of</strong> the flask, date <strong>of</strong> preparation and the<br />
initials <strong>of</strong> the technician preparing the standard.<br />
7. The primary standard is stable for 6 months after which it should be discarded. It is<br />
stored in the refrigerator in the volumetric flask it was prepared in.<br />
8. The primary standard must be allowed to sit for 24 hours prior to use.<br />
5.3.1.2 Preparation <strong>of</strong> Working <strong>Standard</strong>s<br />
1. Check the calibration <strong>of</strong> the balance using the procedure outlined in Section 5.3.1.1.<br />
2. Calibrate the adjustable pipette. The nominal volume on the pipette is not always<br />
accurate. Adjust the pipette as needed and recheck the calibration with each change in<br />
pipette delivery volume.<br />
a. Pipettes are calibrated by setting the pipette at the desired volume and pipetting<br />
this amount <strong>of</strong> Ultrapure water onto a weighting dish on a calibrated balance.<br />
b. The density <strong>of</strong> water at room temperature is essentially 1 g/mL, therefore the<br />
weight <strong>of</strong> the delivered volume <strong>of</strong> Ultrapure water in g equals the volume<br />
delivered in mL. If the volume delivered is not the desired volume, adjust the<br />
pipette and repeat the check <strong>of</strong> volume until it is correct. Recheck the pipette<br />
with each change in pipette delivery volume.<br />
3. Fill the 100 or 200 mL volumetric flasks to be used to prepare working standards part<br />
way with Ultrapure water or Artificial Seawater. Artificial seawater is used when making<br />
standards for analysis <strong>of</strong> marine samples; Ultrapure water is used for all other sample<br />
types. Use an appropriately sized and calibrated adjustable pipette to add stock solution<br />
to the volumetric flask, according to chart below.<br />
8 <strong>of</strong> 15<br />
Ammonia Analysis SOP 014<br />
filename S:\WW\awwword\LABPROC\all QAPPs\LABQAPPs\QAPP Rev5 -0609\SOPs\SOP 014 Ammonia.doc
a. Generally, the following standards are prepared for ISDS samples: 0, 250, 500,<br />
1000, 1500 and 2000 µg/L NH3-N.<br />
b. Generally, the following standards are prepared for ambient and marine samples:<br />
0, 25, 50, 125, 250, and 500 µg/L NH3-N.<br />
Preparation <strong>of</strong> Working <strong>Standard</strong>s<br />
Desired<br />
Concentration<br />
(µg/L NH3-N)<br />
Volume <strong>of</strong> primary NH3<br />
standard to add to 100<br />
mL volumetric flask<br />
(µL)<br />
Volume <strong>of</strong> primary NH3<br />
standard to add to 200<br />
mL volumetric flask<br />
Dilution<br />
Factor<br />
0 0 0<br />
25 25 50 µL 4000<br />
50 50 100 µL 2000<br />
125 125 250 µL 800<br />
250 250 500 µL 400<br />
500 500 1000 µL, (1 mL) 200<br />
1000 1000 2000 µL, (2 mL) 100<br />
1500 1500 3000 µL, (3 mL) 66.67<br />
2000 2000 4000 µL, (4 mL) 50<br />
4. Bring the volumetric flask to volume with Ultrapure or Artificial Seawater, as appropriate.<br />
5. Cover the volumetric flask with parafilm and mix by inverting the flask at least 30 times.<br />
6. Place a label on the flask indicating the contents <strong>of</strong> the flask, date <strong>of</strong> preparation and the<br />
initials <strong>of</strong> the technician preparing the standard.<br />
7. Allow the standard to sit at least 1/2 hr. before using.<br />
8. Store working standards in the 4 °C refrigerator.<br />
9. Working standards are replaced after 1 week.<br />
5.3.2 Procedure – Day <strong>of</strong> Analysis<br />
5.3.2.1 Sample Filtration<br />
Samples may arrive in the laboratory as filtered or unfiltered samples. Unfiltered samples must<br />
be filtered immediately using Millipore AP40 GFF for TCLP filters. After samples are filtered<br />
they must be placed in the freezer until they are analyzed. The procedure for filtering samples<br />
is described below:<br />
1. Locate previously cleaned plastic bottle(s) that will be used to hold the filtered water.<br />
Label the bottle with the sample location, sample depth, date <strong>of</strong> sample collection and<br />
the text “filtered”.<br />
2. Prepare a filter housing by placing one glass fiber filter, gridded side down, onto the<br />
metal screen on the bottom <strong>of</strong> the filter assembly.<br />
3. Always use the tweezers to handle filters.<br />
4. Place the black rubber gasket on top <strong>of</strong> the filter, and screw the filter holder back<br />
together.<br />
9 <strong>of</strong> 15<br />
Ammonia Analysis SOP 014<br />
filename S:\WW\awwword\LABPROC\all QAPPs\LABQAPPs\QAPP Rev5 -0609\SOPs\SOP 014 Ammonia.doc
5. Shake the unfiltered sample bottle well.<br />
6. Use a syringe to draw up approximately 20 mL <strong>of</strong> sample into the syringe. Use this<br />
water to rinse the syringe and then discard the water.<br />
7. Take apart the syringe by pulling the plunger all the way out.<br />
8. Attach the filter holder to the syringe.<br />
9. Mix the sample bottle again and obtain the sample to be filtered by pouring water from<br />
the bottle into the syringe (with the filter holder facing down).<br />
a. Pour approximately 50 mL <strong>of</strong> water from the sample bottle into the syringe.<br />
b. At least 50 mL <strong>of</strong> water must be left in the sample bottle as this remaining water<br />
will be used for other assays.<br />
c. The exact volume filtered is not important unless the filter is to be utilized for<br />
chlorophyll-a analysis (see SOP 012 – Chlorophyll-a Analysis, Welschmeyer<br />
Method).<br />
10. Attach the syringe plunger, and slowly push the water through the filter housing with<br />
even pressure catching the filtered water in the bottle labeled “filtered”.<br />
11. If the filter becomes clogged, remove the filter and start the procedure over with another<br />
aliquot <strong>of</strong> sample.<br />
12. After filtering the water take the filter holder <strong>of</strong>f the syringe and unscrew the two halves.<br />
Discard the filter unless it is to be used for chlorophyll-a analysis.<br />
13. Take apart the syringe.<br />
14. Rinse all apparatus with DI water. Place upside down on a paper towel to dry.<br />
10 <strong>of</strong> 15<br />
5.3.2.2 Matrix Spikes<br />
Matrix spikes are completed on 30% <strong>of</strong> samples. Use the procedure outlined below to prepare<br />
matrix spikes:<br />
1. Use a matrix spike solution that is 10,000 ppb NH3-N, instructions for making the<br />
solution are below.<br />
2. Check and confirm the calibration <strong>of</strong> the following pipettes and volumes on the Mettler<br />
0.5 mg balance using Ultrapure water:<br />
a. 100 µl (yellow tip Brinkmann)<br />
b. 900 µl (black Eppendorf, blue tip)<br />
c. 1000 µl (blue tip Brinkmann)<br />
3. Select a water sample to spike that is known to have detectable results and is not at or<br />
below the limit <strong>of</strong> detection. Ideally it should be at the low end <strong>of</strong> mid-range.<br />
4. First fill a cup with the unspiked sample. Put on sample rack.<br />
5. Next pipette 1900 µl <strong>of</strong> the sample into another 2 ml sample cup.<br />
6. Add 100 µl <strong>of</strong> the 10,000 ppb spike solution to the 1900 µl <strong>of</strong> sample (instructions for<br />
making spike solution are below). This will give you a solution that is spiked with 500<br />
ppb NH3-N. In other words with 100% recovery your spiked samples will be 500 ppb<br />
NH3-N higher than the unspiked sample. (See below for more details.)<br />
Ammonia Analysis SOP 014<br />
filename S:\WW\awwword\LABPROC\all QAPPs\LABQAPPs\QAPP Rev5 -0609\SOPs\SOP 014 Ammonia.doc
7. Mix using pipette. Put the spiked sample on the rack right after the unspiked sample.<br />
8. (Optional) Set up a replicate spiked cup.<br />
9. To use the autoanalyzer matrix spike automatic calculation, edit the ammonia method.<br />
This doesn’t have to be repeated each time, once you have set it up.<br />
a. Go to edit for your ammonia method<br />
b. Go to Channel Properties, CC/QC tab<br />
c. Enter SPK1 for spike number<br />
d. Enter 500 for spike concentration<br />
10. The matrix spike result will be printed on the sample run report, right after the spiked<br />
sample.<br />
11. Calculate results as an alternative to the AP s<strong>of</strong>tware method.<br />
a. See 06 AMM 1 st tri may 03.xls for the formula in excel to cut and paste,<br />
remembering to use appropriate cells for the calculation.<br />
b. Calculation is also below:<br />
% recovery = {SR-UR[V3/(V1+V3)]} / [(V1 x C1)/(V3+V1)]<br />
Excel formula:<br />
= {[SR(V3+V1)] – (UR x V3)} / (V1 x C1) X100<br />
= 100 x {[SR(2000) – UR(1900)] / [(100)C1]}<br />
Where:<br />
C1 = concentration <strong>of</strong> spiking solution<br />
V3 = volume <strong>of</strong> unspiked sample (=1900 ul)<br />
V1 = volume <strong>of</strong> spike solution (=100 ul)<br />
SR = spiked result<br />
UR = unspiked result<br />
Matrix spike solution for Ammonia<br />
These instruction allow for the creation <strong>of</strong> 100 ml <strong>of</strong> matrix spike solution that is 10,000 ppm<br />
NH3-N.<br />
1. Fill a 100 ml volumetric flask about ½ full with Ultrapure water<br />
2. Pipette in 10 ml <strong>of</strong> ammonia stock solution (it is 100 ppm NH3-N)<br />
a. df = 10 = 100 ml / 10 ml<br />
b. final NH3-N concentration is 100 ppm/10 = 10 ppm NH3-N = 10,000 ppb NH3-N<br />
3. Fill volumetric flask to the line with MQ water, shake repeatedly to mix<br />
To spike your water sample (also above)<br />
1. Pipette 1000 µl <strong>of</strong> the water sample into a 2 ml autoanalyzer sample cup<br />
2. Pipette 100 µl <strong>of</strong> the ammonia spike solution into the water sample in the sample cup<br />
3. Pipette 900 µl water sample (more <strong>of</strong> the same one) into sample cup<br />
4. Mix by using the pipette used in (3) to withdraw and push back in mixed sample/spike<br />
solution in sample cup. Repeat 3-4 times.<br />
5. Remember to place the matching unspiked sample right before the spiked sample<br />
in the sample tray!<br />
11 <strong>of</strong> 15<br />
Ammonia Analysis SOP 014<br />
filename S:\WW\awwword\LABPROC\all QAPPs\LABQAPPs\QAPP Rev5 -0609\SOPs\SOP 014 Ammonia.doc
5.3.2.3 Sample Analysis<br />
Detailed instructions regarding operation <strong>of</strong> the Astoria-Pacific automated spectrometer<br />
(autoanalyzer) will not be repeated here. This information is located in the autoanalyzer<br />
operation manuals. A summary <strong>of</strong> the analytical procedure is found below:<br />
1. Allow all filtered samples, standards and blanks to warm to room temperature. This<br />
takes place while the autoanalyzer is being prepared.<br />
2. Obtain reagents needed for the analysis. The NH3 assay utilizes four reagents: the<br />
sodium phenate solution, sodium hypochlorite solution, EDTA reagent and sodium<br />
nitroprusside solution. If analyzing marine samples, Artificial Seawater will be needed as<br />
well. All reagents should be allowed to warm to room temperature prior to use.<br />
Remember that this procedure involves the use <strong>of</strong> 2 highly toxic reagents, phenol and<br />
nitr<strong>of</strong>erricyanide. The fume funnel above the autoanalyzer must be on before using<br />
these reagents.<br />
a. Lab personnel must wear gloves, lab coat and eye protection when handling<br />
reagents. Waste reagents must be collected for later disposal by URI Safety and<br />
Health.<br />
b. Further information regarding reagents is located in the Laboratory MSDS binder.<br />
Further information regarding health and safety is located in SOP 001 – General<br />
Laboratory Safety and SOP 001a – <strong>University</strong> Safety and Waste Handling<br />
Document.<br />
3. A summary <strong>of</strong> Autoanalyzer Operation is provided below:<br />
a. A calibrated volume <strong>of</strong> sample is introduced into the autoanalyzer by the<br />
sampler.<br />
b. The sample is delivered to the analytical cartridge by a peristaltic pump. It is<br />
then combined with reagents and air bubbles in a continuously moving stream.<br />
c. As the sample moves through the cartridge it passes through mixing coils and a<br />
heating bath, as specified by test conditions.<br />
d. A color is produced by the specific analyte in the sample, blue for the NH3 assay.<br />
The intensity <strong>of</strong> the color is determined by the amount <strong>of</strong> analyte present.<br />
e. This colored stream then flows to the photometer where the color intensity is<br />
measured and converted to an electronic signal. The electronic signal is sent to<br />
a computer where the Astoria-Pacific FASPac II® s<strong>of</strong>tware program processes<br />
the signal to create a standard curve and numerical results for the standards and<br />
samples as well as a real-time recorder tracing <strong>of</strong> peaks.<br />
4. Each autoanalyzer rack has 90 places for samples, blanks and QC samples. A sample<br />
run can have up to three racks (270 samples).<br />
12 <strong>of</strong> 15<br />
a. <strong>Standard</strong>s are set up on their own rack. A set <strong>of</strong> standards is run at the<br />
beginning <strong>of</strong> each run. A separate set <strong>of</strong> standards is run at the end, and are<br />
averaged with those run at the beginning.<br />
b. A check calibrant and blank are run after every 15 samples and are used to<br />
monitor the run (see Section 5.2 for further information).<br />
Ammonia Analysis SOP 014<br />
filename S:\WW\awwword\LABPROC\all QAPPs\LABQAPPs\QAPP Rev5 -0609\SOPs\SOP 014 Ammonia.doc
c. Each sample and standard is recorded on a sample log sheet as they are poured<br />
into analytical sample cups.<br />
d. 1 sample out <strong>of</strong> 10 is analyzed in duplicate for ambient and marine samples and<br />
every sample is analyzed in duplicate for ISDS samples (two separate analyzer<br />
sample cups).<br />
e. The autoanalyzer is set to analyze each sample cup twice.<br />
5. The autoanalyzer is connected to a personal computer. The Astoria-Pacific FASPac II ®<br />
program analyzes the data reported by the autoanalyzer. The program performs a linear<br />
regression on the standards and determines sample concentrations.<br />
a. A graph <strong>of</strong> concentration verses absorbance <strong>of</strong> standards is displayed and can<br />
be manipulated to remove obvious outliers.<br />
b. The standard curve is rejected if R 2 is less than 0.95 unless this is due to 1<br />
standard in the suite. (see Section 5.2 for further information.)<br />
c. During the run the real time peak tracing are monitored to check for in-range<br />
heights, proper shapes and any irregularities, so that samples can be reanalyzed,<br />
space permitting during the current run, or saved for re-analysis in a<br />
later run.<br />
d. At the end <strong>of</strong> a run each peak is checked to make sure the marker is in the<br />
proper spot and any irregularities are accounted for (analytical blips, empty<br />
sample cups, etc). Once each peak in a run has been reviewed, the results <strong>of</strong><br />
the run are exported and saved as Excel files, and printed.<br />
6. After the computer results are printed, they are again compared to the peak tracing,<br />
particularly to take note <strong>of</strong> carryover <strong>of</strong> high to low peaks and correct any keyboarding<br />
errors.<br />
7. QC results are compared to previous results as well as "true values". If the results <strong>of</strong> the<br />
run meet the QA/QC criteria set forth in this SOP then the results <strong>of</strong> the run are deemed<br />
acceptable.<br />
8. After the printout has been approved, the data are entered into appropriate Excel<br />
spreadsheet files, where they are subsequently re-checked for data entry errors.<br />
9. After the data are approved samples may be disposed <strong>of</strong> in accordance with Section 4.0.<br />
10. Sample bottles are cleaned by acid washing following SOP 003 – General Labware<br />
Cleaning Procedure<br />
6.0 CALCULATIONS<br />
Ammonia is calculated in the Astoria Pacific FASPac II program from the average <strong>of</strong> standard<br />
curves. Data are reported to the nearest 10 for NH3-N. Values less than the reporting limit are<br />
reported as < (numerical value <strong>of</strong> the) RL µg/L NH3-N.<br />
13 <strong>of</strong> 15<br />
Ammonia Analysis SOP 014<br />
filename S:\WW\awwword\LABPROC\all QAPPs\LABQAPPs\QAPP Rev5 -0609\SOPs\SOP 014 Ammonia.doc
7.0 REFERENCES<br />
APHA, AWWA, WEF. <strong>Standard</strong> Methods for the Examination <strong>of</strong> Water and Wastewater. 19 th ed.<br />
Washington D.C.: APHA, 1995<br />
Method referenced: Nitrogen (Ammonia) (4500-NH3), Automated Phenate Method<br />
(4500-NH4 G).<br />
Astoria-Pacific Inc. Astoria Analyzer Operations Manual. Clackamas, OR: Astoria-Pacific Inc.<br />
2002.<br />
J. Scott, J. Adams and S. Stadlmann. Saline Water: Automated Analysis <strong>of</strong> Sea, Estuarine, and<br />
Brackish Waters. Clackamas, OR: Astoria-Pacific Inc.<br />
U S. Environmental Protection Agency. EPA Method 365 Series, EPA 600/4-79. Cincinnati OH:<br />
US EPA Environmental Monitoring and Support Laboratory, rev. March 1983.<br />
8.0 DOCUMENTATION<br />
Data consisting <strong>of</strong> the sample results, peaks and calibration curves are exported from the<br />
computer running the autoanalyzer into Excel data files. The excel files are then printed and<br />
saved electronically.<br />
14 <strong>of</strong> 15<br />
Ammonia Analysis SOP 014<br />
filename S:\WW\awwword\LABPROC\all QAPPs\LABQAPPs\QAPP Rev5 -0609\SOPs\SOP 014 Ammonia.doc
Sample Log Sheet<br />
SR1 SYNC (High std) SR6 C3= SR11 C8= File/run name: Analyst:<br />
SR2 CO (carryover-blank) SR7 C4= SR12 C9= Method name: Source <strong>of</strong> <strong>Standard</strong>s:<br />
SR3 W (wash) SR8 C5= SR13 C10= Date: Conc. Range <strong>of</strong> <strong>Standard</strong>s:<br />
SR4 C1= SR9 C6= SR14 C11= Analysis <strong>of</strong>/in: %light: ref ______ ch1 _____ ch2 _____<br />
SR5 C2= SR10 C7= SR15 C12= SYNC abs: ch 1 _________ ch2 __________<br />
Check Calibrant # & concentration(CC# _____) = ______ ug/l filename c:\awwexcel\labproc\RFArelated \Astoria Analyzer sample cup log<br />
Pos# Contents & Date DF Pos# Contents & Date DF Pos# Contents & Date DF Pos# Contents & Date DF Pos# Contents & Date DF Pos#<br />
1 16 31 46 61 76<br />
2 17 32 47 62 77<br />
3 18 33 48 63 78<br />
4 19 34 49 64 79<br />
5 20 35 50 65 80<br />
6 21 36 51 66 81<br />
7 22 37 52 67 82<br />
8 23 38 53 68 83<br />
9 24 39 54 69 84<br />
10 25 40 55 70 85<br />
11 26 41 56 71 86<br />
12 27 42 57 72 87<br />
13 28 43 58 73 88<br />
14 29 44 59 74 89<br />
15 30 45 60 75 90<br />
15 <strong>of</strong> 15<br />
Ammonia Analysis SOP 014<br />
filename S:\WW\awwword\LABPROC\all QAPPs\LABQAPPs\QAPP Rev5 -0609\SOPs\SOP 014 Ammonia.doc
<strong>Standard</strong> <strong>Operating</strong> Procedure 015<br />
(Prior number URIWW-SOP-2)<br />
Orthophosphate & Nitrate + Nitrite<br />
Analysis<br />
<strong>University</strong> <strong>of</strong> <strong>Rhode</strong> Island Watershed Watch<br />
TABLE OF CONTENTS<br />
Date:<br />
Revision:<br />
Author:<br />
6/09<br />
4<br />
Linda Green<br />
1.0 PURPOSE AND DESCRIPTION .......................................................................................1<br />
2.0 HEALTH AND SAFETY CONSIDERATIONS ...................................................................2<br />
2.1 HAZARDS.........................................................................................................................2<br />
2.2 TECHNICIAN TRAINING/QUALIFICATIONS ...........................................................................2<br />
3.0 REQUIRED MATERIALS ..................................................................................................2<br />
4.0 SAMPLE STORAGE, PRESERVATION AND DISPOSAL ...............................................5<br />
5.0 METHOD DESCRIPTION ..................................................................................................5<br />
5.1 SCHEDULING CONSIDERATIONS........................................................................................5<br />
5.2 QUALITY ASSURANCE/QUALITY CONTROL ........................................................................5<br />
5.2.1 Method Detection Limit ...............................................................................................6<br />
5.2.2 Method Blanks ............................................................................................................6<br />
5.2.3 Sample Replication .....................................................................................................6<br />
5.2.4 Calibration...................................................................................................................7<br />
5.2.5 Calibration Check/Laboratory Control <strong>Standard</strong> .........................................................7<br />
5.2.6 Matrix Spikes ..............................................................................................................8<br />
5.3 ANALYSIS METHOD ..........................................................................................................8<br />
5.3.1 Preparation - At Least 2 days Before Analysis ...........................................................8<br />
5.3.1.1 Preparation <strong>of</strong> Primary Orthophosphate <strong>Standard</strong> (100 ppm) .............................9<br />
5.3.1.2 Preparation <strong>of</strong> Intermediate Orthophosphate <strong>Standard</strong> (10 ppm) ......................10<br />
5.3.1.3 Preparation <strong>of</strong> Orthophosphate Working <strong>Standard</strong>s..........................................11<br />
5.3.1.4 Preparation <strong>of</strong> Primary Nitrate/Nitrite <strong>Standard</strong> (100 ppm) ................................12<br />
5.3.1.5 Preparation <strong>of</strong> Working Nitrate/Nitrite <strong>Standard</strong>s...............................................12<br />
Preparation <strong>of</strong> Nitrate/Nitrite Working <strong>Standard</strong>s .............................................................13<br />
5.3.2 Procedure – Day <strong>of</strong> Analysis.....................................................................................13<br />
5.3.2.1 Column Regeneration........................................................................................13<br />
5.3.2.2 Sample Filtration................................................................................................13<br />
5.3.2.3 Matrix Spikes .....................................................................................................14<br />
5.3.2.4 Sample Analysis ................................................................................................16<br />
6.0 CALCULATIONS.............................................................................................................18<br />
7.0 REFERENCES.................................................................................................................18<br />
8.0 DOCUMENTATION .........................................................................................................18<br />
Orthophosphate and Nitrate + Nitrite Analysis SOP 015<br />
S:\WW\awwword\LABPROC\all QAPPs\LABQAPPs\QAPP Rev5 -0609\SOPs\SOP 015 Phosphate&Nitrate.doc
1 <strong>of</strong> 19<br />
<strong>Standard</strong> <strong>Operating</strong> Procedure 015<br />
(Prior number URIWW-SOP-2)<br />
Orthophosphate & Nitrate + Nitrite<br />
Analysis<br />
<strong>University</strong> <strong>of</strong> <strong>Rhode</strong> Island Watershed Watch<br />
1.0 PURPOSE AND DESCRIPTION<br />
Date:<br />
Revision:<br />
Author:<br />
7/08<br />
3<br />
Linda Green<br />
This method is for the simultaneous colorimetric analysis <strong>of</strong> dissolved reactive phosphorus<br />
(DRP) and nitrate + nitrite (NO3+NO2) in filtered ambient (river, pond, lake), marine or Individual<br />
Sewage Disposal System (ISDS) samples through analysis on an autoanalyzer. The method<br />
may also be utilized for the analysis <strong>of</strong> just DRP or NO3+NO2. If marine samples are being<br />
analyzed, they are run with ambient samples; artificial seawater is not used as a carrier nor for<br />
preparation <strong>of</strong> standards and blanks. NO3+NO2 results for marine samples run in this manner<br />
will be accurate, but PO4 results will not be accurate, and are therefore not reported. The<br />
method outlined here is the same as the method for the determination <strong>of</strong> total phosphorus and<br />
total nitrogen with the following exceptions:<br />
Water samples are filtered<br />
Water samples are not digested prior to analysis<br />
DRP is a measure <strong>of</strong> orthophosphate (PO4) as well as a small amount <strong>of</strong> condensed phosphate<br />
(pyro-, tripoly, etc. phosphate) that is hydrolyzed by the procedure. Since the amount <strong>of</strong><br />
condensed phosphate hydrolyzed is generally considered low, the terms dissolved reactive<br />
phosphorus and orthophosphate are <strong>of</strong>ten interchanged. In this SOP the term orthophosphate<br />
or PO4 will be used to represent the DRP analysis. Results are reported as µg <strong>of</strong><br />
orthophosphate as Phosphorus (PO4-P) per liter.<br />
The NO3+NO2 analysis is run simultaneously with that <strong>of</strong> the PO4 analysis. The NO3+NO2<br />
method determines the total concentration <strong>of</strong> NO3 plus NO2 in a sample. Generally, the<br />
concentration <strong>of</strong> NO2 in a sample is low. During the analytical procedure NO3 - is converted to<br />
NO2 - which then reacts with method reagents to form a color, the intensity <strong>of</strong> which is related to<br />
concentration. Therefore, the only way to determine NO3 solely is to first determine NO2 and<br />
subtract this from the NO3 + NO2 value. Results are reported as µg <strong>of</strong> Nitrate + Nitrite as<br />
Nitrogen (NO3/NO2-N) per liter.<br />
This method is appropriate for undiluted samples ranging from less than 30 to 2000 µg/L<br />
NO3/NO2-N and less than 4 to 200 µg/L PO4-P as well as samples diluted to return values in<br />
this range.<br />
Orthophosphate and Nitrate + Nitrite Analysis SOP 015<br />
S:\WW\awwword\LABPROC\all QAPPs\LABQAPPs\QAPP Rev5 -0609\SOPs\SOP 015 Phosphate&Nitrate.doc
2.0 HEALTH AND SAFETY CONSIDERATIONS<br />
2.1 Hazards<br />
General laboratory good housekeeping procedures should be practiced as outlined in <strong>Standard</strong><br />
<strong>Operating</strong> Procedure (SOP) 001 – General Laboratory Safety.<br />
ISDS samples should be treated as a potential biological hazard. All personnel handling ISDS<br />
samples should wear a laboratory coat, gloves and goggles.<br />
Several chemicals are utilized in this procedure. Note that ammonium hydroxide, chlor<strong>of</strong>orm,<br />
sulfuric acid and phosphoric acid must be used in the hood. Specific hazards <strong>of</strong> each chemical<br />
are listed under the notes section <strong>of</strong> the required materials table (Section 3.0) <strong>of</strong> this SOP.<br />
When using any chemical general safety procedures should be followed and technicians must<br />
wear goggles, gloves and a laboratory coat.<br />
Further information regarding chemicals utilized in this procedure is found in the laboratory<br />
Material Safety Data Sheet (MSDS) binder found in the laboratory where the chemical <strong>of</strong><br />
interest is stored. General laboratory information regarding safe handling <strong>of</strong> chemicals is<br />
located in SOP 001a – <strong>University</strong> Safety and Waste Handling.<br />
Waste Reagents<br />
Waste reagents must be collected for later disposal by URI Safety and Health.<br />
2.2 Technician Training/Qualifications<br />
General training in laboratory technique and use <strong>of</strong> the Astoria ® -Analyzer Model 303A<br />
Segmented Continuous Flow Autoanalyzer (autoanalyzer) must be completed prior to analyzing<br />
samples using this method. Technician training will be provided by Linda Green, Laboratory<br />
Project Manager – Nutrients. No Technician is allowed to use the autoanalyzer without the<br />
permission <strong>of</strong> Linda Green.<br />
3.0 REQUIRED MATERIALS<br />
Required Material Notes Re-order information<br />
105 °C drying oven<br />
Astoria ® -Analyzer Model 303A<br />
Segmented Continuous Flow<br />
Autoanalyzer (autoanalyzer)<br />
Personal computer<br />
2 <strong>of</strong> 19<br />
Equipped with an 880 nm filter<br />
and 540 nm filter for analysis <strong>of</strong><br />
PO4 and NO3+NO2,<br />
respectively.<br />
Refrigerator Set to 4 °C<br />
Analytical balance Capable <strong>of</strong> weighing to 0.0001 g<br />
Ultrapure water<br />
2 Brinkman pipettes 1-100 µL and 100-1000 µL<br />
600-1000 mL acid-washed<br />
beaker, reserved for P use<br />
Orthophosphate and Nitrate + Nitrite Analysis SOP 015<br />
S:\WW\awwword\LABPROC\all QAPPs\LABQAPPs\QAPP Rev5 -0609\SOPs\SOP 015 Phosphate&Nitrate.doc
Required Material Notes Re-order information<br />
Cover glass, or Al foil<br />
Metal tray<br />
Squeeze bottle containing<br />
Ultrapure water<br />
10-15 200-250 mL volumetric<br />
flasks<br />
2-4 1000 mL Class A<br />
volumetric flasks<br />
120 mL plastic HDPE bottles, Sample storage<br />
acid washed<br />
Phosphorus reagents<br />
Potassium phosphate Hygroscopic (absorbs moisture<br />
monobasic (KH2PO4) from the air). May cause eye,<br />
skin, respiratory<br />
and digestive<br />
tract irritation.<br />
Antimony potassium<br />
tartrate<br />
trihydrate<br />
(C8H4K2O12Sb2·3H2O)<br />
Ammonium molybdate<br />
tetrahydrate<br />
(( NH4)6Mo7O24·4H2O)<br />
L-Ascorbic acid (C6H8O6)<br />
3 <strong>of</strong> 19<br />
May cause eye, skin, respiratory<br />
and digestive irritation upon<br />
contact. Harmful if swallowed.<br />
May cause liver,<br />
kidney and<br />
heart damage.<br />
May cause eye, skin and<br />
respiratory tract irritation upon<br />
contact. May be harmful if<br />
swallowed.<br />
Light sensitive. Air sensitive.<br />
May cause eye, skin and<br />
respiratory tract irritation. Strong<br />
reducing agent. Fire and<br />
explosion risk when in contact<br />
with oxidizing agents.<br />
DowFax surfactant May cause<br />
eye burns upon Available<br />
from Astoria-<br />
contact.<br />
Pacific<br />
Sulfuric acid, concentrated Will cause burns to exposed<br />
(H2SO4)<br />
skin, eyes, respiratory<br />
and<br />
digestive tract.<br />
Orthophosphate and Nitrate + Nitrite Analysis SOP 015<br />
S:\WW\awwword\LABPROC\all QAPPs\LABQAPPs\QAPP Rev5 -0609\SOPs\SOP 015 Phosphate&Nitrate.doc
Required Material Notes Re-order information<br />
Chlor<strong>of</strong>orm (CHCl3)<br />
Nitrogen Reagents<br />
May cause central nervous<br />
system depression. May cause<br />
cardiac disturbances. May<br />
cause cancer based on animal<br />
studies. This substance has<br />
caused adverse reproductive<br />
and fetal effects in animals.<br />
May<br />
be harmful if swallowed. Causes<br />
eye, skin and respiratory tract<br />
irritation. Light sensitive.<br />
Potassium nitrate (KNO3) Strong oxidizer. Contact with<br />
other materials may cause a<br />
fire. May cause respiratory tract,<br />
eye and skin irritation. May<br />
cause methemoglobinemia<br />
(negatively impacts<br />
hemoglobin). May cause kidney<br />
damage. Hygroscopic (absorbs<br />
moisture from the air). May be<br />
harmful if swallowed.<br />
Ammonium chloride (NH4Cl) May cause skin, respiratory and<br />
digestive tract irritation. May be<br />
harmful if swallowed. Causes<br />
eye irritation. Hygroscopic<br />
(absorbs moisture from the air).<br />
Disodium EDTA<br />
Causes eye, skin and<br />
(Disodium ethylenediamine respiratory tract irritation. May<br />
tetraacetic acid dihydrate) be harmful if swallowed.<br />
(C10H14N2Na2O8·2H2O)<br />
Ammonium hydroxide Causes eye, skin, digestive and<br />
(NH4OH)<br />
respiratory tract burns.<br />
Cupric sulfate pentahydrate Harmful if swallowed. Causes<br />
(CuSO4·5H2O)<br />
irritation and may burn the<br />
digestive tract, respiratory tract,<br />
eye and skin. Hygroscopic<br />
(absorbs moisture from the air).<br />
Possible sensitizer.<br />
Sulfanilimide (C6H 8N 2O 2S)<br />
May cause reproductive and<br />
fetal effects. May cause eye,<br />
skin and respiratory tract<br />
irritation. May be harmful if<br />
swallowed or inhaled.<br />
N-1-Napthylethylenediamine<br />
Will cause eye, skin and<br />
(NED)<br />
(N-(1-<br />
Naphthyl)ethylenediamine<br />
dihydrochloride)<br />
(C10H7NHCH2CH2NH2 ·<br />
respiratory system irritation.<br />
4 <strong>of</strong> 19<br />
Orthophosphate and Nitrate + Nitrite Analysis SOP 015<br />
S:\WW\awwword\LABPROC\all QAPPs\LABQAPPs\QAPP Rev5 -0609\SOPs\SOP 015 Phosphate&Nitrate.doc
Required Material<br />
2HCl)<br />
Notes Re-order information<br />
Brij-35% solution su rfactant Available from<br />
Alpkem<br />
Phosphoric acid (H3PO4) Hydroscopic (absorbs moisture<br />
from<br />
the air). Will cause burns<br />
<strong>of</strong> exp<br />
osed skin,<br />
eyes,<br />
respiratory and digestive tract.<br />
Spare Equipment<br />
Equipment is maintained by the <strong>University</strong> <strong>of</strong> <strong>Rhode</strong> Island Watershed Watch (URIWW)<br />
Laboratory. Temporary replacement <strong>of</strong> the autoanalyzer may be made through arrangement<br />
with Astoria-Pacific. Other equipment may be obtained through arrangement with other<br />
scientists in the Natural Resources Science department maintaining similar equipment.<br />
4.0 SAMPLE STORAGE, PRESERVATION AND DISPOSAL<br />
Matrix Sample Preservation Volume Holding Time<br />
Container<br />
Water 120 mL acid<br />
washed plastic<br />
bottles<br />
5 <strong>of</strong> 19<br />
Filtered and then<br />
frozen<br />
20 mL 12 months<br />
Disposal<br />
Samples may be disposed <strong>of</strong> only after final quality assurance checks are completed and the<br />
data found to be acceptable using criteria found in Section 5.2 <strong>of</strong> this SOP. Samples may be<br />
disposed <strong>of</strong> by rinsing down the drain with water. ISDS samples are considered a potential<br />
biological hazard, a laboratory coat, gloves and goggles should be worn when disposing <strong>of</strong><br />
these samples.<br />
5.0 METHOD DESCRIPTION<br />
5.1 Scheduling Considerations<br />
The amount <strong>of</strong> primary and intermediate standard previously prepared should be checked at<br />
least two days<br />
prior to the date <strong>of</strong> expected sample analysis. If necessary, prepare the<br />
standards<br />
as discussed in Section 5.3.1. Approximately 100 mL <strong>of</strong> the primary standard is<br />
necessary to prepare the intermediate standard. Approximately<br />
100 mL <strong>of</strong> the intermediate<br />
standard is necessary to prepare the working standards.<br />
Samples to be analyzed should be removed from the freezer and placed in the refrigerator to<br />
thaw at least a day before the date <strong>of</strong> expected sample analysis.<br />
The available volume <strong>of</strong> each reagent utilized in this analysis should be assessed. Two<br />
reagents are needed for the NO3+NO2<br />
analysis: the ammonium chloride buffer and the color<br />
reagent. One reagent is necessary for the PO4 analysis, this mixed reagent is prepared daily by<br />
addition <strong>of</strong> several other reagents: potassium antimonyl tartrate solution, ammonium molybdate<br />
solution, asorbic acid solution and sulfuric acid solution. The asorbic acid solution is only stable<br />
for 1 week. If necessary prepare more reagent using instructions found in the Astoria-Pacific<br />
manual.<br />
5.2 Quality Assurance/Quality Control<br />
Orthophosphate and Nitrate + Nitrite Analysis SOP 015<br />
S:\WW\awwword\LABPROC\all QAPPs\LABQAPPs\QAPP Rev5 -0609\SOPs\SOP 015 Phosphate&Nitrate.doc
6 <strong>of</strong> 19<br />
5.2.1 Method Detection Limit<br />
The Method Detection Limit (MDL) is set at 0.45 µg/L PO4-P for the orthophosphate assay and<br />
2.3 µg/L NO3/NO2-N for the nitrate + nitrite assay. The Limit <strong>of</strong> Quantitation or Reporting Limit<br />
(RL) is set at 4.5 µg/L PO4-P for the orthophosphate<br />
assay and 23 µg/L NO3/NO2-N for the<br />
nitrate<br />
+ nitrite assay.<br />
The upper RL or the maximum concentration reported by the orthophosphate assay without<br />
dilution is 200 µg/L PO4-P for ambient and marine samples and 2000 µg/L PO4-P for ISDS<br />
samples. The maximum concentration reported by the nitrate + nitrite assay without dilution is<br />
2000 µg/L NO3/NO2-N for all samples. The upper RL<br />
is based on the maximum standard used<br />
to calibrate the autoanalyzer. Values reported for PO4-P are reported to the nearest whole<br />
number, those reported for NO 3/NO2-N are reported to the nearest 10’s (ie: 126 µg/L NO 3/NO2<br />
N is reported as 130 µg/L NO3/NO2-N and 44.3 µg/L PO4-P is reported as 44 µg/L PO4-P).<br />
Updated MDL and RL values are calculated on an annual basis, check with the Laboratory<br />
Manager for the most up-to-date values.<br />
5.2.2 Method Blanks<br />
Method blanks consist <strong>of</strong> Ultrapure water treated as a sample. A method blank is analyzed after<br />
every 6 samples; this corresponds to 6% <strong>of</strong> the samples analyzed. Method blanks must not be<br />
greater than 2 µg/L PO4-P or 20 µg/L NO3/NO2-N.<br />
Corrective Action<br />
If any method blank is found to be greater than 2 µg/L PO4-P or 20 µg/L NO 3/NO2-N then the<br />
method blank is re-analyzed. If the method blank is still greater than the acceptable value then<br />
the<br />
instrument is re-calibrated and any samples analyzed between the accepted method blank<br />
and the unacceptable method blank are re-analyzed.<br />
5.2.3 Sample<br />
Replication<br />
Sample replication is completed in two ways. The autoanalyzer analyzes two aliquots from<br />
every<br />
sample cup for both PO4 and NO3/NO2. The relative percent deviation (%RPD) between<br />
the values obtained from the same sample cup must not be greater than 15% .<br />
If the samples being analyzed originated from an ISDS project then two aliquots <strong>of</strong> the same<br />
sample are poured into two separate autoanalyzer cups for 100% <strong>of</strong> the samples. The %RPD<br />
for values obtained for the same sample in two separate cups is 20%.<br />
If the samples being analyzed originated from an ambient water or marine site then 10% (1<br />
sample in 10) are analyzed in duplicate cups. The %RPD must not be greater than 20% for<br />
these samples.<br />
%RPD is calculated as follows:<br />
%RPD = Result <strong>of</strong> Replicate 1 (µg/L) – Result <strong>of</strong> Replicate 2 (µg/L) x 100<br />
Average <strong>of</strong> Result <strong>of</strong> Replicate 1 (µg/L) and Result <strong>of</strong> Replicate 2 (µg/L)<br />
Corrective Action<br />
Orthophosphate and Nitrate + Nitrite Analysis SOP 015<br />
S:\WW\awwword\LABPROC\all QAPPs\LABQAPPs\QAPP Rev5 -0609\SOPs\SOP 015 Phosphate&Nitrate.doc
If the %RPD is greater than 15% for an analysis from the same sample cup or greater than 20%<br />
when comparing sample values between duplicates placed in different sample cups then the<br />
sample<br />
is re-analyzed. If the sample replicates are still not within 15%RPD and 20%RPD and<br />
the instrument check<br />
standards are within the acceptable Quality Assurance/Quality Control<br />
guidelines then the deviation is noted on the project data sheet and the run continued.<br />
Instrument standardization is completed<br />
by determining the absorbance <strong>of</strong> a series <strong>of</strong> known<br />
working<br />
standards. The autoanalyzer s<strong>of</strong>tware performs a standard linear regression analysis<br />
<strong>of</strong> the standard concentration versus absorbance and returns a standard<br />
equation for a line (y =<br />
mx + b) and a graph. The autoanalyzer is standardized with a minimum <strong>of</strong> 5 working standards<br />
and a blank (see Section 5.3.1.3 and 5.3.1.5). An acceptable linear regression<br />
for a calibration<br />
sequence will have a coefficient <strong>of</strong> determination (R 2 ) value <strong>of</strong> at least 0.990.<br />
7 <strong>of</strong> 19<br />
5.2.4 Calibration<br />
Corrective Action<br />
2<br />
If the R value returned by the standardization procedure is less than 0.990 due to only 1<br />
2<br />
standard, then the standard may be removed and the calibration accepted. If the R value is<br />
less than 0.990 due to more<br />
than 1 standard, then the autoanalyzer is re-calibrated. No<br />
samples are analyzed until an acceptable R 2 value is recorded. Trouble shooting information is<br />
located in the autoanalyzer manual.<br />
5.2.5 Calibration Check/Laboratory Control <strong>Standard</strong><br />
Environmental Protectio n Agency Water Pollution Pr<strong>of</strong>iciency Test Study<br />
The<br />
laboratory participates in the Environmental Protection Agency Water Pollution Pr<strong>of</strong>iciency<br />
Test Study on a yearly basis. Unknown samples are purchased from an outside vendor and<br />
analyzed for PO4 and NO3+NO2. The results <strong>of</strong> the analysis are compared to the actual value<br />
and a performance evaluation provided. Study results are maintained by the laboratory.<br />
Daily Calibration Check<br />
External standards are purchased from an outside vendor and are analyzed as samples during<br />
each analysis batch at a ratio <strong>of</strong> 2% <strong>of</strong> the samples run (1-2 standards per 90 samples). The<br />
percent difference (%D) must<br />
not be greater than 20% for the external standards. External<br />
standards<br />
are prepared by diluting the purchased high concentration standard with UltraPure<br />
water to a value approximately<br />
at the middle <strong>of</strong> the range <strong>of</strong> the standards being used for<br />
calibration.<br />
Check calibrants consisting <strong>of</strong> the middle standard from the standards used to calibrate the<br />
instrument are run at a ratio <strong>of</strong> 1 check calibrant per 15 samples, or approximately<br />
7% <strong>of</strong> the<br />
samples<br />
analyzed. The %D must not be greater than 20% for the check calibrant.<br />
Percent difference is calculated as follows:<br />
%D = Reported value X 100<br />
Known value<br />
Corrective Action<br />
If the %D is greater than 20% for either an external standard or check calibrant then the<br />
standard is re-analyzed. If the %D is still greater than 20% then the instrument is re-calibrated<br />
Orthophosphate and Nitrate + Nitrite Analysis SOP 015<br />
S:\WW\awwword\LABPROC\all QAPPs\LABQAPPs\QAPP Rev5 -0609\SOPs\SOP 015 Phosphate&Nitrate.doc
and the samples analyzed between the acceptable check calibrant or external standard and the<br />
unacceptable check calibrant or external standard are re-analyzed.<br />
8 <strong>of</strong> 19<br />
5.2.6 Matrix Spikes<br />
Matrix spikes are used to verify that the chemical and physical characteristics<br />
<strong>of</strong> the samples<br />
being<br />
analyzed are not sufficiently different from the standards used in calibration to cause the<br />
analyte <strong>of</strong> interest to respond differently in the sample<br />
when compared to the calibrant.<br />
There are two main ways to prepare matrix spikes. The more commonly<br />
used method is to pour<br />
a water sample into a volumetric flask and add a small amount <strong>of</strong> a highly concentrated<br />
standard. The amount<br />
<strong>of</strong> standard added allows the final solution to be approximately double<br />
the original concentration <strong>of</strong> the sample. The second<br />
method, used by URIWW involves<br />
measuring a known volume <strong>of</strong> water sample into an autoanalyzer cup, adding a known volume<br />
<strong>of</strong> a high calibrant or standard to the cup and calculating<br />
the expected final concentration. In<br />
both cases, using the Astoria-Analyzer<br />
system the spike concentration is calculated and entered<br />
in the CC/QC area. The unspiked sample is run, immediately followed by the spiked sample,<br />
and the autoanalyzer system calculates the spike recovery, which should be between 80 –<br />
120%. Sample spikes are run on 30% <strong>of</strong> samples or one sample in 30.<br />
The percent recovery is calculated as follows:<br />
% recovery = {SR-UR[V3/(V1+V3)]} / [(V1 x C1)/(V3+V1)]<br />
Where:<br />
C1 = concentration <strong>of</strong> spiking solution<br />
V3 = volume<br />
<strong>of</strong> unspiked sample (=1900 ul)<br />
V1 = volume <strong>of</strong> spike solution (=100 ul)<br />
SR = spiked result<br />
UR = unspiked result<br />
The matrix spike procedure utilized by URIWW is based on 1/1992 Astoria Pacific Technical<br />
Bulletin <strong>Appendix</strong> which states that “If higher dilutions <strong>of</strong> the sample matrix by the spike solution<br />
have been demonstrated not to change the matrix significantly,<br />
a rapid procedure <strong>of</strong> spiking<br />
directly<br />
into the sample cup can be used … an appropriate volume and concentration <strong>of</strong> spike<br />
solution is accurately pipetted to into<br />
the cup then mixed and analyzed.” This approach is also<br />
based on personal communication with Allen Clement, Astoria-Pacific International Technical<br />
Support, June 2006.<br />
Corrective Action<br />
If the % recovery for a spiked sample is not between 80 and 120% the sample and associated<br />
sample matrix spike will be re-analyzed. If the value is still not within the acceptable range but<br />
all other spiked samples are within QA/QC limits and calibration checks are also acceptable<br />
then the sample data will be flagged, but no further action will be taken. If more than one spiked<br />
sample is not within acceptable percent recovery then additional samples will be spiked to<br />
determine if the sample matrix is causing interference. Appropriate corrective action will be<br />
determined<br />
in consultation with the laboratory manager.<br />
5.3 Analysis Method<br />
5.3.1 Preparation<br />
Orthophosphate and Nitrate + Nitrite Analysis SOP 015<br />
S:\WW\awwword\LABPROC\all QAPPs\LABQAPPs\QAPP Rev5 -0609\SOPs\SOP 015 Phosphate&Nitrate.doc
At least 2 days before analysis the amount <strong>of</strong> each reagent needed for the analysis should be<br />
checked. Two reagents are needed for the NO3+NO2 analysis: the ammonium chloride buffer<br />
and the color reagent. One reagent is necessary for the PO4 analysis,<br />
this reagent is a mixture<br />
<strong>of</strong><br />
several other reagents: potassium antimonyl tartrate solution, ammonium molybdate solution,<br />
asorbic acid solution and sulfuric acid solution. The asorbic acid solution is only stable for 1<br />
week. If necessary, prepare more reagent using instructions found in the Astoria-Pacific<br />
manual.<br />
Preparation<br />
<strong>of</strong> the primary standard takes two days to complete, therefore check to determine if<br />
it is necessary to prepare new primary standard prior to the expected sample analysis date.<br />
Primary and intermediate standards can be stored for up to 6 months. Working standards<br />
are<br />
replaced after 2 months.<br />
Samples<br />
to be analyzed should be removed from the freezer and placed in the refrigerator to<br />
thaw at least a day before the date <strong>of</strong> expected sample analysis.<br />
This<br />
method utilizes several types <strong>of</strong> water. Ultrapure water refers to highly purified water which<br />
is prepared by further purifying deionized (DI) water using the URIWW Aries-Vaponics system.<br />
SOP 002 – Laboratory<br />
Water provides information regarding the different types <strong>of</strong> laboratory<br />
water<br />
available and the method to obtain water.<br />
Glassware preparation for preparation <strong>of</strong> standards<br />
All glassware utilized for standard preparation must be soapy water washed using nonphosphorus<br />
containing detergent, DI water rinsed, 10% HCl soaked overnight and then soaked<br />
in Ultrapure water overnight.<br />
Never use glassware that<br />
has just come from acid soaking; it must equilibrate in Ultrapure water<br />
first.<br />
All phosphorus glassware should be dedicated to the phosphorus assay and not used for any<br />
other analyses.<br />
9 <strong>of</strong> 19<br />
5.3.1.1 Preparation<br />
<strong>of</strong> Primary Orthophosphate <strong>Standard</strong> (100 ppm)<br />
1. The standards utilized for the PO4 and NO3+NO2 analyses are the same as those used<br />
for SOP 016 – Total Phosphorus and Nitrogen Analysis.<br />
2. Dry approximately 0.75 g <strong>of</strong> potassium phosphate (KH2PO4) in the drying oven (set at<br />
105 °C) for 1 hour. After drying the chemical remove it from the oven and store it in a<br />
desiccator.<br />
a. Formula weight <strong>of</strong> KH2PO4 = 136.1 g / mole<br />
b. There is 1 mole <strong>of</strong> P per 1 mole <strong>of</strong> KH2PO4 for a total phosphorus mass <strong>of</strong><br />
30.97<br />
g P / mole KH2PO4.<br />
3. Check<br />
the calibration <strong>of</strong> the balance using the 1 g weight. Use a balance that weighs to<br />
at least 0.0001 g.<br />
a. The calibration weights are located in the drawer under<br />
the balance. Never<br />
touch<br />
the calibration weights with anything but forceps. The oils on the fingers<br />
may change the weight <strong>of</strong> the standard.<br />
b. Values returned by the balance<br />
should be within 10% <strong>of</strong> the actual calibration<br />
weight value. If a deviation <strong>of</strong> greater than 10% is noted then the balance will<br />
be<br />
Orthophosphate and Nitrate + Nitrite Analysis SOP 015<br />
S:\WW\awwword\LABPROC\all QAPPs\LABQAPPs\QAPP Rev5 -0609\SOPs\SOP 015 Phosphate&Nitrate.doc
10 <strong>of</strong> 19<br />
serviced and re-calibrated. If the balance is found to be outside <strong>of</strong> the<br />
acceptable calibration range then it will not be used in this procedure.<br />
4. The 100<br />
ppm primary PO4 standard is prepared using the following formula:<br />
100 ppm P x formula<br />
weight (KH2PO4) = 0.1 g/L x 136.1 g = 0.4394 g KH2PO4/L<br />
Weight <strong>of</strong> P in KH2PO4<br />
30.97 g<br />
5. Therefore, to prepare 1 L <strong>of</strong> 100 mg/L primary PO4 standard, place 0.4394 g <strong>of</strong> KH2PO4<br />
into a 1 L class A volumetric flask.<br />
a. To prepare varying amounts <strong>of</strong> the primary standard refer<br />
to the table below.<br />
b. Dilute to the final volume using Ultrapure water.<br />
c. Note: This solution is 100 mg PO4-P<br />
per L = 100 µg PO4-P per mL = 100 ppm.<br />
Mass <strong>of</strong> (NH4)2PO4 to be<br />
added to flask<br />
Final Volume<br />
(g) (mL)<br />
0. 4394 1000<br />
0.2127 500<br />
0.1099 250<br />
6. Dilute to volume using Ultrapure water.<br />
7. To preserve the standard add 2 mL <strong>of</strong> chlor<strong>of</strong>orm per L using a glass pipette.<br />
8. Place a piece <strong>of</strong> parafilm over the top <strong>of</strong> the volumetric flask and mix by inverting the<br />
flask at least 30 times.<br />
9. Place a label on the flask indicating the contents <strong>of</strong> the flask, date <strong>of</strong> preparation and the<br />
initials <strong>of</strong> the technician preparing the standard.<br />
10. The primary standard is stable for 6 months after which it should be discarded.<br />
It is<br />
stored in the refrigerator in the volumetric flask it was prepared in.<br />
11. The primary standard must be allowed to sit for 24 hours prior to use.<br />
5.3.1.2 Preparation <strong>of</strong> Intermediate Orthophosphate <strong>Standard</strong> (10 ppm)<br />
1. Using a 100 mL class A volumetric pipette add 100<br />
mL <strong>of</strong> the primary orthophosphate<br />
standard (100 ppm) to a 1 L class A volumetric flask.<br />
a. Do not place the volumetric pipette directly into the bottle containing<br />
the primary<br />
standard, place a little more than 100 mL <strong>of</strong> the primary standard into a small<br />
weigh dish or beaker and pipette from this container.<br />
b. Dispose <strong>of</strong> any unused primary standard by rinsing down the drain.<br />
c. Do not put the unused primary standard back into the primary standard storage<br />
bottle.<br />
2. Use Ultrapure water to fill the volumetric flask to volume. This solution is 10 ppm (µg/mL<br />
or mg/L) or 10,000 ppb PO4-P<br />
Orthophosphate and Nitrate + Nitrite Analysis SOP 015<br />
S:\WW\awwword\LABPROC\all QAPPs\LABQAPPs\QAPP Rev5 -0609\SOPs\SOP 015 Phosphate&Nitrate.doc
3. Place a label on the flask indicating the contents <strong>of</strong> the flask, date <strong>of</strong> preparation and<br />
the<br />
initials <strong>of</strong> the technician preparing the standard.<br />
4. The intermediate standard is stable for<br />
6 months after which it should be discarded. It is<br />
stored in the 4 °C refrigerator in the volumetric flask it was prepared in.<br />
11 <strong>of</strong> 19<br />
5.3.1.3 Preparation <strong>of</strong> Orthophosphate Working <strong>Standard</strong>s<br />
1. Note that working orthophosphate and nitrate/nitrite standards are made together in the<br />
same volumetric flasks, although the procedures are listed separately.<br />
2. Check the calibration <strong>of</strong> the balance using the procedure outlined in Section 5.3.1.1.<br />
3. Calibrate the adjustable pipette. The nominal volume on the pipette is not always<br />
accurate. Adjust the pipette as needed and recheck the calibration with each<br />
change in<br />
pipette delivery volume.<br />
a. Pipettes are calibrated by setting the pipette at the desired volume and pipetting<br />
this amount <strong>of</strong> Ultrapure water onto a weighting dish on a calibrated balance.<br />
b. The density <strong>of</strong> water at room temperature is essentially<br />
1 g/mL, therefore the<br />
weight <strong>of</strong> the delivered volume <strong>of</strong> Ultrapure water in g equals the volume<br />
delivered in mL.<br />
c. If the volume delivered is not the desired volume, adjust the pipette and repeat<br />
the check <strong>of</strong> volume until it is correct.<br />
d. Recheck the pipette with each change in pipette delivery volume.<br />
4. Fill the appropriately sized class A volumetric flasks<br />
to be used to prepare working<br />
standards<br />
part way with Ultrapure water. Use an appropriately sized<br />
and<br />
calibrated<br />
adjustable<br />
pipette to add intermediate stock solution<br />
to the volumetric<br />
f lask, according to<br />
chart below.<br />
5. Bring<br />
the volumetric flask to volume with Ultrapure water.<br />
6. Cover each flask with parafilm and mix by inverting the flask at least 30 times.<br />
7. Allow the standard to<br />
sit at least 1/2 hour before using.<br />
8. Store working standards in the 4 °C refrigerator. Working standards<br />
are replaced every<br />
month.<br />
Preparation <strong>of</strong> Orthophosphate<br />
Working <strong>Standard</strong>s:<br />
Ambient Water<br />
(lakes, ponds,<br />
streams) &<br />
Marine<br />
ISDS<br />
Final Concentration<br />
<strong>of</strong> <strong>Standard</strong><br />
(µg P O4-P/L)<br />
Ambient Water<br />
& Marine<br />
(200 mL<br />
volumetric<br />
flasks)<br />
ISDS Samples<br />
(100 mL<br />
volumetric<br />
flasks)<br />
<strong>Standard</strong>s to prepare:<br />
Volume <strong>of</strong> intermediate orthophospha te standard to<br />
use<br />
(µL)<br />
X X 0 0 0<br />
X 2.5 5 0<br />
X 5 100<br />
X 10 2 00<br />
X 15 3 00<br />
Orthophosphate and Nitrate + Nitrite Analysis SOP 015<br />
S:\WW\awwword\LABPROC\all QAPPs\LABQAPPs\QAPP Rev5 -0609\SOPs\SOP 015 Phosphate&Nitrate.doc
X 20 400<br />
X 25 500<br />
X 50 1000 (1.0 mL)<br />
X 100 2000 (2.0 mL)<br />
X 150 3000 (3.0 mL)<br />
X 200 4000 (4.0 mL)<br />
X 250 2500 (2.5 mL)<br />
X 500 5000 (5.0 mL)<br />
X 1000 10,000 (10.0 mL)<br />
X 1500 15,000 (15.0 mL)<br />
X 2000 20,000 (20.0 mL)<br />
1. The standards utilized for the PO4 and NO3+NO2 analyses are the same as those<br />
used<br />
for SOP 016 – Total Phosphorus and Nitrogen Analysis.<br />
2. Dry the approximate amount <strong>of</strong> primary standard grade potassium nitrate (KNO3)<br />
needed for standard preparation in a drying oven set at 105 °C for 24 hours (refer to the<br />
table in Step 3 below). Once the material has dried stor e it in a desiccator.<br />
3. Using a calibrated balance (see Section 5.3.1.1 for balance calibration procedure) weigh<br />
out the amount <strong>of</strong> KNO3 needed to prepare the desired volume <strong>of</strong> primary nitrate/nitrite<br />
standard. This solution is 100 mg NO3-N per L, 100 µg NO3-N per mL, or<br />
100 ppm.<br />
Weight <strong>of</strong> KNO3 needed for primary NO3 standard based on volume prepared:<br />
12 <strong>of</strong> 19<br />
5.3.1.4 Preparation <strong>of</strong> Primary Nitrate/Nitrite <strong>Standard</strong> (100 ppm)<br />
KNO3<br />
Volume <strong>of</strong> Primary <strong>Standard</strong> Prepared<br />
(g) (mL)<br />
0.7218 1000<br />
0.3609 500<br />
0.1805 250<br />
0. 0722 100<br />
4. Dilute to volume using Ultrapure water.<br />
5. Add 2 mL <strong>of</strong> chlor<strong>of</strong>orm per L <strong>of</strong> standard using a glass pipette.<br />
6. Place a piece <strong>of</strong> parafilm over the top <strong>of</strong> the volumetric flask and mix by inverting the<br />
flask at least<br />
30 times.<br />
7. Place a label on the flask indicating the contents <strong>of</strong> the flask, date <strong>of</strong> preparation and the<br />
initials <strong>of</strong> the technician preparing the standard.<br />
8. The primary standard is stable for 6 months after which it should be discarded. It is<br />
stored in the 4 °C refrigerator in the volumetric flask it was prepared in.<br />
9. The primary standard must be allowed to sit for 24 hours prior to use.<br />
5.3.1.5 Preparation <strong>of</strong> Working Nitrate/Nitrite<br />
<strong>Standard</strong>s<br />
Orthophosphate and Nitrate + Nitrite Analysis SOP 015<br />
S:\WW\awwword\LABPROC\all QAPPs\LABQAPPs\QAPP Rev5 -0609\SOPs\SOP 015 Phosphate&Nitrate.doc
1. The preparation <strong>of</strong> working nitrate/nitrite standards requires no intermediate stock<br />
solution.<br />
2. Note that working orthophosphate and nitrate/nitrite standards are made together in the<br />
same volumetric flasks, although the procedures are listed separately.<br />
3. Calibrate the balance (see Section 5.3.1.1 for balance calibration<br />
procedure)<br />
4.<br />
Calibrate the adjustable pipette (see Section 5.3.1.3).<br />
5. Fill the appropriate sized class A volumetric flasks<br />
to be used to prepare working<br />
standards part way with Ultrapure water. Use an appropriately sized and calibrated<br />
adjustable<br />
pipette to add stock standard each volumetric flask, according<br />
to chart below.<br />
6. Bring volumetric<br />
flasks<br />
to volume with Ultrapure<br />
water.<br />
7. Cover each flask with parafilm and mix by inverting each flask at<br />
least 30<br />
times.<br />
8. Allow the standards to sit at least 1/2 hour before using.<br />
9. Store working standards in the 4 ° C refrigerator in<br />
the volumetric flasks they were<br />
prepared in. Working standards are replaced every month.<br />
Preparation <strong>of</strong> Nitrate/Nitrite Working <strong>Standard</strong>s<br />
Ambient Water<br />
(lakes, ponds,<br />
streams) &<br />
Marine<br />
13 <strong>of</strong> 19<br />
ISDS<br />
Final<br />
Concentration <strong>of</strong><br />
<strong>Standard</strong><br />
(µg NO3-N/L)<br />
Ambient Water &<br />
Marine<br />
(200 mL<br />
volumetric<br />
flasks)<br />
ISDS Samples<br />
(100 mL<br />
volumetric<br />
flasks)<br />
<strong>Standard</strong>s to prepare: Volume <strong>of</strong> nitr ate/nitrite primary<br />
standa rd to use<br />
(µL)<br />
X X 0 0 0<br />
X 25 50<br />
X 50 100<br />
X 75 150<br />
X 100 200<br />
X 200 400<br />
X X 250 500 250<br />
X X 500 1000 (1.0 mL) 500<br />
X X 1000 2000 (2.0 mL) 1000 (1.0 mL)<br />
X X 1500 3000 (3.0 mL) 1500 (1.5 mL)<br />
X X 2000 4000 (4.0 mL) 2000 (2.0 mL)<br />
5.3.2 Procedure – Day <strong>of</strong> Analysis<br />
5.3.2.1 Column Regeneration<br />
The cadmium column used to reduce NO3 to NO2 must be regenerated after every 4<br />
autoanalyzer runs. The method utilized for column regeneration is located in the Astoria-Pacific<br />
manual.<br />
5.3.2.2 Sample Filtration<br />
Samples may arrive in the laboratory as filtered or<br />
unfiltered samples. Unfiltered samples must<br />
be filtered immediately using Millipore AP40 GFF for TCLP filters. After samples are filtered<br />
Orthophosphate and Nitrate + Nitrite Analysis SOP 015<br />
S:\WW\awwword\LABPROC\all QAPPs\LABQAPPs\QAPP Rev5 -0609\SOPs\SOP 015 Phosphate&Nitrate.doc
they must be placed in the freezer until they are analyzed. The procedure for filtering samples<br />
is described below:<br />
1. Locate previously cleaned bottle(s) that will<br />
be used to hold the filtered water. Label the<br />
bottle with the sample location, sample depth, date <strong>of</strong> sample collection and the text<br />
“filtered”.<br />
2. Prepare a filter housing by placing one glass fiber filter, gridded<br />
side down, onto the<br />
metal screen on the bottom <strong>of</strong> the filter assembly.<br />
3. Always use the tweezers to handle filters.<br />
4. Place the black rubber gasket on top <strong>of</strong> the filter, and screw the filter holder back<br />
together.<br />
5. Shake the unfiltered sample bottle well.<br />
6. Use a syringe to draw up approximately 20 mL <strong>of</strong> sample into the syringe. Use this<br />
water to rinse the syringe and then discard the water.<br />
7. Take apart the syringe by pulling the plunger all the way out.<br />
8. Attach the filter holder to the syringe.<br />
9. Mix the sample bottle again and obtain the sample to be filtered by pouring water from<br />
the bottle into the syringe (with the filter holder facing down).<br />
a. Pour approximately 50 mL <strong>of</strong> water from the sample bottle into the syringe.<br />
b. At least 50 mL <strong>of</strong> water must be left in the sample bottle as this remaining water<br />
will be used for other assays.<br />
c. The exact volume filtered is not important unless the filter is to be utilized<br />
for<br />
chlorophyll-a analysis<br />
(see SOP 012 – Chlorophyll-a Analysis, Welschmeyer<br />
Method).<br />
10.<br />
Attach the syringe plunger, and slowly push the water through the filter housing with<br />
even pressure catching the filtered water in the bottle labeled “filtered”.<br />
11. If the filter becomes clogged, remove<br />
the filter and start the procedure over with another<br />
aliquot <strong>of</strong> sample.<br />
12. After filtering<br />
the water take the filter holder <strong>of</strong>f the syringe and unscrew the two halves.<br />
Discard the filter unless it is to be used for chlorophyll-a analysis.<br />
13. Take apart the syringe.<br />
14. Rinse all apparatus with DI water. Place upside down on a paper towel to dry.<br />
Matrix spikes are completed on 30% <strong>of</strong> samples. Use the procedure outlined below to prepare<br />
matrix spikes:<br />
14 <strong>of</strong> 19<br />
5.3.2.3 Matrix Spikes<br />
1. Use a matrix spike solution that is 1000 ppb P and 10,000 ppb N03-N, instructions for<br />
making the solution are below.<br />
2. Check and confirm the calibration <strong>of</strong> the following pipettes and volumes on the Mettler<br />
0.5 mg balance using Ultrapure water:<br />
a. 100 µl (yellow tip Brinkmann)<br />
Orthophosphate and Nitrate + Nitrite Analysis SOP 015<br />
S:\WW\awwword\LABPROC\all QAPPs\LABQAPPs\QAPP Rev5 -0609\SOPs\SOP 015 Phosphate&Nitrate.doc
. 900 µl (black Eppendorf, blue tip)<br />
c. 1000 µl (blue tip Brinkmann)<br />
3. Select a water sample to spike that is known to have detectable results and is not at or<br />
below the limit <strong>of</strong> detection. Ideally it should be at the low end <strong>of</strong> mid-range.<br />
4. First fill a cup with the unspiked sample. Put on sample rack.<br />
5. Next pipette 1900 µl <strong>of</strong> the sample into another 2 ml sample cup.<br />
6. Add 100 µl <strong>of</strong> the mixed (1000 ppb P and 10,000 ppb NO3-N) spike solution to the 1900<br />
µl <strong>of</strong> sample (instructions for making spike solution<br />
are below) This will give you a<br />
solution that is spiked with 50 ppb P and 500<br />
ppb NO3-N. In other words with 100%<br />
recovery your spiked samples will be 50 ppb P and 500 ppb NO3-N higher than the<br />
unspiked sample. (See below for more<br />
details.)<br />
7. Mix using pipette. Put the spiked sample on the rack right after the unspiked sample.<br />
8. (Optional) Set up a replicate spiked cup.<br />
9. To use the autoanalyzer matrix spike automatic calculation, edit your nitrogen method<br />
and then edit your phosphorus method. This doesn’t<br />
have to be repeated each time,<br />
once you have set it up.<br />
a. Go to edit for your nitrogen method<br />
b. Go to Channel Properties, CC/QC tab<br />
c. Enter SPK1 for spike number<br />
d. Enter 500 for spike concentration<br />
10. For phosphorus you have to set up a different spike number (2)<br />
a. Go to edit for your phosphorus method<br />
b. Go to Channel Properties, CC/QC tab<br />
c.<br />
Enter SPK2 for the spike number<br />
d. Enter 50 for the spike concentration<br />
11. The<br />
matrix spike result will be printed on the sample run report, right after the spiked<br />
sample.<br />
12. Calculate results as an alternative to the AP s<strong>of</strong>tware<br />
method.<br />
a. See 06 AMM 1 formula in excel to cut and paste,<br />
membering to use appropriate cells for the calculation.<br />
st tri may 03.xls for the<br />
re<br />
b. Calculation is also below:<br />
% r ecovery = {SR-UR[V3/(V1+V3)]} / [(V1 x C1)/(V3+V1)]<br />
Excel<br />
formula:<br />
= {[ SR(V3+V1)] – (UR x V3)} / (V1 x C1) X100<br />
= 100<br />
x {[SR(2000) – UR(1900)] / [(100)C1]}<br />
Where:<br />
C1 = concentration<br />
<strong>of</strong> spiking solution<br />
V3 = volume <strong>of</strong> unspiked sample (=1900 ul)<br />
V1 = volume <strong>of</strong> spike solution (=100 ul)<br />
SR = spiked result<br />
UR = unspiked result<br />
15 <strong>of</strong> 19<br />
Mixed matrix spike solution for Nitrogen and P<br />
hosphorus<br />
Orthophosphate and Nitrate + Nitrite Analysis SOP 015<br />
S:\WW\awwword\LABPROC\all QAPPs\LABQAPPs\QAPP Rev5 -0609\SOPs\SOP 015 Phosphate&Nitrate.doc
Th ese instruction allow for the creation <strong>of</strong> 100 ml <strong>of</strong> matrix spike solution that is 1,000 ppb P and<br />
10,000<br />
ppb NO3-N<br />
1. Fill a 100 ml volumetric flask about ½ full with Ultrapure water<br />
2. Pipette in 10 ml <strong>of</strong> intermediate P stock solution (it is 10 ppm P)<br />
a. df=10 (100 ml / 10 ml)<br />
b. final P concentration is 10 ppm/10 = 1 ppm, = 1000 ppb P<br />
3. Pipette in 10 ml <strong>of</strong> N stock solution (it is 100 ppm N)<br />
a. df= 10 (100 ml / 10 ml)<br />
b. final N concentration<br />
is 100/10 = 10 ppm, = 10000 ppb N<br />
4. Fill volumetric flask to the line with MQ water, shake repeatedly to mix<br />
16 <strong>of</strong> 19<br />
To spike your water sample (also above)<br />
1. Pipette 1000 µl <strong>of</strong> the water sample into a 2 ml autoanalyzer sample cup<br />
2. Pipette 100 µl <strong>of</strong> the mixed Nitrogen/Phosphorus<br />
spike solution into the water sample in<br />
the sample cup<br />
3. Pipette 900 µl water sample (more <strong>of</strong> the same one) into sample cup<br />
4. Mix by using the pipette used in (3) to withdraw and push back in mixed sample/spike<br />
solution in sample cup. Repeat 3-4 times.<br />
5. Remember to place the matching unspiked sample right before the spiked sample<br />
in the sample tray!<br />
5.3.2.4 Sample Analysis<br />
Detailed instructions regarding operation <strong>of</strong> the Astoria-Pacific automated spectrometer<br />
(autoanalyzer) will not be repeated here. This information is located in the autoanalyzer<br />
operation manuals. A summary <strong>of</strong> the analytical procedure is found below:<br />
1. Allow all filtered samples, standards and blanks to warm to room temperature. This<br />
takes place while the autoanalyzer is being prepared.<br />
2. Obtain reagents needed for the analysis. The PO 4 assay only utilizes one reagent, the<br />
mixed reagent. The mixed reagent must be prepared daily, preparation instructions are<br />
located in the Astoria-Pacific manual. The NO3+NO2 analysis utilizes two reagents:<br />
ammonium chloride buffer and color reagent. All reagents should be allowed to warm<br />
to<br />
room temperature prior<br />
to use.<br />
a. Lab personnel must wear gloves, lab coat and eye protection when handling<br />
reagents. Waste reagents must be collected for later disposal by URI Safety and<br />
Health.<br />
b. Further information regarding reagents is located in the Laboratory MSDS binder.<br />
Further information regarding health and safety is located in SOP 001 – General<br />
Laboratory Safety and SOP 001a – <strong>University</strong> Safety and Waste Handling<br />
Document.<br />
3. A summary <strong>of</strong> Autoanalyzer Operation is provided below:<br />
a. A calibrated volume <strong>of</strong> sample is introduced into the autoanalyzer by the<br />
sampler.<br />
Orthophosphate and Nitrate + Nitrite Analysis SOP 015<br />
S:\WW\awwword\LABPROC\all QAPPs\LABQAPPs\QAPP Rev5 -0609\SOPs\SOP 015 Phosphate&Nitrate.doc
4.<br />
17 <strong>of</strong> 19<br />
b. The sample is delivered to the analytical cartridge by a peristaltic pump. It is<br />
then combined with reagents and air bubbles in a continuously moving stream.<br />
c. As the sample moves through the cartridge it passes through mixing coils and a<br />
heating bath, as specified by test conditions.<br />
d. A color is produced by the specific analyte in the sample, blue for the PO4 assay<br />
and pink for the NO3+NO2 assay. The intensity <strong>of</strong> the color is determined by the<br />
amount <strong>of</strong> analyte present.<br />
e. This colored stream then flows to the photometer where the color intensity is<br />
measured and converted to an electronic signal. The electronic signal is sent to<br />
a computer where the Astoria-Pacific FASPac<br />
II® s<strong>of</strong>tware program processes<br />
the signal to create a standard curve and numerical results for the standards and<br />
samples as well as a real-time recorder tracing <strong>of</strong> peaks.<br />
Each autoanalyzer rack has 90 places for samples, blanks and QC samples. A sample<br />
run can have up to three racks (270 samples).<br />
a. <strong>Standard</strong>s are set up on their own rack. A set <strong>of</strong> standards is run at the<br />
beginning <strong>of</strong> each run. A separate set <strong>of</strong> standards is run at the end, and are<br />
averaged with those<br />
run at the beginning.<br />
b. A check calibrant is run after every 15 samples and a blank is run after every 15<br />
samples to monitor the run (see Section<br />
5.2 for further information).<br />
c. Each sample and standard is recorded on a sample log sheet as they are poured<br />
into analytical sample cups.<br />
d. 1 sample out <strong>of</strong> 10 is analyzed in duplicate for ambient and marine<br />
samples and<br />
every sample is analyzed in duplicate for ISDS samples (two separate analyzer<br />
sample cups).<br />
e. The autoanalyzer is set to analyze each sample cup twice.<br />
f. 1 sample out <strong>of</strong> 30 is a matrix spike.<br />
5. II ®<br />
The autoanalyzer is connected to a personal computer. The Astoria-Pacific FASPac<br />
program analyzes the data reported by the autoanalyzer. The program performs a linear<br />
regression on the standards and determines sample concentrations.<br />
a. A graph <strong>of</strong> concentration verses absorbance <strong>of</strong> standards is displayed and can<br />
be manipulated to remove obvious outliers.<br />
b. The standard curve is rejected if R 2 is less than 0.95 unless this is due to 1<br />
standard in the suite (see Section 5.2 for further information).<br />
c. During the run the real time peak tracing are monitored to check for in-range<br />
heights, proper shapes and any irregularities, so that samples can be reanalyzed,<br />
space permitting during the current run, or saved for re-analysis in a<br />
later run.<br />
d. At the end <strong>of</strong> a run each peak is checked to make sure the marker is in the<br />
proper spot and any irregularities are accounted for (analytical blips, empty<br />
sample<br />
cups, etc). Once each peak in a run has been reviewed, the results <strong>of</strong><br />
the run are exported and saved as Excel files, and printed.<br />
Orthophosphate and Nitrate + Nitrite Analysis SOP 015<br />
S:\WW\awwword\LABPROC\all QAPPs\LABQAPPs\QAPP Rev5 -0609\SOPs\SOP 015 Phosphate&Nitrate.doc
6. After the computer results are printed, they are again compared to the peak tracing.<br />
Particularly take note <strong>of</strong> carryover <strong>of</strong> high to low peaks and correct any keyboarding<br />
errors.<br />
7. QC results are compared to previous results as well as "true values". If the results <strong>of</strong> the<br />
run meet the QA/QC criteria<br />
set forth in this SOP then the results <strong>of</strong> the run are deemed<br />
acceptable.<br />
8. After the printout has been approved, the data are entered into appropriate Excel<br />
spreadsheet files, where they are subsequently re-checked for data entry errors.<br />
9. After the data are approved samples may be disposed <strong>of</strong> in accordance with Section 4.0.<br />
10.<br />
Sample bottles are cleaned<br />
by acid washing following SOP 003 – General Labware<br />
Cleaning Procedure<br />
6.0 CALCULATIONS<br />
Orthophosphate and nitrate/nitrite concentrations are calculated in the Astoria Pacific FASPac II<br />
program from the average <strong>of</strong><br />
standard curves analyzed at the beginning and end <strong>of</strong> the sample<br />
run. Data are reported to the nearest whole number for PO 4–P<br />
and the nearest 10’s for<br />
NO3/NO2-N. Values less than the reporting limit are reported as < (numerical value <strong>of</strong> the) RL<br />
µg/L PO4–P<br />
or µg/L NO3/NO2-N.<br />
If marine samples were analyzed, only the NO3/NO2-N are reported, PO 4–P<br />
values are<br />
discarded as they are inaccurate when run in the manner<br />
described in this SOP (namely, using<br />
UltraPure water as a carrier).<br />
7.0 REFERENCES<br />
APHA, . 19 th<br />
AWWA, WEF. <strong>Standard</strong> Methods for the Examination <strong>of</strong> Water and Wastewater<br />
ed. Washington D.C.: APHA, 1995<br />
Method referenced: Automated Cadmium Reduction (4500-NO3 – F), Automated<br />
Ascorbic Acid Reduction Method (4500-P-F)<br />
Astoria-Pacific Inc. Astoria Analyzer Operations Manual. Clackamas, OR: Astoria-Pacific<br />
2002.<br />
U S. Environmental Protection Agency. EPA Method 365 Series, EPA 600/4-79.<br />
Cincinnati OH:<br />
US EPA Environmental Monitoring and Support Laboratory, rev. March 1983.<br />
8.0 DOCUMENTATION<br />
Data consisting <strong>of</strong> the sample results, peaks and calibration curves are exported from the<br />
computer running the autoanalyzer into Excel data files. The Excel files are then printed and<br />
saved electronically.<br />
18 <strong>of</strong> 19<br />
Orthophosphate and Nitrate + Nitrite Analysis SOP 015<br />
S:\WW\awwword\LABPROC\all QAPPs\LABQAPPs\QAPP Rev5 -0609\SOPs\SOP 015 Phosphate&Nitrate.doc<br />
Inc.
19 <strong>of</strong> 19<br />
Orthophosphate and Nitrate + Nitrite Analysis SOP 015<br />
S:\WW\awwword\LABPROC\all QAPPs\LABQAPPs\QAPP Rev5 -0609\SOPs\SOP 015 Phosphate&Nitrate.doc
USample Log Sheet<br />
SR1 SYNC (High std) SR6 C3= SR11 C8= File/run name: Analyst:<br />
SR2 CO (carryover-blank) SR7 C4= SR12 C9= Method name: Source <strong>of</strong> <strong>Standard</strong>s:<br />
SR3 W (wash) SR8 C5= SR13 C10= Date: Conc. Range <strong>of</strong> <strong>Standard</strong>s:<br />
SR4 C1= SR9 C6= SR14 C11= Analysis <strong>of</strong>/in: %light: ref ______ ch1 _____ ch2 _____<br />
SR5 C2= SR10 C7= SR15 C12= SYNC abs: ch 1 _________ ch2 __________<br />
Check Calibrant # & concentration(CC# _____) = ______ ug/l filename c:\awwexcel\labproc\RFArelated \Astoria Analyzer sample cup log<br />
Pos# Contents & Date DF Pos# Contents & Date DF Pos# Contents & Date DF Pos# Contents & Date DF Pos# Contents & Date DF Pos#<br />
1 16 31 46 61 76<br />
2 17 32 47 62 77<br />
3 18 33 48 63 78<br />
4 19 34 49 64 79<br />
5 20 35 50 65 80<br />
6 21 36 51 66 81<br />
7 22 37 52 67 82<br />
8 23 38 53 68 83<br />
9 24 39 54 69 84<br />
10 25 40 55 70 85<br />
11 26 41 56 71 86<br />
12 27 42 57 72 87<br />
13 28 43 58 73 88<br />
14 29 44 59 74 89<br />
15 30 45 60 75 90<br />
20 <strong>of</strong> 19<br />
Orthophosphate and Nitrate + Nitrite Analysis SOP 015<br />
S:\WW\awwword\LABPROC\all QAPPs\LABQAPPs\QAPP Rev5 -0609\SOPs\SOP 015 Phosphate&Nitrate.doc
<strong>Standard</strong> <strong>Operating</strong> Procedure 016<br />
(Prior number URIWW-SOP-1A)<br />
Total Phosphorus and Nitrogen<br />
Analysis<br />
<strong>University</strong> <strong>of</strong> <strong>Rhode</strong> Island Watershed Watch<br />
TABLE OF CONTENTS<br />
Date:<br />
Revision:<br />
Author:<br />
6/09<br />
4<br />
Linda Green<br />
1.0 PURPOSE AND DESCRIPTION ......................................................................................................................1<br />
2.0 HEALTH AND SAFETY CONSIDERATIONS ..................................................................................................1<br />
2.1 HAZARDS .......................................................................................................................................................1<br />
2.2 TECHNICIAN TRAINING/QUALIFICATIONS ............................................................................................................2<br />
3.0 REQUIRED MATERIALS .................................................................................................................................2<br />
4.0 SAMPLE STORAGE, PRESERVATION AND DISPOSAL ..............................................................................5<br />
5.0 METHOD DESCRIPTION.................................................................................................................................6<br />
5.1 SCHEDULING CONSIDERATIONS ........................................................................................................................6<br />
5.2 QUALITY ASSURANCE/QUALITY CONTROL.........................................................................................................6<br />
5.2.1 Method Detection Limit.............................................................................................................................6<br />
5.2.2 Method (Digestion) Blanks .......................................................................................................................6<br />
5.2.3 Sample Replication ..................................................................................................................................7<br />
5.2.4 Calibration ................................................................................................................................................8<br />
5.2.5 Calibration Check/Laboratory Control <strong>Standard</strong>.......................................................................................8<br />
5.2.5.1 Preparation <strong>of</strong> 100 ppm Glycine Total Nitrogen External <strong>Standard</strong> (ISDS samples only) ................9<br />
5.2.5.2 Use <strong>of</strong> the Glycine <strong>Standard</strong>..........................................................................................................10<br />
5.2.6 Matrix Spikes..........................................................................................................................................10<br />
5.3 ANALYSIS METHOD .......................................................................................................................................11<br />
5.3.1 Preparation – At Least 3 Days Prior to Field Sample Collection ............................................................11<br />
5.3.1.1 Prepare Digestion Vials .................................................................................................................11<br />
5.3.2 Preparation – At least 2 days before field samples collected .................................................................12<br />
5.3.2.1 Preparation <strong>of</strong> Primary Orthophosphate <strong>Standard</strong> (100 ppm) .......................................................13<br />
5.3.2.2 Preparation <strong>of</strong> Intermediate Orthophosphate <strong>Standard</strong> (10 ppm) ..................................................14<br />
5.3.2.3 Preparation <strong>of</strong> Orthophosphate Working <strong>Standard</strong>s ......................................................................14<br />
5.3.2.4 Preparation <strong>of</strong> Primary Nitrate/Nitrite <strong>Standard</strong> (100 ppm) ............................................................15<br />
5.3.2.5 Preparation <strong>of</strong> Working Nitrate/Nitrite <strong>Standard</strong>s...........................................................................16<br />
Preparation <strong>of</strong> Nitrate/Nitrite Working <strong>Standard</strong>s ............................................................................................17<br />
5.3.3 Procedure – Day <strong>of</strong> Sample Collection...................................................................................................17<br />
5.3.3.1 Sample Preparation.......................................................................................................................17<br />
5.3.3.2 Matrix Spikes .................................................................................................................................18<br />
5.3.4 Procedure – Day <strong>of</strong> Sample Digestion ...................................................................................................20<br />
5.3.4.1 Digestion Procedure ......................................................................................................................20<br />
5.3.4.2 Preparation <strong>of</strong> Potassium Persulfate Digesting Reagent...............................................................20<br />
5.3.5 Procedure – Day <strong>of</strong> Analysis ..................................................................................................................21<br />
5.3.5.1 Column Regeneration....................................................................................................................21<br />
5.3.5.2 Sample Analysis ............................................................................................................................21<br />
6.0 CALCULATIONS............................................................................................................................................23<br />
7.0 REFERENCES ...............................................................................................................................................23<br />
8.0 DOCUMENTATION ........................................................................................................................................24<br />
Total Phosphorus and Nitrogen Analysis SOP 016<br />
S:\WW\awwword\LABPROC\all QAPPs\LABQAPPs\QAPP Rev5 -0609\SOPs\SOP 016 TN&TP-MOD4.doc
1 <strong>of</strong> 25<br />
<strong>Standard</strong> <strong>Operating</strong> Procedure 016<br />
(Prior number URIWW-SOP-1A)<br />
Total Phosphorus and Nitrogen<br />
Analysis<br />
<strong>University</strong> <strong>of</strong> <strong>Rhode</strong> Island Watershed Watch<br />
1.0 PURPOSE AND DESCRIPTION<br />
Date:<br />
Revision:<br />
Author:<br />
12/06<br />
3<br />
Linda Green<br />
This method is for the simultaneous analysis <strong>of</strong> total phosphorus and total nitrogen in ambient<br />
(river, pond, lake), marine or Individual Sewage Disposal System (ISDS) samples. This<br />
procedure follows much <strong>of</strong> the procedure outlined in <strong>Standard</strong> <strong>Operating</strong> Procedure (SOP) 015<br />
– Orthophosphate and Nitrate + Nitrite analysis. The main differences are that the procedure is<br />
performed on unfiltered samples and the unfiltered samples are digested prior to analysis. The<br />
digestion step converts all forms <strong>of</strong> nitrogen and phosphorus to nitrate (NO3) and<br />
orthophosphate (PO4), respectively. Once samples have been digested the analysis is that for<br />
NO3+NO2 and PO4 as discussed in SOP 15. Samples are analyzed on an autoanalyzer using<br />
a colorimetric technique to determine PO4 and NO3+NO2 concentration. Results are returned<br />
as µg <strong>of</strong> phosphorus (P) per liter and µg <strong>of</strong> Nitrogen (N) per liter. This method is appropriate for<br />
undiluted samples ranging from less than 4 to 200 µg/L P and less than 40 to 2000 µg/L N as<br />
well as samples diluted to return values in this range.<br />
2.0 HEALTH AND SAFETY CONSIDERATIONS<br />
2.1 Hazards<br />
General laboratory good housekeeping procedures should be practiced as outlined in SOP 001<br />
– General Laboratory Safety.<br />
ISDS samples should be treated as a potential biological hazard. All personnel handling ISDS<br />
samples should wear a laboratory coat, gloves and goggles.<br />
Several chemicals are utilized in this procedure. Note that ammonium hydroxide, chlor<strong>of</strong>orm,<br />
sulfuric acid and phosphoric acid must be used in the hood. Specific hazards <strong>of</strong> each chemical<br />
are listed under the notes section <strong>of</strong> the required materials table (Section 3.0) <strong>of</strong> this SOP.<br />
When using any chemical general safety procedures should be followed and technicians shall<br />
wear goggles, gloves and a laboratory coat.<br />
Further information regarding chemicals utilized in this procedure is found in the laboratory<br />
Material Safety Data Sheet (MSDS) binder found in the laboratory where the chemical <strong>of</strong><br />
interest is stored. General laboratory information regarding safe handling <strong>of</strong> chemicals is<br />
located in SOP 001a – <strong>University</strong> Safety and Waste Handling.<br />
Total Phosphorus and Nitrogen Analysis SOP 016<br />
S:\WW\awwword\LABPROC\all QAPPs\LABQAPPs\QAPP Rev5 -0609\SOPs\SOP 016 TN&TP-MOD4.doc
Waste Reagents<br />
All hazardous waste will be collected in appropriate containers, labeled with a URI hazardous<br />
waste label and held in the laboratory Hazardous Waste Accumulation Area for pickup and<br />
proper disposal by URI Safety and Risk Management.<br />
2.2 Technician Training/Qualifications<br />
General training in laboratory technique and use <strong>of</strong> the Astoria ® -Analyzer Model 303A<br />
Segmented Continuous Flow Autoanalyzer (autoanalyzer) must be completed prior to analyzing<br />
samples using this method. Technician training will be provided by Linda Green, Laboratory<br />
Project Manager – Nutrients. No Technician is allowed to use the autoanalyzer without the<br />
permission <strong>of</strong> Linda Green.<br />
3.0 REQUIRED MATERIALS<br />
Required Material Notes Re-order information<br />
Drying oven Set at 105 C<br />
Water bath<br />
Capable <strong>of</strong> reaching 100 °C<br />
Astoria ® -Analyzer Model 303A<br />
Segmented Continuous Flow<br />
Autoanalyzer (autoanalyzer)<br />
Equipped with a 880 nm filter<br />
and 540 nm filter for analysis <strong>of</strong><br />
orthophosphate and<br />
nitrate/nitrite, respectively.<br />
Personal computer<br />
Refrigerator Capable <strong>of</strong> maintaining 4 °C<br />
Analytical balance Capable <strong>of</strong> weighing to 0.0001 g<br />
Ultrapure water<br />
Desiccator<br />
Heated magnetic stirrer and<br />
stir bars<br />
Pipette dispenser, preferably<br />
electronic<br />
600 - 1000 mL acid-washed<br />
beakers<br />
Cover glass, or Al foil<br />
Squeeze bottle containing<br />
Ultrapure water<br />
10-15 200 mL volumetric<br />
flasks<br />
2-4 500 & 1000 mL class A<br />
volumetric flasks<br />
Vials (for phosphorus<br />
digestion)<br />
Reserved for phosphorus<br />
chemistry use<br />
Description: Borosilicate glass,<br />
Type 1, class B, 45 mL (or 11<br />
drams) capacity, 28 mm O.D. X<br />
108 mm high, thread 24-400<br />
Caps for vial 24 mm I.D, 24-400 thread,<br />
polypropylene<br />
20 mL volumetric pipettes class B accuracy +/- 0.06 mL<br />
Calibrated “to deliver”<br />
2 <strong>of</strong> 25<br />
Fisher Catalog #03-339-5D<br />
144 vials/case<br />
Fisher Catalog #02-923-14B<br />
Nalgene #5150-0240<br />
12 vials/pack<br />
Fisher Catalog #13-650N<br />
1 pipette/pack<br />
Total Phosphorus and Nitrogen Analysis SOP 016<br />
S:\WW\awwword\LABPROC\all QAPPs\LABQAPPs\QAPP Rev5 -0609\SOPs\SOP 016 TN&TP-MOD4.doc
Required Material Notes Re-order information<br />
Blue coated-wire rack 60-72 vial capacity. Rack is Fisher Catalog #01-812-5G<br />
cataloged as a “Whirl-pak Bag NASCO # B1048, with a<br />
Rack”. It is found in the “bag” capacity <strong>of</strong> 12, 710 mL<br />
section <strong>of</strong> the Fisher catalog, not samples (NASCO #B1020)<br />
in the rack section.<br />
Sold singly<br />
White plastic racks 24 vial capacity, this type <strong>of</strong> rack<br />
can be placed into the oven (to<br />
dry vials) and will not float in the<br />
water bath.<br />
Fisher Catalog #14-809D<br />
Repipette low pr<strong>of</strong>ile<br />
This repipette variety can Fisher Catalog #13-687-35<br />
dispenser (for dispensing withstand most reagents, has<br />
digesting reagent)<br />
two openings and has a<br />
capacity for dispensing up to 10<br />
mL.<br />
100-250 mL brown glass Qorpak, with TFE-lined closures Fisher Catalog<br />
bottles<br />
Chemical Reagents for<br />
Processing Samples<br />
240 mL bottles #03-320-8D<br />
24 bottles/case<br />
120 mL bottles #03-320-8C<br />
24 bottles/case<br />
Potassium Persulfate<br />
Strong oxidizer. Contact with Fisher Catalog #P282-500,<br />
(K2S2O8)<br />
other material may cause a fire. 500 g, certified, ACS, low<br />
Causes digestive and<br />
respiratory tract irritation. May<br />
cause allergic respiratory or skin<br />
reaction. May be harmful if<br />
swallowed. May cause severe<br />
eye, skin and respiratory tract<br />
irritation with possible burns.<br />
Used as the sample digesting<br />
reagent.<br />
nitrogen (
Required Material Notes Re-order information<br />
Potassium Nitrate (KNO3) Strong oxidizer. Contact with<br />
other material may cause a fire.<br />
May cause respiratory tract, eye<br />
and skin irritation. May cause<br />
methemoglobinemia. May cause<br />
kidney damage. Hygroscopic<br />
(absorbs moisture from the air).<br />
4 <strong>of</strong> 25<br />
May be harmful if swallowed.<br />
Reagents for Autoanalyzer.<br />
Orthophosphate Analysis<br />
Chlor<strong>of</strong>orm (CHCl3) May cause central nervous<br />
system depression. May cause<br />
cardiac disturbances. May<br />
cause cancer based on animal<br />
studies. This substance has<br />
caused adverse reproductive<br />
and fetal effects in animals. May<br />
be harmful if swallowed. Causes<br />
eye, skin and respiratory tract<br />
Antimony Potassium Tartrate<br />
Trihydrate<br />
(C8H4K2O12Sb2·3H2O)<br />
Ammonium Molybdate<br />
Tetrahydrate<br />
((NH4)6Mo7O24·4H2O)<br />
L-Ascorbic Acid (C6H8O6)<br />
DowFax<br />
Surfactant for P analysis<br />
Sulfuric Acid, concentrated<br />
(H2SO4)<br />
Nitrate/Nitrite Reagents<br />
irritation. Light sensitive.<br />
May cause eye, skin, respiratory<br />
and digestive irritation upon<br />
contact. Harmful if swallowed.<br />
May cause liver, kidney and<br />
heart damage.<br />
May cause eye, skin and<br />
respiratory tract irritation upon<br />
contact. May be harmful if<br />
swallowed.<br />
Light sensitive. Air sensitive.<br />
May cause eye, skin, and<br />
respiratory tract irritation. Strong<br />
reducing agent. Fire and<br />
explosion risk in contact with<br />
oxidizing agents.<br />
May cause eye burns upon<br />
contact.<br />
Will cause burns <strong>of</strong> exposed<br />
skin, eyes, respiratory and<br />
digestive tract.<br />
Ammonium Chloride (NH4Cl) May cause skin, respiratory and<br />
digestive tract irritation. May be<br />
harmful if swallowed. Causes<br />
eye irritation. Hygroscopic<br />
(absorbs moisture from the air).<br />
Fisher Catalog #P383-100,<br />
primary standard<br />
Fisher Catalog<br />
#A 867-500<br />
Fisher Catalog<br />
#A674-500<br />
Fisher Catalog<br />
#A61-100<br />
Available from Astoria-<br />
Pacific<br />
Fisher Catalog<br />
#A300-212<br />
Total Phosphorus and Nitrogen Analysis SOP 016<br />
S:\WW\awwword\LABPROC\all QAPPs\LABQAPPs\QAPP Rev5 -0609\SOPs\SOP 016 TN&TP-MOD4.doc
Required Material Notes Re-order information<br />
Disodium EDTA<br />
(Disodium Ethylenediamine<br />
Tetraacetic Acid Dihydrate)<br />
(C10H14N2Na2O8·2H2O)<br />
Ammonium Hydroxide<br />
(NH4OH)<br />
Cupric Sulfate Pentahydrate<br />
(CuSO4·5H2O)<br />
Sulfanilimide (C6H8N2O2S)<br />
N-1-Napthylethylenediamine<br />
(NED) (N-(1-<br />
Naphthyl)ethylenediamine<br />
dihydrochloride)<br />
(C10H7NHCH2CH2NH2 ·<br />
2HCl)<br />
5 <strong>of</strong> 25<br />
Causes eye, skin and<br />
respiratory tract irritation. May<br />
be harmful if swallowed.<br />
Causes eye, skin, digestive and<br />
respiratory tract burns.<br />
Harmful if swallowed. Causes<br />
digestive and respiratory tract,<br />
eye and skin irritation with<br />
possible burns. Hygroscopic<br />
(absorbs moisture from the air).<br />
Possible sensitizer.<br />
May cause reproductive and<br />
fetal effects. May cause eye,<br />
skin, and respiratory tract<br />
irritation. May be harmful if<br />
swallowed or inhaled.<br />
Will cause eye, skin and<br />
respiratory system irritation.<br />
Sigma Catalog<br />
#c7631<br />
Fisher Catalog<br />
#04525-100<br />
Sigma Catalog<br />
#N-9125<br />
Brij-35% solution surfactant (Available from Alpkem)<br />
Glycine (NH2CH2COOH) May be absorbed through intact<br />
Fisher Catalog #G46-500<br />
skin. May cause respiratory (500 gram bottle- smallest<br />
tract, eye and skin irritation. amount<br />
available).<br />
Phosphoric Acid (H3PO4) Hydroscopic (absorbs moisture<br />
from the air). Will cause burns<br />
<strong>of</strong> exposed skin, eyes,<br />
respiratory and digestive tract.<br />
Spare Equipment<br />
Equipment is maintained by the <strong>University</strong> <strong>of</strong> <strong>Rhode</strong> Island Watershed Watch (URIWW)<br />
Laboratory. Temporary replacement <strong>of</strong> the autoanalyzer may be made through arrangement<br />
with Astoria-Pacific. Other equipment may be obtained through arrangement with other<br />
scientists in the Natural Resources Science department maintaining similar equipment.<br />
4.0 SAMPLE STORAGE, PRESERVATION AND DISPOSAL<br />
Matrix Sample<br />
Container<br />
Preservation Volume Holding Time<br />
Water<br />
125 or 250 mL 4 °C 100 mL<br />
14 days at 4 °C<br />
acid washed<br />
3 months once<br />
brown glass<br />
bottles<br />
pipetted into vials<br />
Disposal<br />
Total Phosphorus and Nitrogen Analysis SOP 016<br />
S:\WW\awwword\LABPROC\all QAPPs\LABQAPPs\QAPP Rev5 -0609\SOPs\SOP 016 TN&TP-MOD4.doc
Field samples and digested samples may be disposed <strong>of</strong> only after final quality assurance<br />
checks are completed and the data found to be acceptable using criteria found in Section 5.2 <strong>of</strong><br />
this SOP. Samples may be disposed <strong>of</strong> by<br />
rinsing down the drain with water. ISDS samples<br />
are considered a potential biological hazard, a laboratory coat, gloves and goggles should be<br />
worn when disposing <strong>of</strong> these samples.<br />
5.0 METHOD DESCRIPTION<br />
5.1 Scheduling Considerations<br />
The amount <strong>of</strong> primary and intermediate standard previously prepared should be checked at<br />
least two days prior to the date <strong>of</strong> expected sample analysis. If necessary, prepare the primary<br />
standards as discussed in Section 5.3.2. Approximately 100<br />
mL <strong>of</strong> the primary standard is<br />
necessary<br />
to prepare the intermediate standard. Approximately 100 mL <strong>of</strong> the intermediate<br />
standard is necessary to prepare the working standards.<br />
The available volume <strong>of</strong> each reagent utilized in this analysis should be assessed. Two<br />
reagents are needed for the NO3/NO2 analysis: the ammonium chloride buffer and the color<br />
reagent. One reagent is necessary for the PO4 analysis, this mixed reagent is prepared daily by<br />
addition <strong>of</strong> several other reagents: potassium antimonyl tartrate solution, ammonium molybdate<br />
solution, asorbic<br />
acid solution and sulfuric acid solution. The asorbic acid solution is only stable<br />
for<br />
1 week. If necessary prepare more reagent using instructions found in the Astoria-Pacific<br />
manual.<br />
Preparation<br />
<strong>of</strong> vials to be used in the digestion <strong>of</strong> samples must occur at least 3 days prior to a<br />
sample event. Direction regarding the preparation <strong>of</strong> the vials is in Section 5.3.1.1 <strong>of</strong> this SOP.<br />
5.2 Quality Assurance/Quality Control<br />
The Method Detection Limit (MDL) is set at 0.3 µg/L P for the total phosphorus assay and 3.2<br />
µg/L N for the total nitrogen assay. The Limit <strong>of</strong> Quantitation or Reporting Limit (RL) is set at 3<br />
µg/L P for the total phosphorus<br />
assay and 30 µg/L N for the total nitrogen assay. Updated MDL<br />
and<br />
RL values are calculated on an annual basis, check with the Laboratory Manager for the<br />
most up-to-date values.<br />
The upper RL or the maximum concentration reported by the total phosphorus assay without<br />
dilution <strong>of</strong> the digested sample is 200 µg/L P for ambient and marine samples and 2000 µg/L P<br />
for ISDS samples. The maximum concentration reported by the total nitrogen assay without<br />
dilution <strong>of</strong> the digested sample is 2000 µg/L N for all samples. The upper RL is based on the<br />
maximum standard used to calibrate the autoanalyzer. Values reported<br />
for total phosphorus are<br />
reported<br />
to the nearest whole number, those reported for total nitrogen are reported to the<br />
nearest 10’s (ie: 46 µg/L N = 50 µg/L N and 13.6<br />
µg/L P = 14 µg/L P)<br />
Method (digestion) blanks consist <strong>of</strong> 20 ml Ultrapure water digested as a sample and then<br />
analyzed as a sample. A minimum <strong>of</strong> four (4) digestion blanks are prepared per sample run. A<br />
method (digestion) blank is analyzed after every 15 samples; this corresponds to 6% <strong>of</strong> the<br />
samples analyzed. Method (digestion) blanks must not be greater than 3 µg/L P and 20 µg/L N.<br />
6 <strong>of</strong> 25<br />
5.2.1 Method Detection Limit<br />
5.2.2 Method (Digestion) Blanks<br />
Total Phosphorus and Nitrogen Analysis SOP 016<br />
S:\WW\awwword\LABPROC\all QAPPs\LABQAPPs\QAPP Rev5 -0609\SOPs\SOP 016 TN&TP-MOD4.doc
Corrective Action<br />
If any method (digestion) blank is found to be greater than 3 µg/L P or 20 µg/L N then this will<br />
be noted on the project data sheet. Since these blanks are digested it is not possible to reprepare<br />
the blanks. If all the digestion blanks are outside <strong>of</strong> accepted quality assurance/quality<br />
control guidelines then the run will be considered contaminated and the data marked<br />
accordingly. If all the digestion blanks are outside <strong>of</strong> acceptable guidelines, but are very close<br />
to one another in value then it is possible to subtract this value from the final sample results,<br />
especially if the “0” standard used in calibration is also elevated. This will be determined by<br />
discussion with Linda Green – Laboratory Manager.<br />
5.2.3 Sample Replication<br />
Sample replication is completed in three ways. The autoanalyzer analyzes two aliquots from<br />
every sample cup for both total phosphorus and total nitrogen. The relative percent deviation<br />
(%RPD) between the values obtained from the same sample cup must not be greater than 15%.<br />
The digested sample is poured into two separate autoanalyzer cups for 10% <strong>of</strong> the samples.<br />
The %RPD for values obtained for the same sample in two separate cups is 20%.<br />
Replicate digestions <strong>of</strong> the same sample are completed on 20% <strong>of</strong> the ambient and marine<br />
samples. The %RPD for value obtained for two separate digestions <strong>of</strong> the same sample is<br />
25%.<br />
Triplicate digestions <strong>of</strong> the same sample are completed on 100% <strong>of</strong> the ISDS samples. The<br />
%RPD for value obtained for two separate digestions <strong>of</strong> the same sample is 25%.<br />
%RPD is calculated as follows:<br />
%RPD = Result <strong>of</strong> Replicate 1 (µg/L) – Result <strong>of</strong> Replicate 2 (µg/L) x 100<br />
Average <strong>of</strong> Result <strong>of</strong> Replicate 1 (µg/L) and Result <strong>of</strong> Replicate 2 (µg/L)<br />
Corrective Action<br />
If the %RPD is greater than 15% for an analysis from the same sample cup or greater than 20%<br />
when comparing sample values between duplicates placed in different sample cups then the<br />
sample is re-analyzed. If the sample replicates are still not within 15%RPD and 20%RPD and<br />
the instrument check standards are within the acceptable Quality Assurance/Quality Control<br />
guidelines then the deviation is noted on the project data sheet and the run continued.<br />
7 <strong>of</strong> 25<br />
Total Phosphorus and Nitrogen Analysis SOP 016<br />
S:\WW\awwword\LABPROC\all QAPPs\LABQAPPs\QAPP Rev5 -0609\SOPs\SOP 016 TN&TP-MOD4.doc
5.2.4 Calibration<br />
Instrument standardization is completed by determining the absorbance <strong>of</strong> a series <strong>of</strong> known<br />
digested working standards. The autoanalyzer s<strong>of</strong>tware performs a standard linear regression<br />
analysis <strong>of</strong> the standard concentration versus absorbance and returns a standard equation for a<br />
line (y = mx + b) and a graph. The autoanalyzer is standardized with a minimum <strong>of</strong> 5 digested<br />
working standards and a blank (see Section 5.3.2.3 and 5.3.2.5). An acceptable linear<br />
regression for a calibration sequence will have a coefficient <strong>of</strong> determination (R 2 ) value <strong>of</strong> at<br />
least 0.990.<br />
Two (2) vials containing each standard are digested as samples if greater than 60 samples are<br />
being prepared for analysis. If less than 60 samples are being prepared then only 1 vial<br />
containing each standard are digested. The vials containing standard are placed randomly<br />
throughout the sample vials during the digestion step. After digestion 1 vial for each standard<br />
concentration is selected to be used as the standard to calibrate the autoanalyzer. Otherwise,<br />
no random selection <strong>of</strong> the standards to be run is necessary, as only one vial per standard was<br />
prepared. Three vials containing 20 mL <strong>of</strong> Ultrapure water digested as samples are prepared<br />
as method blanks or the zero standard (see Section 5.2.2.2). After digestion, 1 vial is selected<br />
as the zero standard the other two vials are used as method blanks and dilution liquid for <strong>of</strong>f<br />
scale samples.<br />
Corrective Action<br />
If the R 2 value returned by the standardization procedure is less than 0.990 due to only 1<br />
standard, then the standard may be removed and the calibration accepted. If the R 2 value is<br />
less than 0.990 due to more than 1 standard, then the autoanalyzer is re-calibrated. No<br />
samples are analyzed until an acceptable R 2 value is recorded. Trouble shooting information is<br />
located in the autoanalyzer manual.<br />
5.2.5 Calibration Check/Laboratory Control <strong>Standard</strong><br />
Environmental Protection Agency Water Pollution Pr<strong>of</strong>iciency Test Study<br />
The laboratory participates in the Environmental Protection Agency Water Pollution Pr<strong>of</strong>iciency<br />
Test Study on a yearly basis. Unknown samples are purchased from an outside vendor and<br />
analyzed for total phosphorus and total nitrogen. URIWW results are sent to the vendor who<br />
provides a comparison to the actual value and a performance evaluation. Study results are<br />
maintained by the laboratory.<br />
Daily Calibration Check<br />
External standards are purchased from Accu<strong>Standard</strong> or another outside vendor and are<br />
digested and analyzed as samples during each analysis batch at a ratio <strong>of</strong> 2 standards per run<br />
(150 vials). The percent difference (%D) must not be greater than 20% for the external<br />
standards.<br />
Check calibrants consisting <strong>of</strong> the middle standard from the digested standards used to<br />
calibrate the instrument are run at a ratio <strong>of</strong> 1 check calibrant per 15 samples, or approximately<br />
6% <strong>of</strong> the samples analyzed. The %D must not be greater than 20% for the check calibrant.<br />
Percent difference is calculated as follows:<br />
%D = Reported value X 100<br />
Known value<br />
8 <strong>of</strong> 25<br />
Total Phosphorus and Nitrogen Analysis SOP 016<br />
S:\WW\awwword\LABPROC\all QAPPs\LABQAPPs\QAPP Rev5 -0609\SOPs\SOP 016 TN&TP-MOD4.doc
Corrective Action<br />
If the %D is greater than 20% for either an external standard or check calibrant then the<br />
standard is re-analyzed. If the %D is still greater than 20% then the instrument is re-calibrated<br />
and the samples analyzed between the acceptable check calibrant or external standard and the<br />
unacceptable check calibrant or external standard are re-analyzed.<br />
External Glycine <strong>Standard</strong><br />
Glycine is used as an external standard for only the total nitrogen analysis <strong>of</strong> ISDS samples.<br />
The glycine standard is prepared at a concentration <strong>of</strong> 100 ppm N, which is much higher than<br />
the typical concentration found in ambient or marine samples. This standard is analyzed to<br />
assess the completeness <strong>of</strong> digestion in the higher N concentration ISDS samples. Generally,<br />
ambient and marine samples have a total nitrogen concentration <strong>of</strong> less than 1 ppm N.<br />
Three (3) vials containing the external standard are prepared per ISDS sample run (see Section<br />
5.2.5.1 for preparation information). The %D must be less than or equal to 10%. Calculation <strong>of</strong><br />
%D is discussed in the section above<br />
Corrective Action<br />
If the %D is greater than 10% for the external glycine standard then the standard is re-analyzed.<br />
If the %D is still greater than 10% then the deviation is noted on the project data sheet. If the<br />
%D for all the external glycine standards analyzed in a run is greater than 20% then the results<br />
<strong>of</strong> the external standards, digestion blanks and samples will be analyzed to determine if it will be<br />
necessary to re-digest samples or reject data due to quality assurance/quality control<br />
deviations. Final determination as to the course <strong>of</strong> action rests with Linda Green – Laboratory<br />
Manager.<br />
5.2.5.1 Preparation <strong>of</strong> 100 ppm Glycine Total Nitrogen External <strong>Standard</strong><br />
(ISDS samples only)<br />
1. The formula weight <strong>of</strong> glycine (NH2CH2COOH) is 75.07 g glycine / mole.<br />
a. Glycine is 18.7% nitrogen.<br />
b. 1 mol glycine / 1 mole N = 75 g (glycine) / 14 g (N) = 5.36<br />
2. To prepare a solution <strong>of</strong> 100 mg/L (ppm) <strong>of</strong> N which is equivalent to 0.1 g N/L use the<br />
following equation:<br />
100 mg/L N = 0.1 g N X 75 g glycine = 0.536 g glycine / L<br />
L 14 g N<br />
Therefore, 0.536 grams <strong>of</strong> glycine per liter <strong>of</strong> solution are needed to prepare a 100 ppm<br />
N solution.<br />
3. Dry approximately 0.75 g <strong>of</strong> glycine in the drying oven set at 105 °C for at least 3 hours.<br />
4. After drying, store the glycine in a desiccator.<br />
5. Rinse a 1 L volumetric flask and fill it partly with Ultrapure water.<br />
9 <strong>of</strong> 25<br />
Total Phosphorus and Nitrogen Analysis SOP 016<br />
S:\WW\awwword\LABPROC\all QAPPs\LABQAPPs\QAPP Rev5 -0609\SOPs\SOP 016 TN&TP-MOD4.doc
6. Check the calibration <strong>of</strong> the balance using the procedure found in Section 5.3.2.1, Step<br />
3.<br />
7. Weigh 0.5360 g <strong>of</strong> glycine on a disposable weighing tray using the analytical balance.<br />
8. Use a squirt bottle to transfer the glycine to the volumetric flask.<br />
9. Dilute to volume with Ultrapure water.<br />
10. Cap the flask and mix thoroughly.<br />
11. Place a label on the flask indicating the contents <strong>of</strong> the flask, date <strong>of</strong> preparation and the<br />
initials <strong>of</strong> the technician preparing the standard.<br />
12. Let the standard sit at least 1/2 hour before using.<br />
13. Store the standard in the refrigerator in the volumetric flask it was prepared in.<br />
14. The standard should be discarded after 3 months.<br />
5.2.5.2 Use <strong>of</strong> the Glycine <strong>Standard</strong><br />
1. Bring the volumetric flask containing the glycine standard to room temperature.<br />
2. Calibrate the adjustable pipette using the procedure outlined in Section 5.3.2.3, Step 3.<br />
The nominal volume on the pipette is not always accurate. Adjust the pipette as needed<br />
and recheck the calibration with each change in pipette delivery volume.<br />
3. Pipette 1 mL <strong>of</strong> the standard into each <strong>of</strong> 3 total nitrogen/total phosphorus vials.<br />
4. Add 19 mL <strong>of</strong> Ultrapure water to each <strong>of</strong> the 3 vials.<br />
5. Add 5 mL <strong>of</strong> digesting reagent to each <strong>of</strong> the 3 vials.<br />
6. Cap each vial and place them randomly in a rack with the other samples to be analyzed.<br />
Analytical Notes:<br />
1. Percent recovery was 95-100% (%D less than or equal to 5%) when the 100 ppm<br />
glycine was less than 3 months old. It declined to 90-95% when the glycine standard<br />
was 3-6 months old.<br />
2. On 12/00 the above procedure was performed using 2 mL glycine and 18 mL water.<br />
Percent recovery was
The percent recovery is calculated as follows:<br />
% recovery = {SR-UR[V3/(V1+V3)]} / [(V1 x C1)/(V3+V1)]<br />
Where:<br />
C1 = concentration <strong>of</strong> spiking solution<br />
V3 = volume <strong>of</strong> unspiked sample (= 19 ml)<br />
V1 = volume <strong>of</strong> spike solution (=1 ml)<br />
SR = spiked result<br />
UR = unspiked result<br />
Corrective Action<br />
If the % recovery for a spiked sample is not between 80 and 120% the sample and associated<br />
sample matrix spike will be re-analyzed. If the value is still not within the acceptable range but<br />
all other spiked samples are within QA/QC limits and calibration checks are also acceptable<br />
then the sample data will be flagged, but no further action will be taken. If more than one spiked<br />
sample is not within acceptable percent recovery then additional samples will be spiked to<br />
determine if the sample matrix is causing interference. Appropriate corrective action will be<br />
determined in consultation with the laboratory manager.<br />
5.3 Analysis Method<br />
5.3.1 Preparation – At Least 3 Days Prior to Field Sample Collection<br />
5.3.1.1 Prepare Digestion Vials<br />
1. Obtain digestion vials<br />
2. Empty contents <strong>of</strong> vials, if they have been previously used.<br />
3. Rinse the vial caps with Ultrapure water 3-5 times. Set caps to dry, inverted on paper<br />
towels.<br />
4. Place previously used vials in a tub <strong>of</strong> (preferably) hot tap water. Use the tub labeled<br />
“label soak only”. The labels <strong>of</strong> the samples are easier to remove after the vials have<br />
soaked.<br />
5. While vials are soaking begin to remove labels from vials.<br />
6. Once sample labels have been removed, place vials in another tub filled with hot tap<br />
water and non-phosphate detergent. Use the tub labeled “soapy soak only”. Do not use<br />
the same tub for label removal and soapy soak. The labels are high in phosphorus and<br />
will contaminate the vials.<br />
7. Scrub out the vials using a brush and the soapy water.<br />
8. Rinse the vials with DI water 3-5 times.<br />
9. Acid wash vials (not caps) by placing vials in a10% hydrochloric acid tub in fume hood in<br />
room 002. Let vials soak overnight.<br />
10. Empty out acid from vials back into tub, rinse 3 times with Ultrapure water inside and<br />
out.<br />
11. Fill vials with Ultrapure water and let sit overnight with the vial caps on.<br />
11 <strong>of</strong> 25<br />
Total Phosphorus and Nitrogen Analysis SOP 016<br />
S:\WW\awwword\LABPROC\all QAPPs\LABQAPPs\QAPP Rev5 -0609\SOPs\SOP 016 TN&TP-MOD4.doc
12. If the vials cannot be pre-digested the next day leave them filled with MQ water, cap and<br />
store, labeled "ready for pre-digestion."<br />
13. Pre-digest vials by adding 5 mL digesting reagent to each vial (Preparation <strong>of</strong> digestion<br />
reagent Section 5.3.4.2). Using the re-pipette labeled "old digesting reagent".<br />
a. Cap the vials tightly.<br />
b. Vials do not have to be pre-digested immediately and can be stored with<br />
digesting reagent in them. Just remember to label them as to their contents.<br />
14. Place capped vials in a rack and in a water bath. If needed add DI water to the water<br />
bath to approximately 1/3 <strong>of</strong> vial height.<br />
15. Put the cover on the water bath. It will not reach 100 °C if the cover is <strong>of</strong>f.<br />
16. Turn on water bath heat at switch and bring to boiling. This takes 45-60 minutes. Boil<br />
for 15 minutes. Turn <strong>of</strong>f the water bath.<br />
17. Let the vials cool to room temperature in the water bath overnight.<br />
18. Remove cooled vials and empty out digesting reagent.<br />
19. Rinse vials and caps 3-5 times with Ultrapure water.<br />
20. Fill the vials completely with Ultrapure water and cap them. Allow vials to sit at least 24<br />
hours prior to use. If vials are not used immediately they are left filled with Ultrapure<br />
water until the day they are to be used and labeled “ready for use”. Vials for clean lakes<br />
samples and for ISDS samples are stored in separate areas <strong>of</strong> room 002.<br />
5.3.2 Preparation – At least 2 days before field samples collected<br />
The amount <strong>of</strong> each reagent needed for the analysis should be checked. Two reagents are<br />
needed for the total nitrogen analysis: the ammonium chloride buffer and the color reagent.<br />
One reagent is necessary for the total phosphorus analysis; this reagent is a mixture <strong>of</strong> several<br />
other reagents: potassium antimonyl tartrate solution, ammonium molybdate solution, asorbic<br />
acid solution and sulfuric acid solution. The asorbic acid solution is only stable for 1 week. If<br />
necessary, prepare more reagent using instructions found in the Astoria-Pacific manual.<br />
Preparation <strong>of</strong> the primary standard takes two days to complete, therefore check to determine if<br />
it is necessary to prepare new primary standard prior to the expected sample analysis date.<br />
Primary and intermediate standards can be stored for up to 6 months. Working standards are<br />
replaced after 2 months.<br />
This method utilizes several types <strong>of</strong> water. Ultrapure water refers to highly purified water which<br />
is prepared by further purifying deionized (DI) water using the Aries-Vaptronics system. SOP<br />
002 – Laboratory Water provides information regarding the different types <strong>of</strong> laboratory water<br />
available and the method to obtain water.<br />
Glassware preparation for preparation <strong>of</strong> standards<br />
All glassware utilized for standard preparation must be soapy water washed using nonphosphorus<br />
containing detergent, DI water rinsed, 10% HCl soaked overnight and then soaked<br />
in Ultrapure water overnight.<br />
Never use glassware that has just come from acid soaking; it must equilibrate in Ultrapure water<br />
first.<br />
12 <strong>of</strong> 25<br />
Total Phosphorus and Nitrogen Analysis SOP 016<br />
S:\WW\awwword\LABPROC\all QAPPs\LABQAPPs\QAPP Rev5 -0609\SOPs\SOP 016 TN&TP-MOD4.doc
All phosphorus glassware should be dedicated to the phosphorus assay and not used for any<br />
other analyses.<br />
13 <strong>of</strong> 25<br />
5.3.2.1 Preparation <strong>of</strong> Primary Orthophosphate <strong>Standard</strong> (100 ppm)<br />
1. The standards utilized for the TN/TP analyses are the same as those used for SOP 015<br />
– Orthophosphate and Nitrate + Nitrite Analysis.<br />
2. Dry approximately 0.75 g <strong>of</strong> potassium phosphate (KH2PO4) in the drying oven (set at<br />
105 °C) for 1 hour. After drying the chemical remove it from the oven and store it in a<br />
desiccator.<br />
a. Formula weight <strong>of</strong> KH2PO4 = 136.1 g / mole<br />
b. There is 1 mole <strong>of</strong> P per 1 mole <strong>of</strong> KH2PO4 for a total phosphorus mass <strong>of</strong> 30.97<br />
g P / mole KH2PO4.<br />
3. Check the calibration <strong>of</strong> the balance using the 1 g weight. Use a balance that weighs to<br />
at least 0.0001 g.<br />
a. The calibration weights are located in the drawer under the balance. Never<br />
touch the calibration weights with anything but forceps. The oils on the fingers<br />
may change the weight <strong>of</strong> the standard.<br />
b. Values returned by the balance should be within 10% <strong>of</strong> the actual calibration<br />
weight value. If a deviation <strong>of</strong> greater than 10% is noted then the balance will be<br />
serviced and re-calibrated. If the balance is found to be outside <strong>of</strong> the<br />
acceptable calibration range then it will not be used in this procedure.<br />
4. The 100 mg/L primary PO4 standard is prepared using the following formula:<br />
100 ppm P x formula weight (KH2PO4) = 0.1 g/L x 136.1 g = 0.4394 g KH2PO4/L<br />
Weight <strong>of</strong> P in KH2PO4 30.97 g<br />
5. Therefore, to prepare 1 L <strong>of</strong> 100 mg/L primary PO4 standard, place 0.4394 g <strong>of</strong> KH2PO4<br />
into a 1 L class A volumetric flask. Or:<br />
a. To prepare varying amounts <strong>of</strong> the primary standard refer to the table below.<br />
b. Dilute to the final volume using Ultrapure water.<br />
c. Note: This solution is 100 mg PO4-P per L = 100 µg PO4-P per mL = 100 ppm.<br />
6. Dilute to volume using Ultrapure water.<br />
Mass <strong>of</strong> (NH4)2PO4 to be<br />
added to flask<br />
Final Volume<br />
(g)<br />
(mL)<br />
0. 4394 1000<br />
0.2127 500<br />
0.1099 250<br />
Total Phosphorus and Nitrogen Analysis SOP 016<br />
S:\WW\awwword\LABPROC\all QAPPs\LABQAPPs\QAPP Rev5 -0609\SOPs\SOP 016 TN&TP-MOD4.doc
7. Add 2 mL <strong>of</strong> chlor<strong>of</strong>orm per L using a glass pipette to preserve the standard.<br />
8. Place a piece <strong>of</strong> parafilm over the top <strong>of</strong> the volumetric flask and mix by inverting the<br />
flask at least 30 times.<br />
9. Place a label on the flask indicating the contents <strong>of</strong> the flask, date <strong>of</strong> preparation and the<br />
initials <strong>of</strong> the technician preparing the standard.<br />
10. The primary standard is stable for 6 months after which it should be discarded. It is<br />
stored in the refrigerator in the volumetric flask it was prepared in.<br />
11. The primary standard must be allowed to sit for 24 hours prior to use.<br />
5.3.2.2 Preparation <strong>of</strong> Intermediate Orthophosphate <strong>Standard</strong> (10 ppm)<br />
1. Using a 100 mL class A volumetric pipette add 100 mL <strong>of</strong> the primary orthophosphate<br />
standard (100 ppm) to a 1 L class A volumetric flask.<br />
a. Do not place the volumetric pipette directly into the bottle containing the primary<br />
standard, place a little more than 100 mL <strong>of</strong> the primary standard into a small<br />
weigh dish or beaker and pipette from this container.<br />
b. Dispose <strong>of</strong> any unused primary standard by rinsing down the drain.<br />
c. Do not put the unused primary standard back into the primary standard storage<br />
bottle.<br />
2. Use Ultrapure water to fill the volumetric flask to volume. This solution is 10 ppm (µg/mL<br />
or mg/L) or 10,000 ppb PO4-P<br />
3. Place a label on the flask indicating the contents <strong>of</strong> the flask, date <strong>of</strong> preparation and the<br />
initials <strong>of</strong> the technician preparing the standard.<br />
4. The intermediate standard is stable for 6 months after which it should be discarded. It is<br />
stored in the 4 °C refrigerator in the volumetric flask it was prepared in.<br />
5.3.2.3 Preparation <strong>of</strong> Orthophosphate Working <strong>Standard</strong>s<br />
1. Note that working orthophosphate and nitrate/nitrite standards are made together in the<br />
same volumetric flasks, although the procedures are listed separately.<br />
2. Check the calibration <strong>of</strong> the balance using the procedure outlined in Section 5.3.2.1.<br />
3. Calibrate the adjustable pipette. The nominal volume on the pipette is not always<br />
accurate. Adjust the pipette as needed and recheck the calibration with each change in<br />
pipette delivery volume.<br />
a. Pipettes are calibrated by setting the pipette at the desired volume and pipetting<br />
this amount <strong>of</strong> Ultrapure water onto a weighting dish on a calibrated balance.<br />
The density <strong>of</strong> water at room temperature is essentially 1 g/mL; therefore the<br />
weight <strong>of</strong> the delivered volume <strong>of</strong> Ultrapure water in g equals the volume<br />
delivered in mL.<br />
b. If the volume delivered is not the desired volume, adjust the pipette and repeat<br />
the check <strong>of</strong> volume until it is correct.<br />
c. Recheck the pipette with each change in pipette delivery volume.<br />
4. Fill the appropriately sized class A volumetric flasks to be used to prepare working<br />
standards part way with Ultrapure water. Use an appropriately sized and calibrated<br />
14 <strong>of</strong> 25<br />
Total Phosphorus and Nitrogen Analysis SOP 016<br />
S:\WW\awwword\LABPROC\all QAPPs\LABQAPPs\QAPP Rev5 -0609\SOPs\SOP 016 TN&TP-MOD4.doc
adjustable pipette to add intermediate stock solution to the volumetric flask, according to<br />
chart on the next page.<br />
5. Bring the volumetric flask to volume with Ultrapure water.<br />
6. Cover each flask with parafilm and mix by inverting the flask at least 30 times.<br />
7. Allow the standard to sit at least a 1/2 hour before using.<br />
8. Store working standards in the 4 °C refrigerator. Working standards are replaced every<br />
month.<br />
Preparation <strong>of</strong> Orthophosphate Working <strong>Standard</strong>s:<br />
Ambient Water<br />
(lakes, ponds,<br />
streams)<br />
ISDS<br />
Final Concentration<br />
<strong>of</strong> <strong>Standard</strong><br />
(µg PO4-P/L)<br />
Ambient Water<br />
(200 mL<br />
volumetric<br />
flasks)<br />
ISDS Samples<br />
(100 mL<br />
volumetric<br />
flasks)<br />
<strong>Standard</strong>s to prepare:<br />
Volume <strong>of</strong> intermediate<br />
orthophosphate standard to use<br />
(µL)<br />
X X 0 0 0<br />
X 5 100<br />
X 10 200<br />
X 15 300<br />
X 20 400<br />
X 25 500<br />
X 50 1000 (1.0 mL)<br />
X 100 2000 (2.0 mL)<br />
X 150 3000 (3.0 mL)<br />
X 200 4000 (4.0 mL)<br />
X 250 2500 (2.5 mL)<br />
X 500 5000 (5.0 mL)<br />
X 1000 10,000 (10.0 mL)<br />
X 1500 15,000 (15.0 mL)<br />
X 2000 20,000 (20.0 mL)<br />
5.3.2.4 Preparation <strong>of</strong> Primary Nitrate/Nitrite <strong>Standard</strong> (100 ppm)<br />
1. The standards utilized for the PO4 and NO3+NO2 analyses are the same as those used<br />
for SOP 016 – Total Phosphorus and Nitrogen Analysis.<br />
2. Dry the approximate amount <strong>of</strong> primary standard grade potassium nitrate (KNO3)<br />
needed for standard preparation in a drying oven set at 105 °C for 24 hours (refer to the<br />
table in Step 3 below). Once the material has dried store it in a desiccator.<br />
3. Using a calibrated balance (see Section 5.3.2.1 for balance calibration procedure) weigh<br />
out the amount <strong>of</strong> KNO3 needed to prepare the desired volume <strong>of</strong> primary nitrate/nitrite<br />
standard. This solution is 100 mg NO3-N per L, 100 µg NO3-N per mL, or 100 ppm.<br />
15 <strong>of</strong> 25<br />
Total Phosphorus and Nitrogen Analysis SOP 016<br />
S:\WW\awwword\LABPROC\all QAPPs\LABQAPPs\QAPP Rev5 -0609\SOPs\SOP 016 TN&TP-MOD4.doc
Weight <strong>of</strong> KNO3 needed for primary NO3 standard based on volume prepared:<br />
KNO3<br />
(g)<br />
Volume <strong>of</strong> Primary<br />
<strong>Standard</strong> Prepared<br />
(mL)<br />
0.7218 1000<br />
0.3609 500<br />
0.1805 250<br />
0. 0722 100<br />
4. Dilute to volume using Ultrapure water.<br />
5. Add 2 mL <strong>of</strong> chlor<strong>of</strong>orm per L <strong>of</strong> standard using a glass pipette.<br />
6. Place a piece <strong>of</strong> parafilm over the top <strong>of</strong> the volumetric flask and mix by inverting the<br />
flask at least 30 times.<br />
7. Place a label on the flask indicating the contents <strong>of</strong> the flask, date <strong>of</strong> preparation and the<br />
initials <strong>of</strong> the technician preparing the standard.<br />
8. The primary standard is stable for 6 months after which it should be discarded. It is<br />
stored in the 4 °C refrigerator in the volumetric flask it was prepared in.<br />
9. The primary standard must be allowed to sit for 24 hours prior to use.<br />
5.3.2.5 Preparation <strong>of</strong> Working Nitrate/Nitrite <strong>Standard</strong>s<br />
1. The preparation <strong>of</strong> working nitrate/nitrite standards requires no intermediate stock<br />
solution.<br />
2. Note that working orthophosphate and nitrate/nitrite standards are made together in the<br />
same volumetric flasks, although the procedures are listed separately.<br />
3. Calibrate the balance (see Section 5.3.2.1 for balance calibration procedure).<br />
4. Calibrate the adjustable pipette (see Section 5.3.2.3).<br />
5. Fill the appropriate sized class A volumetric flasks to be used to prepare working<br />
standards part way with Ultrapure water. Use an appropriately sized and calibrated<br />
adjustable pipette to add stock standard each volumetric flask, according to chart below.<br />
6. Bring volumetric flasks to volume with Ultrapure water.<br />
7. Cover each flask with parafilm and mix by inverting each flask at least 30 times.<br />
8. Allow the standards to sit at least 1/2 hour before using.<br />
9. Store working standards in the 4 °C refrigerator in the volumetric flasks they were<br />
prepared in. Working standards are replaced every month.<br />
16 <strong>of</strong> 25<br />
Total Phosphorus and Nitrogen Analysis SOP 016<br />
S:\WW\awwword\LABPROC\all QAPPs\LABQAPPs\QAPP Rev5 -0609\SOPs\SOP 016 TN&TP-MOD4.doc
Preparation <strong>of</strong> Nitrate/Nitrite Working <strong>Standard</strong>s<br />
Ambient Water<br />
(lakes, ponds,<br />
streams)<br />
ISDS<br />
Final<br />
Concentration <strong>of</strong><br />
<strong>Standard</strong><br />
(µg NO3-N/L)<br />
Ambient Water<br />
(200 mL<br />
volumetric<br />
flasks)<br />
ISDS Samples<br />
(100 mL<br />
volumetric<br />
flasks)<br />
<strong>Standard</strong>s to prepare: Volume <strong>of</strong> intermediate<br />
nitrate/nitrite standard to use (µL)<br />
X X 0 0 0<br />
X 50 100<br />
X 75 150<br />
X 100 200<br />
X 200 400<br />
X X 250 500 250<br />
X X 500 1000 (1.0 mL) 500<br />
X X 1000 2000 (2.0 mL) 1000 (1.0 mL)<br />
X X 1500 3000 (3.0 mL) 1500 (1.5 mL)<br />
X X 2000 4000 (4.0 mL) 2000 (2.0 mL)<br />
5.3.3 Procedure – Day <strong>of</strong> Sample Collection<br />
5.3.3.1 Sample Preparation<br />
1. Prepare the Clean Vials<br />
a. Use vials that have been cleaned and pre-digested as described in Section<br />
5.3.1.1. These vials should have been previously filled with Ultrapure water and<br />
capped.<br />
2. Pour out Ultrapure water and rinse vials and caps 3 times with Ultrapure water. After<br />
rinsing shake out as much excess water as possible.<br />
3. Stand vials upright in rack.<br />
4. Put rack in 105 °C drying oven until vials are dry (about 15-20 minutes). Do not put caps<br />
in the oven. Stack caps face down on a clean paper towel.<br />
5. Prepare labels for samples and standards.<br />
6. Remove samples and standards from refrigerator, bring to room temperature.<br />
7. Just prior to filling vials shake the samples/standards well.<br />
8. Use a pipette to transfer an aliquot <strong>of</strong> the unfiltered sample into a clean and labeled vial.<br />
a. Ambient water sites (rives, lakes, ponds): pipette 20 mL <strong>of</strong> unfiltered sample into<br />
each vial.<br />
i. Prepare a replicate every 10 samples.<br />
b. ISDS sites: Pipette 1.0 mL <strong>of</strong> unfiltered sample and 19.0 mL Ultrapure water into<br />
each vial.<br />
i. ISDS samples are digested in triplicate (3 vials are digested per ISDS<br />
sample)<br />
c. All site: Complete a matrix spike every 30 samples. Instructions are below in<br />
Section 5.3.3.2.<br />
9. Rinse pipette well (with Ultrapure water) between samples or switch tips if using pipette<br />
with disposable tips.<br />
17 <strong>of</strong> 25<br />
Total Phosphorus and Nitrogen Analysis SOP 016<br />
S:\WW\awwword\LABPROC\all QAPPs\LABQAPPs\QAPP Rev5 -0609\SOPs\SOP 016 TN&TP-MOD4.doc
10. Prepare standards by pipetting 20 mL <strong>of</strong> each standard into a clean and labeled vial.<br />
Method blanks and standards should be randomly interspersed among the samples after<br />
the standards and blanks are prepared.<br />
a. If greater than 60 samples are being prepared, prepare 2 vials containing each<br />
standard.<br />
b. If 60 or less samples are being prepared only pipette 1 vial for each standard.<br />
c. Prepare the zero standard/method blank by pipetting 20 mL <strong>of</strong> Ultrapure water<br />
into each <strong>of</strong> 3 vials.<br />
11. Prepare external standards and the glycine standard according to Section 5.2.5.<br />
12. Cap vials.<br />
13. Samples may be stored up to 3 months in the refrigerator until the digesting reagent is<br />
added and the samples digested.<br />
5.3.3.2 Matrix Spikes<br />
Matrix spikes are completed on 30% <strong>of</strong> samples. Use the procedure outlined below to prepare<br />
matrix spikes:<br />
1. Use a matrix spike solution that is 1000 ppb P and 10,000 ppb N03-N, instructions for<br />
making the solution are below.<br />
2. Check and confirm the calibration <strong>of</strong> the following pipettes and volumes on the Mettler<br />
0.5 mg balance using Ultrapure water:<br />
a. 1000 µl (1 mL) (blue tip Brinkmann)<br />
3. Select a water sample to spike that is known to have detectable results and is not at or<br />
below the limit <strong>of</strong> detection. Ideally it should be at the low end <strong>of</strong> mid-range.<br />
4. Pipette 19 mL <strong>of</strong> sample into a clean vial.<br />
5. Add 1 mL <strong>of</strong> the mixed (1000 ppb P and 10,000 ppb NO3-N) spike solution to the 19 mL<br />
<strong>of</strong> sample (instructions for making spike solution are below). This will give you a solution<br />
that is spiked with 50 ppb P and 500 ppb NO3-N. In other words with 100% recovery<br />
your spiked samples will be 50 ppb P and 500 ppb NO3-N higher than the unspiked<br />
sample. (See below for more details.)<br />
6. Cap the vial and mix by inverting the sample vial. Put the spiked sample on the rack<br />
right after the unspiked sample.<br />
7. (Optional) Set up a replicate spiked cup.<br />
8. When you run the spiked sample on the autoanalyzer use the matrix spike automatic<br />
calculation, edit your nitrogen method and then edit your phosphorus method. This<br />
doesn’t have to be repeated each time, once you have set it up.<br />
a. Go to edit for your nitrogen method<br />
b. Go to Channel Properties, CC/QC tab<br />
c. Enter SPK1 for spike number<br />
d. Enter 500 for spike concentration<br />
9. For phosphorus you have to set up a different spike number (2)<br />
a. Go to edit for your phosphorus method<br />
b. Go to Channel Properties, CC/QC tab<br />
18 <strong>of</strong> 25<br />
Total Phosphorus and Nitrogen Analysis SOP 016<br />
S:\WW\awwword\LABPROC\all QAPPs\LABQAPPs\QAPP Rev5 -0609\SOPs\SOP 016 TN&TP-MOD4.doc
c. Enter SPK2 for the spike number<br />
d. Enter 50 for the spike concentration<br />
10. The matrix spike result will be printed on the sample run report, right after the spiked<br />
sample.<br />
11. Calculate results as an alternative to the AP s<strong>of</strong>tware method.<br />
a. See 06 AMM 1 st tri may 03.xls for the formula in excel to cut and paste,<br />
remembering to use appropriate cells for the calculation.<br />
b. Calculation is also below:<br />
% recovery = {SR-UR[V3/(V1+V3)]} / [(V1 x C1)/(V3+V1)]<br />
Excel formula:<br />
= {[SR(V3+V1)] – (UR x V3)} / (V1 x C1) X100<br />
= 100 x {[SR(2000) – UR(1900)] / [(100)C1]}<br />
Where:<br />
C1 = concentration <strong>of</strong> spiking solution<br />
V3 = volume <strong>of</strong> unspiked sample (= 19 mL)<br />
V1 = volume <strong>of</strong> spike solution (=1 mL)<br />
SR = spiked result<br />
UR = unspiked result<br />
Mixed matrix spike solution for Nitrogen and Phosphorus<br />
These instruction allow for the creation <strong>of</strong> 100 ml <strong>of</strong> matrix spike solution that is 1,000 ppb P and<br />
10,000 ppb NO3-N<br />
1. Fill a 100 ml volumetric flask about ½ full with Ultrapure water<br />
2. Pipette in 10 ml <strong>of</strong> intermediate P stock solution (it is 10 ppm P)<br />
a. df=10 (100 ml / 10 ml)<br />
b. final P concentration is 10 ppm/10 = 1 ppm, = 1000 ppb P<br />
3. Pipette in 10 ml <strong>of</strong> N stock solution (it is 100 ppm N)<br />
a. df= 10 (100 ml / 10 ml)<br />
b. final N concentration is 100/10 = 10 ppm, = 10000 ppb N<br />
4. Fill volumetric flask to the line with MQ water, shake repeatedly to mix<br />
To spike your water sample (also above)<br />
1. Pipette 19 mL <strong>of</strong> the unfiltered water sample into a TN/TP sample vial.<br />
2. Pipette 1 mL <strong>of</strong> the mixed Nitrogen/Phosphorus spike solution into the water sample in<br />
the sample vial.<br />
3. Cap the sample vial and mix by inverting the vial.<br />
4. Remember to place the matching unspiked sample right before the spiked sample<br />
in the sample tray!<br />
19 <strong>of</strong> 25<br />
Total Phosphorus and Nitrogen Analysis SOP 016<br />
S:\WW\awwword\LABPROC\all QAPPs\LABQAPPs\QAPP Rev5 -0609\SOPs\SOP 016 TN&TP-MOD4.doc
5.3.4 Procedure – Day <strong>of</strong> Sample Digestion<br />
5.3.4.1 Digestion Procedure<br />
1. Obtain racks <strong>of</strong> standards and samples from the refrigerator.<br />
2. Prepare the digestion solution. The digestion solution is prepared daily as described<br />
below in Section 5.3.4.2.<br />
3. Pump the repipette containing digesting reagent several times to make sure that there<br />
are no air bubbles in the delivery tube.<br />
4. Check calibration to make sure that repipette is dispensing desired volume by<br />
dispensing "one shot" into a tared beaker on a balance: 5 mL = 5 grams. Adjust<br />
repipette if necessary. Remember to check the calibration <strong>of</strong> the balance using the<br />
procedure outlined in Section 5.3.2.1.<br />
5. Remove the caps from the vials and dispense 5.0 mL <strong>of</strong> the digesting reagent into each<br />
vial. 5.0 mL <strong>of</strong> digesting reagent is used for all samples and standards.<br />
6. Cap each vial tightly and shake vigorously. Place in rack.<br />
7. Once the digestion solution has been added to each vial put the rack <strong>of</strong> vials into room<br />
temperature water bath. Add DI water to water bath to approximately a 1/4 inch below<br />
the level <strong>of</strong> liquid in the sample vials.<br />
8. Put the lid on the water bath and switch it on. It will take 45 – 60 minutes to reach<br />
boiling temperature.<br />
9. Boil gently for 15 minutes. The thermometer in the water bath must reach and maintain<br />
a temperature <strong>of</strong> at least 100 °C for 15 minutes; record the temperature on the water<br />
bath temperature log sheet.<br />
10. Turn <strong>of</strong>f water bath and allow the vials to cool to room temperature (overnight) in the<br />
water bath. Keep the cover on the water bath<br />
11. The next day, remove the racks <strong>of</strong> vials from the water bath.<br />
12. Store racks in refrigerator until day <strong>of</strong> analysis. Samples should be analyzed within 48<br />
hours <strong>of</strong> the time <strong>of</strong> digestion. If the samples are being analyzed the same day they are<br />
removed from the water bath do not refrigerate the samples prior to analysis.<br />
5.3.4.2 Preparation <strong>of</strong> Potassium Persulfate Digesting Reagent<br />
1. The potassium persulfate digesting reagent should be made fresh on the day <strong>of</strong> use.<br />
2. Use a beaker with a magnetic stir bar that has been specifically reserved for total<br />
phosphorus digestions. These beakers are stored in a labeled glass cabinet in room<br />
002.<br />
3. Determine the amount <strong>of</strong> potassium persulfate digesting reagent needed. Each sample<br />
requires 5.0 mL digesting reagent.<br />
4. Weigh the dry reagents (potassium persulfate and boric acid) into the beaker referring to<br />
the table below for reagent and volume information.<br />
20 <strong>of</strong> 25<br />
Total Phosphorus and Nitrogen Analysis SOP 016<br />
S:\WW\awwword\LABPROC\all QAPPs\LABQAPPs\QAPP Rev5 -0609\SOPs\SOP 016 TN&TP-MOD4.doc
Digesting Reagent for Total Phosphorus and Total Nitrogen<br />
Final<br />
Volume <strong>of</strong><br />
Potassium<br />
Persulfate<br />
(mL)<br />
Beaker<br />
Size for<br />
Reagent<br />
Preparation<br />
(mL)<br />
Add to beaker<br />
Potassium<br />
Persulfate<br />
(g)<br />
Boric<br />
Acid<br />
(g)<br />
1N NaOH<br />
solution<br />
(mL)<br />
Ultrapure<br />
Water<br />
(mL)<br />
Approximate<br />
number <strong>of</strong><br />
vials reagent<br />
volume will<br />
fill<br />
1000 1000 50 30 350 900 190<br />
500 500 25 15 175 450 90<br />
250 500 12.50 7.50 87.50 200 45<br />
200 500 10 5 70 150 35<br />
5. Add the sodium hydroxide solution.<br />
6. Using Ultrapure water, dilute to the appropriate volume according to the chart above.<br />
7. Cover beaker with aluminum foil.<br />
8. Place beaker onto a heating magnetic stirrer.<br />
9. Stir with low heat until all crystals are dissolved. This takes 5-10 minutes.<br />
10. When crystals are dissolved, pour solution into appropriate sized volumetric flask<br />
specifically reserved for “TP only”.<br />
11. Let digesting reagent cool.<br />
12. Once reagent has cooled add Ultrapure water to the final volume.<br />
13. Transfer to an amber Repipette, labeled "new digesting reagent." Label with current<br />
date.<br />
14. Any digesting reagent in the repipette from a prior digestion can be poured into the "old<br />
TP digest" repipette and used for “pre-digesting” vials.<br />
5.3.5 Procedure – Day <strong>of</strong> Analysis<br />
5.3.5.1 Column Regeneration<br />
The cadmium column used to reduce NO3 to NO2 must be regenerated after every 4<br />
autoanalyzer runs. The method utilized for column regeneration is located in the Astoria-Pacific<br />
manual.<br />
5.3.5.2 Sample Analysis<br />
Detailed instructions regarding operation <strong>of</strong> the Astoria®-Analyzer Model 303A Segmented<br />
Continuous Flow Autoanalyer will not be repeated here. This information is located in the<br />
autoanalyzer operation manuals. A summary <strong>of</strong> the analytical procedure is found below:<br />
1. Allow all digested samples, standards and blanks to warm to room temperature. This<br />
takes place while the autoanalyzer is being prepared.<br />
2. Obtain reagents needed for the analysis. The PO4 assay only utilizes one reagent, the<br />
mixed reagent. The mixed reagent must be prepared daily, preparation instructions are<br />
located in the Astoria-Pacific manual. The NO3+NO2 analysis utilizes two reagents:<br />
21 <strong>of</strong> 25<br />
Total Phosphorus and Nitrogen Analysis SOP 016<br />
S:\WW\awwword\LABPROC\all QAPPs\LABQAPPs\QAPP Rev5 -0609\SOPs\SOP 016 TN&TP-MOD4.doc
ammonium chloride buffer and color reagent. All reagents should be allowed to warm to<br />
room temperature prior to use.<br />
a. Lab personnel must wear gloves, lab coat and eye protection when handling<br />
reagents. Waste reagents must be collected for later disposal by URI Safety and<br />
Health.<br />
b. Further information regarding reagents is located in the Laboratory MSDS binder.<br />
Further information regarding health and safety is located in SOP 001 – General<br />
Laboratory Safety and SOP 001a – <strong>University</strong> Safety and Waste Handling<br />
Document.<br />
3. A summary <strong>of</strong> Autoanalyzer Operation is provided below:<br />
a. A calibrated volume <strong>of</strong> sample is introduced into the autoanalyzer by the<br />
sampler.<br />
b. The sample is delivered to the analytical cartridge by a peristaltic pump. It is<br />
then combined with reagents and air bubbles in a continuously moving stream.<br />
c. As the sample moves through the cartridge it passes through mixing coils and a<br />
heating bath, as specified by test conditions.<br />
d. A color is produced by the specific analyte in the sample, blue for the PO4 assay<br />
and pink for the NO3+NO2 assay. The intensity <strong>of</strong> the color is determined by the<br />
amount <strong>of</strong> analyte present.<br />
e. This colored stream then flows to the photometer where the color intensity is<br />
measured and converted to an electronic signal. The electronic signal is sent to<br />
a computer where the Astoria-Pacific FASPac II® s<strong>of</strong>tware program processes<br />
the signal to create a standard curve and numerical results for the standards and<br />
samples as well as a real-time recorder tracing <strong>of</strong> peaks.<br />
4. Each autoanalyzer rack has 90 places for samples, blanks and QC samples. A sample<br />
run can have up to three racks (270 samples).<br />
a. <strong>Standard</strong>s are set up on their own rack. A set <strong>of</strong> standards is run at the<br />
beginning <strong>of</strong> each run. A separate set <strong>of</strong> standards is run at the end, and are<br />
averaged with those run at the beginning, using standards from a different vial<br />
that those used for the first set <strong>of</strong> standards.<br />
b. See Section 5.2 for information regarding the frequency <strong>of</strong> blanks and standards.<br />
c. Each sample and standard is recorded on a sample log sheet as they are poured<br />
into analytical sample cups.<br />
d. 1 sample out <strong>of</strong> 10 is analyzed in duplicate (two separate analyzer sample cups).<br />
e. The autoanalyzer is set to analyze each sample cup twice.<br />
f. 1 sample out <strong>of</strong> 30 is a matrix spike.<br />
5. The autoanalyzer is connected to a personal computer. The Astoria-Pacific FASPac II ®<br />
program analyzes the data reported by the autoanalyzer. The program performs a linear<br />
regression on the standards and determines sample concentrations.<br />
22 <strong>of</strong> 25<br />
a. A graph <strong>of</strong> concentration verses absorbance <strong>of</strong> standards is displayed and can<br />
be manipulated to remove obvious outliers.<br />
Total Phosphorus and Nitrogen Analysis SOP 016<br />
S:\WW\awwword\LABPROC\all QAPPs\LABQAPPs\QAPP Rev5 -0609\SOPs\SOP 016 TN&TP-MOD4.doc
. The standard curve is rejected if R 2 is less than 0.95 unless this is due to 1<br />
standard in the suite. (see Section 5.2 for further information)<br />
c. During the run the real time peak tracing are monitored to check for in-range<br />
heights, proper shapes and any irregularities, so that samples can be reanalyzed,<br />
space permitting during the current run, or saved for re-analysis in a<br />
later run.<br />
d. At the end <strong>of</strong> a run each peak is checked to make sure the marker is in the<br />
proper spot and any irregularities are accounted for (analytical blips, empty<br />
sample cups, etc). Once each peak in a run has been reviewed, the results <strong>of</strong><br />
the run are exported and saved as Excel files, and printed.<br />
6. After the computer results are printed, they are again compared to the peak tracing.<br />
Particularly take note <strong>of</strong> carryover <strong>of</strong> high to low peaks and correct any keyboarding<br />
errors.<br />
7. QC results are compared to previous results as well as "true values". If the results <strong>of</strong> the<br />
run meet the QA/QC criteria set forth in this SOP then the results <strong>of</strong> the run are deemed<br />
acceptable.<br />
8. After the printout has been approved, the data are entered into appropriate Excel<br />
spreadsheet files, where they are subsequently re-checked for data entry errors.<br />
9. After the data are approved samples may be disposed <strong>of</strong> in accordance with Section 4.0.<br />
10. Sample bottles are cleaned by acid washing following SOP 003 – General Labware<br />
Cleaning Procedure. Digestion vials are cleaned as specified in Section 5.3.1.1 <strong>of</strong> this<br />
SOP.<br />
6.0 CALCULATIONS<br />
Total nitrogen and total phosphorus concentrations are calculated in the Astoria Pacific FASPac<br />
II program from the standard curve analyzed at the beginning and end <strong>of</strong> the sample run. Data<br />
are reported to the nearest 10’s for total nitrogen and the nearest whole number for total<br />
phosphorus. Values less than the reporting limit are reported as
Astoria-Pacific Inc. Astoria Analyzer Operations Manual. PO Box 830, Clackamas, OR. 2002.<br />
Oviatt, C.A. and K.M. Hindle. 1994. Manual <strong>of</strong> Biological and Geochemical Techniques in<br />
Coastal Areas. MERL Series, Report #1, Third Edition. Section 1.6, pp. 88-91, "Total<br />
Dissolved and Total Particulate Nitrogen and Phosphorus." The <strong>University</strong> <strong>of</strong> <strong>Rhode</strong><br />
Island, Kingston, <strong>Rhode</strong> Island.<br />
U S. Environmental Protection Agency. EPA Method 365 Series, EPA 600/4-79, rev. March<br />
1983. Environmental Monitoring and Support Laboratory, Cincinnati, Ohio.<br />
Valderrama, J.C. 1981. The simultaneous analysis <strong>of</strong> total nitrogen and total phosphorus in<br />
natural waters. Marine Chemistry 10:109-122.<br />
8.0 DOCUMENTATION<br />
Data consisting <strong>of</strong> the sample results, peaks and calibration curves are exported from the<br />
computer running the autoanalyzer into Excel data files. The Excel files are then printed and<br />
saved electronically.<br />
24 <strong>of</strong> 25<br />
Total Phosphorus and Nitrogen Analysis SOP 016<br />
S:\WW\awwword\LABPROC\all QAPPs\LABQAPPs\QAPP Rev5 -0609\SOPs\SOP 016 TN&TP-MOD4.doc
Sample Log Sheet<br />
SR1 SYNC (High std) SR6 C3= SR11 C8= File/run name: Analyst:<br />
SR2 CO (carryover-blank) SR7 C4= SR12 C9= Method name: Source <strong>of</strong> <strong>Standard</strong>s:<br />
SR3 W (wash) SR8 C5= SR13 C10= Date: Conc. Range <strong>of</strong> <strong>Standard</strong>s:<br />
SR4 C1= SR9 C6= SR14 C11= Analysis <strong>of</strong>/in: %light: ref ______ ch1 _____ ch2 _____<br />
SR5 C2= SR10 C7= SR15 C12= SYNC abs: ch 1 _________ ch2 __________<br />
Check Calibrant # & concentration(CC# _____) = ______ ug/l filename c:\awwexcel\labproc\RFArelated \Astoria Analyzer sample cup log<br />
Pos# Contents & Date DF Pos# Contents & Date DF Pos# Contents & Date DF Pos# Contents & Date DF Pos# Contents & Date DF Pos#<br />
1 16 31 46 61 76<br />
2 17 32 47 62 77<br />
3 18 33 48 63 78<br />
4 19 34 49 64 79<br />
5 20 35 50 65 80<br />
6 21 36 51 66 81<br />
7 22 37 52 67 82<br />
8 23 38 53 68 83<br />
9 24 39 54 69 84<br />
10 25 40 55 70 85<br />
11 26 41 56 71 86<br />
12 27 42 57 72 87<br />
13 28 43 58 73 88<br />
14 29 44 59 74 89<br />
15 30 45 60 75 90<br />
25 <strong>of</strong> 25<br />
Total Phosphorus and Nitrogen Analysis SOP 016<br />
S:\WW\awwword\LABPROC\all QAPPs\LABQAPPs\QAPP Rev5 -0609\SOPs\SOP 016 TN&TP-MOD4.doc
<strong>Standard</strong> <strong>Operating</strong> Procedure 017<br />
Salinity Analysis<br />
<strong>University</strong> <strong>of</strong> <strong>Rhode</strong> Island Watershed Watch<br />
TABLE OF CONTENTS<br />
Date:<br />
Revision:<br />
Author:<br />
04/05<br />
1<br />
Marie Evans<br />
Esten<br />
1.0 PURPOSE AND DESCRIPTION ......................................................................................................1<br />
2.0 HEALTH AND SAFETY CONSIDERATIONS..................................................................................1<br />
2.1 HAZARDS.........................................................................................................................1<br />
2.2 TECHNICIAN TRAINING/QUALIFICATIONS ...........................................................................1<br />
3.0 REQUIRED MATERIALS .................................................................................................................2<br />
4.0 SAMPLE STORAGE, PRESERVATION AND DISPOSAL .............................................................2<br />
5.0 METHOD DESCRIPTION .................................................................................................................2<br />
5.1 SCHEDULING CONSIDERATIONS........................................................................................2<br />
5.2 QUALITY ASSURANCE/QUALITY CONTROL ........................................................................2<br />
5.2.1 Method Detection Limit .............................................................................................................2<br />
5.2.2 Method Blanks...........................................................................................................................2<br />
5.2.3 Sample Replication ...................................................................................................................3<br />
5.2.4 Sample Comparison..................................................................................................................3<br />
5.2.5 Calibration .................................................................................................................................3<br />
5.3 ANALYSIS METHOD ..........................................................................................................3<br />
6.0 CALCULATIONS..............................................................................................................................4<br />
7.0 REFERENCES..................................................................................................................................4<br />
8.0 DOCUMENTATION ..........................................................................................................................4<br />
<strong>Appendix</strong> A : Instructions for Operation <strong>of</strong> the Refractometer<br />
Salinity Analysis SOP 017<br />
S:\WW\awwword\LABPROC\all QAPPs\LABQAPPs\QAPP Rev5 -0609\SOPs\SOP 017 salinity-MOD.doc
<strong>Standard</strong> <strong>Operating</strong> Procedure 017<br />
Salinity Analysis<br />
<strong>University</strong> <strong>of</strong> <strong>Rhode</strong> Island Watershed Watch<br />
1.0 PURPOSE AND DESCRIPTION<br />
Date:<br />
Revision:<br />
Author:<br />
04/05<br />
1<br />
Marie Evans<br />
Esten<br />
The purpose <strong>of</strong> this method is to determine the salinity <strong>of</strong> marine and estuarine samples. This<br />
method is not appropriate for determining the salt content <strong>of</strong> freshwater samples. Unfiltered<br />
samples are analyzed using a LaMotte Salinity Titration Kit and checked using a refractometer.<br />
This method is appropriate for undiluted samples ranging from 0.4 to 40 ppt.<br />
2.0 HEALTH AND SAFETY CONSIDERATIONS<br />
2.1 Hazards<br />
General laboratory good housekeeping procedures should be practiced as outlined in <strong>Standard</strong><br />
<strong>Operating</strong> Procedure (SOP) 001 – General Laboratory Safety.<br />
Potassium chromate and silver nitrate are utilized in this procedure. Potassium chromate will<br />
cause eye, respiratory tract and skin irritation upon contact. It is a carcinogen and may cause<br />
liver and kidney damage. Silver nitrate may cause eye, skin, digestive and respiratory tract<br />
irritation with possible burns upon exposure. Ingestion may cause methemoglobinemia (lack <strong>of</strong><br />
oxygen in the blood) and kidney damage. Use these chemicals in a well ventilated area<br />
wearing a laboratory coat, gloves and safety goggles. General safe handling practices should<br />
be used when working with all chemicals.<br />
Further information regarding chemicals utilized in this procedure is found in the laboratory<br />
Material Safety Data Sheet (MSDS) binder found in the laboratory where the chemical <strong>of</strong><br />
interest is stored. General laboratory information regarding safe handling <strong>of</strong> chemicals is<br />
located in SOP 001a – <strong>University</strong> Safety and Waste Handling.<br />
Waste Reagents<br />
Titrated samples and waste reagents may be rinsed down the drain with water.<br />
2.2 Technician Training/Qualifications<br />
General training in laboratory technique must be completed prior to analyzing samples using<br />
this method. Technician training will be provided by Linda Green, Laboratory Project Manager –<br />
Nutrients or Elizabeth Herron – Laboratory Project Manager - Microbiology.<br />
1 <strong>of</strong> 5<br />
Salinity Analysis SOP 017<br />
S:\WW\awwword\LABPROC\all QAPPs\LABQAPPs\QAPP Rev5 -0609\SOPs\SOP 017 salinity-MOD.doc
3.0 REQUIRED MATERIALS<br />
Required Material Notes Re-order information<br />
LaMotte Salinity Titration Kit<br />
(Model 7459-01)<br />
A366ATC Hand Held Salinity<br />
Refractometer<br />
Equipment is maintained by the <strong>University</strong> <strong>of</strong> <strong>Rhode</strong> Island Watershed Watch (URIWW)<br />
Laboratory. Several replacement test kits are available in the URIWW Laboratory.<br />
4.0 SAMPLE STORAGE, PRESERVATION AND DISPOSAL<br />
Matrix Sample<br />
Container<br />
Water (Marine 60-125 mL acid<br />
and Estuarine) washed brown<br />
glass bottle<br />
Preservation Volume Holding Time<br />
None 30 mL 1 year<br />
Disposal<br />
Samples may be disposed <strong>of</strong> only after final quality assurance checks are completed and the<br />
data found to be acceptable using criteria found in Section 5.2 <strong>of</strong> this SOP. Samples may be<br />
disposed <strong>of</strong> by rinsing down the drain with water.<br />
5.0 METHOD DESCRIPTION<br />
5.1 Scheduling Considerations<br />
There are no specific scheduling considerations for this method. Enough chemical should be<br />
available to complete the analysis.<br />
5.2 Quality Assurance/Quality Control<br />
5.2.1 Method Detection Limit<br />
The Method Detection Limit (MDL) for this assay is 0.4 ppt salinity. The Limit <strong>of</strong> Quantitation or<br />
Reporting Limit (RL) for this assay is 0.4 ppt salinity. The upper limit <strong>of</strong> reporting is 40 ppt.<br />
Results are reported to the nearest tenth.<br />
5.2.2 Method Blanks<br />
No method blanks are completed in this assay.<br />
2 <strong>of</strong> 5<br />
Salinity Analysis SOP 017<br />
S:\WW\awwword\LABPROC\all QAPPs\LABQAPPs\QAPP Rev5 -0609\SOPs\SOP 017 salinity-MOD.doc
5.2.3 Sample Replication<br />
Sample replication is completed on 100% <strong>of</strong> samples. The difference between the replicates<br />
must be not greater than 2 ppt.<br />
Corrective Action<br />
If the difference between replicates is greater than 2 ppt then a third titration will be completed.<br />
If the sample replicates are still not within 2 ppt then the deviation is noted on the project data<br />
sheet.<br />
5.2.4 Sample Comparison<br />
At least 50% <strong>of</strong> the samples will be analyzed using a A366ATC Hand Held Salinity<br />
Refractometer or a similar unit. The operation instructions for this unit are attached in <strong>Appendix</strong><br />
A. The refractometer unit may measure samples within the range <strong>of</strong> 0 – 100 ppt and is accurate<br />
to 1 ppt. The difference between the average <strong>of</strong> the values obtained using the test kit and the<br />
value obtained from the refractometer must not be greater than 2 ppt.<br />
Corrective Action<br />
If the difference between the salinity value obtained using the LaMotte Test Kit and the<br />
refractometer is greater than 2 ppt then the sample will be re-analyzed using both the test kit<br />
and the refractometer. If the difference is still greater than 2 ppt then the test kit titrant will be<br />
replaced and the sample reanalyzed. If the values are still greater than 2 ppt different then it will<br />
be assumed that the refractometer is in error and it will be repaired.<br />
5.2.5 Calibration<br />
Titrant is obtained from LaMotte, therefore no calibration is completed as the purchased titrant is<br />
<strong>of</strong> a known value.<br />
5.3 Analysis Method<br />
1. Safety goggles and gloves must be worn when completing this analysis. Care must<br />
be taken with this kit as the chemical reagents will permanently stain counter tops,<br />
tables and clothing as well as create long lasting stains on skin. Cover working<br />
surfaces with newspapers and wear gloves and protective clothing when using this<br />
kit.<br />
2. Fill the demineralizer bottle with tap water. It is the big bottle with the brown-black<br />
crystals in it.<br />
3. Recap, making sure that the spout is closed, and shake vigorously for 30 seconds.<br />
4. Fill the titration vial (code 0648) to the 10 mL line with demineralized water.<br />
5. Fill the 1 mL titrator syringe (code 0376) with the water sample. Wipe <strong>of</strong>f the tip <strong>of</strong><br />
the titrator syringe.<br />
6. Dispense 0.5 mL <strong>of</strong> sample water into the titration vial containing the demineralized<br />
water.<br />
7. Add 3 drops <strong>of</strong> the potassium chromate indicator solution (salinity reagent A). Cap<br />
the titration vial and swirl gently to mix. The solution will turn yellow.<br />
8. Fill the 0 - 20 mL titrator syringe (code 0378) with the silver nitrate reagent (salinity<br />
reagent B).<br />
3 <strong>of</strong> 5<br />
Salinity Analysis SOP 017<br />
S:\WW\awwword\LABPROC\all QAPPs\LABQAPPs\QAPP Rev5 -0609\SOPs\SOP 017 salinity-MOD.doc
9. Insert that titrator syringe into the hole in the cap <strong>of</strong> the titration vial.<br />
10. Depress the plunger and add the silver nitrate dropwise. Swirl gently to mix the<br />
reagent with the water sample.<br />
11. The end point <strong>of</strong> the reaction is when the color changes from yellow to cloudy pinkbrown,<br />
sort <strong>of</strong> a grapefruit pink.<br />
12. Read the titrator syringe where the tip <strong>of</strong> the plunger crosses the scale. Record the<br />
result. (Remember that the smallest divisions are 0.4 ppt.).<br />
13. Repeat the test with another aliquot <strong>of</strong> the same sample.<br />
14. Clean-up: Flush all unused reagents in the syringes and the solution in the titration<br />
vial down the drain with plenty <strong>of</strong> water. Take apart the syringes and rinse with tap<br />
water. Invert the syringe barrels to dry. Rinse the titration vial with tap water and<br />
invert to dry.<br />
6.0 CALCULATIONS<br />
Each division on the titrator is equal to 0.4 ppt. Therefore multiply the amount <strong>of</strong> titrant<br />
dispensed by 0.4 ppt to obtain the sample salinity. Data are reported to the nearest 10 th <strong>of</strong> a<br />
unit.<br />
7.0 REFERENCES<br />
LaMotte Test Kit Instructions. www.lamotte.com<br />
8.0 DOCUMENTATION<br />
The results <strong>of</strong> each titration are recorded on the sample data sheet.<br />
4 <strong>of</strong> 5<br />
Salinity Analysis SOP 017<br />
S:\WW\awwword\LABPROC\all QAPPs\LABQAPPs\QAPP Rev5 -0609\SOPs\SOP 017 salinity-MOD.doc
Sample Data Sheet<br />
Analysis Tech's Refractometer Kit Kit<br />
Date Initials Monitoring Location Salinity Salinity Rep 1 Salinity Rep 2<br />
GH-In Pond-mid-depth<br />
5 <strong>of</strong> 5<br />
Green Hill and Ninigret Ponds<br />
SALINITY DATA<br />
November 17, 2004 water collection<br />
Please fill-in your initials, and the appropriate value.<br />
There should be something in each space.<br />
Check sample log sheet to see if monitoring location has been received<br />
GH-In Pond-deep<br />
GH-Indigo Point<br />
GH-Sea Lea<br />
GH-Teal Road<br />
GH-Twin Peninsula<br />
NP-Crawford Dock<br />
NP-Ft Neck Cove<br />
NP-Pond Street<br />
NP-Stumpy Point<br />
NP-Tockwotten Dock<br />
NP-Tom Cod Cove<br />
NP-Vigna's Dock<br />
Salinity Analysis SOP 017<br />
S:\WW\awwword\LABPROC\all QAPPs\LABQAPPs\QAPP Rev5 -0609\SOPs\SOP 017 salinity-MOD.doc
<strong>Appendix</strong> A : Instructions for Operation <strong>of</strong> the Refractometer<br />
Salinity Analysis SOP 017<br />
S:\WW\awwword\LABPROC\all QAPPs\LABQAPPs\QAPP Rev5 -0609\SOPs\SOP 017 salinity-MOD.doc
Salinity Analysis SOP 017<br />
S:\WW\awwword\LABPROC\all QAPPs\LABQAPPs\QAPP Rev5 -0609\SOPs\SOP 017 salinity-MOD.doc
<strong>Standard</strong> <strong>Operating</strong> Procedure 018<br />
Enterococci Analysis Using<br />
Enterolert IDEXX Method<br />
<strong>University</strong> <strong>of</strong> <strong>Rhode</strong> Island Watershed Watch<br />
Date:<br />
Revision:<br />
Author:<br />
08/08<br />
1<br />
Marie Esten<br />
1.0 PURPOSE AND DESCRIPTION .......................................................................................1<br />
2.0 HEALTH AND SAFETY CONSIDERATIONS ...................................................................1<br />
2.1 HAZARDS .........................................................................................................................1<br />
2.2 TECHNICIAN TRAINING/QUALIFICATIONS............................................................................2<br />
3.0 REQUIRED MATERIALS ..................................................................................................2<br />
4.0 SAMPLE STORAGE, PRESERVATION AND DISPOSAL ...............................................3<br />
5.0 METHOD DESCRIPTION ..................................................................................................3<br />
5.1 SCHEDULING CONSIDERATIONS ........................................................................................3<br />
5.2 QUALITY ASSURANCE/QUALITY CONTROL .........................................................................4<br />
5.2.1 Method Detection Limit ...............................................................................................4<br />
5.2.2 Method Blanks ............................................................................................................4<br />
5.2.3 Sample Replication .....................................................................................................4<br />
5.2.4 Calibration and <strong>Standard</strong>s ..........................................................................................4<br />
5.2.4.1 Positive Trays ......................................................................................................4<br />
5.2.4.2 Calibration Check/Laboratory Control <strong>Standard</strong> ..................................................5<br />
6.0<br />
5.2.5 Incubators ...................................................................................................................5<br />
5.2.6 Sterility Check on IDEXX Mixing Bottles.....................................................................5<br />
5.2.7 Sterility Check on Sample Bottles...............................................................................6<br />
5.2.8 Germicidal Unit (UV Box) ............................................................................................6<br />
METHOD DESCRIPTION ..................................................................................................6<br />
7.0 CALCULATIONS...............................................................................................................9<br />
8.0 REFERENCES.................................................................................................................13<br />
Enterolert SOP 018<br />
filename S:\WW\awwword\LABPROC\all QAPPs\LABQAPPs\QAPP Rev5 -0609\SOPs\SOP 018 Enterococci-Enterolert.doc
<strong>Standard</strong> <strong>Operating</strong> Procedure 018<br />
Enterococci Analysis Using<br />
Enterolert IDEXX Method<br />
<strong>University</strong> <strong>of</strong> <strong>Rhode</strong> Island Watershed Watch<br />
1.0 PURPOSE AND DESCRIPTION<br />
Date:<br />
Revision:<br />
Author:<br />
08/08<br />
1<br />
Marie Esten<br />
The purpose <strong>of</strong> this method is to determine the number <strong>of</strong> enterococci bacteria within an<br />
ambient (lakes, ponds and rivers) or marine water sample. Marine samples must be diluted at<br />
least tenfold with sterile Ultrapure water. Samples are collected in sterile bottles, a measured<br />
volume aseptically transferred to a sterile IDEXX vessel, commercially prepared reagents are<br />
added and the solution poured into a Quanti-Tray or Quanti-Tray/2000 and sealed. The Quanti-<br />
Tray or Quanti-Tray/2000 is then incubated for 24 hours. The number <strong>of</strong> Quanti-Tray or Quanti-<br />
Tray/2000 cells that fluoresce under a UV light are used to determine the Most Probable<br />
Number (MPN) <strong>of</strong> bacteria per 100 mL.<br />
This method is applicable to undiluted samples in the range <strong>of</strong>
the laboratory Material Safety Data Sheet (MSDS) binder found in the laboratory where the<br />
chemical <strong>of</strong> interest is stored.<br />
A UV light is utilized in this procedure, keep expose to the UV light to a minimum. Use<br />
protective face shield or goggles and gloves when reading samples. General laboratory<br />
information regarding safe handling <strong>of</strong> chemicals is located in SOP 001a - <strong>University</strong> Safety and<br />
Waste Handling.<br />
2.2 Technician Training/Qualifications<br />
General training in laboratory technique, aseptic technique, and the proper use <strong>of</strong> the UV light<br />
and Quanti-Tray sealer must be completed prior to analyzing samples using this method.<br />
Technician training will be provided by Elizabeth Herron Project Manager – Microbiology<br />
3.0 REQUIRED MATERIALS<br />
Required Material Notes Re-order information<br />
Enterolert Medium Snap packs <strong>of</strong> sterile media<br />
vessels for 100 mL samples.<br />
Stable for 12 months at<br />
Quanti-Tray or Quanti-<br />
Tray/2000<br />
IDEXX Quanti-Tray Sealer<br />
Model 2x<br />
IDEXX Sterile Disposable<br />
Vessels<br />
2-30°C, away from light.<br />
Marked at 100 mL, may have<br />
been resterilized and tested<br />
for sterility by URIWW<br />
IDEXX Cat # WENT020 or<br />
WENT200<br />
IDEXX Cat # WQT100<br />
(Quanti-Tray) or<br />
EQT-2K (Quanti-Tray/2000)<br />
IDEXX Cat # WQTS2X-115<br />
IDEXX Cat # WV120SBST-<br />
200<br />
Quanti-Tray/2000 rubber<br />
insert<br />
IDEXX Cat # WQTSRBR-2K<br />
UV light and viewing box UV light #WL160,<br />
Replacement lamp #WL161<br />
UV cabinet #WCM10<br />
Sterile Ultrapure water 4 L carboy used for Enterolert<br />
dilution<br />
41 °C Incubator Precision Scientific Model<br />
4EG<br />
Paper towels, safety goggles,<br />
lab gloves<br />
Autoclave and maximum<br />
temperature thermometer<br />
UV goggles #WLG<br />
Equipment is maintained by the <strong>University</strong> <strong>of</strong> <strong>Rhode</strong> Island Watershed Watch (URIWW)<br />
Laboratory and the Natural Resources Science department. Temporary replacement <strong>of</strong> large<br />
equipment such as the Quanti-Tray Sealer is available through arrangement with the<br />
manufacturer.<br />
2 <strong>of</strong> 21<br />
Enterolert SOP 018<br />
filename S:\WW\awwword\LABPROC\all QAPPs\LABQAPPs\QAPP Rev5 -0609\SOPs\SOP 018 Enterococci-Enterolert.doc
4.0 SAMPLE STORAGE, PRESERVATION AND DISPOSAL<br />
Matrix Sample Container Preservation Volume Holding<br />
Time<br />
Water Autoclavable 250 mL white plastic bottle Kept at 4 °C in<br />
Sterile Bottles<br />
100 mL 6 Hours<br />
Disposal<br />
Samples are archived for approximately 48 hours. Aqueous samples may only be disposed <strong>of</strong><br />
after final quality assurance checks are completed and the data found to be acceptable using<br />
criteria found in Section 5.2 <strong>of</strong> this SOP. Aqueous samples are considered a potential biological<br />
hazard. Samples may be rinsed down the drain with running water. Personnel will wear gloves,<br />
eye protection and a laboratory coat when disposing <strong>of</strong> samples.<br />
Disposal <strong>of</strong> used Quanti-Trays should be completed in accordance with SOP 006 - Waste<br />
Autoclaving Procedure.<br />
Trays are not archived and may be disposed <strong>of</strong> immediately after counting and recording <strong>of</strong><br />
data.<br />
Cleaning and sterilization <strong>of</strong> sample and IDEXX mixing vessels<br />
Sample bottles are cleaned in accordance with SOP 003 - General Labware Cleaning<br />
Procedure and SOP 005 - Bottle Autoclaving Procedure.<br />
IDEXX mixing vessels are cleaned according to SOP 003 - General Labware Cleaning<br />
Procedure, then sterilized in the UV box for at least 5 minutes, with caps set inside up.<br />
Recapped sterilized mixing vessels are stored in the appropriate containers. Sterilization<br />
processing and sterility confirmation are recorded on datasheets stored in the Room 019<br />
Maintenance notebook and provided in Section 8.0 Documentation, <strong>of</strong> this SOP.<br />
5.0 METHOD DESCRIPTION<br />
5.1 Scheduling Considerations<br />
The information provided below is a basic outline <strong>of</strong> tasks that must be completed prior to the<br />
sampling day. Step-by-step instructions to complete each task are provided under Section 6.0.<br />
At least 2 days prior to analysis, check that enough Enterolert media and sterile IDEXX mixing<br />
bottles are available for the anticipated number <strong>of</strong> samples to be analyzed. An operations<br />
check <strong>of</strong> the UV viewing box should also be completed at this time.<br />
The day before a sampling event (24 hours) data sheets and a final check <strong>of</strong> equipment should<br />
be completed.<br />
3 <strong>of</strong> 21<br />
Enterolert SOP 018<br />
filename S:\WW\awwword\LABPROC\all QAPPs\LABQAPPs\QAPP Rev5 -0609\SOPs\SOP 018 Enterococci-Enterolert.doc
5.2 Quality Assurance/Quality Control<br />
5.2.1 Method Detection Limit<br />
The method detection limit is set by the product manufacturer at < 1 CFU/100 mL.<br />
5.2.2 Method Blanks<br />
Method blanks are determined by treating 100 mL <strong>of</strong> sterile Ultrapure water as a sample.<br />
There will be 2 method blanks per run. The first blank will be prepared at the beginning <strong>of</strong> the<br />
sample run and the second at the end <strong>of</strong> the sample run. The method blank shall be less than 1<br />
colony forming unit (CFU)/100 mL.<br />
Corrective Action<br />
If the method blank is equal or greater than 1 CFU/100 mL then the sample run will be<br />
considered contaminated and the samples reanalyzed. The field samples will be out <strong>of</strong><br />
compliance with holding times if samples need to be reanalyzed. This will be noted on the data<br />
sheet.<br />
5.2.3 Sample Replication<br />
Sample replication is completed on 1 sample in 5; 20% <strong>of</strong> the collected field samples. Sample<br />
replication is completed by taking a second 100 mL (or 10 mL if an estuarine or marine sample)<br />
aliquot <strong>of</strong> the sample and treating it as a regular sample. Analysis results for replicate samples<br />
should be with 20% relative percent deviation (%RPD). %RPD is calculated as follows:<br />
%RPD =Result <strong>of</strong> Replicate 1 (CFU/100 mL) – Result <strong>of</strong> Replicate 2 (CFU/100 mL) x 100<br />
Average <strong>of</strong> Result <strong>of</strong> Replicate 1 (CFU/100 mL) and Result <strong>of</strong> Replicate 2 (CFU/100 mL)<br />
Corrective Action<br />
If the %RPD is greater than 20% then the deviation is noted on the data sheet. The processing<br />
time to determine the sample value is greater than the holding time for the samples. Therefore,<br />
the samples will not be reanalyzed unless contamination is suspected as shown through a non-<br />
compliant method blank or the positive tray indicates that the method was compromised in<br />
another manner.<br />
5.2.4 Calibration and <strong>Standard</strong>s<br />
5.2.4.1 Positive Trays<br />
Calibration is completed in a qualitative way through an assessment <strong>of</strong> false negatives. A<br />
purchased enterococci bacterial sample is used to inoculate a sample <strong>of</strong> Ultrapure water. The<br />
standard is then treated as a sample. These samples are referred to as “positive trays”, 1<br />
positive trays is prepared per sample batch. After incubation these trays must exhibit<br />
fluorescence.<br />
Corrective Action<br />
The inoculated trays (positive trays) must show fluorescence after incubation. If the trays do not<br />
show fluorescence then it is assumed that the run was in error and the batch <strong>of</strong> samples is<br />
4 <strong>of</strong> 21<br />
Enterolert SOP 018<br />
filename S:\WW\awwword\LABPROC\all QAPPs\LABQAPPs\QAPP Rev5 -0609\SOPs\SOP 018 Enterococci-Enterolert.doc
eanalyzed. The field samples will be out <strong>of</strong> compliance with holding times if samples need to<br />
be reanalyzed. This will be noted on the data sheet.<br />
5.2.4.2 Calibration Check/Laboratory Control <strong>Standard</strong><br />
Environmental Protection Agency Water Pollution Pr<strong>of</strong>iciency Test Study<br />
The laboratory participates in the Environmental Protection Agency Water Pollution Pr<strong>of</strong>iciency<br />
Test Study on a yearly basis. Unknown samples are purchased from an outside vendor and<br />
analyzed for enterococci. URIWW results are sent to the vendor who provides a comparison to<br />
the actual value and a performance evaluation. Study results are maintained by the laboratory.<br />
Corrective Action<br />
If study results return values outside acceptable limits then the laboratory will review the<br />
enterococci procedures and purchase another unknown to be analyzed for enterococci. If these<br />
data are also outside acceptable criteria then the laboratory will continue working with<br />
unknowns until the issue is resolved.<br />
5.2.5 Incubators<br />
The temperature <strong>of</strong> the 41 °C incubator is checked on a daily basis, when in use. Initial and<br />
final temperatures for incubations <strong>of</strong> samples are recorded on the project data reporting sheet<br />
(see Section 8.0). The acceptable temperature range for the 41 °C incubator is 41 +/- 0.5 °C.<br />
Corrective Action<br />
The incubator temperature must remain in the range specified above. If the incubator<br />
temperature is found to be outside the acceptable range, contact Elizabeth Herron and adjust<br />
the incubator temperature control. Pr<strong>of</strong>essional maintenance <strong>of</strong> the incubator may be<br />
necessary if adjustment <strong>of</strong> the temperature control does not rectify the problem.<br />
5.2.6 Sterility Check on IDEXX Mixing Bottles<br />
IDEXX mixing bottles must be checked for sterility after cleaning and before being placed with<br />
the general stock <strong>of</strong> sterilized IDEXX mixing bottles. A bottle sterility check will be completed at<br />
a frequency <strong>of</strong> one sample bottle per sterilization run. Sterility checks will be completed by<br />
selecting one sterilized sample bottle at random after cleaning and sterilization <strong>of</strong> a batch <strong>of</strong><br />
bottles has been completed. The IDEXX mixing bottle will then be filled with 100 mL <strong>of</strong><br />
Ultrapure water capped and mixed. Once the water has been mixed it will be treated as a<br />
sample. All data will be recorded on the “Bacterial Sample Log & Worksheet: Bacteria Bottle<br />
Sterilization Confirmation” data sheet (see Section 8.0 Documentation).<br />
Corrective Action<br />
If the IDEXX mixing bottle blank returns a value greater than 0 CFUs then all the IDEXX mixing<br />
bottles sterilized in the run must be re-sterilized and the IDEXX mixing bottle sterility check<br />
completed again after the second sterilization process. No IDEXX mixing bottles will be placed<br />
into the general laboratory stock <strong>of</strong> sterilized mixing bottles until the sterility check returns a<br />
value <strong>of</strong> 0.<br />
5 <strong>of</strong> 21<br />
Enterolert SOP 018<br />
filename S:\WW\awwword\LABPROC\all QAPPs\LABQAPPs\QAPP Rev5 -0609\SOPs\SOP 018 Enterococci-Enterolert.doc
5.2.7 Sterility Check on Sample Bottles<br />
Sample bottles after sterilization must be checked for sterility before being placed with the<br />
general stock <strong>of</strong> sterilized bottles. A bottle sterility check will be completed at a frequency <strong>of</strong><br />
one sample bottle per sterilization run. Sterility checks will be completed by selecting one<br />
sterilized sample bottle at random after the sterilization run has been completed. The sample<br />
bottle will then be filled with Ultrapure water capped and mixed. Once the water has been<br />
mixed it will be filtered and treated as a sample. All data will be recorded on the “Bacterial<br />
Sample Log & Worksheet: Bacteria Bottle Sterilization Confirmation” data sheet (see Section<br />
8.0 Documentation).<br />
Corrective Action<br />
If the bottle blank returns a value greater than 0 CFUs then all the sample bottles sterilized in<br />
the run must be re-sterilized and the bottle sterility check completed again after the second<br />
sterilization process. No sample bottles will be placed into the general laboratory stock <strong>of</strong><br />
sterilized bottles until the sterility check returns a value <strong>of</strong> 0.<br />
5.2.8 Germicidal Unit (UV Box)<br />
The UV light box efficiency will be tested quarterly with a UV light meter. Each lamp will be<br />
tested individually. A lamp will be replaced if it emits less than 70% <strong>of</strong> its initial output. All<br />
efficiency checks will be recorded on the “Quarterly UV Germicidal Tube Record” data sheet<br />
(see Section 8.0 Documentation) and will be available for review.<br />
Corrective Action<br />
If a UV lamp is found to emit less than 70% <strong>of</strong> its initial output then it will be replaced. The date<br />
<strong>of</strong> replacement will be recorded on the efficiency check data sheet.<br />
6.0 METHOD DESCRIPTION<br />
Samples must be collected in sterilized bottles using proper sampling technique. The procedure<br />
for sterilizing sample bottles is located in SOP 005, Bottle Autoclaving Procedure. Samples<br />
should be analyzed immediately.<br />
Prepare at least 1 blank consisting <strong>of</strong> 100 mL <strong>of</strong> sterile Ultrapure water at the beginning and end<br />
<strong>of</strong> the run. The blank should be treated as a sample.<br />
For each sample repeat the following procedure:<br />
1. Obtain a sterile IDEXX mixing vessel.<br />
2. If the sample is from a freshwater source pour 100 mL <strong>of</strong> the sample into the vessel<br />
using the 100 mL mark on the bottle as a guide.<br />
a. If the sample is expected to return a value greater then the maximum acceptable<br />
value then dilution may be necessary, the procedure for diluting a sample is<br />
provided below. Alternatively, the Quanti-Tray/2000 may be utilized to obtain a<br />
greater maximum acceptable value, use previous data as a guide to determine<br />
appropriate measures.<br />
b. Complete a dilution by recording the sample volume on the project data sheet<br />
and use a pipette aide and sterile pipette to transfer the appropriate amount <strong>of</strong><br />
sample to the sterile IDEXX mixing vessel.<br />
6 <strong>of</strong> 21<br />
Enterolert SOP 018<br />
filename S:\WW\awwword\LABPROC\all QAPPs\LABQAPPs\QAPP Rev5 -0609\SOPs\SOP 018 Enterococci-Enterolert.doc
c. Dilute to the 100 mL mark on the IDEXX mixing vessel using sterile Ultrapure<br />
water.<br />
3. If the sample is from a saltwater source then you must dilute the sample before adding<br />
the reagent. The procedure for dilution is outlined below:<br />
a. Shake the sample vigorously (about 25 times in 7 seconds).<br />
b. Using the pipette-aide and a sterile 10 mL pipette, pipette 10 mL <strong>of</strong> sample into<br />
the sterile 100 mL vessel and then dilute to the 100 mL mark using sterile<br />
Ultrapure water.<br />
4. Pour contents <strong>of</strong> one snap pack <strong>of</strong> Enterolert into the 100 mL vessel, cap and with a<br />
vigorous rotation <strong>of</strong> the wrist, mix until the medium is completely dissolved.<br />
5. Record reagent lot number and expiration date on the data sheet.<br />
6. With a permanent marker, record sample identification and volume on the front (plastic<br />
well side) <strong>of</strong> a Quanti-Tray or Quanti-Tray/2000.<br />
7. Pour the sample into a Quanti-Tray or Quanti-Tray/2000 and seal it using the IDEXX<br />
Quanti-Tray Sealer.<br />
a. Instruction on how to use a Quanti-Tray or Quanti-Tray/2000 are attached below.<br />
b. Instructions on how to use the IDEXX Sealer are below:<br />
i. Figure showing IDEXX Sealer (www.idexx.com)<br />
ii. Turn the power switch on and the amber power light should illuminate. If<br />
the sealer is not operating properly contact Elizabeth Herron.<br />
iii. The sealer is warmed-up and ready to use when the green “Ready Light’<br />
comes on. It should take about 10 minutes. The sealer will not operate<br />
until the amber power light and green “Ready Light” are lit.<br />
iv. Put an empty Quanti-Tray or Quanti-Tray/2000 Rubber Insert on the Input<br />
Shelf with the large cutout facing away from the Sealer (as shown the<br />
figure above).<br />
v. Place a Quanti-Tray or Quanti-Tray/2000 filled with sample and reagent<br />
onto the Rubber Insert, making sure that the tray is properly seated in the<br />
Rubber Insert, and each well <strong>of</strong> the tray in its corresponding Rubber<br />
Insert hole.<br />
7 <strong>of</strong> 21<br />
Enterolert SOP 018<br />
filename S:\WW\awwword\LABPROC\all QAPPs\LABQAPPs\QAPP Rev5 -0609\SOPs\SOP 018 Enterococci-Enterolert.doc
vi. Slide the inset and tray into the sealer until the motor grabs the rubber<br />
insert and begins to pull it into the Sealer.<br />
vii. The sealer will then seal the tray and push it partially out <strong>of</strong> the sealer.<br />
The process takes about 15 seconds.<br />
viii. Remove the tray and insert from the Sealer.<br />
ix. Check that the tray sealed properly; sample should be contained in each<br />
cell and not able to flow from cell to cell.<br />
x. You can put the next tray into the sealer once the first tray has been fully<br />
drawn into the sealer.<br />
xi. If there is a problem and the tray goes into the sealer improperly use the<br />
reverse button by pressing and holding it.<br />
xii. Do not reverse the motor once the rubber insert is fully drawn into the<br />
input slot.<br />
xiii. Turn <strong>of</strong>f sealer when not in use.<br />
xiv. Preventative maintenance information for the Sealer is attached in<br />
Section 8.0 <strong>of</strong> this SOP.<br />
8. Record sample and processing information on the appropriate data worksheet.<br />
9. Place the sealed tray into the 41 °C incubator foil side up for 24 hours. With multiple<br />
trays, stack no higher than 15 trays, and ensure that there is adequate airflow around<br />
the trays by not placing any trays on the floor <strong>of</strong> the incubator, or covering any one rack.<br />
The incubator should be set at 41 °C +/- 0.5°C.<br />
10. After 24 hours remove the trays from the incubator and count the number <strong>of</strong> wells that<br />
exhibit fluorescence when placed under a UV light (6 watt, 365 nm). Use the UV viewing<br />
box.<br />
11. The Most Probable Number is determined using the MPN table attached below.<br />
12. Blanks should return a value <strong>of</strong>
7.0 CALCULATIONS<br />
Record the number <strong>of</strong> positive wells onto the sample data sheet. The number <strong>of</strong> positive large<br />
and small cells on the Quanti-Tray/2000 should be recorded in separate columns on the data<br />
sheet. Note that if you are running a sample in a Quanti-Tray, place a “—“ in the column for “#<br />
pos. sm. cells” on the data sheet to indicate that you were using a Quanti-Tray and no small<br />
cells are available. If you are running a sample in a Quanti-Tray/2000 place a “0” in the column<br />
for “# pos. sm. cells” if none are positive, this will indicate that you were running the Quanti-<br />
Tray/2000 instead <strong>of</strong> the Quanti-Tray.<br />
The numbers <strong>of</strong> positive wells as recorded on the sample data sheet are then input into the<br />
IDEXX data tables below to determine the Most Probably Number (MPN). You can use the data<br />
table directly if you did not dilute the sample. If you diluted the sample use the calculation below<br />
to determine the final MPN.<br />
MPN = table value X 100 mL<br />
100 mL volume in mL <strong>of</strong> sample analyzed<br />
Be sure to use the correct data tables; there are different tables for the Quanti-Tray and Quanti-<br />
Tray/2000 samples.<br />
The final sample value should be less than 200 CFU/mL, if the Quanti-Tray has been used in<br />
the analysis and less than 2,419 CFU/mL, if the Quanti-Tray/2000 was used in the analysis. If<br />
the results are higher then acceptable, make a note on the data sheet and reanalyze the<br />
sample. The samples will be outside the holding time <strong>of</strong> 6 hours after the first analysis, be sure<br />
to note this on the data sheet.<br />
9 <strong>of</strong> 21<br />
Enterolert SOP 018<br />
filename S:\WW\awwword\LABPROC\all QAPPs\LABQAPPs\QAPP Rev5 -0609\SOPs\SOP 018 Enterococci-Enterolert.doc
MPN Tables (WWW.IDEXX.COM)<br />
10 <strong>of</strong> 21<br />
Enterolert SOP 018<br />
filename S:\WW\awwword\LABPROC\all QAPPs\LABQAPPs\QAPP Rev5 -0609\SOPs\SOP 018 Enterococci-Enterolert.doc
11 <strong>of</strong> 21<br />
Enterolert SOP 018<br />
filename S:\WW\awwword\LABPROC\all QAPPs\LABQAPPs\QAPP Rev5 -0609\SOPs\SOP 018 Enterococci-Enterolert.doc
12 <strong>of</strong> 21<br />
Enterolert SOP 018<br />
filename S:\WW\awwword\LABPROC\all QAPPs\LABQAPPs\QAPP Rev5 -0609\SOPs\SOP 018 Enterococci-Enterolert.doc
8.0 REFERENCES<br />
APHA, AWWA, WEF. <strong>Standard</strong> Methods for the Examination <strong>of</strong> Water and Wastewater. 19 th ed.<br />
Washington D.C.: APHA, 1995.<br />
Method referenced: Heterotrophic Plate Count (9215).<br />
IDEXX Enterolert web-site: http://www.idexx.com/water/enterolert/index.jsp accessed December<br />
18, 2006.<br />
13 <strong>of</strong> 21<br />
Enterolert SOP 018<br />
filename S:\WW\awwword\LABPROC\all QAPPs\LABQAPPs\QAPP Rev5 -0609\SOPs\SOP 018 Enterococci-Enterolert.doc
8.0 DOCUMENTATION<br />
Sample Data Sheet<br />
Bacterial Sample Log & Worksheet: Fourth Collection (Sept)<br />
Media Batch #<br />
IDEXX Multiple Well Method<br />
Expiration<br />
Sample/Setup Setup Dilution Incubator incubator Count # pos. lg # pos. sm Table<br />
Monitoring Location Date tech (mls) temp. start temp. end tech wells wells Value<br />
Notes:<br />
If you are running a sample in a Quanti-Tray place a “—“ in the column for “# pos. sm. cells” to<br />
indicate that you were using a Quanti-Tray and no small cells are available.<br />
If you are running a sample in a Quanti-Tray/2000 place a “0” in the column for “# pos. sm.<br />
cells” if none are positive, this will indicate that you were running the Quanti-Tray/2000 instead<br />
<strong>of</strong> the Quanti-Tray.<br />
14 <strong>of</strong> 21<br />
Enterolert SOP 018<br />
filename S:\WW\awwword\LABPROC\all QAPPs\LABQAPPs\QAPP Rev5 -0609\SOPs\SOP 018 Enterococci-Enterolert.doc
Sample Bottle Sterility Check<br />
Bacterial Sample Log & Worksheet: Bacteria Bottle Sterilization Confirmation<br />
mTEC Membrane Filtration Method<br />
Analyst - set-up: Analyst - Counts:<br />
Incubator temp. start: Waterbath temp. start:<br />
incubator temp. end: Waterbath temp. end:<br />
Setup Dil. 24 Hr Total fecal<br />
Monitoring Location Date (mls) Count (per 100ml) Comments<br />
Batch #4 100<br />
Batch #5 100<br />
Analyst - set-up:<br />
Enterolert IDEXX Method<br />
Analyst - Counts: Media Batch #:<br />
Incubator temp. start: Incubator temp. end:<br />
Notes: "-" = Quanti-tray used, no small wells<br />
Expiration:<br />
Final count determined by using the correct table<br />
(51 well Quanti-Tray lg wells only, Quanti-Tray / 2000 with small wells)<br />
Setup Dil. # lg pos. # sm pos. Table<br />
Enterococci Date (mls) wells wells Value<br />
Batch #4 100 -<br />
Batch #5 100 -<br />
IDEXX Blank 100 -<br />
URIWW Sterilized 100 -<br />
15 <strong>of</strong> 21<br />
Enterolert SOP 018<br />
filename S:\WW\awwword\LABPROC\all QAPPs\LABQAPPs\QAPP Rev5 -0609\SOPs\SOP 018 Enterococci-Enterolert.doc
IDEXX Bottle Sterilization Check Record<br />
Date <strong>of</strong> UV<br />
Sterilization<br />
URI Watershed Watch Laboratory<br />
IDEXX Bottle sterilization Record<br />
UV Tech's<br />
Initials<br />
UV<br />
exposure<br />
time<br />
Batch #<br />
# <strong>of</strong><br />
Bottles<br />
Setup<br />
Date<br />
Setup<br />
Tech<br />
Media<br />
Batch<br />
#<br />
Exp. Date<br />
Media Batch<br />
Incub<br />
Start<br />
Temp<br />
Incub<br />
End<br />
Temp<br />
This form is intended to be used to maintain a record <strong>of</strong> QC requirements for sterilation <strong>of</strong> the IDEXX sample bottles. Once<br />
this sheet is full it should be replaced with a new blank sheet. The full sheet should be returned to the URIWW Micro<br />
Laboratory Binder in Room 019; blank sheets are also located in this binder. Any maintenance activity should also be<br />
recorded on this sheet. See Elizabeth with questions.<br />
16 <strong>of</strong> 21<br />
Enterolert SOP 018<br />
filename S:\WW\awwword\LABPROC\all QAPPs\LABQAPPs\QAPP Rev5 -0609\SOPs\SOP 018 Enterococci-Enterolert.doc<br />
Count<br />
Tech<br />
# pos.<br />
wells
URI Watershed Watch Laboratory<br />
Quarterly UV germicidal Tube Record<br />
Date Tube # Intensity Date Tube # Intensity<br />
Initial intensity 1 4<br />
readings 2 5<br />
3 6<br />
Date<br />
Tech's<br />
Initials<br />
Tube #<br />
Reading<br />
(right side)<br />
Reading<br />
(center)<br />
Reading<br />
(left side)<br />
Average<br />
Reading<br />
Wear protective gear when<br />
measuring UV lamp intensity!<br />
Intensity<br />
Reduction<br />
Comments / Notes<br />
This form is intended to be used to maintain a quarterly record <strong>of</strong> the intensity <strong>of</strong> the germicidal UV labs in the<br />
sterilzing box in room 19. The intensity <strong>of</strong> EACH <strong>of</strong> the SIX tubes must be measured on a quarterly basis,<br />
with each tube measured four inches from each end, as well as in the center, wtih the average <strong>of</strong> those<br />
three readings used. Once this sheet is full it should be replaced with a new blank sheet. The full sheet<br />
should be returned to the URIWW Micro Laboratory Binder in Room 019; blank sheets are also located in this<br />
binder. Any maintenance activity should also be recorded on this sheet. See Elizabeth with questions.<br />
17 <strong>of</strong> 21<br />
Enterolert SOP 018<br />
filename S:\WW\awwword\LABPROC\all QAPPs\LABQAPPs\QAPP Rev5 -0609\SOPs\SOP 018 Enterococci-Enterolert.doc
Filling a Quanti-Tray or Quanti-Tray/2000 (source: www.idexx.com)<br />
18 <strong>of</strong> 21<br />
Enterolert SOP 018<br />
filename S:\WW\awwword\LABPROC\all QAPPs\LABQAPPs\QAPP Rev5 -0609\SOPs\SOP 018 Enterococci-Enterolert.doc
19 <strong>of</strong> 21<br />
Enterolert SOP 018<br />
filename S:\WW\awwword\LABPROC\all QAPPs\LABQAPPs\QAPP Rev5 -0609\SOPs\SOP 018 Enterococci-Enterolert.doc
20 <strong>of</strong> 21<br />
Enterolert SOP 018<br />
filename S:\WW\awwword\LABPROC\all QAPPs\LABQAPPs\QAPP Rev5 -0609\SOPs\SOP 018 Enterococci-Enterolert.doc
21 <strong>of</strong> 21<br />
Enterolert SOP 018<br />
filename S:\WW\awwword\LABPROC\all QAPPs\LABQAPPs\QAPP Rev5 -0609\SOPs\SOP 018 Enterococci-Enterolert.doc
<strong>Standard</strong> <strong>Operating</strong> Procedure 019<br />
Analytical Balance Calibration<br />
<strong>University</strong> <strong>of</strong> <strong>Rhode</strong> Island Watershed Watch<br />
1.0 PURPOSE AND DESCRIPTION<br />
Date:<br />
Revision:<br />
Author:<br />
2/06<br />
2<br />
Marie Esten<br />
The analytical balance located in Room 018 is capable to weighing to 4 decimal places. It is a<br />
delicate instrument and must be treated as such. Never place books or other documents on top<br />
<strong>of</strong> the balance, and clean up any chemical spills on or near the balance at once. The following<br />
procedure outlines how to check the calibration <strong>of</strong> the balance. This should be done on a daily<br />
basis. Actual calibration is completed by a trained service technician. All balance calibration<br />
checks should be recorded on the balance calibration data sheet (figure 1) located in the drawer<br />
below the balance.<br />
1.1 Check Balance Level<br />
Before each use, the balance level indicator should be checked. The level indicator is a small<br />
bubble that can be seen by looking down on the balance from above. It is in the back <strong>of</strong> the<br />
balance. The bubble should be centered within the printed circle. If it is not, adjust the feet <strong>of</strong><br />
the balance until the bubble is within the circle. Check the box “Balance level?” on the data<br />
sheet after checking the balance.<br />
1.2 Calibration Check<br />
The calibration <strong>of</strong> the balance should be checked at least once a day, when in use. The<br />
calibration weights are in a box located in the drawer beneath the balance. Check the<br />
calibration by first making sure nothing is on the balance weigh pan, and then tare the balance.<br />
Once the balance is successfully tared use the tweezers to place the 50 mg certified weight<br />
onto the pan, and allow the balance to stabilize. NEVER HANDLE THE CERTIFIED WEIGHTS<br />
WITH YOUR FINGERS, THEY ARE PRECISELY CALIBRATED, AND EVEN THE OILS ON<br />
YOUR HANDS CAN AFFECT THE CALIBRATED WEIGHT.<br />
Once the balance has stabilized, record the weight in the column “50 mg weight, Actual<br />
Reading” on the balance data sheet. The reading must be +/- 10% <strong>of</strong> the certified weight (50<br />
mg). This is 0.0450 to 0.0550 mg. If the weight does not meet this criteria contact Linda Green<br />
or Elizabeth Herron, and do not use the balance.<br />
After checking the balance with the 50 mg weight, complete the same procedure with the 20 g<br />
weight. Remember, don’t pick up the weight with your fingers; use the tweezers. Put the<br />
reading for the 20 g weight in the column “20 g weight, Actual Reading”. The reading must be<br />
+/- 1% <strong>of</strong> the certified weight (20 g). This is 20.2000 to 19.8000 g. If the weight does not meet<br />
this criteria contact Linda Green or Elizabeth Herron, and do not use the balance.<br />
Make sure that the rest <strong>of</strong> the data sheet is filled out and the calibrated weights are put away.<br />
Do not take the calibration weights out <strong>of</strong> Room 019 without permission from Linda Green or<br />
Elizabeth Herron.<br />
1 <strong>of</strong> 2 Analytical Balance Calibration Check SOP 019<br />
S:\WW\awwword\LABPROC\all QAPPs\LABQAPPs\QAPP Rev5 -0609\SOPs\SOP 019 Balance calibration.doc
Figure 1: Balance Calibration Data Sheet<br />
Date<br />
URI Watershed Watch Laboratory<br />
Maintenance and Service Record - Mettler Toledo AB104 Balance<br />
Tech's<br />
Initials<br />
Balance<br />
level? 1<br />
Actual Expected<br />
Reading Reading 2<br />
Actual Expected<br />
Reading Reading 2<br />
50 mg weight 20 g weight<br />
0.0450 to<br />
20.2000 to<br />
0.0550 g<br />
19.8000 g<br />
Actions taken (None, Serviced<br />
Instrument, etc.)<br />
This form is intended to be used to maintain a record <strong>of</strong> calibration and maintenance <strong>of</strong> the Mettler Toledo balance. All maintenance<br />
activity should also be recorded on this sheet. Once this sheet is full it should be replaced with a new blank sheet. The full sheet<br />
should be returned to the URIWW Laboratory Maintenance Binder in Room 002; blank sheets are also located in this binder.<br />
Calibration and Maintenance Information:<br />
1<br />
Each day the balance is used the level indicator should be checked. If the balance isn't level it should be adjusted and the adjustment<br />
recorded on this data sheet.<br />
2 The reading for the 50 mg calibration weight should be +/- 10% <strong>of</strong> the actual mass (0.0450 mg to 0.0550 mg).<br />
The reading for the 20 g calibration weight should be +/- 1% <strong>of</strong> the actual mass ( 20.2000 g to 19.8000 g).<br />
If the balance is outside these ranges contact L. Green or E. Herron; do not use the balance if it doesn't calibrate correctly.<br />
2 <strong>of</strong> 2 Analytical Balance Calibration Check SOP 019<br />
S:\WW\awwword\LABPROC\all QAPPs\LABQAPPs\QAPP Rev5 -0609\SOPs\SOP 019 Balance calibration.doc
<strong>Standard</strong> <strong>Operating</strong> Procedure 020<br />
Heterotrophic Plate Count Using<br />
IDEXX SimPlate Method<br />
<strong>University</strong> <strong>of</strong> <strong>Rhode</strong> Island Watershed Watch<br />
1.0 PURPOSE AND DESCRIPTION<br />
Date:<br />
Revision:<br />
Author:<br />
10/08<br />
1 (E Herron)<br />
Marie Esten<br />
The purpose <strong>of</strong> this method is to determine the number <strong>of</strong> live heterotrophic bacteria in water.<br />
This method is used by the <strong>University</strong> <strong>of</strong> <strong>Rhode</strong> Island Watershed Watch (URIWW) solely for<br />
the purpose <strong>of</strong> complying with the RI HEALTH rules and procedures for the certified analysis <strong>of</strong><br />
fecal coliform samples. Sample results are not reported for any other purpose.<br />
Samples <strong>of</strong> water from the laboratory’s Ultrapure water system are analyzed by mixing with<br />
media and then allowing the mixture to incubate. After the incubation the number <strong>of</strong> organisms<br />
present are counted and reported. The method presented here is modified from the IDEXX<br />
SimPlate for HPC Multi Dose method and correlates to the Pour Plate method using Total Plate<br />
Count Agar incubated at 35°C for 48 hours as described in <strong>Standard</strong> Methods for the<br />
Examination <strong>of</strong> Water and Wastewater, 19 th ed.<br />
2.0 HEALTH AND SAFETY CONSIDERATIONS<br />
2.1 Hazards<br />
General laboratory good housekeeping procedures should be practiced as outlined in <strong>Standard</strong><br />
<strong>Operating</strong> Procedure (SOP) 001 - General Laboratory Safety. The only chemical utilized in this<br />
SOP is the media. The media is not listed as hazardous but should be treated with care.<br />
Always wear protective clothing in the form <strong>of</strong> gloves, a laboratory coat and goggles when<br />
working with this chemical. Further information regarding this chemical may be found in the<br />
laboratory Material Safety Data Sheet (MSDS) binder found in the laboratory where the<br />
chemical <strong>of</strong> interest is stored. A UV light is utilized in this procedure, keep expose to the UV<br />
light to a minimum. Use protective face shield or goggles and gloves when reading samples.<br />
General laboratory information regarding safe handling <strong>of</strong> chemicals is located in SOP 001a -<br />
<strong>University</strong> Safety and Waste Handling.<br />
2.2 Technician Training/Qualifications<br />
General training in laboratory technique, aseptic technique and the proper use <strong>of</strong> the UV light<br />
must be completed prior to analyzing samples using this method. Technician training will be<br />
provided by Elizabeth Herron Project Manager – Microbiology.<br />
3.0 REQUIRED MATERIALS<br />
Required Material Notes Re-order information<br />
Media Foil-packed sterile media<br />
vessels for 100 mL <strong>of</strong> media<br />
when hydrated<br />
IDEXX Cat # WHPC-100<br />
SimPlates Comes with multi-dose kit<br />
1 <strong>of</strong> 5<br />
Heterotrophic Plate Count SOP 020<br />
filename S:\WW\awwword\LABPROC\all QAPPs\LABQAPPs\QAPP Rev5 -0609\SOPs\SOP 020 HeterotrophicPC.doc
Required Material Notes Re-order information<br />
UV light and viewing box UV light #WL160,<br />
Replacement lamp #WL161<br />
UV cabinet #WCM10<br />
Pipettes<br />
35 °C Incubator Thermolyne Type 142300<br />
Sterile Ultrapure water 4L carboy used for Enterolert<br />
Paper towels, safety goggles,<br />
lab gloves<br />
2 <strong>of</strong> 5<br />
dilution<br />
UV goggles #WLG<br />
Equipment is maintained by the <strong>University</strong> <strong>of</strong> <strong>Rhode</strong> Island Watershed Watch (URIWW)<br />
Laboratory and the Natural Resources Science department. Temporary replacement <strong>of</strong> large<br />
equipment such as incubators is available through arrangement with other scientists in the<br />
department maintaining similar equipment.<br />
4.0 METHOD DESCRIPTION<br />
1. Samples should be collected directly from the Ultrapure water system into a sterile<br />
bottle. Samples should be analyzed immediately.<br />
2. Obtain a foil-packed sterile media vessel and dilute to the 100 mL mark with sterile<br />
Ultrapure water. Re-cap the vessel and shake to dissolve the media.<br />
3. Setup 10 SimPlates. 8 <strong>of</strong> the plates will be used to test the Ultrapure water collected<br />
from the Ultrapure water system. The other two plates will be used as a blank at the<br />
beginning and end <strong>of</strong> the run. The blanks consist <strong>of</strong> 10 mL <strong>of</strong> rehydrated media.<br />
4. Prepare the first blank. Pipette 10 mL rehydrated media onto the center <strong>of</strong> the SimPlate<br />
base.<br />
5. Cover the SimPlate with the plate lid and gently swirl the plate to distribute the sample<br />
into the plate wells. Air bubbles do not interfere with the test. Label cover with a<br />
permanent marker.<br />
6. Tip the plate 90° to 120° to drain excess sample into the absorbent pad on the plate.<br />
7. Repeat the procedure for the Ultrapure water samples. (total <strong>of</strong> 8 plates)<br />
8. Prepare the end blank. (10 mL <strong>of</strong> rehydrated media).<br />
9. Invert the plates and place them into the 35 °C incubator for 48 hours. The incubator<br />
should be set at 35 °C +/- 0.5 °C.<br />
10. Unused media can be refrigerated up to 5 days, if it is not used by then, it should be<br />
discarded by rinsing down the drain.<br />
11. After 48 hours remove the plates from the incubator and count the number <strong>of</strong> wells that<br />
exhibit fluorescence when placed under a UV light (6 watt, 365 nm). Use the UV viewing<br />
box.<br />
12. The Most Probable Number is determined using the MPN table attached below.<br />
13. Blanks should return a value <strong>of</strong>
5.0 CALCULATIONS<br />
Input the number <strong>of</strong> positive wells into the table below to determine the MPN. Record the MPN<br />
on the data sheet. The MPN should be less than 500 CFU/mL, if the value is greater than 500<br />
CFU/mL then re-run the test. If the results are still higher than 500 CFU/mL then begin to<br />
investigate any potential sources <strong>of</strong> contamination to the source water. Until the heterotrophic<br />
plate count returns a value less than 500 CFU/mL bacterial analyses should not be run.<br />
3 <strong>of</strong> 5<br />
Heterotrophic Plate Count SOP 020<br />
filename S:\WW\awwword\LABPROC\all QAPPs\LABQAPPs\QAPP Rev5 -0609\SOPs\SOP 020 HeterotrophicPC.doc
6.0 DOCUMENTATION<br />
4 <strong>of</strong> 5<br />
Bacterial Sample Log & Worksheet: Monthly HPC Analyses<br />
IDEXX SimPlate for HPC Method<br />
Analyst - set-up: Analyst - Counts: Media Batch #:<br />
Incubator temp. start: Incubator temp. end: Expiration:<br />
Setup Dil. # pos. Table MPN<br />
SimPlate Date (mls) wells Value<br />
Start Blank 10<br />
MQ #1 1<br />
MQ #2 1<br />
MQ #3 1<br />
MQ #4 1<br />
MQ #5 1<br />
MQ #6 1<br />
MQ #7 1<br />
MQ #8 1<br />
End Blank 10<br />
7.0 REFERENCES<br />
APHA, AWWA, WEF. <strong>Standard</strong> Methods for the Examination <strong>of</strong> Water and Wastewater. 19 th ed.<br />
Washington D.C.: APHA, 1995.<br />
Method referenced: Heterotrophic Plate Count (9215).<br />
IDEXX SimPlate for HPC web-site: http://www.idexx.com/water/simplate/index.jsp accessed<br />
October 10, 2006.<br />
Heterotrophic Plate Count SOP 020<br />
filename S:\WW\awwword\LABPROC\all QAPPs\LABQAPPs\QAPP Rev5 -0609\SOPs\SOP 020 HeterotrophicPC.doc