

Seed Guide 2007 pgs 01/41 - McKenzie Seeds
Seed Guide 2007 pgs 01/41 - McKenzie Seeds
Seed Guide 2007 pgs 01/41 - McKenzie Seeds

Create successful ePaper yourself
Turn your PDF publications into a flip-book with our unique Google optimized e-Paper software.
G R O W I N G I N F O R M A T I O N<br />
year or more has passed, so never be too<br />
hasty in discarding a seed container.<br />
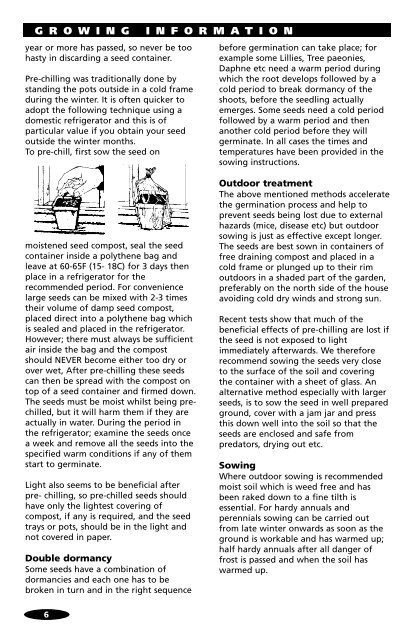
Pre-chilling was traditionally done by<br />
standing the pots outside in a cold frame<br />
during the winter. It is often quicker to<br />
adopt the following technique using a<br />
domestic refrigerator and this is of<br />
particular value if you obtain your seed<br />
outside the winter months.<br />
To pre-chill, first sow the seed on<br />
moistened seed compost, seal the seed<br />
container inside a polythene bag and<br />
leave at 60-65F (15- 18C) for 3 days then<br />
place in a refrigerator for the<br />
recommended period. For convenience<br />
large seeds can be mixed with 2-3 times<br />
their volume of damp seed compost,<br />
placed direct into a polythene bag which<br />
is sealed and placed in the refrigerator.<br />
However; there must always be sufficient<br />
air inside the bag and the compost<br />
should NEVER become either too dry or<br />
over wet, After pre-chilling these seeds<br />
can then be spread with the compost on<br />
top of a seed container and firmed down.<br />
The seeds must be moist whilst being prechilled,<br />
but it will harm them if they are<br />
actually in water. During the period in<br />
the refrigerator; examine the seeds once<br />
a week and remove all the seeds into the<br />
specified warm conditions if any of them<br />
start to germinate.<br />
Light also seems to be beneficial after<br />
pre- chilling, so pre-chilled seeds should<br />
have only the lightest covering of<br />
compost, if any is required, and the seed<br />
trays or pots, should be in the light and<br />
not covered in paper.<br />
Double dormancy<br />
Some seeds have a combination of<br />
dormancies and each one has to be<br />
broken in turn and in the right sequence<br />
6<br />
before germination can take place; for<br />
example some Lillies, Tree paeonies,<br />
Daphne etc need a warm period during<br />
which the root develops followed by a<br />
cold period to break dormancy of the<br />
shoots, before the seedling actually<br />
emerges. Some seeds need a cold period<br />
followed by a warm period and then<br />
another cold period before they will<br />
germinate. In all cases the times and<br />
temperatures have been provided in the<br />
sowing instructions.<br />
Outdoor treatment<br />
The above mentioned methods accelerate<br />
the germination process and help to<br />
prevent seeds being lost due to external<br />
hazards (mice, disease etc) but outdoor<br />
sowing is just as effective except longer.<br />
The seeds are best sown in containers of<br />
free draining compost and placed in a<br />
cold frame or plunged up to their rim<br />
outdoors in a shaded part of the garden,<br />
preferably on the north side of the house<br />
avoiding cold dry winds and strong sun.<br />
Recent tests show that much of the<br />
beneficial effects of pre-chilling are lost if<br />
the seed is not exposed to light<br />
immediately afterwards. We therefore<br />
recommend sowing the seeds very close<br />
to the surface of the soil and covering<br />
the container with a sheet of glass. An<br />
alternative method especially with larger<br />
seeds, is to sow the seed in well prepared<br />
ground, cover with a jam jar and press<br />
this down well into the soil so that the<br />
seeds are enclosed and safe from<br />
predators, drying out etc.<br />
Sowing<br />
Where outdoor sowing is recommended<br />
moist soil which is weed free and has<br />
been raked down to a fine tilth is<br />
essential. For hardy annuals and<br />
perennials sowing can be carried out<br />
from late winter onwards as soon as the<br />
ground is workable and has warmed up;<br />
half hardy annuals after all danger of<br />
frost is passed and when the soil has<br />
warmed up.