WORKSHOP MANUAL for HEINKEL TOURIST - Secret Society ...
WORKSHOP MANUAL for HEINKEL TOURIST - Secret Society ...
WORKSHOP MANUAL for HEINKEL TOURIST - Secret Society ...

Create successful ePaper yourself
Turn your PDF publications into a flip-book with our unique Google optimized e-Paper software.
6. Remove exhaust silencer and air outlet pipe.<br />
Please note:<br />
Avoid stress when fitting exhaust silencer as otherwise exhaust<br />
manifold might break!<br />
7. Undo four nuts on the rear wheel and remove the rear wheel.<br />
Undo fixing bolts and nuts on the spring leg and remove spring<br />
l eg.<br />
I<br />
Please note:<br />
When fitting the rear wheel, tighten wheel nuts at 6.0 rnkg. Insert<br />
upper fixing bolt of spring leg from inside!<br />
Disengage rear wheel brake cable from the brake lever and<br />
unscrew the brake cable set-screw from the support on the<br />
swinging arm.<br />
9. Disconnect the clutch control cable from the clutch lever. Unscrew<br />
adjusting screw.<br />
1 0. Undo cylinder screw on the shift lever and push lever off gear<br />
selector. (Do not damage rubber ring!) Remove adjusting screw<br />
<strong>for</strong> the clutch cable from the support on the clutch cover.<br />
Please note:<br />
When fitting the shift lever, the marks on the gear selector and<br />
the shift lever have to correspond. Grease both rubber sleeves<br />
on the switch cable by grease gun.<br />
1 1. Undo the hex. nuts of the rubber elements <strong>for</strong> engine suspension<br />
with a box spanner, push back hex. bolts (Box spanner SW 17.)<br />
1 2. Loosen hex. bolt (SW 17) of clamp (right-hand side) (this makes<br />
engine removal easier).<br />
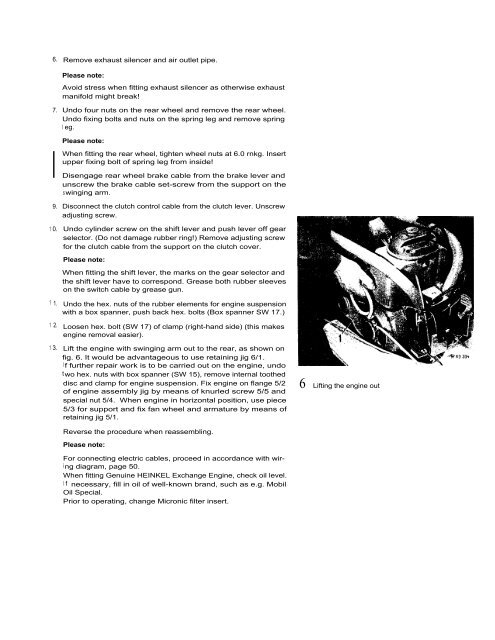
1 3. Lift the engine with swinging arm out to the rear, as shown on<br />
fig. 6. It would be advantageous to use retaining jig 6/1.<br />
If further repair work is to be carried out on the engine, undo<br />
two hex. nuts with box spanner (SW 15), remove internal toothed<br />
disc and clamp <strong>for</strong> engine suspension. Fix engine on flange 5/2<br />
of engine assembly jig by means of knurled screw 5/5 and<br />
special nut 5/4. When engine in horizontal position, use piece<br />
5/3 <strong>for</strong> support and fix fan wheel and armature by means of<br />
retaining jig 5/1.<br />
Reverse the procedure when reassembling.<br />
Please note:<br />
For connecting electric cables, proceed in accordance with wiring<br />
diagram, page 50.<br />
When fitting Genuine <strong>HEINKEL</strong> Exchange Engine, check oil level.<br />
I f necessary, fill in oil of well-known brand, such as e.g. Mobil<br />
Oil Special.<br />
Prior to operating, change Micronic filter insert.<br />
6 Lifting the engine out