WORKSHOP MANUAL for HEINKEL TOURIST - Secret Society ...
WORKSHOP MANUAL for HEINKEL TOURIST - Secret Society ...
WORKSHOP MANUAL for HEINKEL TOURIST - Secret Society ...
You also want an ePaper? Increase the reach of your titles
YUMPU automatically turns print PDFs into web optimized ePapers that Google loves.
Removing and Fitting of Front Wheel Hub<br />
1. Using socket spanner (SW 17), undo wheel nuts.<br />
2. Undo clamp screw <strong>for</strong> speedometer spiral, remove spiral.<br />
3. Undo hex. nut on front wheel brake control cable. Disconnect<br />
cable on brake lever, take off control cable.<br />
4. Take off both front wheel axle nuts, remove front wheel.<br />
5. Remove rim with tyre from hub.<br />
6. Take off the broke disc with brake shoes. (Watch out <strong>for</strong> spacing<br />
washer 75/2.)<br />
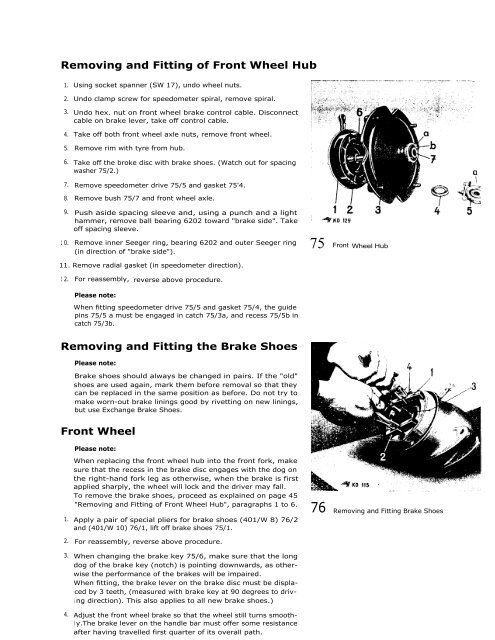
7. Remove speedometer drive 75/5 and gasket 75'4.<br />
8. Remove bush 75/7 and front wheel axle.<br />
9. Push aside spacing sleeve and, using a punch and a light<br />
hammer, remove ball bearing 6202 toward "brake side". Take<br />
off spacing sleeve.<br />
1 0. Remove inner Seeger ring, bearing 6202 and outer Seeger ring<br />
(in direction of "brake side").<br />
11. Remove radial gasket (in speedometer direction).<br />
1 2. For reassembly, - reverse above procedure.<br />
Please note:<br />
When fitting speedometer drive 75/5 and gasket 75/4, the guide<br />
pins 75/5 a must be engaged in catch 75/3a, and recess 75/5b in<br />
catch 75/3b.<br />
Removing and Fitting the Brake Shoes<br />
Please note:<br />
Brake shoes should always be changed in pairs. If the "old"<br />
shoes are used again, mark them be<strong>for</strong>e removal so that they<br />
can be replaced in the same position as be<strong>for</strong>e. Do not try to<br />
make worn-out brake linings good by rivetting on new linings,<br />
but use Exchange Brake Shoes.<br />
Front Wheel<br />
Please note:<br />
When replacing the front wheel hub into the front <strong>for</strong>k, make<br />
sure that the recess in the brake disc engages with the dog on<br />
the right-hand <strong>for</strong>k leg as otherwise, when the brake is first<br />
applied sharply, the wheel will lock and the driver may fall.<br />
To remove the brake shoes, proceed as explained on page 45<br />
"Removing and Fitting of Front Wheel Hub", paragraphs 1 to 6.<br />
1. Apply a pair of special pliers <strong>for</strong> brake shoes (401/W 8) 76/2<br />
and (401/W 10) 76/1, lift off brake shoes 75/1.<br />
2. For reassembly, reverse above procedure.<br />
3. When changing the brake key 75/6, make sure that the long<br />
dog of the brake key (notch) is pointing downwards, as otherwise<br />
the per<strong>for</strong>mance of the brakes will be impaired.<br />
When fitting, the brake lever on the brake disc must be displaced<br />
by 3 teeth, (measured with brake key at 90 degrees to driving<br />
direction). This also applies to all new brake shoes.)<br />
4. Adjust the front wheel brake so that the wheel still turns smoothly.The<br />
brake lever on the handle bar must offer some resistance<br />
after having travelled first quarter of its overall path.<br />
75 Front Wheel Hub<br />
76 Removing and Fitting Brake Shoes


