WORKSHOP MANUAL for HEINKEL TOURIST - Secret Society ...
WORKSHOP MANUAL for HEINKEL TOURIST - Secret Society ...
WORKSHOP MANUAL for HEINKEL TOURIST - Secret Society ...

You also want an ePaper? Increase the reach of your titles
YUMPU automatically turns print PDFs into web optimized ePapers that Google loves.
Check piston and cylinder<br />
Please note:<br />
Proceed as explained on page 11, "Dismantling Cylinder Head,<br />
Cylinder and Piston".<br />
Cover the crankcase with a clean rag.<br />
When refitting a used piston, remove all traces of oil carbon<br />
from the piston head and the cylinder, take care that the piston<br />
is fitted in the same direction as be<strong>for</strong>e (i.e. front to front).<br />
1. Check piston (i.e. surface of contact) <strong>for</strong> grooves, traces of piston<br />
seizures, worn spots (light grey surface!); check piston rings<br />
<strong>for</strong> burns.<br />
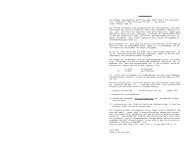
2. Using a feeler gouge 19/1, check the height play of the piston<br />
rings, the permissible tolerance between the piston ring and the<br />
ring groove being:<br />
Ring Groove Piston Ring Minimum Maximum<br />
I Compression ring (chromium) 0.060 mm. 0.090 mm.<br />
I I Compression ring 0.035 mm. 0.070 mm.<br />
I I I Oil scraper ring 0.025 mm. 0.060 mm.<br />
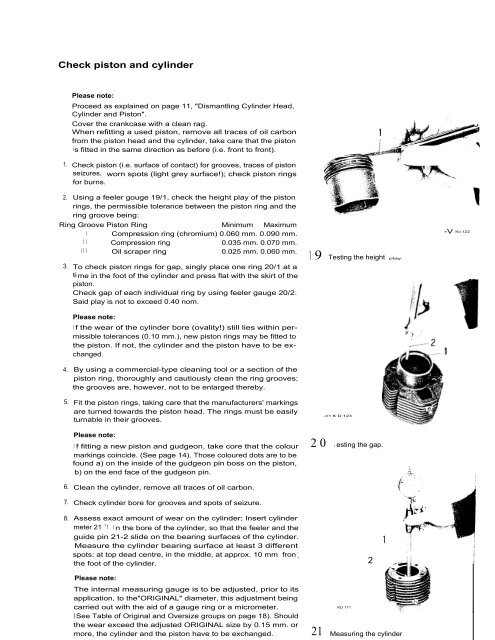
3. To check piston rings <strong>for</strong> gap, singly place one ring 20/1 at a<br />
time in the foot of the cylinder and press flat with the skirt of the<br />
piston.<br />
Check gap of each individual ring by using feeler gauge 20/2.<br />
Said play is not to exceed 0.40 nom.<br />
Please note:<br />
I f the wear of the cylinder bore (ovality!) still lies within permissible<br />
tolerances (0.10 mm.), new piston rings may be fitted to<br />
the piston. If not, the cylinder and the piston have to be exchanged.<br />
4. By using a commercial-type cleaning tool or a section of the<br />
piston ring, thoroughly and cautiously clean the ring grooves;<br />
the grooves are, however, not to be enlarged thereby.<br />
5. Fit the piston rings, taking care that the manufacturers' markings<br />
are turned towards the piston head. The rings must be easily<br />
turnable in their grooves.<br />
Please note:<br />
I f fitting a new piston and gudgeon, take core that the colour<br />
markings coincide. (See page 14). Those coloured dots are to be<br />
found a) on the inside of the gudgeon pin boss on the piston,<br />
b) on the end face of the gudgeon pin.<br />
6. Clean the cylinder, remove all traces of oil carbon.<br />
7. Check cylinder bore <strong>for</strong> grooves and spots of seizure.<br />
8. Assess exact amount of wear on the cylinder; Insert cylinder<br />
meter 21 1 1 i n the bore of the cylinder, so that the feeler and the<br />
guide pin 21-2 slide on the bearing surfaces of the cylinder.<br />
Measure the cylinder bearing surface at least 3 different<br />
spots: at top dead centre, in the middle, at approx. 10 mm fron ,<br />
- ,<br />
the foot of the cylinder.<br />
l<br />
Please note:<br />
The internal measuring gauge is to be adjusted, prior to its<br />
application, to the"ORIGINAL" diameter, this adjustment being<br />
carried out with the aid of a gauge ring or a micrometer.<br />
(See Table of Original and Oversize groups on page 18). Should<br />
the wear exceed the adjusted ORIGINAL size by 0.15 mm. or<br />
more, the cylinder and the piston have to be exchanged.<br />
1 9 Testing the height play<br />
2 0 I<br />
-I/1 K D 123<br />
esting the gap.<br />
KD 171<br />
2<br />
21 Measuring the cylinder<br />
-V<br />
Ko 1Z2