Amiga Computing - Commodore Is Awesome
Amiga Computing - Commodore Is Awesome
Amiga Computing - Commodore Is Awesome

You also want an ePaper? Increase the reach of your titles
YUMPU automatically turns print PDFs into web optimized ePapers that Google loves.
NE of the things the <strong>Amiga</strong> artist<br />
has to appreciate, and all too<br />
often doesn't, is just how easy it<br />
is for him to manipulate repeated<br />
shapes — namely, brushes. Every single<br />
tool in DPaint uses brushes, making it<br />
not only incredibly easy to paint with,<br />
but also jolly consistent.<br />
Let me give you an example of what I<br />
have just said. Set up a 16 colour lo-res<br />
screen, pick one of the preset circle<br />
brushes from the top right of the toolbox<br />
and then draw a Small Picture with it<br />
("Smileys" are always popular, although<br />
some people prefer drawing normal<br />
faces. Figure I gives an example of a<br />
"Small Picture").<br />
Select 'cut rectangular brush" and cut<br />
the thing out. Now, ensuring that your<br />
background colour is black, hold down<br />
the right mouse button and move the<br />
brush over the original picture, erasing it,<br />
This is an important technique to<br />
remember — holding down the right<br />
mouse button paints with the brush's<br />
silouhette, coloured the same as the<br />
background colour. This is almost<br />
always true, but for the moment, don't<br />
worry about the "almost".<br />
You will have noticed that when you<br />
cut the brush out the paint mode<br />
reverted to matte, and the dotted<br />
freehand tool was activated. This<br />
happens every time you cut a brush,<br />
and is worth remembering - it is very<br />
easy to ruin a picture by cutting out a<br />
brush and Only realising you're no<br />
longer in "shade" mode when you've<br />
slapped a bright yellow circle over the<br />
past six hours work. I know, I've done it<br />
many a time.<br />
*<br />
1<br />
1 Pick the line tool, and drag out a line.<br />
It will be drawn with your picture instead<br />
.<br />
of dots. Although it's very clever, it's not<br />
1<br />
particularly useful. So press ''p'' to bring<br />
up 1 the palette selector, set the second<br />
colour / to white (it's normally that<br />
horrible 0 fleshy colour) and the very last<br />
one 1 to black.<br />
. Spread the white to the black to<br />
.<br />
1<br />
..0e<br />
4<br />
1 VSg<br />
4<br />
?" i -<br />
,<br />
A. crt E P i r c . r i •<br />
1<br />
/ gr!<br />
i•m•<br />
1<br />
Z rt/<br />
r<br />
,<br />
,<br />
C•c<br />
e '<br />
- %._ ' -<br />
y<br />
Figure " ,r 11: Logo vandalising<br />
7F<br />
A<br />
i30 AMIGA COMPUTING November 1990<br />
-<br />
L •I . L<br />
-<br />
X<br />
-<br />
11*<br />
.<br />
3-<br />
U4<br />
I1.<br />
I<br />
altd<br />
s<br />
.<br />
,<br />
Deluxe Paint<br />
I -<br />
_<br />
1<br />
L s 1<br />
.<br />
.<br />
Ip•<br />
1:111Ark ' *Ai A 46* or<br />
r<br />
.<br />
t<br />
i<br />
I-JElb<br />
4 * • JO* ispar.<br />
i<br />
p<br />
Mu<br />
= D O I<br />
1<br />
t<br />
b<br />
P 0 aik orb<br />
4<br />
. 1<br />
4<br />
1<br />
6<br />
0:<br />
—<br />
*<br />
1 l<br />
ArP 4 .<br />
:<br />
a<br />
- : I<br />
. L<br />
t t<br />
$<br />
O<br />
1I<br />
%<br />
[ Jr<br />
1Deluxe<br />
A Paint<br />
r<br />
l<br />
-<br />
1-<br />
2<br />
CIA* b..-<br />
1 1<br />
-<br />
1<br />
, b<br />
% 1<br />
.<br />
-<br />
Zok<br />
•;;I<br />
I E<br />
.<br />
1<br />
L a<br />
* K<br />
s .<br />
4 it s e •<br />
a a /C r 13_•••• mItibt<br />
a e i r , I<br />
D . 1<br />
C<br />
-<br />
1 i r - M . 1 1 1<br />
2<br />
0<br />
1 1 1<br />
-<br />
4<br />
A .<br />
1<br />
E<br />
AAr create * a series of graduated - s greys, and<br />
then 1 click "range" and select o ar<br />
white. You<br />
have 1 now created a range * -of<br />
colours,<br />
with 1 which we may do many . interesting<br />
things... 1<br />
J<br />
brush has up<br />
1<br />
its proverbial sleeve, and<br />
these I shall . discuss now. You will<br />
require a clean d brush, so draw a new<br />
one, cutting it Out with a one pixel<br />
border around it so that the box the<br />
Click the right mouse button , on the "cut" tool produces touches, but doesn't<br />
line tool. A requester pops - up, not<br />
entirely dissimilar from one e of the two in<br />
go over, the brush.<br />
Figure II. What we're going J to do is<br />
break up the line into a series r of dots so<br />
that the brushes are spaced * out more.<br />
If you are using DPII, select I<br />
"Relative", enter an arbitrary number<br />
into the "number' box use 16 for the<br />
moment — and select "on". DPIII users<br />
should select "N Total'' and enter 16 into<br />
the box next to it.<br />
Pick "OK" and the requester goes. Try<br />
drawing a line again — you will notice<br />
that this time not only is the update<br />
faster, but also that the line is made up<br />
of only 16 "points" in total. The<br />
"Relative" or "N Total" option tells the<br />
computer to draw only a certain number<br />
of brushes at roughly equal distances<br />
from each other.<br />
0<br />
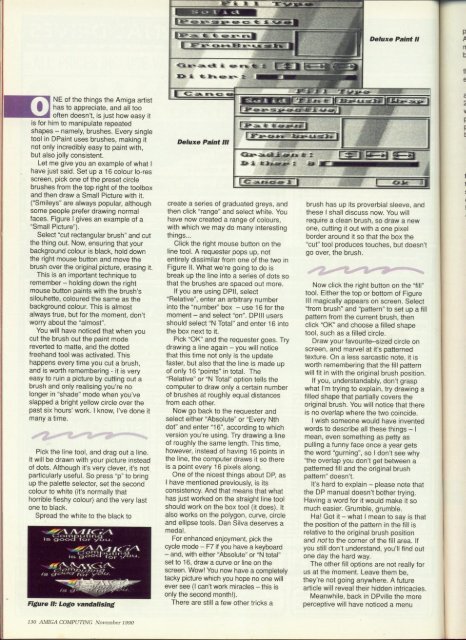
0Now<br />
click the right button on the gill"<br />
tool. Either the top or bottom of Figure<br />
III 2magically<br />
appears on screen. Select<br />
"from , brush" and 'pattern" to set up a fill<br />
pattern from the current brush, then<br />
click 0 "OK" and choose a filled shape<br />
tool, such as a filled circle.<br />
0Draw<br />
your favourite—sized circle on<br />
screen, 1 and marvel at it's patterned<br />
texture. On a less sarcastic note, it is<br />
worth . remembering that the fill pattern<br />
will fit in with the original brush position.<br />
0If<br />
you, understandably, don't grasp<br />
what 0 I'm trying to explain, try drawing a<br />
filled shape that partially covers the<br />
original • brush. You will notice that there<br />
Now go back to the requester and<br />
select either "Absolute" or "Every Nth<br />
is no overlap where the two coincide.<br />
1I<br />
wish someone would have invented<br />
dot" and enter "16'', according to which<br />
version you're using. Try drawing a line<br />
of roughly the same length. This time,<br />
however, instead of having 16 points in<br />
the line, the computer draws it so there<br />
is a point every 16 pixels along.<br />
One of the nicest things about DP, as<br />
words " to describe all these things — I<br />
mean, even something as petty as<br />
pulling a funny face once a year gets<br />
the word "gurning", so I don't see why<br />
"the overlap you don't get between a<br />
patterned fill and the original brush<br />
pattern" doesn't.<br />
I have mentioned previously, is its<br />
consistency. And that means that what<br />
It's hard to explain — please note that<br />
the DP manual doesn't bother trying.<br />
has just worked on the straight line tool Having a word for it would make it so<br />
should work on the box tool (it does). It<br />
also works on the polygon, curve, circle<br />
and ellipse tools. Dan Silva deserves a<br />
medal.<br />
For enhanced enjoyment, pick the<br />
much easier. Grumble, grumble.<br />
Ha! Got it — what I mean to say is that<br />
the position of the pattern in the fill is<br />
relative to the original brush position<br />
and not to the corner of the fill area. If<br />
cycle mode — F7 if you have a keyboard<br />
—and, with either "Absolute" or ''N total"<br />
set to 16, draw a curve or line on the<br />
screen. Wow! You now have a completely<br />
you still don't understand, you'll find out<br />
one day the hard way.<br />
The other fill options are not really for<br />
us at the moment. Leave them be,<br />
tacky picture which you hope no one will<br />
ever see (I can't work miracles — this is<br />
they're not going anywhere. A future<br />
article will reveal their hidden intricacies.<br />
only the second month!).<br />
There are still a few other tricks a<br />
Meanwhile, back in DPville the more<br />
perceptive will have noticed a menu