Amiga Computing - Commodore Is Awesome
Amiga Computing - Commodore Is Awesome
Amiga Computing - Commodore Is Awesome

Create successful ePaper yourself
Turn your PDF publications into a flip-book with our unique Google optimized e-Paper software.
pertaining to brushes (in best Rowan<br />
Atkinson voice) known as the "Brush"<br />
menu. Here, all the seemingly tasteless<br />
brush warping tools are stored.<br />
It is important to know how to use<br />
these inside out in order to produce any<br />
effects that may be considered original.<br />
First, cut a new brush. It would be<br />
advisable to make it quite large. about<br />
200 by 100 pixels, otherwise the effects<br />
will confuse the image. You should<br />
paste a copy of this on to the spare<br />
page so you can revert to it later if need<br />
be.<br />
40<br />
11<br />
1<br />
)<br />
-<br />
a<br />
d<br />
l<br />
1<br />
T<br />
0<br />
-<br />
0<br />
1<br />
W<br />
1<br />
1<br />
2<br />
1<br />
w<br />
1<br />
—<br />
"f<br />
t<br />
e<br />
--<br />
The first tool to play with has to be<br />
the freehand resize. Everyone has used<br />
this at sometime or other, and any<br />
serious artist is going to need to<br />
eventually. Try it — hold down the left<br />
button, and move the mouse around to<br />
change the brush to any size you want.<br />
The mathematics of the procedure<br />
are instantaneous, and can be very<br />
useful in that you know what your<br />
resized brush will look like.<br />
Unfortunately. it usually ends up either<br />
as a cross-section of Legoland or a<br />
gritty mess. There is, however, a way of<br />
getting around this.<br />
Curiously enough, the options for this<br />
are not in the brush menu — they are in<br />
fact in the perspective menu, tucked<br />
away under "extras".<br />
First the antialias should be set to<br />
"high" and the perspective centre<br />
positioned in a clear area of the screen<br />
— on the spare page if possible. You<br />
should then select "do" from the<br />
perspective menu — or enter from the<br />
keyboard — and position the centre of<br />
the brush grid over the perspective<br />
centre.<br />
Now use the # and ; keys to move the<br />
brush into or out of the screen. You<br />
must use the grid to work out when the<br />
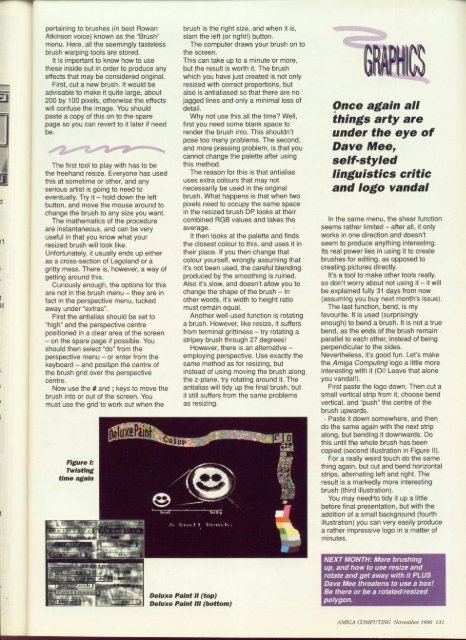
Figure I:<br />
Twisting<br />
time again<br />
4.u2112.11 -<br />
brush is the right size, and when it is,<br />
slam the left (Or right!) button.<br />
The computer draws your brush on to<br />
the screen.<br />
This can take up to a minute or more,<br />
but the result is worth it. The brush<br />
which you have just created is not only<br />
resized with correct proportions, but<br />
also is antialiased so that there are no<br />
jagged lines and only a minimal loss of<br />
detail.<br />
Why not use this all the time? Well,<br />
first you need some blank space to<br />
render the brush into. This shouldn't<br />
pose too many problems. The second,<br />
and more pressing problem, is that you<br />
cannot change the palette after using<br />
this method.<br />
The reason for this is that antialias<br />
uses extra colours that may not<br />
necessarily be used in the original<br />
brush. What happens is that when two<br />
pixels need to occupy the same space<br />
in the resized brush DP looks at their<br />
combined RGB values and takes the<br />
average.<br />
It then looks at the palette and finds<br />
the closest colour to this, and uses it in<br />
their place. If you then change that<br />
colour yourself. wrongly assuming that<br />
it's not been used. the careful blending<br />
produced by the smoothing is ruined.<br />
Also it's slow, and doesn't allow you to<br />
change the shape of the brush — In<br />
other words, it's width to height ratio<br />
must remain equal.<br />
Another well-used function is rotating<br />
a brush. However, like resize, it suffers<br />
from terminal grittiness try rotating a<br />
stripey brush through 27 degrees!<br />
However, there is an alternative —<br />
employing perspective. Use exactly the<br />
same method as for resizing, but<br />
instead of using moving the brush along<br />
the z-plane, try rotating around it. The<br />
antialias will tidy up the final brush, but<br />
it still suffers from the same problems<br />
as resizing.<br />
Deluxe Paint U (top)<br />
Deluxe Paint Ill (bottom)<br />
41111.11111<br />
Once again all<br />
things arty are<br />
under the eye of<br />
Dave Mee,<br />
self-styled<br />
linguistics critic<br />
and logo vandal<br />
In the same menu, the shear function<br />
seems rather limited — after all, it only<br />
works in one direction and doesn't<br />
seem to produce anything interesting.<br />
Its real power lies in using it to create<br />
brushes for editing, as opposed to<br />
creating pictures directly.<br />
It's a tool to make other tools really,<br />
so don't worry about not using it — it will<br />
be explained fully 31 days from now<br />
(assuming you buy next month's issue).<br />
The last function, bend, is my<br />
favourite. It is used (surprisingly<br />
enough) to bend a brush. It is not a true<br />
bend, as the ends of the brush remain<br />
parallel to each other, instead of being<br />
perpendicular to the sides.<br />
Nevertheless, it's good fun. Let's make<br />
the <strong>Amiga</strong> <strong>Computing</strong> logo a little more<br />
interesting with it (Oil Leave that alone<br />
you vandal!).<br />
First paste the logo down. Then cut a<br />
small vertical strip from it, choose bend<br />
vertical, and "push" the centre of the<br />
brush upwards.<br />
- Paste it down somewhere, and then<br />
do the same again with the next strip<br />
along, but bending it downwards. Do<br />
this until the whole brush has been<br />
copied (second illustration in Figure II).<br />
For a really weird touch do the same<br />
thing again, but cut and bend horizontal<br />
strips, alternating left and right. The<br />
result is a markedly more interesting<br />
brush (third illustration).<br />
You may need<br />
before - final presentation, but with the<br />
addition to tidy of a small background (fourth<br />
illustration) i t you can very easily produce<br />
a rather impressive logo in a matter of<br />
minutes.<br />
u p<br />
a<br />
l i t t l<br />
NEXT e MONTH; More brushing<br />
up, and how to use resize and<br />
rotate and get away with it PLUS<br />
Dave Mee threatens to use a box!<br />
Be there or be a rotatedlresized<br />
polygon.<br />
1MIGA COMPUTING November I 9g0 131