
Create successful ePaper yourself
Turn your PDF publications into a flip-book with our unique Google optimized e-Paper software.
16<br />
Press to exit from<br />
a menu screen<br />
Press to go back to<br />
the previous screen<br />
Note<br />
About broadcasting<br />
systems<br />
Analog (NTSC):<br />
Conventional<br />
broadcasting<br />
Digital (ATSC):<br />
New programming<br />
that allows you<br />
to view more<br />
channels featuring<br />
high-quality video<br />
and sound<br />
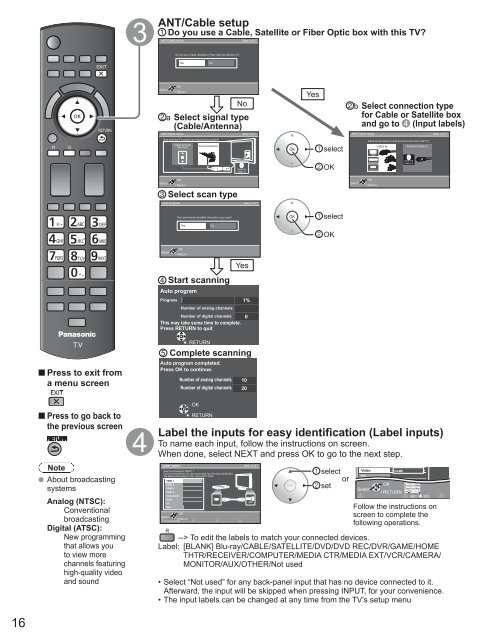
ANT/Cable set<strong>up</strong><br />
Do you use a Cable, Satellite or Fiber Optic box with this TV?<br />
ANT/Cable set<strong>up</strong> Step 4 of 7<br />
Select<br />
Do you use a Cable, Satellite or Fiber Optic box with this TV?<br />
OK<br />
Yes No<br />
Return<br />
a Select signal type<br />
(Cable/Antenna)<br />
Select scan type<br />
No<br />
ANT/Cable set<strong>up</strong> Step 4 of 7<br />
How does the TV receive its programming content?<br />
Select<br />
Cable service<br />
(No box)<br />
OK<br />
Return<br />
Over-the-Air Antenna<br />
Antenna<br />
Cable In<br />
Auto program Step 4 of 7<br />
Select<br />
Start scanning for available channels in your area?<br />
OK<br />
Yes No<br />
Return<br />
Start scanning<br />
Auto program<br />
Yes<br />
Progress<br />
1%<br />
Number of analog channels<br />
Number of digital channels 0<br />
This may take some time to complete.<br />
Press RETURN to quit<br />
RETURN<br />
Complete scanning<br />
Auto program completed.<br />
Press OK to continue.<br />
Number of analog channels 10<br />
Number of digital channels 20<br />
OK<br />
RETURN<br />
Yes<br />
select<br />
OK<br />
select<br />
OK<br />
b Select connection type<br />
for Cable or Satellite box<br />
and go to (Input labels)<br />
ANT/Cable set<strong>up</strong> Step 4 of 7<br />
Select<br />
Which wiring method is used to connect your box to the TV?<br />
HDMI<br />
Component<br />
Composite<br />
OK<br />
Return<br />
VIDEO IN<br />
Antenna/Cable in<br />
Label the inputs for easy identification (Label inputs)<br />
To name each input, follow the instructions on screen.<br />
When done, select NEXT and press OK to go to the next step.<br />
Label inputs Step 5 of 7<br />
What is connected to HDMI 1 ?<br />
For your convenience, you may name each input for easy identification.<br />
The labels will be shown in the “Input select” menu.<br />
HDMI 1<br />
HDMI 2<br />
HDMI 3<br />
HDMI 4<br />
Component<br />
Video<br />
HDMI<br />
PC<br />
Next<br />
Customize label Return<br />
OK<br />
Select<br />
select<br />
or<br />
set<br />
Video<br />
PC<br />
Select<br />
GAME<br />
OK<br />
RETURN<br />
Antenna<br />
Cable In<br />
1 @. 2 ABC 3 DEF<br />
4 GHI 5 JKL 6MNO<br />
7 PQRS 8 TUV 9 WXYZ<br />
LAST 0 - ,<br />
ABC abc<br />
Follow the instructions on<br />
screen to complete the<br />
following operations.<br />
--> To edit the labels to match your connected devices.<br />
Label: [BLANK] Blu-ray/CABLE/SATELLITE/DVD/DVD REC/DVR/GAME/HOME<br />
THTR/RECEIVER/COMPUTER/MEDIA CTR/MEDIA EXT/VCR/CAMERA/<br />
MONITOR/AUX/OTHER/Not used<br />
• Select “Not used” for any back-panel input that has no device connected to it.<br />
Afterward, the input will be skipped when pressing INPUT, for your convenience.<br />
• The input labels can be changed at any time from the TV’s set<strong>up</strong> menu