

1 On the - Pitney Bowes Canada
1 On the - Pitney Bowes Canada
1 On the - Pitney Bowes Canada

Create successful ePaper yourself
Turn your PDF publications into a flip-book with our unique Google optimized e-Paper software.
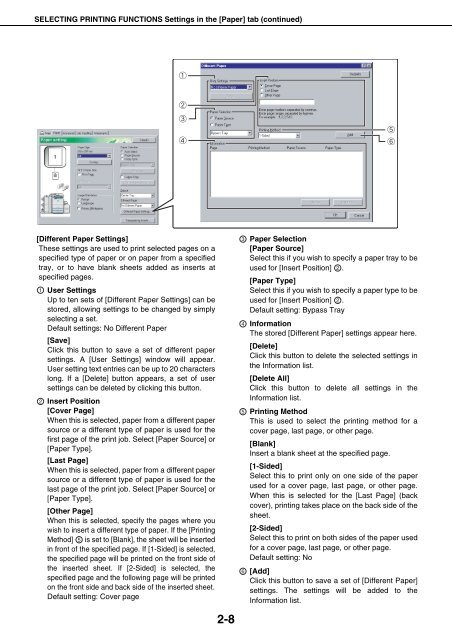
SELECTING PRINTING FUNCTIONS Settings in <strong>the</strong> [Paper] tab (continued)<br />
[Different Paper Settings]<br />
These settings are used to print selected pages on a<br />
specified type of paper or on paper from a specified<br />
tray, or to have blank sheets added as inserts at<br />
specified pages.<br />
1 User Settings<br />
Up to ten sets of [Different Paper Settings] can be<br />
stored, allowing settings to be changed by simply<br />
selecting a set.<br />
Default settings: No Different Paper<br />
[Save]<br />
Click this button to save a set of different paper<br />
settings. A [User Settings] window will appear.<br />
User setting text entries can be up to 20 characters<br />
long. If a [Delete] button appears, a set of user<br />
settings can be deleted by clicking this button.<br />
2 Insert Position<br />
[Cover Page]<br />
When this is selected, paper from a different paper<br />
source or a different type of paper is used for <strong>the</strong><br />
first page of <strong>the</strong> print job. Select [Paper Source] or<br />
[Paper Type].<br />
[Last Page]<br />
When this is selected, paper from a different paper<br />
source or a different type of paper is used for <strong>the</strong><br />
last page of <strong>the</strong> print job. Select [Paper Source] or<br />
[Paper Type].<br />
[O<strong>the</strong>r Page]<br />
When this is selected, specify <strong>the</strong> pages where you<br />
wish to insert a different type of paper. If <strong>the</strong> [Printing<br />
Method] 5 is set to [Blank], <strong>the</strong> sheet will be inserted<br />
in front of <strong>the</strong> specified page. If [1-Sided] is selected,<br />
<strong>the</strong> specified page will be printed on <strong>the</strong> front side of<br />
<strong>the</strong> inserted sheet. If [2-Sided] is selected, <strong>the</strong><br />
specified page and <strong>the</strong> following page will be printed<br />
on <strong>the</strong> front side and back side of <strong>the</strong> inserted sheet.<br />
Default setting: Cover page<br />
2-8<br />
3<br />
4<br />
5<br />
6<br />
Paper Selection<br />
[Paper Source]<br />
Select this if you wish to specify a paper tray to be<br />
used for [Insert Position] 2 .<br />
[Paper Type]<br />
Select this if you wish to specify a paper type to be<br />
used for [Insert Position] 2 .<br />
Default setting: Bypass Tray<br />
Information<br />
The stored [Different Paper] settings appear here.<br />
[Delete]<br />
Click this button to delete <strong>the</strong> selected settings in<br />
<strong>the</strong> Information list.<br />
[Delete All]<br />
Click this button to delete all settings in <strong>the</strong><br />
Information list.<br />
Printing Method<br />
This is used to select <strong>the</strong> printing method for a<br />
cover page, last page, or o<strong>the</strong>r page.<br />
[Blank]<br />
Insert a blank sheet at <strong>the</strong> specified page.<br />
[1-Sided]<br />
Select this to print only on one side of <strong>the</strong> paper<br />
used for a cover page, last page, or o<strong>the</strong>r page.<br />
When this is selected for <strong>the</strong> [Last Page] (back<br />
cover), printing takes place on <strong>the</strong> back side of <strong>the</strong><br />
sheet.<br />
[2-Sided]<br />
Select this to print on both sides of <strong>the</strong> paper used<br />
for a cover page, last page, or o<strong>the</strong>r page.<br />
Default setting: No<br />
[Add]<br />
Click this button to save a set of [Different Paper]<br />
settings. The settings will be added to <strong>the</strong><br />
Information list.


