

KODAK ESP 5200 Series All-in-One Printer - Maplin Electronics
KODAK ESP 5200 Series All-in-One Printer - Maplin Electronics
KODAK ESP 5200 Series All-in-One Printer - Maplin Electronics

Create successful ePaper yourself
Turn your PDF publications into a flip-book with our unique Google optimized e-Paper software.
Pr<strong>in</strong>t<strong>in</strong>g<br />
Zoom<strong>in</strong>g and cropp<strong>in</strong>g pictures<br />
Use the zoom buttons to select a portion of your picture for pr<strong>in</strong>t<strong>in</strong>g.<br />
To zoom and crop a picture:<br />
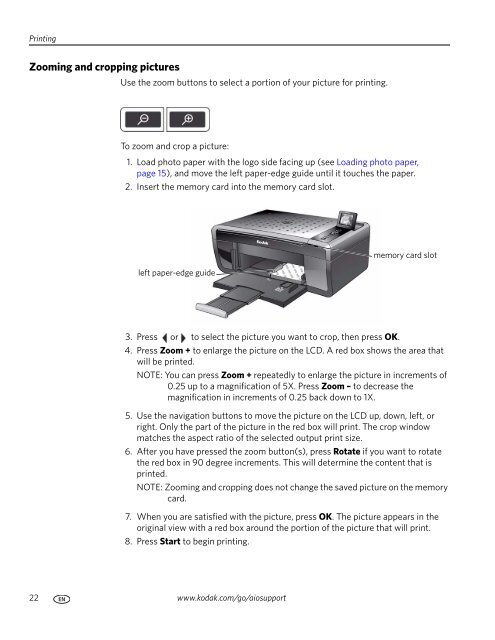
1. Load photo paper with the logo side fac<strong>in</strong>g up (see Load<strong>in</strong>g photo paper,<br />
page 15), and move the left paper-edge guide until it touches the paper.<br />
2. Insert the memory card <strong>in</strong>to the memory card slot.<br />
left paper-edge guide<br />
3. Press or to select the picture you want to crop, then press OK.<br />
4. Press Zoom + to enlarge the picture on the LCD. A red box shows the area that<br />
will be pr<strong>in</strong>ted.<br />
NOTE: You can press Zoom + repeatedly to enlarge the picture <strong>in</strong> <strong>in</strong>crements of<br />
0.25 up to a magnification of 5X. Press Zoom – to decrease the<br />
magnification <strong>in</strong> <strong>in</strong>crements of 0.25 back down to 1X.<br />
5. Use the navigation buttons to move the picture on the LCD up, down, left, or<br />
right. Only the part of the picture <strong>in</strong> the red box will pr<strong>in</strong>t. The crop w<strong>in</strong>dow<br />
matches the aspect ratio of the selected output pr<strong>in</strong>t size.<br />
6. After you have pressed the zoom button(s), press Rotate if you want to rotate<br />
the red box <strong>in</strong> 90 degree <strong>in</strong>crements. This will determ<strong>in</strong>e the content that is<br />
pr<strong>in</strong>ted.<br />
NOTE: Zoom<strong>in</strong>g and cropp<strong>in</strong>g does not change the saved picture on the memory<br />
card.<br />
7. When you are satisfied with the picture, press OK. The picture appears <strong>in</strong> the<br />
orig<strong>in</strong>al view with a red box around the portion of the picture that will pr<strong>in</strong>t.<br />
8. Press Start to beg<strong>in</strong> pr<strong>in</strong>t<strong>in</strong>g.<br />
22 www.kodak.com/go/aiosupport<br />
memory card slot


