KODAK ESP 5200 Series All-in-One Printer - Maplin Electronics
KODAK ESP 5200 Series All-in-One Printer - Maplin Electronics
KODAK ESP 5200 Series All-in-One Printer - Maplin Electronics
You also want an ePaper? Increase the reach of your titles
YUMPU automatically turns print PDFs into web optimized ePapers that Google loves.
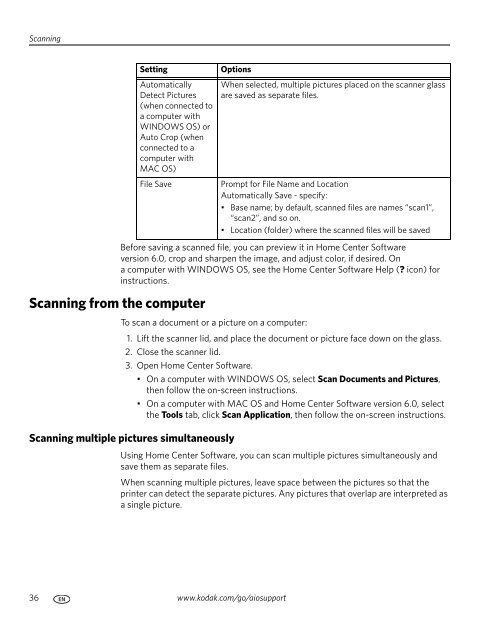
Scann<strong>in</strong>g<br />
Sett<strong>in</strong>g Options<br />
Automatically<br />
Detect Pictures<br />
(when connected to<br />
a computer with<br />
WINDOWS OS) or<br />
Auto Crop (when<br />
connected to a<br />
computer with<br />
MAC OS)<br />
Scann<strong>in</strong>g from the computer<br />
Before sav<strong>in</strong>g a scanned file, you can preview it <strong>in</strong> Home Center Software<br />
version 6.0, crop and sharpen the image, and adjust color, if desired. On<br />
a computer with WINDOWS OS, see the Home Center Software Help (? icon) for<br />
<strong>in</strong>structions.<br />
To scan a document or a picture on a computer:<br />
1. Lift the scanner lid, and place the document or picture face down on the glass.<br />
2. Close the scanner lid.<br />
3. Open Home Center Software.<br />
• On a computer with WINDOWS OS, select Scan Documents and Pictures,<br />
then follow the on-screen <strong>in</strong>structions.<br />
• On a computer with MAC OS and Home Center Software version 6.0, select<br />
the Tools tab, click Scan Application, then follow the on-screen <strong>in</strong>structions.<br />
Scann<strong>in</strong>g multiple pictures simultaneously<br />
Us<strong>in</strong>g Home Center Software, you can scan multiple pictures simultaneously and<br />
save them as separate files.<br />
When scann<strong>in</strong>g multiple pictures, leave space between the pictures so that the<br />
pr<strong>in</strong>ter can detect the separate pictures. Any pictures that overlap are <strong>in</strong>terpreted as<br />
a s<strong>in</strong>gle picture.<br />
36 www.kodak.com/go/aiosupport<br />
When selected, multiple pictures placed on the scanner glass<br />
are saved as separate files.<br />
File Save Prompt for File Name and Location<br />
Automatically Save - specify:<br />
• Base name; by default, scanned files are names “scan1”,<br />
“scan2”, and so on.<br />
• Location (folder) where the scanned files will be saved


