INTELLI+ - Fluid Control Services
INTELLI+ - Fluid Control Services
INTELLI+ - Fluid Control Services

Create successful ePaper yourself
Turn your PDF publications into a flip-book with our unique Google optimized e-Paper software.
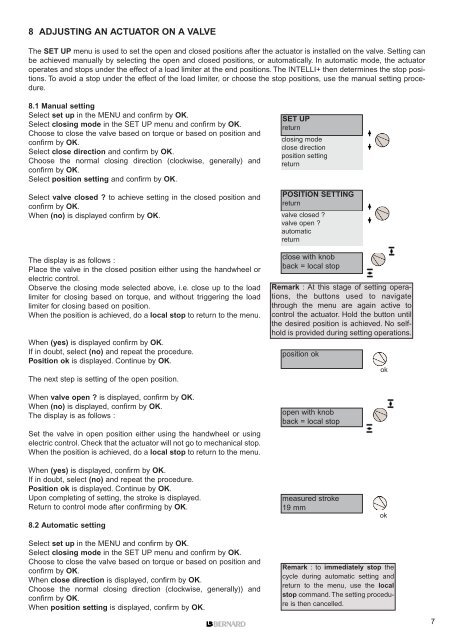
8 ADJUSTING AN ACTUATOR ON A VALVE<br />
The SET UP menu is used to set the open and closed positions after the actuator is installed on the valve. Setting can<br />
be achieved manually by selecting the open and closed positions, or automatically. In automatic mode, the actuator<br />
operates and stops under the effect of a load limiter at the end positions. The <strong>INTELLI+</strong> then determines the stop positions.<br />
To avoid a stop under the effect of the load limiter, or choose the stop positions, use the manual setting procedure.<br />
8.1 Manual setting<br />
Select set up in the MENU and confirm by OK.<br />
Select closing mode in the SET UP menu and confirm by OK.<br />
Choose to close the valve based on torque or based on position and<br />
confirm by OK.<br />
Select close direction and confirm by OK.<br />
Choose the normal closing direction (clockwise, generally) and<br />
confirm by OK.<br />
Select position setting and confirm by OK.<br />
Select valve closed ? to achieve setting in the closed position and<br />
confirm by OK.<br />
When (no) is displayed confirm by OK.<br />
The display is as follows :<br />
Place the valve in the closed position either using the handwheel or<br />
electric control.<br />
Observe the closing mode selected above, i.e. close up to the load<br />
limiter for closing based on torque, and without triggering the load<br />
limiter for closing based on position.<br />
When the position is achieved, do a local stop to return to the menu.<br />
When (yes) is displayed confirm by OK.<br />
If in doubt, select (no) and repeat the procedure.<br />
Position ok is displayed. Continue by OK.<br />
The next step is setting of the open position.<br />
When valve open ? is displayed, confirm by OK.<br />
When (no) is displayed, confirm by OK.<br />
The display is as follows :<br />
Set the valve in open position either using the handwheel or using<br />
electric control. Check that the actuator will not go to mechanical stop.<br />
When the position is achieved, do a local stop to return to the menu.<br />
When (yes) is displayed, confirm by OK.<br />
If in doubt, select (no) and repeat the procedure.<br />
Position ok is displayed. Continue by OK.<br />
Upon completing of setting, the stroke is displayed.<br />
Return to control mode after confirming by OK.<br />
8.2 Automatic setting<br />
Select set up in the MENU and confirm by OK.<br />
Select closing mode in the SET UP menu and confirm by OK.<br />
Choose to close the valve based on torque or based on position and<br />
confirm by OK.<br />
When close direction is displayed, confirm by OK.<br />
Choose the normal closing direction (clockwise, generally)) and<br />
confirm by OK.<br />
When position setting is displayed, confirm by OK.<br />
SET UP<br />
return<br />
closing mode<br />
close direction<br />
position setting<br />
return<br />
POSITION SETTING<br />
return<br />
valve closed ?<br />
valve open ?<br />
automatic<br />
return<br />
close with knob<br />
back = local stop<br />
Remark : At this stage of setting operations,<br />
the buttons used to navigate<br />
through the menu are again active to<br />
control the actuator. Hold the button until<br />
the desired position is achieved. No selfhold<br />
is provided during setting operations.<br />
position ok<br />
open with knob<br />
back = local stop<br />
measured stroke<br />
19 mm<br />
ok<br />
ok<br />
Remark : to immediately stop the<br />
cycle during automatic setting and<br />
return to the menu, use the local<br />
stop command. The setting procedure<br />
is then cancelled.<br />
7