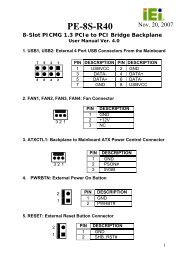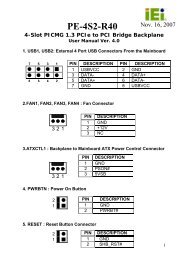
PCIE-G41A2 PICMG 1.3 CPU card - iEi
PCIE-G41A2 PICMG 1.3 CPU card - iEi
PCIE-G41A2 PICMG 1.3 CPU card - iEi

You also want an ePaper? Increase the reach of your titles
YUMPU automatically turns print PDFs into web optimized ePapers that Google loves.
<strong>PCIE</strong>-<strong>G41A2</strong> <strong>PICMG</strong> <strong>1.3</strong> <strong>CPU</strong> <strong>card</strong><br />
Page 117<br />
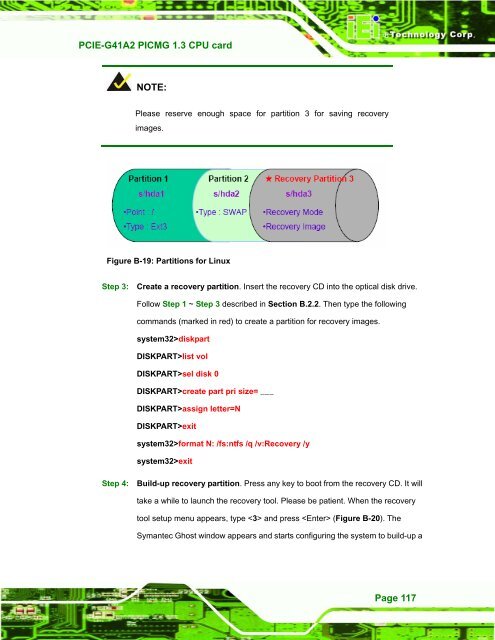
NOTE:<br />
Please reserve enough space for partition 3 for saving recovery<br />
images.<br />
Figure B-19: Partitions for Linux<br />
Step 3: Create a recovery partition. Insert the recovery CD into the optical disk drive.<br />
Follow Step 1 ~ Step 3 described in Section B.2.2. Then type the following<br />
commands (marked in red) to create a partition for recovery images.<br />
system32>diskpart<br />
DISKPART>list vol<br />
DISKPART>sel disk 0<br />
DISKPART>create part pri size= ___<br />
DISKPART>assign letter=N<br />
DISKPART>exit<br />
system32>format N: /fs:ntfs /q /v:Recovery /y<br />
system32>exit<br />
Step 4: Build-up recovery partition. Press any key to boot from the recovery CD. It will<br />
take a while to launch the recovery tool. Please be patient. When the recovery<br />
tool setup menu appears, type and press (Figure B-20). The<br />
Symantec Ghost window appears and starts configuring the system to build-up a