PCIE-G41A2 PICMG 1.3 CPU card - iEi
PCIE-G41A2 PICMG 1.3 CPU card - iEi
PCIE-G41A2 PICMG 1.3 CPU card - iEi
Create successful ePaper yourself
Turn your PDF publications into a flip-book with our unique Google optimized e-Paper software.
<strong>PCIE</strong>-<strong>G41A2</strong> <strong>PICMG</strong> <strong>1.3</strong> <strong>CPU</strong> <strong>card</strong><br />
4.2.3 DIMM Installation<br />
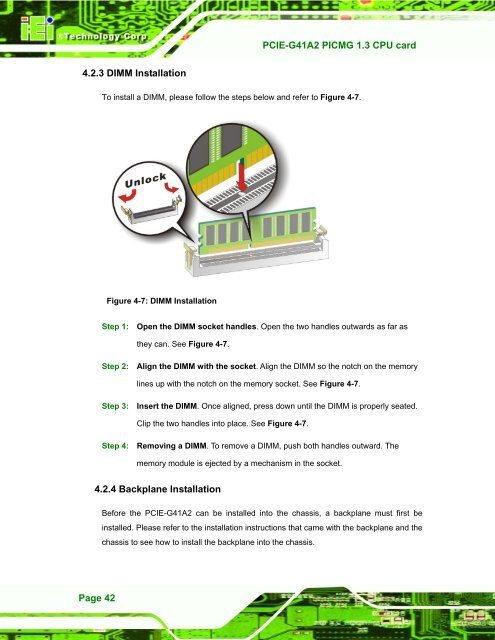
To install a DIMM, please follow the steps below and refer to Figure 4-7.<br />
Figure 4-7: DIMM Installation<br />
Step 1: Open the DIMM socket handles. Open the two handles outwards as far as<br />
they can. See Figure 4-7.<br />
Step 2: Align the DIMM with the socket. Align the DIMM so the notch on the memory<br />
lines up with the notch on the memory socket. See Figure 4-7.<br />
Step 3: Insert the DIMM. Once aligned, press down until the DIMM is properly seated.<br />
Clip the two handles into place. See Figure 4-7.<br />
Step 4: Removing a DIMM. To remove a DIMM, push both handles outward. The<br />
memory module is ejected by a mechanism in the socket.Step 0:<br />
4.2.4 Backplane Installation<br />
Before the <strong>PCIE</strong>-<strong>G41A2</strong> can be installed into the chassis, a backplane must first be<br />
installed. Please refer to the installation instructions that came with the backplane and the<br />
chassis to see how to install the backplane into the chassis.<br />
Page 42


